> ## Documentation Index
> Fetch the complete documentation index at: https://notes.kodekloud.com/llms.txt
> Use this file to discover all available pages before exploring further.
# Demo Template Basics
> How to create and run a Backstage scaffolder template to generate Node.js starter repositories, push to GitHub, and register services in the Backstage catalog
In this lesson you'll create a first Backstage scaffolder template and follow the end-to-end flow: author a blueprint, surface it in Backstage, run the template from the Create UI, and inspect the published repository and catalog registration.
The example use case: your organization wants every Node.js API to include ESLint, Prettier, Jest, GitHub Actions CI/CD, and Express.js. A platform team can bake those standards into a template so developers get a ready-made starter repo when they scaffold a new service.
 ## Conceptual workflow
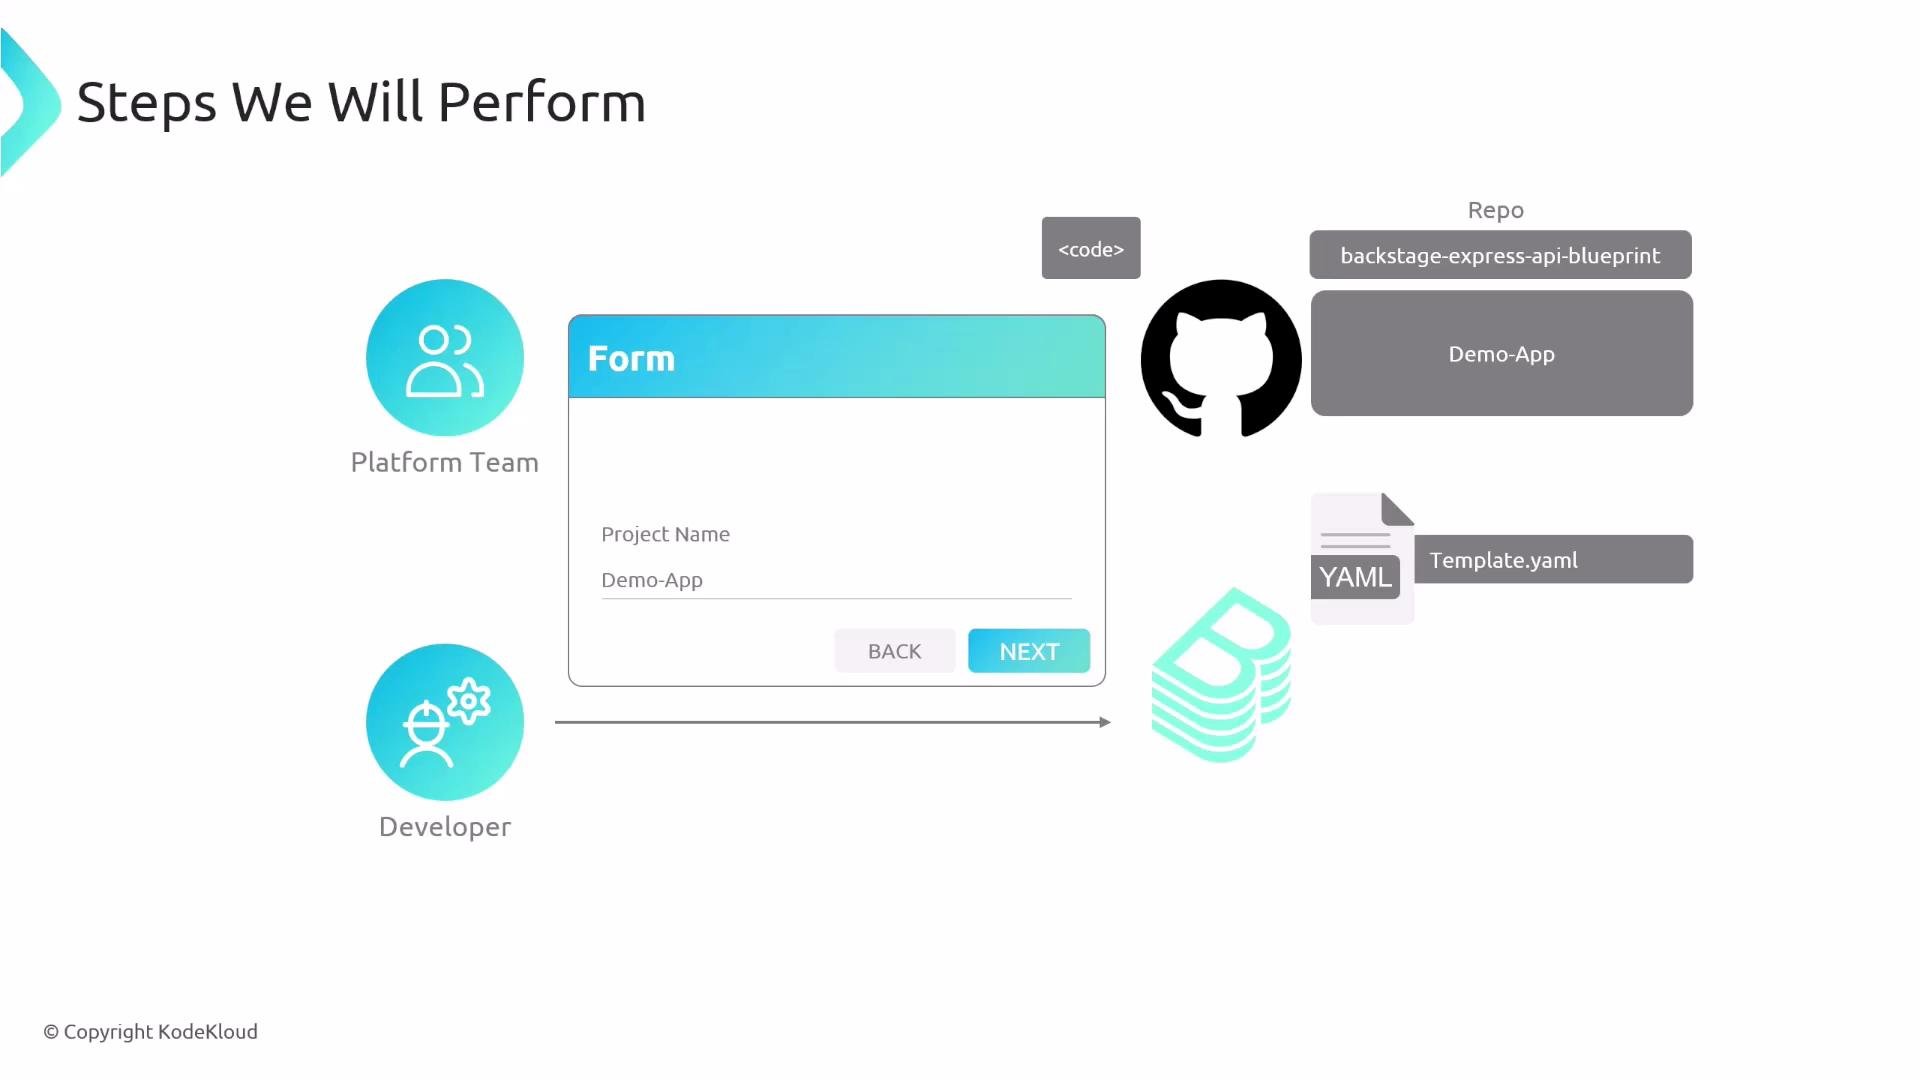
High-level flow for templated scaffolding:
* Platform team maintains a blueprint repository with starter code (linter, formatter, tests, CI workflow, Express app).
* The blueprint + its `template.yaml` descriptor are made available to Backstage (for example, registered via `app-config.yaml` static entries).
* Developers open Backstage → Create → select the template → fill a brief form → the scaffolder:
1. fetches the blueprint,
2. renders files with the form values,
3. creates a new GitHub repository and pushes the rendered files,
4. registers the new service in the Backstage catalog.
Below is the example template that ships with Backstage and appears under Create → Templates.
## Conceptual workflow
High-level flow for templated scaffolding:
* Platform team maintains a blueprint repository with starter code (linter, formatter, tests, CI workflow, Express app).
* The blueprint + its `template.yaml` descriptor are made available to Backstage (for example, registered via `app-config.yaml` static entries).
* Developers open Backstage → Create → select the template → fill a brief form → the scaffolder:
1. fetches the blueprint,
2. renders files with the form values,
3. creates a new GitHub repository and pushes the rendered files,
4. registers the new service in the Backstage catalog.
Below is the example template that ships with Backstage and appears under Create → Templates.
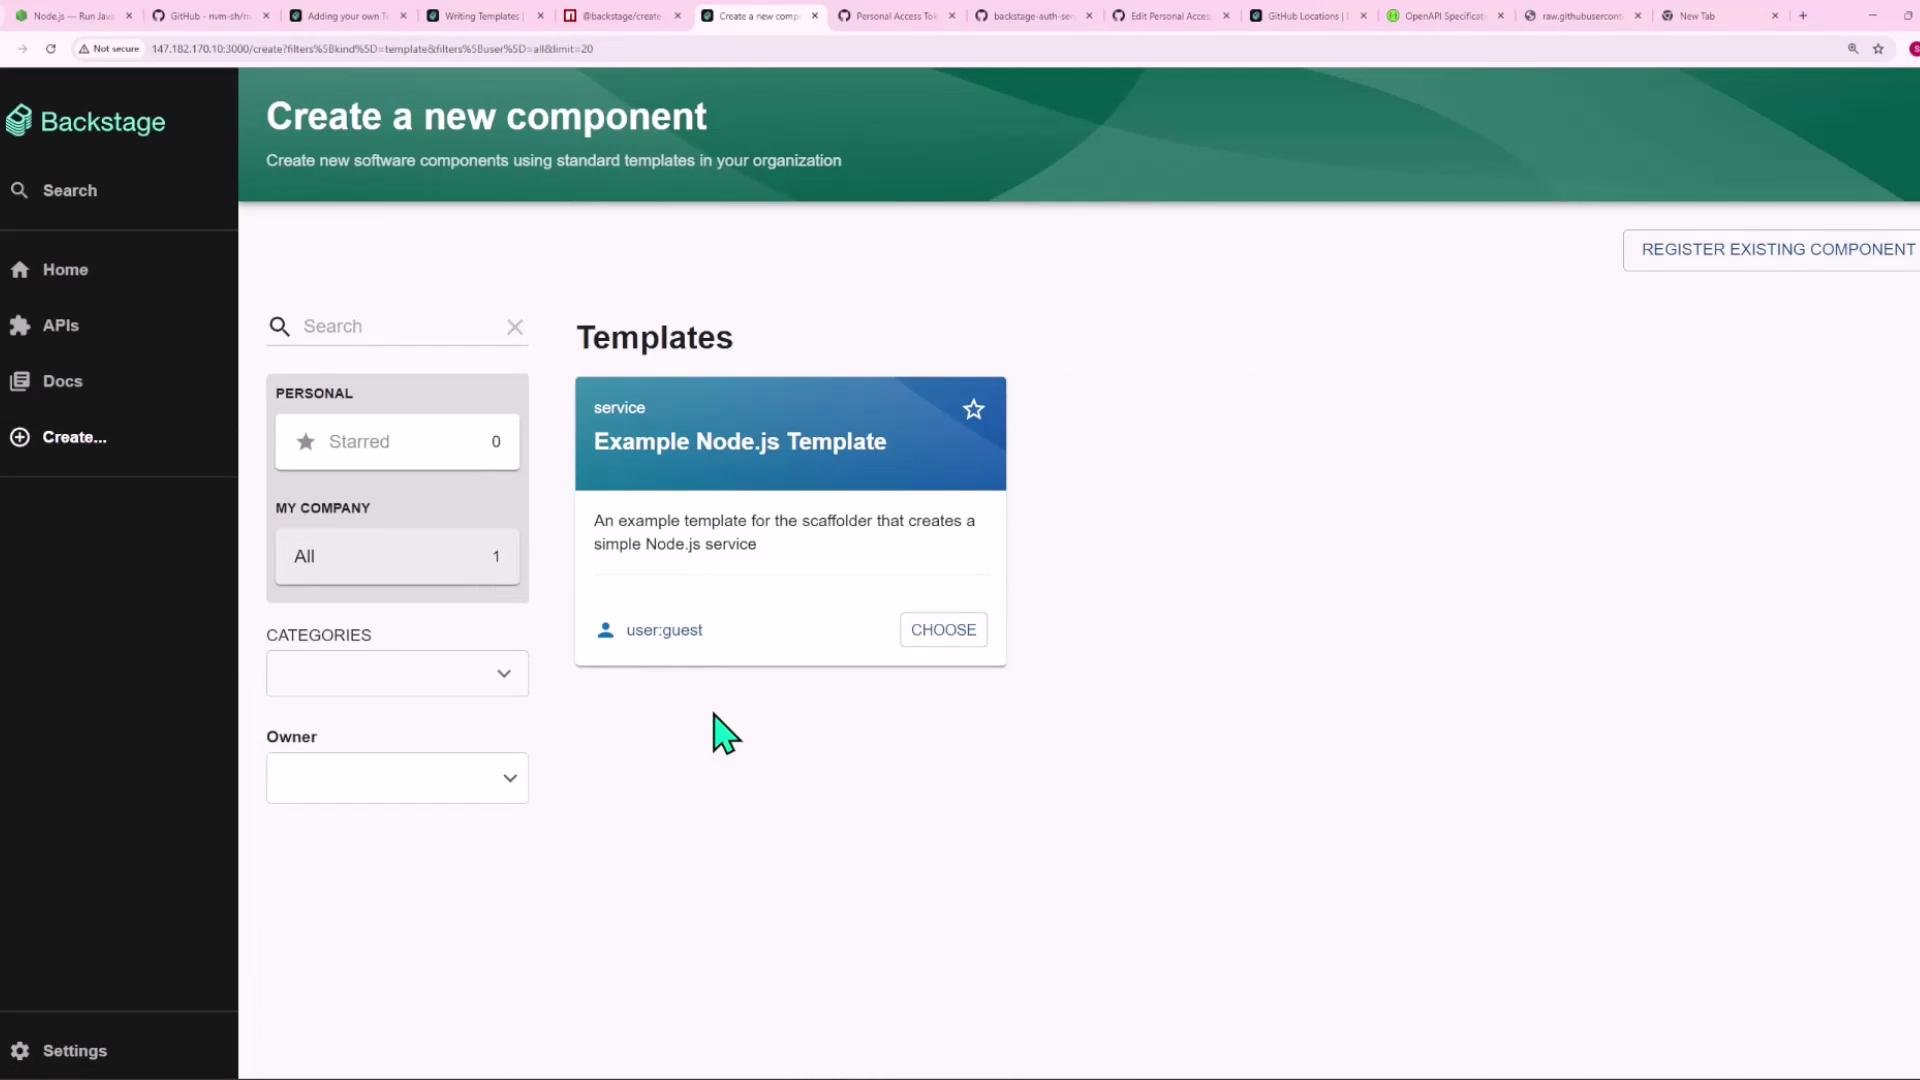 ## Where does that example template come from?
Backstage can import static templates via `app-config.yaml`. A representative static entry that imports the local example template looks like this:
```yaml theme={null}
# app-config.yaml (excerpt)
catalog:
locations:
- type: file
target: ../../examples/entities.yaml
# Local example template
- type: file
target: ../../examples/template/template.yaml
rules:
- allow: [Template]
# Local example organizational data
- type: file
target: ../../examples/org.yaml
rules:
- allow: [User, Group]
```
The `target` above points to the example `template.yaml` that Backstage imports and lists in the Create UI.
## Minimal `template.yaml` example
A template descriptor follows the Scaffolder descriptor format. Here is a minimal cleaned `template.yaml` example:
```yaml theme={null}
apiVersion: scaffolder.backstage.io/v1beta3
# https://backstage.io/docs/features/software-catalog/descriptor-format#kind-template
kind: Template
metadata:
name: example-nodejs-template
title: Example Node.js Template
description: An example template for the scaffolder that creates a simple Node.js service
spec:
owner: user:guest
type: service
# Parameters define the form fields that appear in the UI.
parameters:
- title: Fill in some steps
required:
- name
properties:
name:
title: Name
type: string
description: Unique name of the component
ui:autofocus: true
- title: Choose a location
required:
- repoUrl
properties:
repoUrl:
title: Repository Location
type: string
ui:field: RepoUrlPicker
ui:options:
allowedHosts:
- github.com
```
Parameters map directly to the Backstage form:
* `name` is a required string used as the project name.
* `repoUrl` uses the `RepoUrlPicker` UI component and restricts allowed hosts to `github.com`.
When authoring or editing template YAML and template files in MDX content, always place expressions such as `${{ parameters.name }}` or `{{ values.name }}` inside fenced code blocks or inline code backticks so MDX does not attempt to evaluate them.
## How the template executes — steps
The scaffolder runs a sequence of steps defined under `spec.steps`. A canonical Node.js blueprint flow includes:
1. Fetch the blueprint content and render it with provided values.
2. Publish the rendered files to GitHub (create repo and push).
3. Register the new service in the Backstage catalog.
A cleaned `steps` example:
```yaml theme={null}
spec:
steps:
# 1) Fetch the base template files and render them with provided values.
- id: fetch-base
name: Fetch Base
action: fetch:template
input:
url: ./content
values:
name: ${{ parameters.name }}
# 2) Publish rendered contents to GitHub (creates repo and pushes files).
- id: publish
name: Publish
action: publish:github
input:
allowedHosts: ['github.com']
description: This is ${{ parameters.name }}
repoUrl: ${{ parameters.repoUrl }}
# 3) Register the new component in the catalog using the published repo.
- id: register
name: Register
action: catalog:register
input:
repoContentsUrl: ${{ steps['publish'].output.repoContentsUrl }}
catalogInfoPath: '/catalog-info.yaml'
# Outputs shown to the user after a successful run.
output:
links:
- title: Repository
url: ${{ steps['publish'].output.remoteUrl }}
- title: Open in catalog
icon: catalog
entityRef: ${{ steps['register'].output.entityRef }}
```
Key points:
* The `fetch:template` action copies and renders files from the blueprint `./content` folder into a working directory. In this example we pass `values.name` as `name` using `name: ${{ parameters.name }}`.
* The `publish:github` action creates the repository and pushes the rendered files. It requires the `repoUrl` input derived from the UI parameter.
* The `catalog:register` action uses the `repoContentsUrl` output from the `publish` step and the `catalogInfoPath` (for example, `/catalog-info.yaml`) to register the entity in the catalog.
### Scaffolder actions at a glance
| Action | Purpose | Key inputs / outputs |
| ------------------ | -------------------------------------------------------- | ---------------------------------------------------------------- |
| `fetch:template` | Copy and render blueprint files into a working directory | Input: `url`, `values` |
| `publish:github` | Create GitHub repo and push rendered files | Input: `repoUrl`, output: `remoteUrl`, `repoContentsUrl` |
| `catalog:register` | Register the new service entity in Backstage catalog | Input: `repoContentsUrl`, `catalogInfoPath`, output: `entityRef` |
## Example blueprint content files
The blueprint `content` folder typically contains files that the scaffolder renders with template expressions.
package.json (in `content/package.json`):
```json theme={null}
{
"name": "${{ values.name }}",
"private": true,
"dependencies": {
"express": "^4.18.2"
},
"scripts": {
"start": "node index.js",
"test": "jest"
}
}
```
index.js (in `content/index.js`):
```javascript theme={null}
console.log('Hello from ${{ values.name }}!');
```
catalog-info.yaml (in `content/catalog-info.yaml`):
```yaml theme={null}
apiVersion: backstage.io/v1alpha1
kind: Component
metadata:
name: {{ values.name | dump }}
spec:
type: service
owner: user:guest
lifecycle: experimental
```
When the scaffolder runs:
* It renders files by replacing template placeholders (e.g., `package.json`'s `name` becomes the project name entered in the UI because `${{ values.name }}` is substituted).
* The `publish` step uploads the rendered files to the created GitHub repository (using the `repoUrl` supplied by the user).
* The `register` step registers the `catalog-info.yaml` entity in the Backstage catalog using `repoContentsUrl` from the `publish` step and the `catalogInfoPath`.
## Outputs and UX
After a successful run, `template.yaml`'s `output.links` field surfaces useful links to the user:
* Repository: `steps['publish'].output.remoteUrl` — opens the newly created repo.
* Open in catalog: `steps['register'].output.entityRef` — opens the newly registered entity in Backstage.
This provides immediate access to both the code repo and the catalog entry.
## Summary
Templates let platform teams encode organizational best practices into reproducible blueprints. With only a couple of form fields, Backstage can:
* Create a new repository from a standardized blueprint,
* Render project-specific values into files,
* Publish the project to GitHub,
* Register the service in the Backstage catalog.
You can author your own templates: create content in a `content` folder, write your `template.yaml` with `spec.steps`, and test the end-to-end scaffolding flow from the Backstage Create UI.
## Links and References
* Backstage Scaffolder docs: [https://backstage.io/docs/features/software-templates/creating-templates](https://backstage.io/docs/features/software-templates/creating-templates)
* Descriptor format: [https://backstage.io/docs/features/software-catalog/descriptor-format#kind-template](https://backstage.io/docs/features/software-catalog/descriptor-format#kind-template)
* Scaffolder actions reference: [https://backstage.io/docs/features/software-templates/available-actions](https://backstage.io/docs/features/software-templates/available-actions)
* GitHub repository: [https://github.com/](https://github.com/) (for `publish:github`)
## Where does that example template come from?
Backstage can import static templates via `app-config.yaml`. A representative static entry that imports the local example template looks like this:
```yaml theme={null}
# app-config.yaml (excerpt)
catalog:
locations:
- type: file
target: ../../examples/entities.yaml
# Local example template
- type: file
target: ../../examples/template/template.yaml
rules:
- allow: [Template]
# Local example organizational data
- type: file
target: ../../examples/org.yaml
rules:
- allow: [User, Group]
```
The `target` above points to the example `template.yaml` that Backstage imports and lists in the Create UI.
## Minimal `template.yaml` example
A template descriptor follows the Scaffolder descriptor format. Here is a minimal cleaned `template.yaml` example:
```yaml theme={null}
apiVersion: scaffolder.backstage.io/v1beta3
# https://backstage.io/docs/features/software-catalog/descriptor-format#kind-template
kind: Template
metadata:
name: example-nodejs-template
title: Example Node.js Template
description: An example template for the scaffolder that creates a simple Node.js service
spec:
owner: user:guest
type: service
# Parameters define the form fields that appear in the UI.
parameters:
- title: Fill in some steps
required:
- name
properties:
name:
title: Name
type: string
description: Unique name of the component
ui:autofocus: true
- title: Choose a location
required:
- repoUrl
properties:
repoUrl:
title: Repository Location
type: string
ui:field: RepoUrlPicker
ui:options:
allowedHosts:
- github.com
```
Parameters map directly to the Backstage form:
* `name` is a required string used as the project name.
* `repoUrl` uses the `RepoUrlPicker` UI component and restricts allowed hosts to `github.com`.
When authoring or editing template YAML and template files in MDX content, always place expressions such as `${{ parameters.name }}` or `{{ values.name }}` inside fenced code blocks or inline code backticks so MDX does not attempt to evaluate them.
## How the template executes — steps
The scaffolder runs a sequence of steps defined under `spec.steps`. A canonical Node.js blueprint flow includes:
1. Fetch the blueprint content and render it with provided values.
2. Publish the rendered files to GitHub (create repo and push).
3. Register the new service in the Backstage catalog.
A cleaned `steps` example:
```yaml theme={null}
spec:
steps:
# 1) Fetch the base template files and render them with provided values.
- id: fetch-base
name: Fetch Base
action: fetch:template
input:
url: ./content
values:
name: ${{ parameters.name }}
# 2) Publish rendered contents to GitHub (creates repo and pushes files).
- id: publish
name: Publish
action: publish:github
input:
allowedHosts: ['github.com']
description: This is ${{ parameters.name }}
repoUrl: ${{ parameters.repoUrl }}
# 3) Register the new component in the catalog using the published repo.
- id: register
name: Register
action: catalog:register
input:
repoContentsUrl: ${{ steps['publish'].output.repoContentsUrl }}
catalogInfoPath: '/catalog-info.yaml'
# Outputs shown to the user after a successful run.
output:
links:
- title: Repository
url: ${{ steps['publish'].output.remoteUrl }}
- title: Open in catalog
icon: catalog
entityRef: ${{ steps['register'].output.entityRef }}
```
Key points:
* The `fetch:template` action copies and renders files from the blueprint `./content` folder into a working directory. In this example we pass `values.name` as `name` using `name: ${{ parameters.name }}`.
* The `publish:github` action creates the repository and pushes the rendered files. It requires the `repoUrl` input derived from the UI parameter.
* The `catalog:register` action uses the `repoContentsUrl` output from the `publish` step and the `catalogInfoPath` (for example, `/catalog-info.yaml`) to register the entity in the catalog.
### Scaffolder actions at a glance
| Action | Purpose | Key inputs / outputs |
| ------------------ | -------------------------------------------------------- | ---------------------------------------------------------------- |
| `fetch:template` | Copy and render blueprint files into a working directory | Input: `url`, `values` |
| `publish:github` | Create GitHub repo and push rendered files | Input: `repoUrl`, output: `remoteUrl`, `repoContentsUrl` |
| `catalog:register` | Register the new service entity in Backstage catalog | Input: `repoContentsUrl`, `catalogInfoPath`, output: `entityRef` |
## Example blueprint content files
The blueprint `content` folder typically contains files that the scaffolder renders with template expressions.
package.json (in `content/package.json`):
```json theme={null}
{
"name": "${{ values.name }}",
"private": true,
"dependencies": {
"express": "^4.18.2"
},
"scripts": {
"start": "node index.js",
"test": "jest"
}
}
```
index.js (in `content/index.js`):
```javascript theme={null}
console.log('Hello from ${{ values.name }}!');
```
catalog-info.yaml (in `content/catalog-info.yaml`):
```yaml theme={null}
apiVersion: backstage.io/v1alpha1
kind: Component
metadata:
name: {{ values.name | dump }}
spec:
type: service
owner: user:guest
lifecycle: experimental
```
When the scaffolder runs:
* It renders files by replacing template placeholders (e.g., `package.json`'s `name` becomes the project name entered in the UI because `${{ values.name }}` is substituted).
* The `publish` step uploads the rendered files to the created GitHub repository (using the `repoUrl` supplied by the user).
* The `register` step registers the `catalog-info.yaml` entity in the Backstage catalog using `repoContentsUrl` from the `publish` step and the `catalogInfoPath`.
## Outputs and UX
After a successful run, `template.yaml`'s `output.links` field surfaces useful links to the user:
* Repository: `steps['publish'].output.remoteUrl` — opens the newly created repo.
* Open in catalog: `steps['register'].output.entityRef` — opens the newly registered entity in Backstage.
This provides immediate access to both the code repo and the catalog entry.
## Summary
Templates let platform teams encode organizational best practices into reproducible blueprints. With only a couple of form fields, Backstage can:
* Create a new repository from a standardized blueprint,
* Render project-specific values into files,
* Publish the project to GitHub,
* Register the service in the Backstage catalog.
You can author your own templates: create content in a `content` folder, write your `template.yaml` with `spec.steps`, and test the end-to-end scaffolding flow from the Backstage Create UI.
## Links and References
* Backstage Scaffolder docs: [https://backstage.io/docs/features/software-templates/creating-templates](https://backstage.io/docs/features/software-templates/creating-templates)
* Descriptor format: [https://backstage.io/docs/features/software-catalog/descriptor-format#kind-template](https://backstage.io/docs/features/software-catalog/descriptor-format#kind-template)
* Scaffolder actions reference: [https://backstage.io/docs/features/software-templates/available-actions](https://backstage.io/docs/features/software-templates/available-actions)
* GitHub repository: [https://github.com/](https://github.com/) (for `publish:github`)