> ## Documentation Index
> Fetch the complete documentation index at: https://notes.kodekloud.com/llms.txt
> Use this file to discover all available pages before exploring further.
# Install Istio
> Guide to installing and validating Istio on Kubernetes using istioctl or Helm, enabling sidecar injection, deploying the Bookinfo sample, and troubleshooting configuration
This guide walks through installing Istio on a Kubernetes cluster (EKS, GKE, AKS, or local clusters such as kind or Minikube). It covers the two common installation methods—istioctl and Helm—and shows how to enable sidecar injection (automatic and manual), deploy the Bookinfo sample, and validate your installation.
Key topics:
* Prerequisites
* Downloading and configuring istioctl
* Installing kubectl (if needed)
* Installation profiles
* Installing Istio with istioctl
* Enabling automatic sidecar injection
* Manual (offline) sidecar injection
* Installing Istio with Helm
* Validation and analysis
Prerequisites
| Requirement | Why it's needed |
| -------------------------------------------------------------- | ------------------------------------------------------------------------------------ |
| A running Kubernetes cluster and an authenticated `kubeconfig` | Istio runs on top of Kubernetes and needs API access |
| `kubectl` | To interact with cluster resources |
| `istioctl` (or Helm) | `istioctl` simplifies installation and validation. Helm is an alternative installer. |
Always verify the istioctl client version and whether Istio pods are running. istioctl reports the client version even when Istio is not yet installed in the cluster.
Installation methods
| Method | When to use |
| ---------- | ----------------------------------------------------------------------------------------------------------- |
| `istioctl` | Recommended for single-command installs and built-in validation (`istioctl install`, `istioctl analyze`) |
| Helm | Use when you need to integrate with existing Helm-based workflows or customize chart values at install time |
## Download istioctl (example: Istio 1.26.3)
For the Istio Service Mesh labs we use Istio 1.26.3. Download and install `istioctl` for that version with a single command:
```bash theme={null}
# Download istioctl for version 1.26.3 (installs into a local directory)
curl -L https://istio.io/downloadIstio | ISTIO_VERSION=1.26.3 sh -
```
Then change into the downloaded directory and add `istioctl` to your PATH:
```bash theme={null}
cd istio-1.26.3
export PATH=$PWD/bin:$PATH
```
Verify the `istioctl` client version:
```bash theme={null}
istioctl version
```
Example output when Istio is not installed in the cluster:
```console theme={null}
no running Istio pods in "istio-system"
1.26.3
```
This output shows the `istioctl` client version (1.26.3) and that there are no running Istio pods in the `istio-system` namespace.
## Install kubectl (if needed)
`kubectl` is required to manage Kubernetes resources. Example downloads for Linux:
```bash theme={null}
# Linux amd64
curl -LO https://dl.k8s.io/release/v1.30.0/bin/linux/amd64/kubectl
chmod +x kubectl
sudo mv kubectl /usr/local/bin/
# Linux arm64
curl -LO https://dl.k8s.io/release/v1.30.0/bin/linux/arm64/kubectl
chmod +x kubectl
sudo mv kubectl /usr/local/bin/
```
On macOS you can use Homebrew (confirm the installed versions match your requirements):
```bash theme={null}
brew install kubectl
brew install istioctl
```
## Istio installation profiles
Istio provides multiple installation profiles (default, demo, minimal, remote, empty, preview, ambient). Each profile includes a different set of core components (istiod, ingress/egress gateways, CNI, ztunnel, etc.). For most labs we'll use the `demo` profile (feature-rich, good for learning) or the `ambient` profile (sidecar-less ambient mesh).
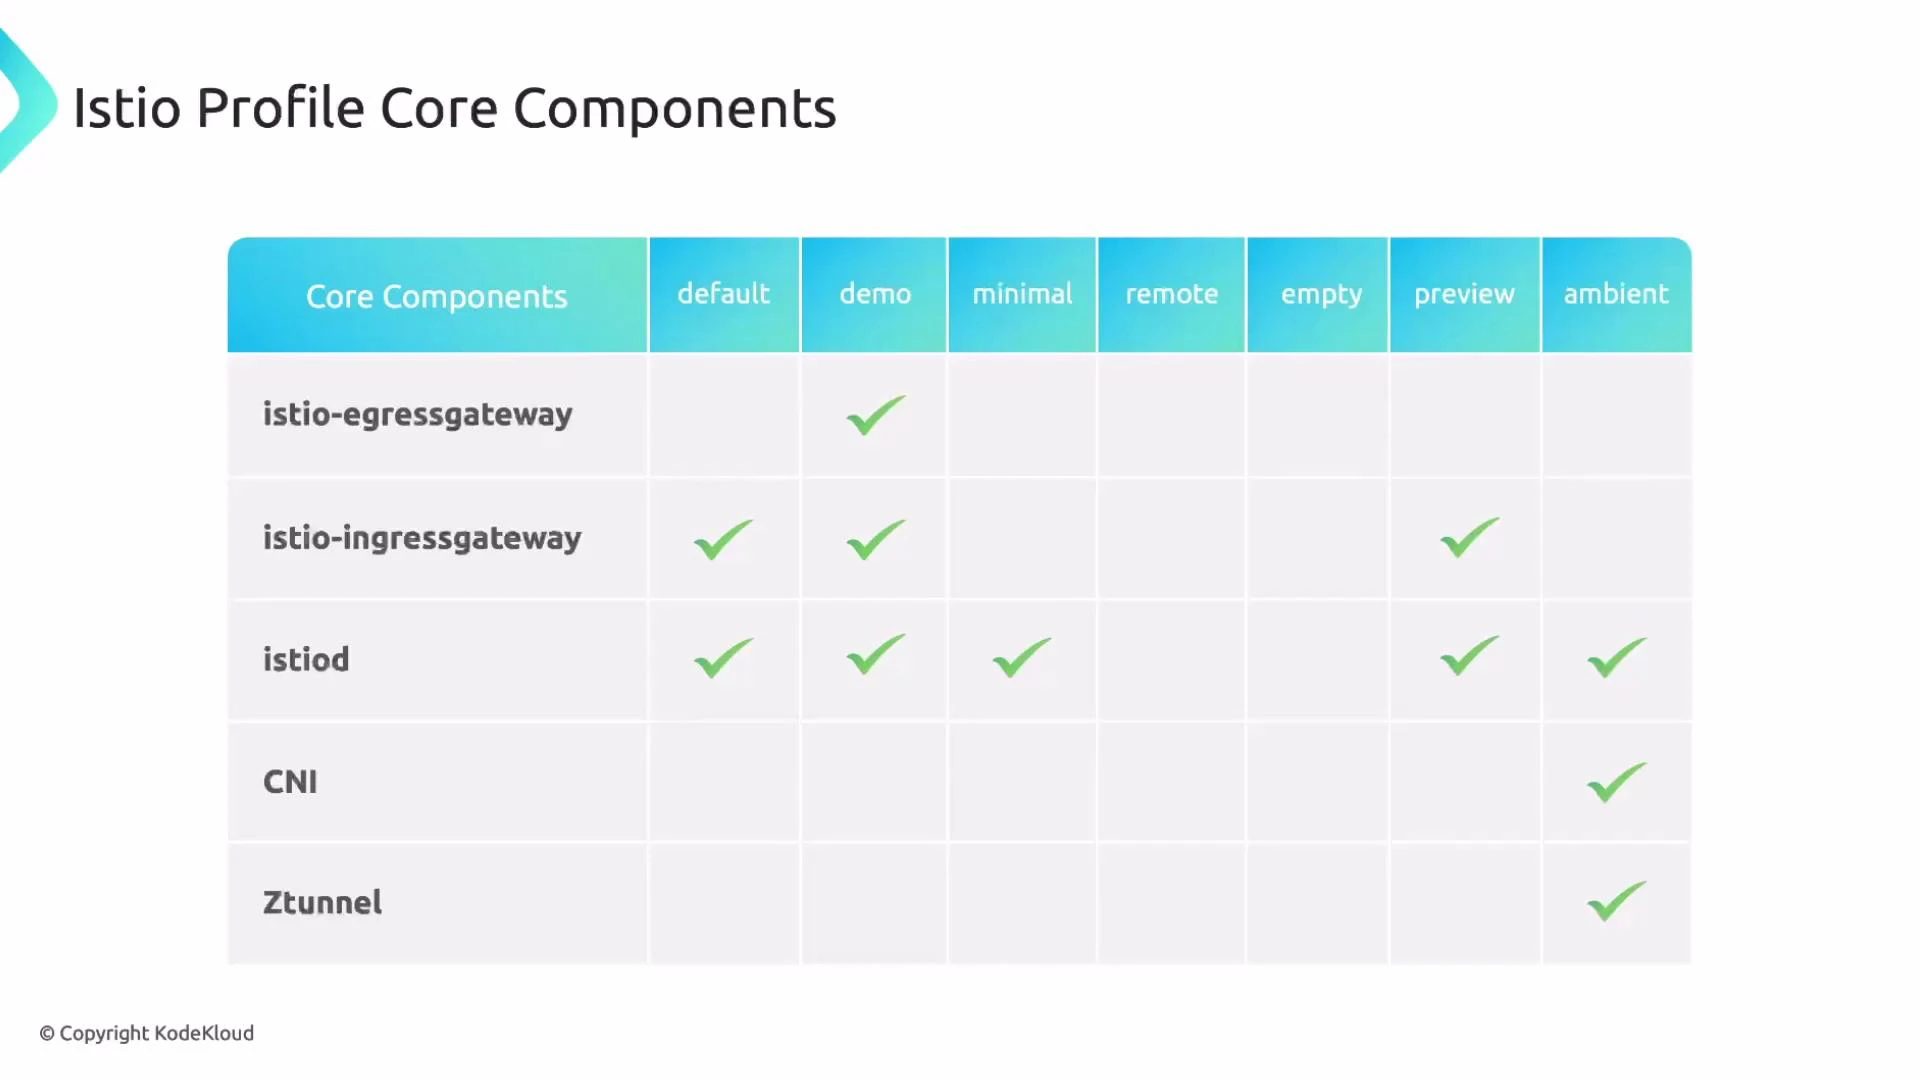 Quick reference: when to use each profile
| Profile | Use case |
| ------------------------------ | ------------------------------------------------------- |
| `demo` | Learning, labs, and examples (includes most components) |
| `default` | Standard production-ready feature set |
| `minimal` | Small footprint, only essential components |
| `ambient` | Ambient mesh (sidecar-less) architectures |
| `remote` / `empty` / `preview` | Advanced topologies or experimental options |
## Install Istio with istioctl
The simplest way to install Istio with the demo profile:
```bash theme={null}
istioctl install --set profile=demo -y
```
Sample successful output:
```console theme={null}
✓ Istio core installed
✓ Istiod installed
✓ Egress gateways installed
✓ Ingress gateways installed
✓ Installation complete
Please verify that Istio is running:
kubectl get pods -n istio-system
NAME READY STATUS RESTARTS AGE
istio-egressgateway-6db9994577-sn95p 1/1 Running 0 79s
istio-ingressgateway-58649bfdf4-cs4fk 1/1 Running 0 79s
istiod-dd4b7db5-nxrjv 1/1 Running 0 111s
```
Note: Installing Istio adds the control plane and gateway resources to the cluster. It does not automatically inject sidecars into existing workloads unless you enable injection or redeploy those workloads.
## Enabling automatic sidecar injection
Istio injects an Envoy sidecar container into pod definitions for classic sidecar-based deployments. To enable automatic sidecar injection for a namespace, label that namespace:
```bash theme={null}
kubectl label namespace default istio-injection=enabled
```
Verify the label:
```bash theme={null}
kubectl get ns default --show-labels
```
Example output:
```console theme={null}
NAME STATUS AGE LABELS
default Active 20h istio-injection=enabled,kubernetes.io/metadata.name=default
```
After labeling a namespace, existing pods must be recreated (restart or reapply manifests) for the sidecar to be injected.
Note: The Ambient profile implements a sidecar-less ambient mesh. If you install Istio using the ambient profile, automatic sidecar injection (the istio-injection label) does not inject Envoy sidecars. The namespace labeling below applies to classic sidecar-based profiles such as demo or default.
## Example: Deploy Bookinfo and observe sidecar injection
1. Apply the Bookinfo sample (matching release-1.26):
```bash theme={null}
kubectl apply -f https://raw.githubusercontent.com/istio/istio/release-1.26/samples/bookinfo/platform/kube/bookinfo.yaml
kubectl get pods
```
2. Before enabling injection you will see one container per pod (1/1):
```console theme={null}
NAME READY STATUS RESTARTS AGE
details-v1-7c5d957895-mkflq 1/1 Running 0 8s
productpage-v1-f47f868c8-v6qdl 1/1 Running 0 7s
ratings-v1-85cf8d8647-8cqxs 1/1 Running 0 8s
reviews-v1-5fc87d67c-lpg76 1/1 Running 0 8s
reviews-v2-f6d449f65-hwtz9 1/1 Running 0 8s
reviews-v3-76f75877b9-q7d75 1/1 Running 0 8s
```
3. Enable injection on the namespace:
```bash theme={null}
kubectl label namespace default istio-injection=enabled
```
4. Recreate the workload (restart the deployment or delete and reapply manifests). Example: delete and reapply Bookinfo:
```bash theme={null}
kubectl delete -f https://raw.githubusercontent.com/istio/istio/release-1.26/samples/bookinfo/platform/kube/bookinfo.yaml
kubectl apply -f https://raw.githubusercontent.com/istio/istio/release-1.26/samples/bookinfo/platform/kube/bookinfo.yaml
kubectl get pods
```
5. After recreation you should see two containers per pod (2/2), indicating the application container plus the Istio sidecar:
```console theme={null}
NAME READY STATUS RESTARTS AGE
details-v1-7c5d957895-pss97 2/2 Running 0 8s
productpage-v1-f47f868c8-wtkx2 2/2 Running 0 7s
ratings-v1-85cf8d8647-tl6cr 2/2 Running 0 8s
reviews-v1-5fc87d67c-h8925 2/2 Running 0 7s
reviews-v2-f6d449f65-p4zwc 2/2 Running 0 7s
reviews-v3-76f75877b9-gn88k 2/2 Running 0 7s
```
Inspect a pod to confirm both containers and the `istio-proxy` image/version:
```bash theme={null}
kubectl describe pod details-v1-7c5d957895-pss97
```
Example snippet from the pod description:
```console theme={null}
Containers:
details:
Image: docker.io/istio/examples-bookinfo-details-v1:1.20.2
Port: 9080/TCP
State: Running
istio-proxy:
Image: docker.io/istio/proxyv2:1.26.3
Port: 15090/TCP
```
## Manual (offline) sidecar injection
If you prefer not to enable automatic namespace injection, inject sidecars manually into manifests and then apply them:
```bash theme={null}
wget https://raw.githubusercontent.com/istio/istio/release-1.26/samples/bookinfo/platform/kube/bookinfo.yaml
istioctl kube-inject -f bookinfo.yaml | kubectl apply -f -
```
Manual injection is useful for pipelines or environments where you control pod manifests before they reach the cluster.
## Install Istio with Helm
When using Helm, install three charts in this recommended order:
1. `istio/base` — cluster-wide resources (ServiceAccounts, ClusterRoles, CRDs when required)
2. `istiod` — control plane
3. `istio/gateway` — ingress/egress gateway(s)
Example Helm commands for Istio 1.26.3:
```bash theme={null}
helm repo add istio https://istio-release.storage.googleapis.com/charts
helm repo update
helm install istio-base istio/base --namespace istio-system --version 1.26.3 --create-namespace
helm install istiod istio/istiod --namespace istio-system --version 1.26.3 --wait
helm install istio-ingress istio/gateway --namespace istio-ingress --version 1.26.3 --create-namespace --wait
helm ls -A
```
Sample Helm listing:
```console theme={null}
NAME NAMESPACE REVISION UPDATED STATUS CHART APP VERSION
istio-base istio-system 1 ... deployed base-1.26.3 1.26.3
istiod istio-system 1 ... deployed istiod-1.26.3 1.26.3
istio-ingress istio-ingress 1 ... deployed gateway-1.26.3 1.26.3
```
After a Helm install, the resulting cluster resources and runtime behavior are equivalent to an `istioctl` installation; you can inspect pods and services with `kubectl`.
## Validation and analysis
Use these `istioctl` commands to validate and analyze Istio configuration and your installation:
```bash theme={null}
# Validate an Istio YAML file
istioctl validate filename.yaml
# Verify the control plane installation
istioctl verify-install
# Analyze Istio configuration in all namespaces
istioctl analyze -A
# Or analyze a specific namespace
istioctl analyze -n default
```
`istioctl analyze` is especially helpful: it reports configuration problems, missing references, and other issues that can prevent Istio features from working correctly. Run it regularly during development and labs.
## Links and references
* [Istio official website and downloads](https://istio.io)
* [Istio Service Mesh course (labs)](https://learn.kodekloud.com/user/courses/istio-service-mesh)
* [Istio releases repository (Bookinfo sample)](https://github.com/istio/istio/tree/release-1.26/samples/bookinfo)
***
That covers the core steps for installing Istio with `istioctl` or Helm, enabling sidecar injection (automatic or manual), and validating your installation. Practice these commands in a terminal to become comfortable with Istio installation and troubleshooting.
Quick reference: when to use each profile
| Profile | Use case |
| ------------------------------ | ------------------------------------------------------- |
| `demo` | Learning, labs, and examples (includes most components) |
| `default` | Standard production-ready feature set |
| `minimal` | Small footprint, only essential components |
| `ambient` | Ambient mesh (sidecar-less) architectures |
| `remote` / `empty` / `preview` | Advanced topologies or experimental options |
## Install Istio with istioctl
The simplest way to install Istio with the demo profile:
```bash theme={null}
istioctl install --set profile=demo -y
```
Sample successful output:
```console theme={null}
✓ Istio core installed
✓ Istiod installed
✓ Egress gateways installed
✓ Ingress gateways installed
✓ Installation complete
Please verify that Istio is running:
kubectl get pods -n istio-system
NAME READY STATUS RESTARTS AGE
istio-egressgateway-6db9994577-sn95p 1/1 Running 0 79s
istio-ingressgateway-58649bfdf4-cs4fk 1/1 Running 0 79s
istiod-dd4b7db5-nxrjv 1/1 Running 0 111s
```
Note: Installing Istio adds the control plane and gateway resources to the cluster. It does not automatically inject sidecars into existing workloads unless you enable injection or redeploy those workloads.
## Enabling automatic sidecar injection
Istio injects an Envoy sidecar container into pod definitions for classic sidecar-based deployments. To enable automatic sidecar injection for a namespace, label that namespace:
```bash theme={null}
kubectl label namespace default istio-injection=enabled
```
Verify the label:
```bash theme={null}
kubectl get ns default --show-labels
```
Example output:
```console theme={null}
NAME STATUS AGE LABELS
default Active 20h istio-injection=enabled,kubernetes.io/metadata.name=default
```
After labeling a namespace, existing pods must be recreated (restart or reapply manifests) for the sidecar to be injected.
Note: The Ambient profile implements a sidecar-less ambient mesh. If you install Istio using the ambient profile, automatic sidecar injection (the istio-injection label) does not inject Envoy sidecars. The namespace labeling below applies to classic sidecar-based profiles such as demo or default.
## Example: Deploy Bookinfo and observe sidecar injection
1. Apply the Bookinfo sample (matching release-1.26):
```bash theme={null}
kubectl apply -f https://raw.githubusercontent.com/istio/istio/release-1.26/samples/bookinfo/platform/kube/bookinfo.yaml
kubectl get pods
```
2. Before enabling injection you will see one container per pod (1/1):
```console theme={null}
NAME READY STATUS RESTARTS AGE
details-v1-7c5d957895-mkflq 1/1 Running 0 8s
productpage-v1-f47f868c8-v6qdl 1/1 Running 0 7s
ratings-v1-85cf8d8647-8cqxs 1/1 Running 0 8s
reviews-v1-5fc87d67c-lpg76 1/1 Running 0 8s
reviews-v2-f6d449f65-hwtz9 1/1 Running 0 8s
reviews-v3-76f75877b9-q7d75 1/1 Running 0 8s
```
3. Enable injection on the namespace:
```bash theme={null}
kubectl label namespace default istio-injection=enabled
```
4. Recreate the workload (restart the deployment or delete and reapply manifests). Example: delete and reapply Bookinfo:
```bash theme={null}
kubectl delete -f https://raw.githubusercontent.com/istio/istio/release-1.26/samples/bookinfo/platform/kube/bookinfo.yaml
kubectl apply -f https://raw.githubusercontent.com/istio/istio/release-1.26/samples/bookinfo/platform/kube/bookinfo.yaml
kubectl get pods
```
5. After recreation you should see two containers per pod (2/2), indicating the application container plus the Istio sidecar:
```console theme={null}
NAME READY STATUS RESTARTS AGE
details-v1-7c5d957895-pss97 2/2 Running 0 8s
productpage-v1-f47f868c8-wtkx2 2/2 Running 0 7s
ratings-v1-85cf8d8647-tl6cr 2/2 Running 0 8s
reviews-v1-5fc87d67c-h8925 2/2 Running 0 7s
reviews-v2-f6d449f65-p4zwc 2/2 Running 0 7s
reviews-v3-76f75877b9-gn88k 2/2 Running 0 7s
```
Inspect a pod to confirm both containers and the `istio-proxy` image/version:
```bash theme={null}
kubectl describe pod details-v1-7c5d957895-pss97
```
Example snippet from the pod description:
```console theme={null}
Containers:
details:
Image: docker.io/istio/examples-bookinfo-details-v1:1.20.2
Port: 9080/TCP
State: Running
istio-proxy:
Image: docker.io/istio/proxyv2:1.26.3
Port: 15090/TCP
```
## Manual (offline) sidecar injection
If you prefer not to enable automatic namespace injection, inject sidecars manually into manifests and then apply them:
```bash theme={null}
wget https://raw.githubusercontent.com/istio/istio/release-1.26/samples/bookinfo/platform/kube/bookinfo.yaml
istioctl kube-inject -f bookinfo.yaml | kubectl apply -f -
```
Manual injection is useful for pipelines or environments where you control pod manifests before they reach the cluster.
## Install Istio with Helm
When using Helm, install three charts in this recommended order:
1. `istio/base` — cluster-wide resources (ServiceAccounts, ClusterRoles, CRDs when required)
2. `istiod` — control plane
3. `istio/gateway` — ingress/egress gateway(s)
Example Helm commands for Istio 1.26.3:
```bash theme={null}
helm repo add istio https://istio-release.storage.googleapis.com/charts
helm repo update
helm install istio-base istio/base --namespace istio-system --version 1.26.3 --create-namespace
helm install istiod istio/istiod --namespace istio-system --version 1.26.3 --wait
helm install istio-ingress istio/gateway --namespace istio-ingress --version 1.26.3 --create-namespace --wait
helm ls -A
```
Sample Helm listing:
```console theme={null}
NAME NAMESPACE REVISION UPDATED STATUS CHART APP VERSION
istio-base istio-system 1 ... deployed base-1.26.3 1.26.3
istiod istio-system 1 ... deployed istiod-1.26.3 1.26.3
istio-ingress istio-ingress 1 ... deployed gateway-1.26.3 1.26.3
```
After a Helm install, the resulting cluster resources and runtime behavior are equivalent to an `istioctl` installation; you can inspect pods and services with `kubectl`.
## Validation and analysis
Use these `istioctl` commands to validate and analyze Istio configuration and your installation:
```bash theme={null}
# Validate an Istio YAML file
istioctl validate filename.yaml
# Verify the control plane installation
istioctl verify-install
# Analyze Istio configuration in all namespaces
istioctl analyze -A
# Or analyze a specific namespace
istioctl analyze -n default
```
`istioctl analyze` is especially helpful: it reports configuration problems, missing references, and other issues that can prevent Istio features from working correctly. Run it regularly during development and labs.
## Links and references
* [Istio official website and downloads](https://istio.io)
* [Istio Service Mesh course (labs)](https://learn.kodekloud.com/user/courses/istio-service-mesh)
* [Istio releases repository (Bookinfo sample)](https://github.com/istio/istio/tree/release-1.26/samples/bookinfo)
***
That covers the core steps for installing Istio with `istioctl` or Helm, enabling sidecar injection (automatic or manual), and validating your installation. Practice these commands in a terminal to become comfortable with Istio installation and troubleshooting.