Pulumi Essentials
Pulumi Essentials
Creating Security Group
In this lesson, we'll demonstrate how to create and manage a custom security group using Pulumi, ensuring that only the required ports are open for your EC2 instances. You'll configure a security group with two inbound rules (SSH and HTTP) and one outbound rule (allowing all outbound traffic). We'll attach this security group to an EC2 instance, and later extend the setup to create multiple instances programmatically.
Below is a comprehensive example that illustrates how to create a security group, define its rules, and attach it to an EC2 instance.
1. Creating a Security Group and Attaching It to an EC2 Instance
Start by initializing your Pulumi program. In the code snippet below, we create an S3 Bucket (for demonstration), set up a security group for our web server, configure security rules, and launch an EC2 instance with the security group attached.
import pulumi
from pulumi_aws import s3, ec2

# Create an AWS resource (S3 Bucket) for demonstration purposes.
bucket = s3.Bucket("my-bucket")
pulumi.export("bucket_name", bucket.id)

# Create a security group for web servers.
sg = ec2.SecurityGroup("web-server-sg",
    description="Security group for web servers")

# Define an ingress rule to allow SSH (port 22).
allow_ssh = ec2.SecurityGroupRule("AllowSSH",
    type="ingress",
    from_port=22,
    to_port=22,
    protocol="tcp",
    cidr_blocks=["0.0.0.0/0"],
    security_group_id=sg.id)

# Define an ingress rule to allow HTTP traffic (port 80).
allow_http = ec2.SecurityGroupRule("AllowHTTP",
    type="ingress",
    from_port=80,
    to_port=80,
    protocol="tcp",
    cidr_blocks=["0.0.0.0/0"],
    security_group_id=sg.id)

# Define an egress rule to allow all outbound traffic.
allow_all = ec2.SecurityGroupRule("AllowAll",
    type="egress",
    from_port=0,
    to_port=0,
    protocol="-1",
    cidr_blocks=["0.0.0.0/0"],
    security_group_id=sg.id)

# Launch an EC2 instance using the security group.
ec2_instance = ec2.Instance("web-server",
    ami="ami-053b0d53c279acc90",
    instance_type="t3.nano",
    key_name="test1",
    vpc_security_group_ids=[sg.id],
    tags={
        "Name": "web"
    })

pulumi.export("public_ip", ec2_instance.public_ip)
After deploying this stack with pulumi up, you might encounter a connection error when testing SSH connectivity. For example:
(venv) C:\Users\sanje\Downloads>ssh -i test1.pem [email protected]
ssh: connect to host 34.205.89.1 port 22: Connection timed out
Note
Ensure that your security group allows SSH access. If you experience a timeout, verify that the ingress rule for port 22 is correctly configured.
You can verify the security group and its rules by reviewing the Pulumi preview output in your terminal:
C:\Users\sanje\Documents\scratch\pulumi-demo>pulumi up
Previewing update (dev)

View in Browser (Ctrl+O): https://app.pulumi.com/your-org/pulumi-demo/dev/previews/...

Type                             Name                    Plan      Info
pulumi:pulumi:Stack             pulumi-demo-dev
+  aws:ec2:SecurityGroup        web-server-sg           create
+  aws:ec2:SecurityGroupRule    AllowSSH                create
+  aws:ec2:SecurityGroupRule    AllowHTTP               create
+  aws:ec2:SecurityGroupRule    AllowAll                create
~  aws:ec2:Instance             web-server              update    [diff: ~vpcSecurityGroupIds]

Resources:
+ 4 to create
~ 1 to update
5 changes. 2 unchanged

Do you want to perform this update? [Use arrows to move, type to filter]
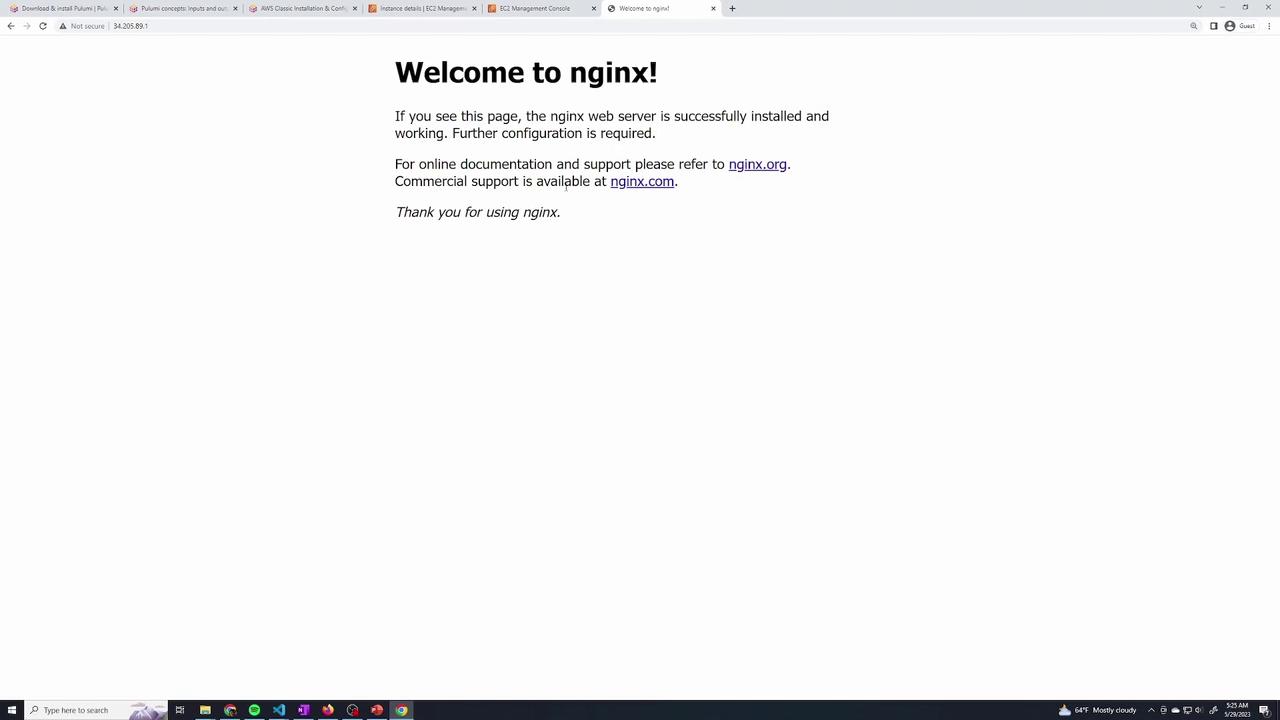
Once the update is complete, connect to your instance using SSH. When connected, update the package manager and install Nginx:
sudo apt update
sudo apt install nginx
Check that Nginx is running:
systemctl status nginx
When you navigate to the public IP of your instance in a web browser, you should see the default Nginx welcome page confirming that the server is configured correctly.
2. Generating a Clickable DNS URL for Your Instance
Instead of manually copying the public IP address, you can output a clickable URL using the instance's public DNS. Update your outputs as follows:
pulumi.export("public_ip", ec2_instance.public_ip)
pulumi.export("instance_url", pulumi.Output.concat("http://", ec2_instance.public_dns))
After deploying with pulumi up, the output will display similar values:
Outputs:
  bucket_name: "my-bucket-5d138fe"
  instance_url: "http://ec2-34-205-89-1.compute-1.amazonaws.com"
  public_ip: "34.205.89.1"
You can also retrieve the stack outputs at any time by running:
pulumi stack output
3. Creating Multiple EC2 Instances Using a Loop
To efficiently create multiple EC2 instances, define an array of instance names and iterate over it. In the example below, three instances ("web1", "web2", and "web3") are created, and their public IP addresses are collected for output.
instance_names = ["web1", "web2", "web3"]
output_public_ip = []

for name in instance_names:
    ec2_instance = ec2.Instance(name,
        ami="ami-053b0d53c279acc90",
        instance_type="t3.nano",
        key_name="test1",
        vpc_security_group_ids=[sg.id],
        tags={"Name": name}
    )
    output_public_ip.append(ec2_instance.public_ip)

pulumi.export("public_ip", output_public_ip)
During the next pulumi up execution, Pulumi will detect that the original "web-server" instance is no longer needed. It will remove it and create the three new instances. The terminal output will reflect these changes:
Outputs:
- instance_url: "http://ec2-34-205-89-1.compute-1.amazonaws.com"
- public_ip: "34.205.89.1"
+ public_ip: [
    [0]: "44.201.56.20"
    [1]: "44.200.224.43"
    [2]: "3.230.151.48"
  ]

Resources:
  + 3 to create
  - 1 to delete
Verify the changes by checking the AWS console for the newly created instances ("web1", "web2", and "web3").
4. Monitoring Your Pulumi Deployment
After running an update, click the provided URL in the output to access the Pulumi dashboard. This dashboard offers a detailed view of the recent update, including resource creation, updates, or deletions. It also provides a comprehensive timeline of configuration changes and deployment events.
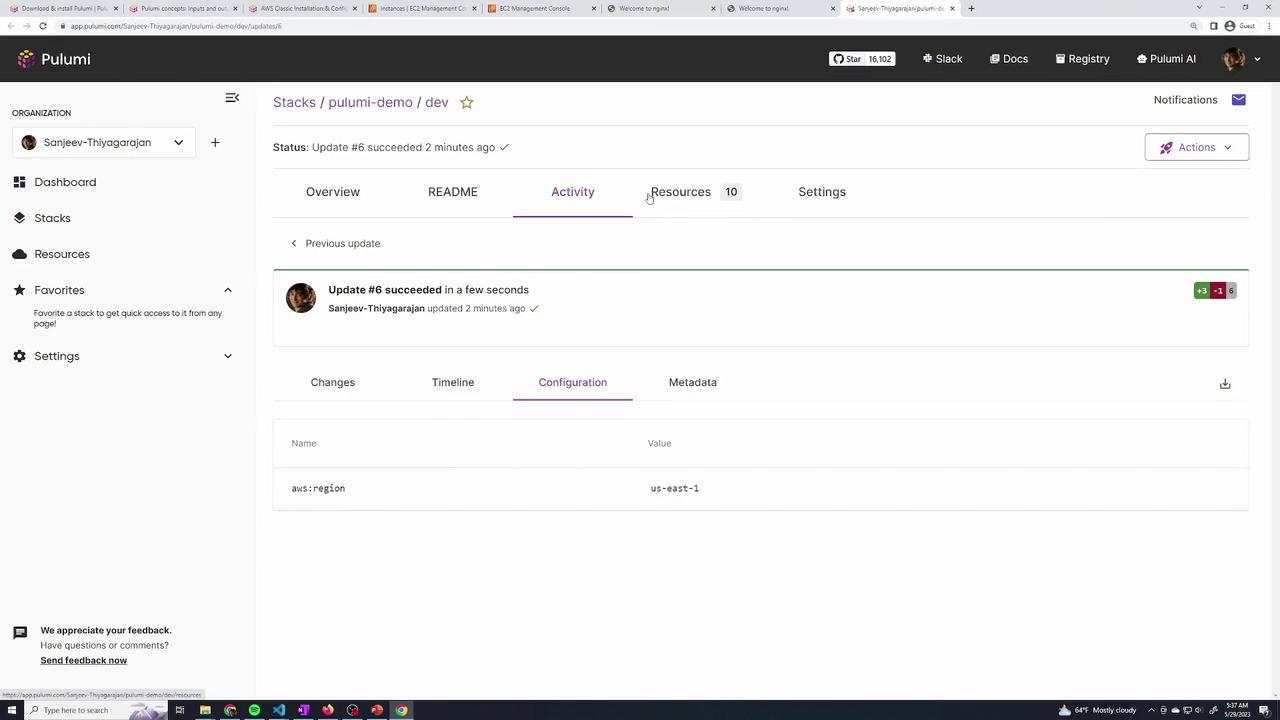
Helpful Tip
The Pulumi dashboard is a powerful tool for tracking your deployment progress and understanding resource changes. Make sure to explore it after every update for better insight.
5. Cleaning Up Resources
When you are finished with the demonstration, you can remove all resources from your stack by running:
pulumi destroy
This command marks all resources for deletion. The output will look similar to this:
Outputs:
  - bucket_name: "my-bucket-5d138fe"
  - public_ip: [
      [0]: "44.201.56.20"
      [1]: "44.200.224.43"
      [2]: "3.230.151.48"
    ]

Resources:
  - 9 to delete

Do you want to perform this destroy? yes
Destroying (dev)
Confirm the prompt to allow Pulumi to clean up the resources created during this demo.
This lesson demonstrated how to create and manage security groups and EC2 instances using Pulumi. From outputting useful connection information to scaling your deployment with a loop, you now have a solid foundation for using Pulumi in your infrastructure projects. Happy coding!
Watch Video
Watch video content