> ## Documentation Index
> Fetch the complete documentation index at: https://notes.kodekloud.com/llms.txt
> Use this file to discover all available pages before exploring further.
# Deploy Ubuntu VM
> This guide explains how to deploy a FastAPI application on an Ubuntu server using DigitalOcean, covering setup, configuration, and security steps.
In this guide, you'll learn how to deploy a FastAPI application on an Ubuntu server. Although these steps remain the same regardless of the cloud provider (AWS, Azure, GCP, DigitalOcean, VirtualBox, or Raspberry Pi), we will use DigitalOcean for demonstration purposes due to its cost-effective fixed pricing.
Once your DigitalOcean account is created and you are logged in, follow the instructions below.
***
## 1. Creating a Droplet on DigitalOcean
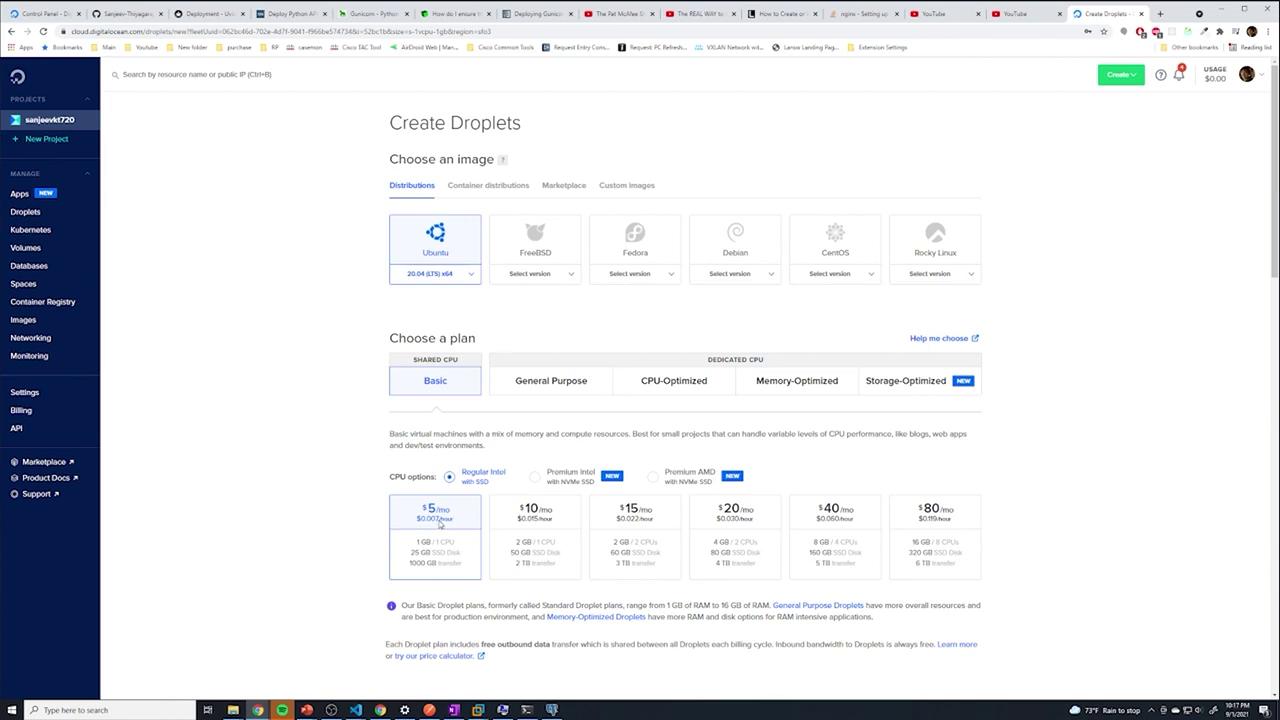
Start by selecting **Get Started with a Droplet** on the DigitalOcean dashboard. Choose the following options:
* **Image:** Ubuntu 20.04 (or a newer version if available; the commands remain the same).
* **CPU Options:** Regular Intel with SSD for optimum pricing.
* **Plan:** Select the \$5/month option (0.007 per hour).
* **Data Center:** Pick the regional data center closest to you (e.g., East Coast).
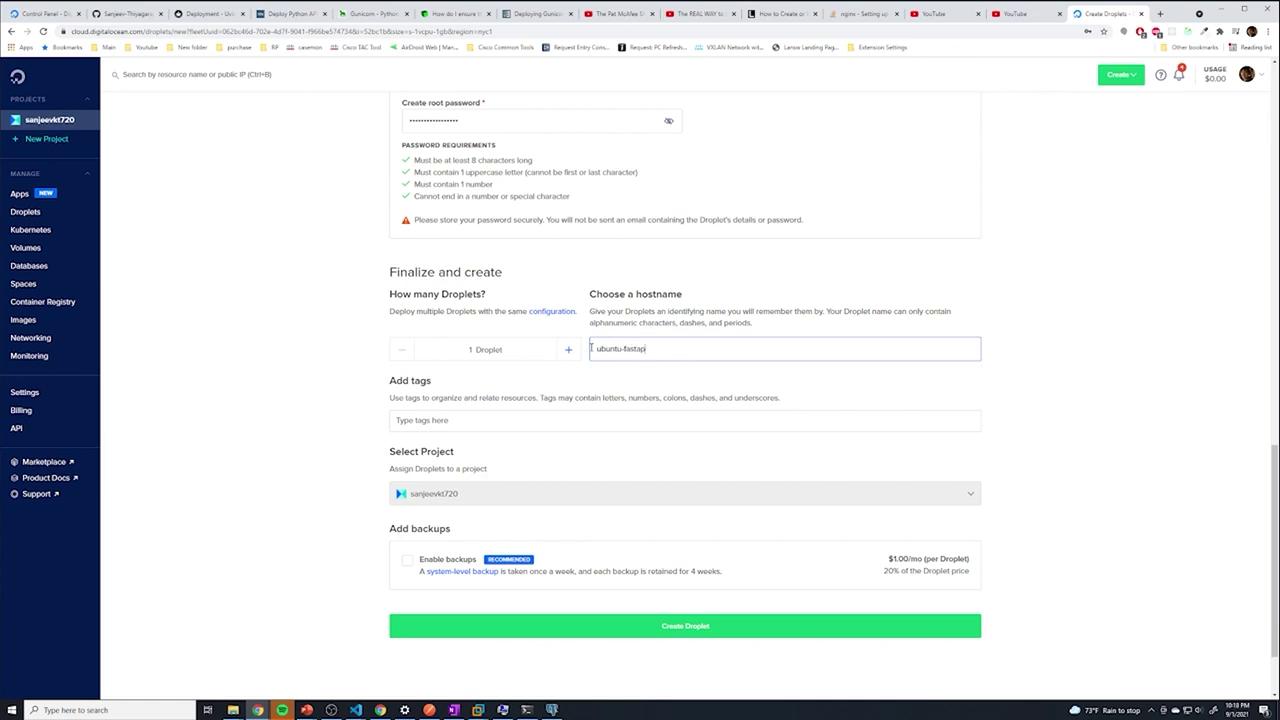
* **Authentication:** Either set a strong password (ensuring you meet DigitalOcean’s password criteria) or use SSH keys if preferred.
* **Hostname:** Use a descriptive name for your droplet, such as `ubuntu-fastapi`.
DigitalOcean will create your Ubuntu VM and assign it a public IP address. This IP will be used to connect to your server.
***
## 2. Connecting to Your Ubuntu VM
Once your droplet is ready, connect via SSH:
1. Open your terminal (or Command Prompt/VS Code integrated terminal).
2. Execute the SSH command:
```bash theme={null}
ssh root@
```
For example:
```bash theme={null}
ssh root@134.122.25.116
```
3. Type “yes” when prompted to accept the fingerprint and then enter your password.
After a successful login, you'll notice your home directory (which might include a `snap` folder). It is vital to update your Ubuntu system:
```bash theme={null}
sudo apt update && sudo apt upgrade -y
```
Using the `-y` flag automatically confirms prompts during the upgrade process. You may be asked to confirm configuration changes for applications like `openssh-server`.
***
## 3. Installing Python, pip, and Virtual Environment
First, verify that Python is installed:
```bash theme={null}
python --version
```
If the command isn’t found, try:
```bash theme={null}
python3 --version
```
A typical outcome might be:
```bash theme={null}
Python 3.8.10
```
If pip is missing, you will receive a suggestion such as:
```bash theme={null}
Command 'pip' not found, but can be installed with:
sudo apt install python3-pip
```
Install pip with:
```bash theme={null}
sudo apt install python3-pip
```
Then, install the virtual environment tool:
```bash theme={null}
sudo pip3 install virtualenv
```
This isolates your FastAPI application and its dependencies.
***
## 4. Installing and Configuring PostgreSQL
Set up PostgreSQL and its additional libraries with:
```bash theme={null}
sudo apt install postgresql postgresql-contrib -y
```
Start PostgreSQL if it’s not running already:
```bash theme={null}
pg_ctlcluster 12 main start
```
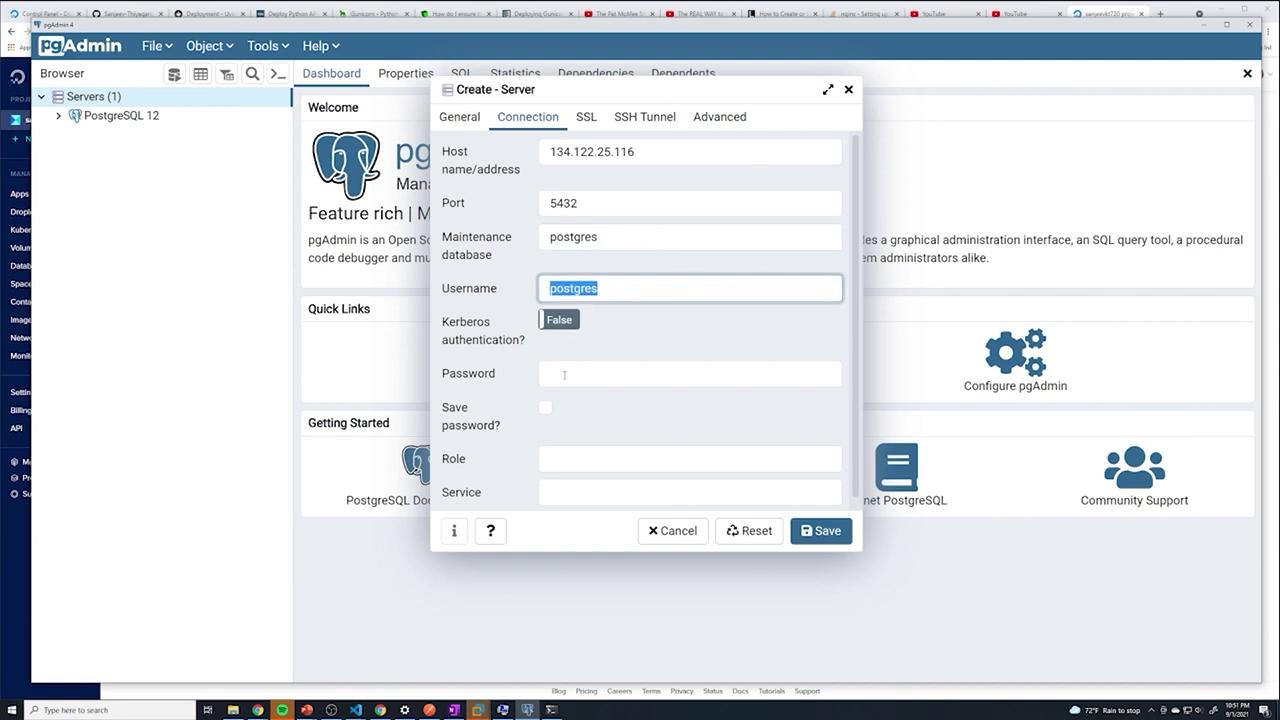
Access PostgreSQL using the `psql` command. By default, a PostgreSQL user named `postgres` is created with peer authentication:
```bash theme={null}
psql -U postgres
```
If you see an error like:
```bash theme={null}
psql: error: FATAL: Peer authentication failed for user "postgres"
```
Follow these steps:
1. Switch to the `postgres` user:
```bash theme={null}
su - postgres
```
2. Access psql:
```bash theme={null}
psql -U postgres
```
3. Set a new password for the `postgres` user:
```sql theme={null}
\password postgres
```
4. Exit psql:
```sql theme={null}
\q
```
Next, modify the PostgreSQL configuration files located in `/etc/postgresql/12/main`:
* In `pg_hba.conf`, change:
```conf theme={null}
local all postgres peer
```
to:
```conf theme={null}
local all postgres md5
```
* To enable remote connections (if needed), edit `postgresql.conf` and set:
```conf theme={null}
listen_addresses = '*'
```
Now, restart PostgreSQL:
```bash theme={null}
sudo systemctl restart postgresql
```
Test the connection:
```bash theme={null}
psql -U postgres
```
You should now be prompted for the password.
***
## 5. Creating a Non-Root User and Setting Up the Application Environment
For enhanced security, create a non-root user instead of running your application as root. For example, create a user named `sanjeev`:
```bash theme={null}
adduser sanjeev
```
Follow the prompts to set a password and enter the user details. Next, add this user to the sudo group:
```bash theme={null}
usermod -aG sudo sanjeev
```
Now, log in as the new user:
```bash theme={null}
ssh sanjeev@
```
Prepare your application environment by creating an application directory:
```bash theme={null}
mkdir app
cd app
```
Create and activate a virtual environment:
```bash theme={null}
virtualenv venv
source venv/bin/activate
```
Within your application directory, create a folder (e.g., `src`) for your source code and clone your FastAPI project from GitHub:
```bash theme={null}
cd src
git clone https://github.com/Sanjeev-Thiyagarajan/fastapi-course .
```
If files are nested within a repository folder and you wish to have them directly in `src`, clone them directly by appending a dot (.) at the end.
Install the necessary project dependencies:
```bash theme={null}
pip install -r requirements.txt
```
If you encounter errors related to PostgreSQL or missing header files (like `libpq-fe.h`), install the development libraries:
```bash theme={null}
sudo apt install libpq-dev
```
Then, rerun the pip install command.
Test your FastAPI application locally using Uvicorn:
```bash theme={null}
uvicorn app.main:app --host 0.0.0.0
```
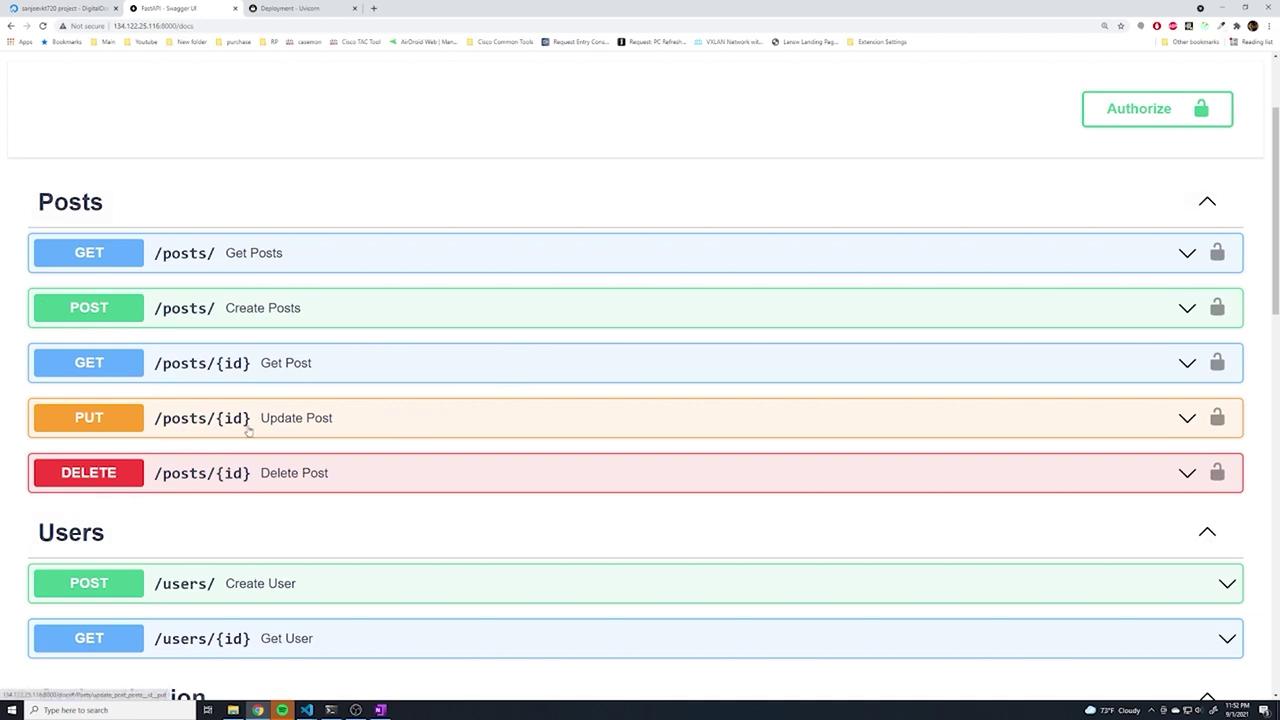
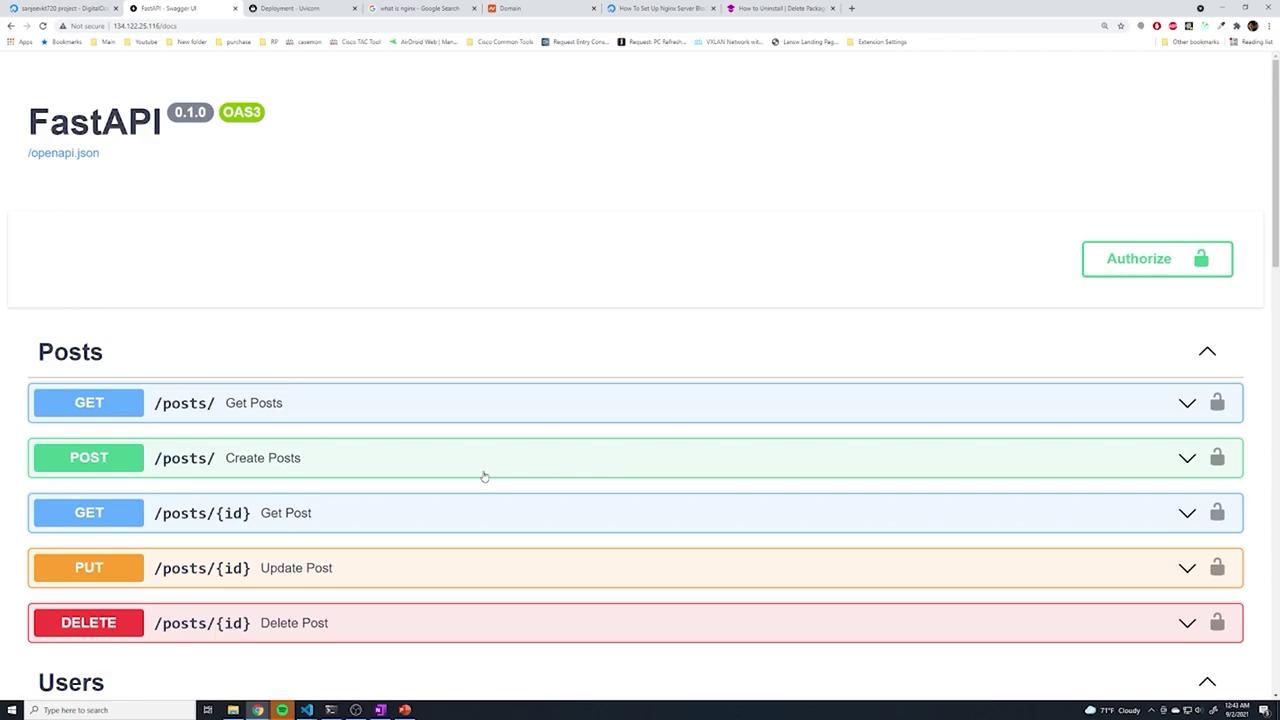
Your API should now be accessible on port 8000.
***
## 6. Running the Application with Gunicorn and Creating a systemd Service
### Production with Gunicorn
For production environments, use Gunicorn with Uvicorn workers. Install Gunicorn (if not already included in your requirements):
```bash theme={null}
pip install gunicorn
```
Test Gunicorn using Uvicorn workers:
```bash theme={null}
gunicorn -w 4 -k uvicorn.workers.UvicornWorker app.main:app --bind 0.0.0.0:8000
```
You should see output confirming that Gunicorn has booted four worker processes.
### Creating a systemd Service
To ensure that your application runs in the background and starts automatically on reboot, create a systemd service file. Create a file named `api.service` in `/etc/systemd/system/` with the following contents (adjust the paths and usernames to match your environment):
```ini theme={null}
[Unit]
Description=Demo FastAPI Application
After=network.target
[Service]
User=sanjeev
Group=sanjeev
WorkingDirectory=/home/sanjeev/app/src/
Environment="PATH=/home/sanjeev/app/venv/bin"
EnvironmentFile=/home/sanjeev/.env
ExecStart=/home/sanjeev/app/venv/bin/gunicorn -w 4 -k uvicorn.workers.UvicornWorker app.main:app --bind 0.0.0.0:8000
[Install]
WantedBy=multi-user.target
```
The `EnvironmentFile` directive loads additional environment variables from your `.env` file. Ensure this file contains all required credentials and settings.
Reload systemd to apply the new service configuration:
```bash theme={null}
sudo systemctl daemon-reload
```
Start and verify the service status:
```bash theme={null}
sudo systemctl start api.service
sudo systemctl status api.service
```
If you experience issues related to missing environment variables (e.g., `secret_key` or `access_token_expire_minutes`), ensure your `.env` file (located in your home directory) includes lines similar to:
```env theme={null}
DATABASE_HOSTNAME=localhost
DATABASE_PORT=5432
DATABASE_PASSWORD=password123
DATABASE_NAME=fastapi
DATABASE_USERNAME=postgres
SECRET_KEY=09d25e094faa6ca2556c818166b7a9563b93f7099f6f0f4caa6cf63b88e8d3e7
ALGORITHM=HS256
ACCESS_TOKEN_EXPIRE_MINUTES=300
```
Then, restart the systemd service:
```bash theme={null}
sudo systemctl restart api.service
```
Finally, enable the service to start on boot:
```bash theme={null}
sudo systemctl enable api.service
```
***
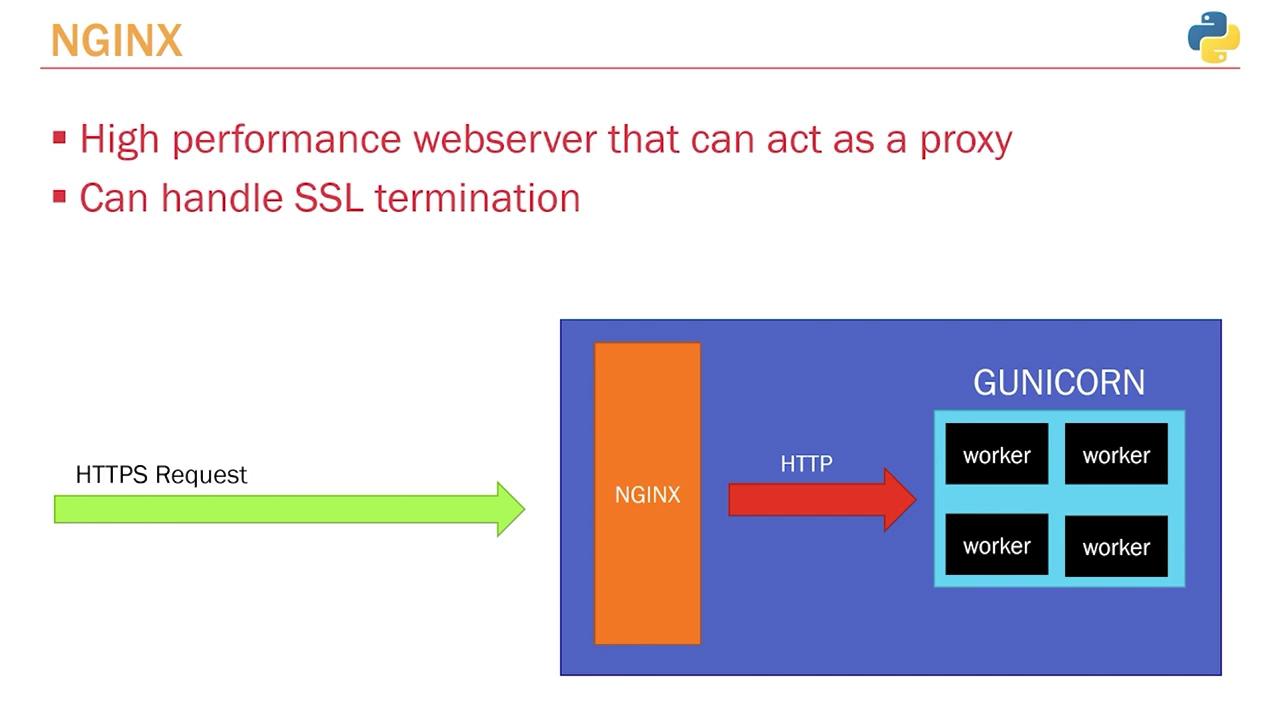
## 7. Configuring Nginx as a Reverse Proxy
### Installing Nginx
Install Nginx with:
```bash theme={null}
sudo apt install nginx -y
```
Start (or restart) the Nginx service:
```bash theme={null}
sudo systemctl start nginx
sudo systemctl restart nginx
```
Visiting your droplet’s IP in a browser should display the default Nginx page.
### Configuring the Reverse Proxy
Edit the default server block for Nginx by modifying the configuration file located at `/etc/nginx/sites-available/default`:
```bash theme={null}
sudo vi /etc/nginx/sites-available/default
```
Replace the contents (or modify the location block) with the following configuration:
```nginx theme={null}
server {
listen 80;
listen [::]:80;
server_name sanjeev.xyz www.sanjeev.xyz; # Replace with your domain
location / {
proxy_pass http://localhost:8000;
proxy_http_version 1.1;
proxy_set_header X-Real-IP $remote_addr;
proxy_set_header X-Forwarded-For $proxy_add_x_forwarded_for;
proxy_set_header Upgrade $http_upgrade;
proxy_set_header Connection "upgrade";
proxy_set_header Host $http_host;
proxy_set_header X-NginX-Proxy true;
proxy_redirect off;
}
}
```
Save the file and restart Nginx:
```bash theme={null}
sudo systemctl restart nginx
```
Your domain should now forward requests to your FastAPI application running on port 8000.
***
## 8. Setting Up DNS and Domain Name
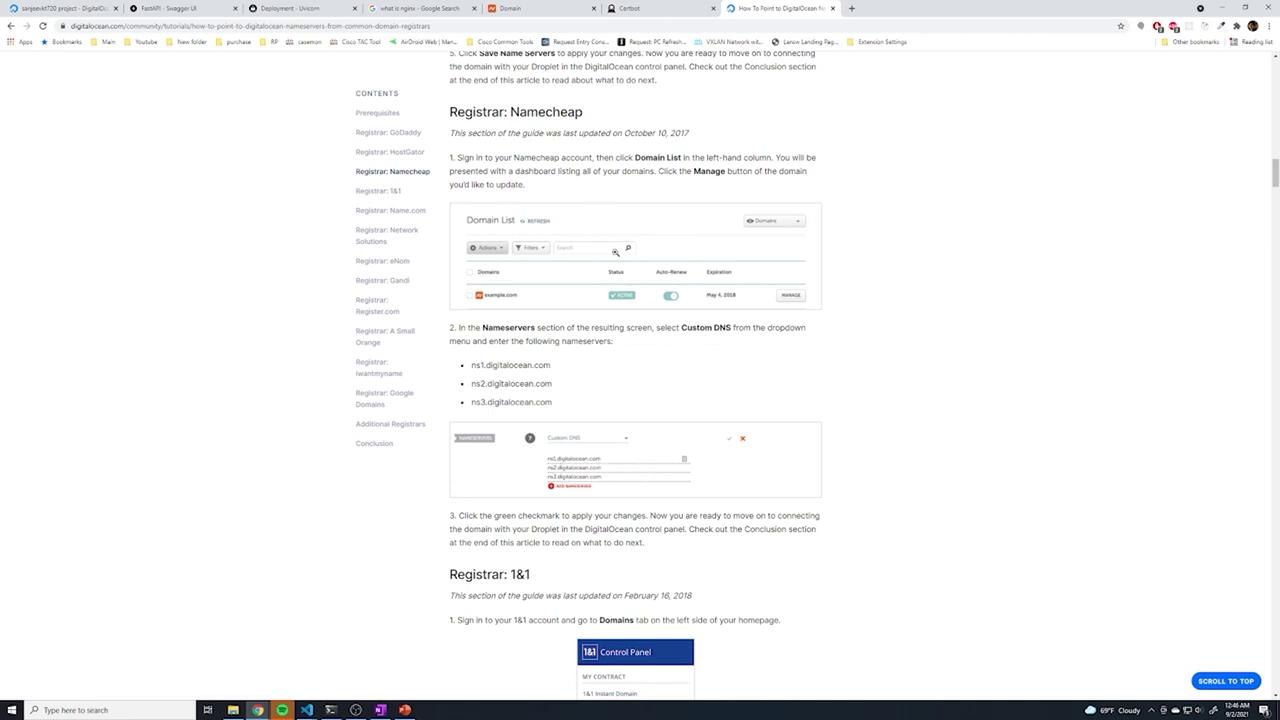
If you have a custom domain (e.g., purchased from Namecheap), point its DNS to your DigitalOcean droplet:
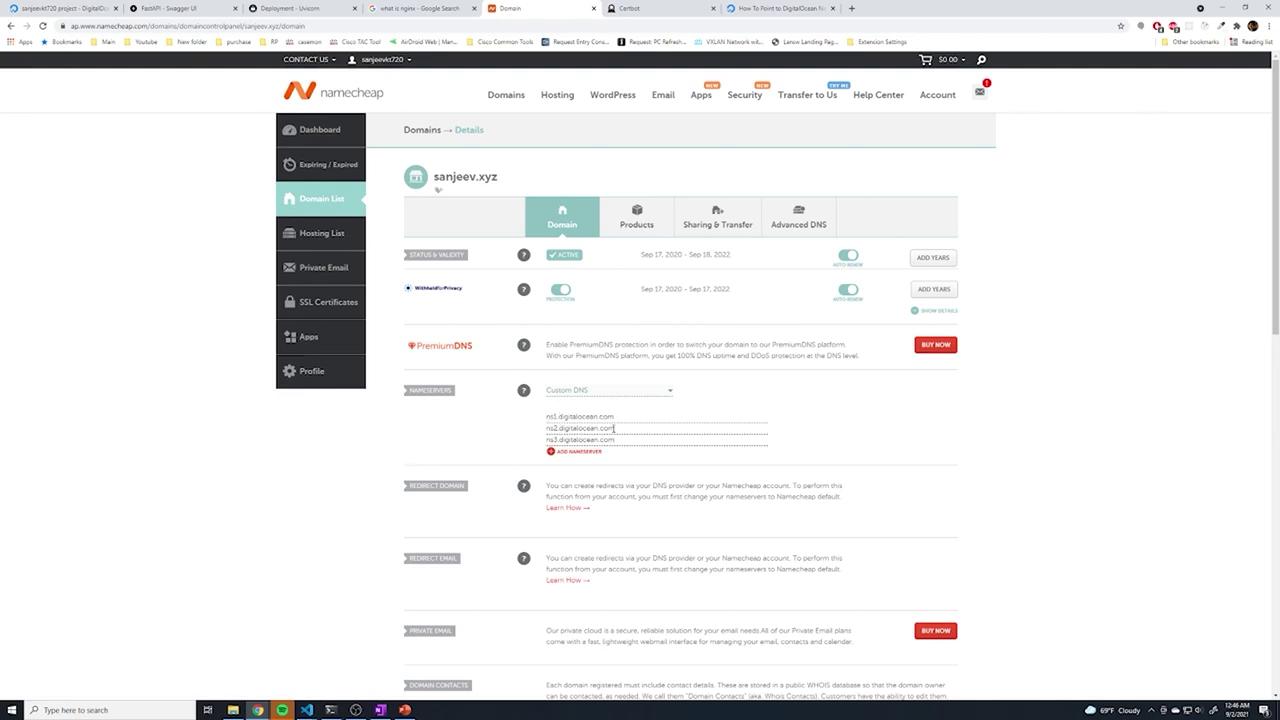
1. Log in to your domain registrar and update the name servers to:
* ns1.digitalocean.com
* ns2.digitalocean.com
* ns3.digitalocean.com
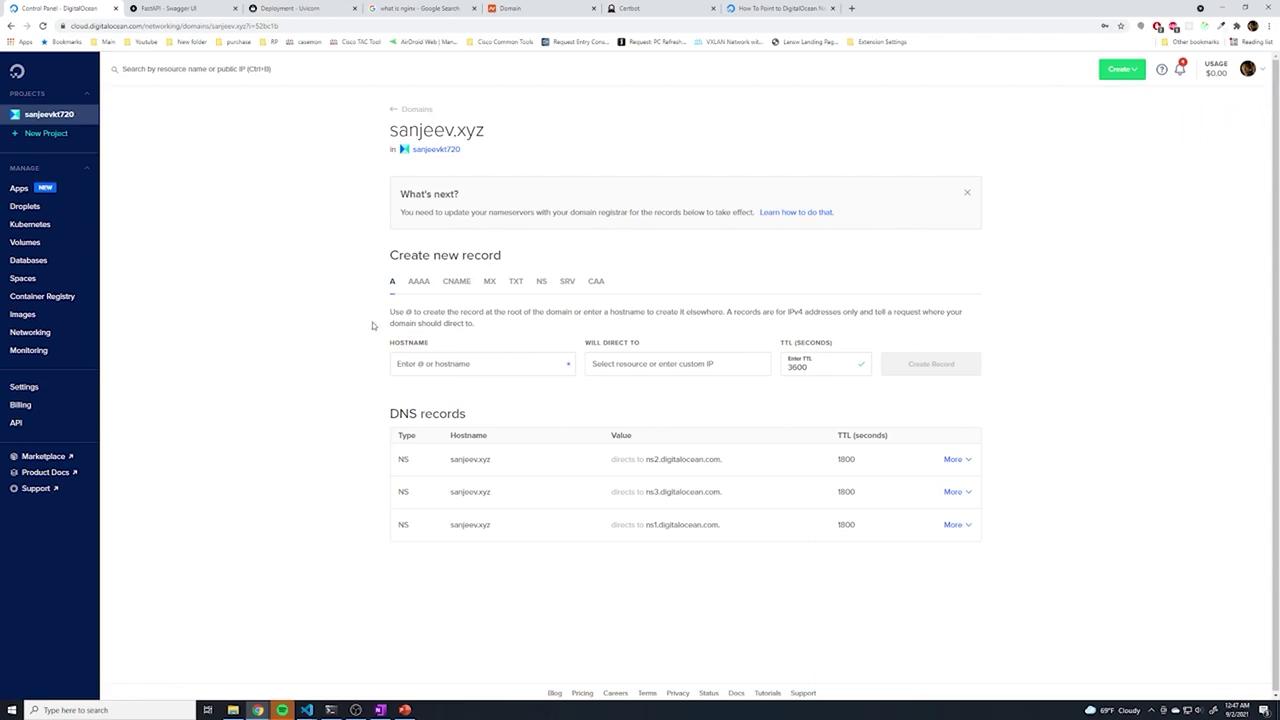
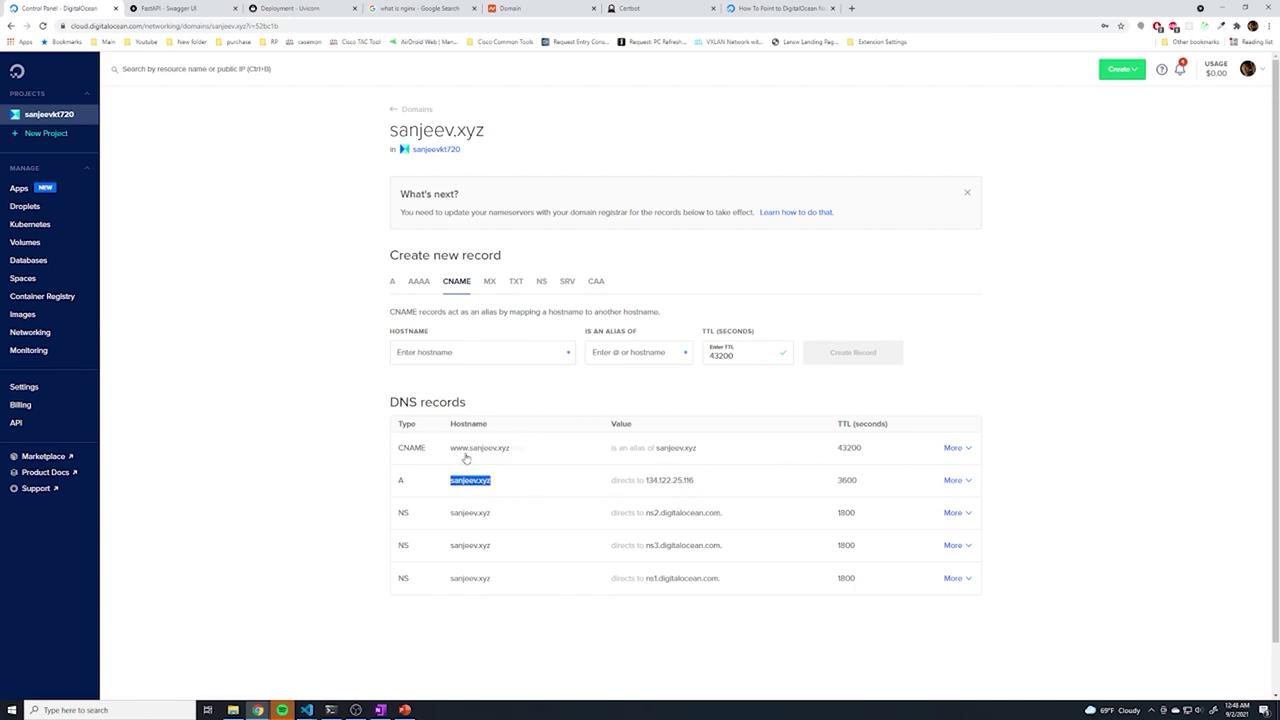
2. In the DigitalOcean dashboard, navigate to **Manage DNS** and add your domain (for example, `sanjeev.xyz`). Create:
* An A record (with `@`) pointing to your droplet’s IP.
* A CNAME record for `www` pointing to `@`.
Once DNS changes propagate (this may take a few minutes to an hour), visiting your domain should serve your application.

***
## 9. Securing Your Site with HTTPS (SSL)
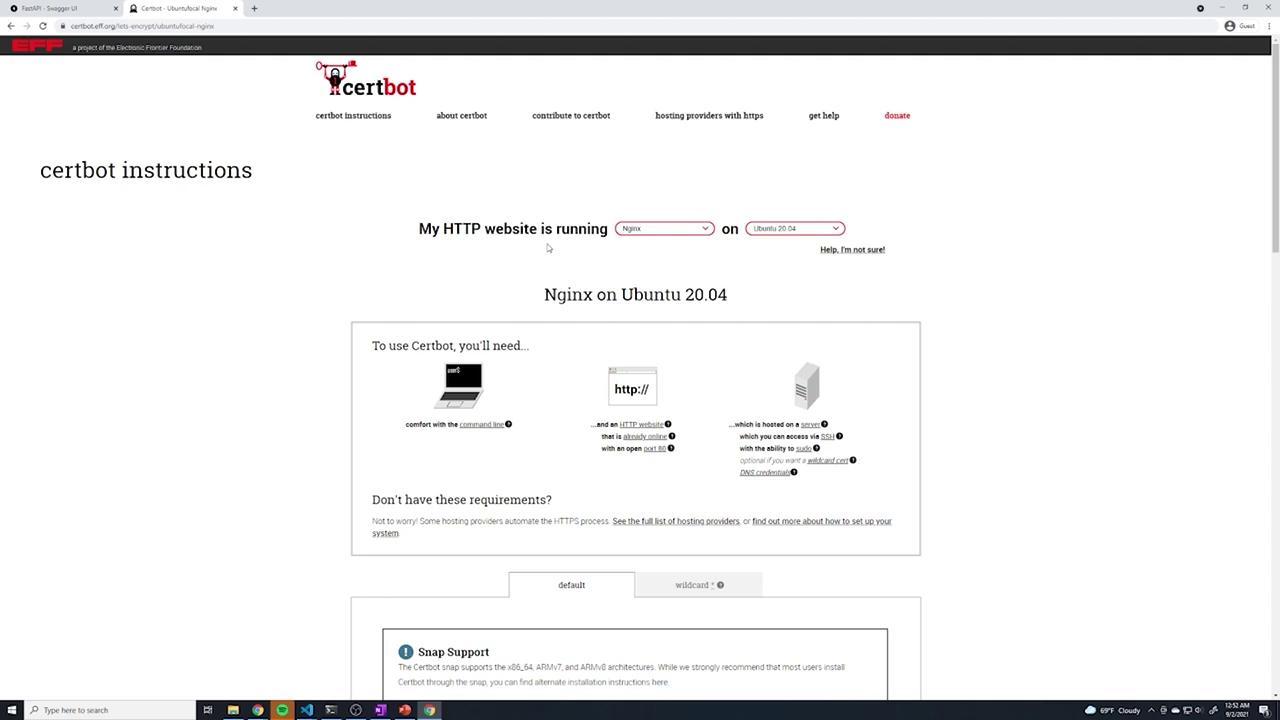
Use Certbot from Let’s Encrypt to secure your site with HTTPS at no additional cost.
1. Install Certbot via Snap:
```bash theme={null}
sudo snap install core; sudo snap refresh core
sudo snap install --classic certbot
sudo ln -s /snap/bin/certbot /usr/bin/certbot
```
2. Run Certbot with the Nginx plugin:
```bash theme={null}
sudo certbot --nginx
```
3. Follow the interactive prompts:
* Enter your email address.
* Agree to the Terms of Service.
* Decide if you want to share your email with the EFF.
* Provide the domain names (e.g., `sanjeev.xyz` and `www.sanjeev.xyz`) for the certificate.
Certbot will update your Nginx configuration to enable HTTPS and set up proper redirection from HTTP.
Once complete, you should see a secure padlock in your browser, indicating that HTTPS is active.
***
## 10. Configuring the Firewall with UFW
Configure UFW (Uncomplicated Firewall) to allow only essential traffic:
1. Check the current UFW status:
```bash theme={null}
sudo ufw status
```
2. Allow HTTP, HTTPS, and SSH traffic:
```bash theme={null}
sudo ufw allow http
sudo ufw allow https
sudo ufw allow ssh
```
3. Optionally, if remote access to PostgreSQL is required, allow port 5432:
```bash theme={null}
sudo ufw allow 5432
```
4. Enable UFW:
```bash theme={null}
sudo ufw enable
```
Verify the active firewall rules:
```bash theme={null}
sudo ufw status
```
You should see allowed entries for ports 80, 443, 22, and optionally 5432.
***
## 11. Deploying Code Changes
When updating your application, push the changes to your Git repository and then pull them on the server.
On your local machine, make changes and push them:
```bash theme={null}
# Edit your code (e.g., app/main.py)
git add --all
git commit -m "Update Hello World message"
git push origin main
```
On your production server:
1. Navigate to your application source directory:
```bash theme={null}
cd ~/app/src
```
2. Pull the latest changes:
```bash theme={null}
git pull
```
3. Restart the API service to apply the changes:
```bash theme={null}
sudo systemctl restart api.service
```
Reload your browser (or use an HTTP client) to verify that the updates are active.
***
## 12. Summary
Your FastAPI deployment is now fully configured and running:
* Your Ubuntu server is updated and ready.
* Python, Virtualenv, and PostgreSQL are installed and configured.
* The FastAPI application runs on Gunicorn, managed by systemd for automatic restarts.
* Nginx functions as a reverse proxy and is secured with a Let’s Encrypt SSL certificate.
* UFW ensures only necessary ports (HTTP, HTTPS, SSH, etc.) are exposed.
* Code updates can be deployed using Git followed by a service restart.
This setup improves performance, enhances security, and provides a robust production environment for your FastAPI application.
***
By following these comprehensive steps, you have successfully deployed your FastAPI application using an Ubuntu VM, DigitalOcean Droplets, Gunicorn, Nginx, and Let's Encrypt SSL. In upcoming guides, we will explore how to automate code updates via a CI/CD pipeline to further streamline your deployment process.
Happy deploying!