> ## Documentation Index
> Fetch the complete documentation index at: https://notes.kodekloud.com/llms.txt
> Use this file to discover all available pages before exploring further.
# Configure networking and hostname resolution statically or dynamically
> This guide covers configuring networking and hostname resolution in Linux, including static and dynamic methods for IP addresses, gateways, and DNS settings.
Welcome to this comprehensive guide on configuring networking and hostname resolution in Linux—both statically and dynamically. Every device connected to a network requires an IP address (e.g., 192.168.0.5 or 10.0.0.9). In addition, internet connectivity demands proper gateway and DNS resolver settings. For instance, when accessing google.com, the typical process is:
1. The device queries a DNS resolver to obtain google.com's IP address (e.g., 203.0.113.9).
2. With the resolved IP, the device sends data to its gateway.
3. The gateway forwards the data hop-by-hop until it reaches the destination.
These settings—IP addresses, gateways, DNS resolvers, network routes, and so forth—can be configured dynamically (typically using DHCP) or statically (via manual configuration).
On Red Hat-based systems (such as Red Hat Enterprise Linux or CentOS), the configuration files and tools may vary slightly compared to other Linux distributions.
***
## Identifying Your Network Interface
Before modifying any settings, it is important to identify the correct network interface. Start by listing all network interfaces with the following command:
```bash theme={null}
ip link show
```
A sample output might look like this:
```bash theme={null}
[aaron@LFCS-CentOS ~]$ ip link show
1: lo: mtu 65536 qdisc noqueue state UNKNOWN mode DEFAULT
group default qlen 1000
link/loopback 00:00:00:00:00:00 brd 00:00:00:00:00:00
2: enp0s3: mtu 1500 qdisc fq_codel state UP mode DEFAULT
group default qlen 1000
link/ether 08:00:27:6b:d7:87 brd ff:ff:ff:ff:ff:ff
3: virbr0: mtu 1500 qdisc noqueue state DOWN mode DEFAULT
group default qlen 1000
link/ether 52:54:00:9c:e8:04 brd ff:ff:ff:ff:ff:ff
[aaron@LFCS-CentOS ~]$
```
In this example, the first non-loopback interface is **enp0s3**. To see the IP addresses assigned to these interfaces, you can run:
```bash theme={null}
ip address show
```
Alternatively, use the abbreviated command:
```bash theme={null}
ip a
```
The loopback adapter typically has the IP address 127.0.0.1 (localhost), while the physical adapter (enp0s3) might have an IP like 192.168.1.79/24. Note that the CIDR notation ("/24") designates the network prefix length, meaning 24 bits are fixed and only the remaining 8 bits are available for device addressing. For example, with a /16 configuration, the first 16 bits are fixed (e.g., 192.168), and the last two octets can vary.
A detailed sample output from `ip address show` is:
```bash theme={null}
[aaron@LFCS-CentOS ~]$ ip address show
1: lo: mtu 65536 qdisc noop state UNKNOWN group default qlen 1000
link/loopback 00:00:00:00:00:00 brd 00:00:00:00:00:00
inet 127.0.0.1/8 scope host lo
valid_lft forever preferred_lft forever
inet6 ::1/128 scope host
valid_lft forever preferred_lft forever
2: enp0s3: mtu 1500 qdisc fq_codel state UP group default qlen 1000
link/ether 08:00:27:6b:d7:87 brd ff:ff:ff:ff:ff:ff
inet 192.168.1.79/24 brd 192.168.1.255 scope global dynamic noprefixroute enp0s3
valid_lft 2449sec preferred_lft 2449sec
inet6 fe80::a00:27ff:fe6b:d787/64 scope link noprefixroute
valid_lft forever preferred_lft forever
3: virbr0: mtu 1500 qdisc noqueue state DOWN group default qlen 1000
link/ether 52:54:00:9c:e8:04 brd ff:ff:ff:ff:ff:ff
inet 192.168.122.1/24 brd 192.168.122.255 scope global virbr0
valid_lft forever preferred_lft forever
[aaron@LFCS-CentOS ~]$
```
Note that physical network interfaces typically start with "e" (e.g., enp0s3) and wireless interfaces generally start with "w".
***
## Understanding IPv6 Addresses
The output above also displays IPv6 addresses. For example, the IPv6 address on enp0s3 appears as:
```bash theme={null}
inet6 fe80::a00:27ff:fe6b:d787/64 scope link noprefixroute
```
IPv6 addresses are 128 bits long. The "/64" indicates that the first 64 bits are reserved as the network prefix, leaving the remaining bits for the device's interface identifier.
***
## Viewing the Routing Table
The routing table dictates how network traffic is directed. To review the system’s routing table, use:
```bash theme={null}
ip route show
```
Or the shorter version:
```bash theme={null}
ip r
```
A typical routing table output might be:
```bash theme={null}
[aaron@LFCS-CentOS ~]$ ip r
default via 192.168.1.1 dev enp0s3 proto dhcp metric 100
192.168.1.0/24 dev enp0s3 proto kernel scope link src 192.168.1.79 metric 100
192.168.122.0/24 dev virbr0 proto kernel scope link src 192.168.122.1 linkdown
[aaron@LFCS-CentOS ~]$
```
This output confirms that the default gateway is 192.168.1.1. To check the DNS resolver settings, display the contents of the `/etc/resolv.conf` file:
```bash theme={null}
cat /etc/resolv.conf
```
A sample output might be:
```bash theme={null}
[aaron@LFCS-CentOS ~]$ cat /etc/resolv.conf
# Generated by NetworkManager
nameserver 192.168.1.1
[aaron@LFCS-CentOS ~]$
```
Each line beginning with `nameserver` signifies a valid DNS resolver. It is common to configure multiple resolvers for redundancy. The automatic appearance of these settings suggests they were assigned via DHCP or a similar mechanism.
***
## Network Configuration Files in Red Hat-Based Systems
On Red Hat-based distributions, networking configuration files are stored in the `/etc/sysconfig/network-scripts/` directory. Files often follow the naming scheme `ifcfg-`. For example, the configuration file for the enp0s3 interface might be:
```bash theme={null}
[aaron@LFCS-CentOS ~]$ ls /etc/sysconfig/network-scripts/
ifcfg-enp0s3 route-enp0s3
[aaron@LFCS-CentOS ~]$
```
Viewing the contents of the interface configuration file is simple:
```bash theme={null}
cat /etc/sysconfig/network-scripts/ifcfg-enp0s3
```
A typical file using DHCP might look like:
```bash theme={null}
TYPE=Ethernet
PROXY_METHOD=none
BROWSER_ONLY=no
BOOTPROTO=dhcp
DEFRROUTE=yes
IPV4_FAILURE_FATAL=no
IPV6INIT=yes
IPV6_AUTOCONF=yes
IPV6_DEFROUTE=yes
IPV6_FAILURE_FATAL=no
NAME=enp0s3
UUID=fadff03a-8b55-4b81-b582-3e84b50fa8f5
DEVICE=enp0s3
ONBOOT=yes
```
Notice that `BOOTPROTO=dhcp` signifies a dynamic configuration. For a static setup, change this value to `none` and manually assign the IP address, gateway, and DNS details.
***
## Using NetworkManager Tools: nmtui and nmcli
NetworkManager is the default network management tool on most Red Hat-based systems. Two key utilities provided are:
* **nmtui**: A text-based user interface.
* **nmcli**: A command-line interface.
### Editing a Connection with nmtui
Launch nmtui by executing:
```bash theme={null}
sudo nmtui
```
You will see an interface similar to the following:
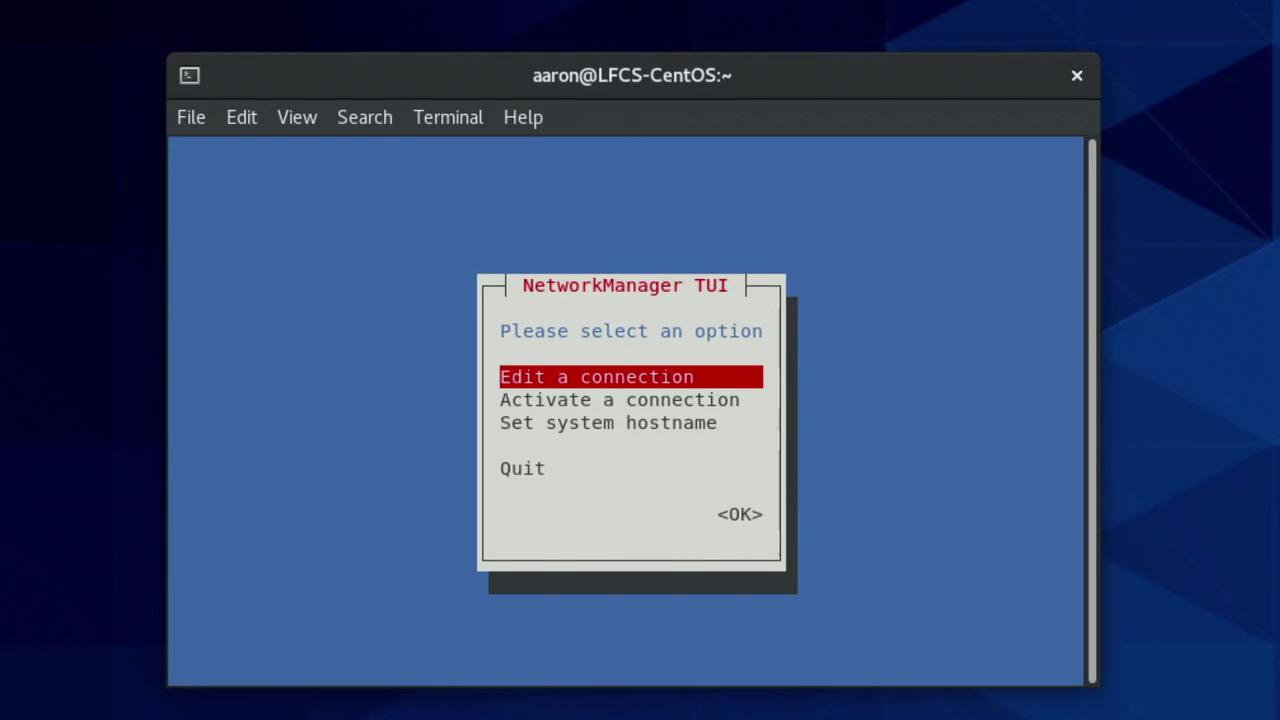
Select "Edit a connection" and choose the network connection corresponding to enp0s3:
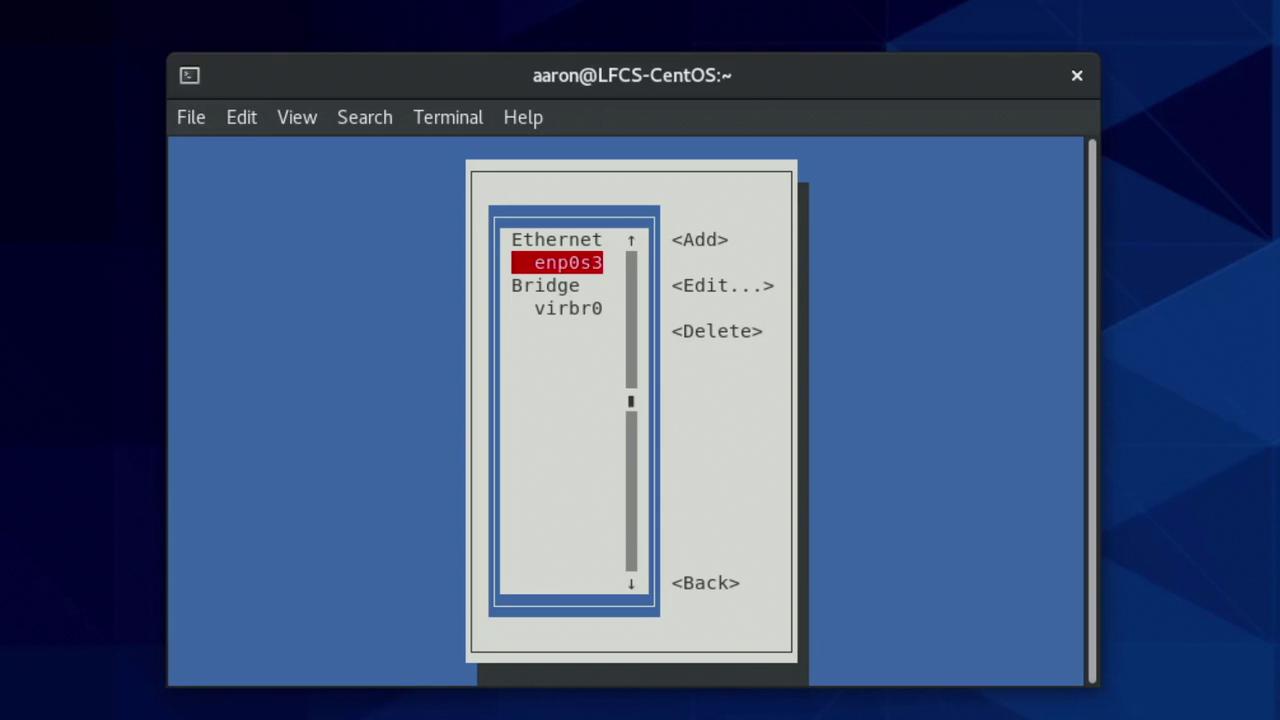
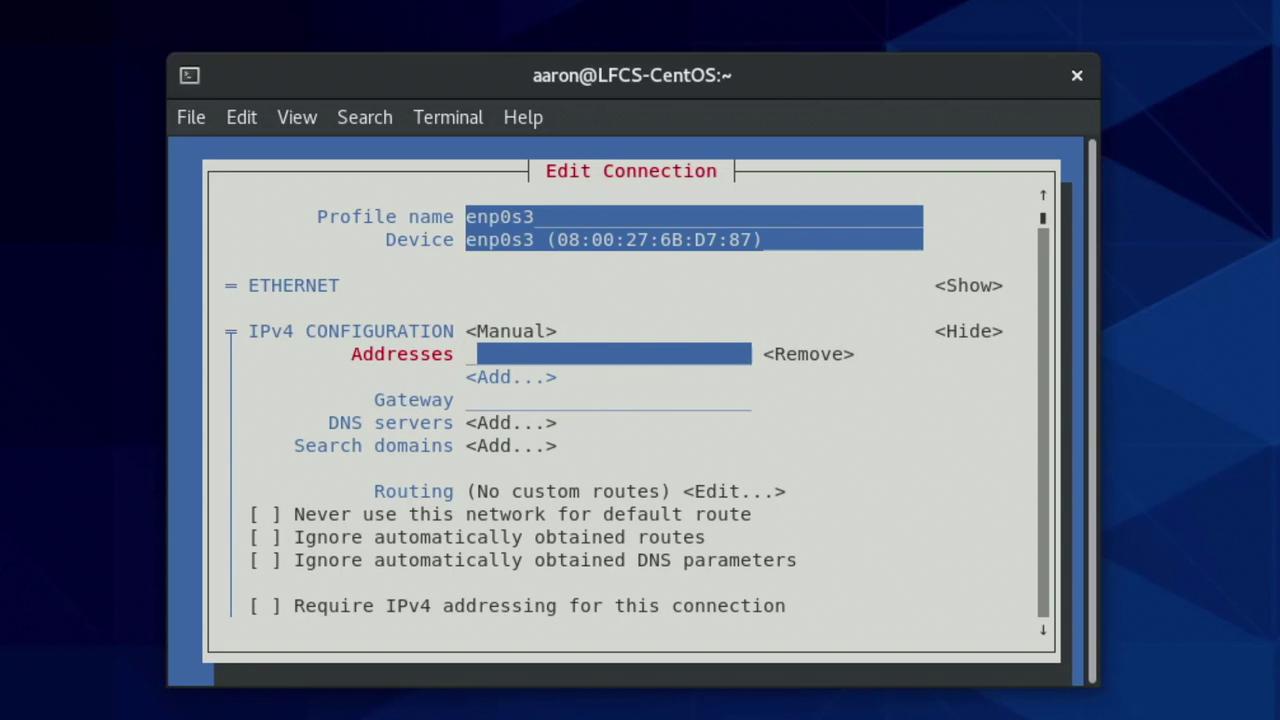
Within the editor, use the Tab and arrow keys to navigate between fields. The profile name can be arbitrary, but the "Device" field must exactly match the network interface (e.g., enp0s3). By default, the IPv4 and IPv6 settings use DHCP. To configure IPv4 with a static IP, change the method from "automatic" to "manual" and specify your desired static address (e.g., 192.168.1.79/24) along with the default gateway and DNS information.
After entering the static settings, navigate to the "OK" button to save your changes:
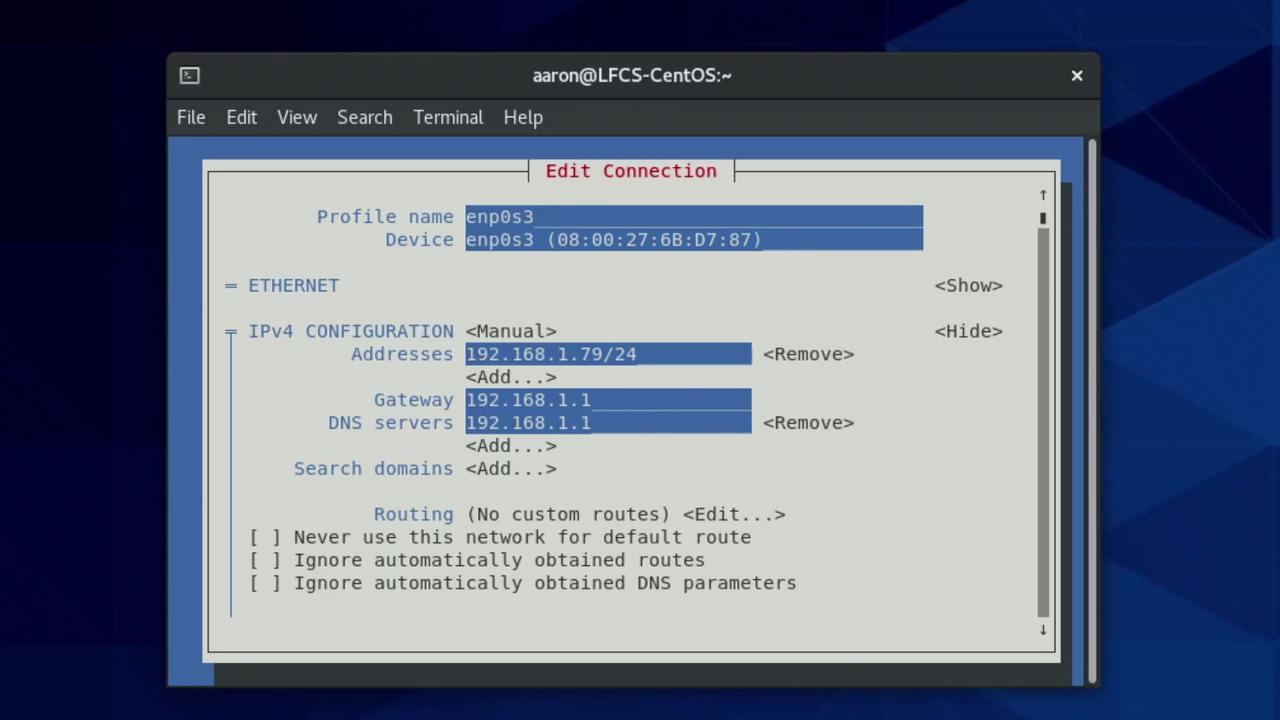
If you are connected remotely (e.g., via SSH), saving these changes may temporarily disrupt your network connection. It is advisable to test the new configuration locally before applying it to remote systems.
It is also possible to combine both DHCP and manual assignments. In such a hybrid configuration, the system obtains a primary IP via DHCP, while additional manual IP addresses are applied upon connection restart or system boot.
To apply the changes immediately, use nmcli. For example, if your network interface is correctly identified as enp0s3, run:
```bash theme={null}
sudo nmcli device reapply enp0s3
```
If you mistype the device name, you will receive an error such as:
```bash theme={null}
sudo nmcli device reapply enp03
```
which produces:
```bash theme={null}
# Error: Device 'enp03' not found.
```
After verifying the correct device name with `ip link show`, reapply using:
```bash theme={null}
sudo nmcli device reapply enp0s3
```
A successful operation returns:
```bash theme={null}
Connection successfully reapplied to device 'enp0s3'.
```
***
## Hostname Resolution
Hostname resolution is essential for converting human-friendly domain names into IP addresses. When you run a command like:
```bash theme={null}
ping google.com
```
the system resolves google.com to an IP address (e.g., 142.251.33.46) and sends ICMP packets to it. A sample ping output could be:
```bash theme={null}
[aaron@LFCS-CentOS ~]$ ping google.com
PING google.com (142.251.33.46) 56(84) bytes of data.
64 bytes from dfw28s31-in-f14.le100.net (142.251.33.46): icmp_seq=1 ttl=116 time=14.9 ms
64 bytes from dfw28s31-in-f14.le100.net (142.251.33.46): icmp_seq=2 ttl=116 time=15.7 ms
64 bytes from dfw28s31-in-f14.le100.net (142.251.33.46): icmp_seq=3 ttl=116 time=13.9 ms
^C
--- google.com ping statistics ---
3 packets transmitted, 3 received, 0% packet loss, time 201ms
rtt min/avg/max/mdev = 13.880/14.825/15.741/0.760 ms
[aaron@LFCS-CentOS ~]$
```
This dynamic resolution relies on the DNS server configured earlier (in this case, 192.168.1.1).
### Static Hostname Resolution via /etc/hosts
Static hostname resolution bypasses DNS by using the local `/etc/hosts` file. Open the file using a text editor with elevated privileges:
```bash theme={null}
sudo vim /etc/hosts
```
A sample file might contain:
```text theme={null}
127.0.0.1 localhost localhost.localdomain localhost4 localhost4.localdomain4
::1 localhost localhost.localdomain localhost6 localhost6.localdomain6
192.168.0.18 LFCS-CentOS2
```
To add a new static mapping—for instance, for a database server—append a new line:
```text theme={null}
192.168.1.82 dbserver
```
After saving the file, verify the static mapping by pinging the new hostname:
```bash theme={null}
ping dbserver
```
Expected output (even if the host is unreachable) will confirm that the hostname is resolving to 192.168.1.82:
```bash theme={null}
[aaron@LFCS-CentOS ~]$ ping dbserver
PING dbserver (192.168.1.82) 56(84) bytes of data.
From LFCS-CentOS (192.168.1.79) icmp_seq=1 Destination Host Unreachable
From LFCS-CentOS (192.168.1.79) icmp_seq=2 Destination Host Unreachable
From LFCS-CentOS (192.168.1.79) icmp_seq=3 Destination Host Unreachable
^C
--- dbserver ping statistics ---
5 packets transmitted, 0 received, +3 errors, 100% packet loss, time 4133ms
pipe 3
[aaron@LFCS-CentOS ~]$
```
This ensures that commands like:
```bash theme={null}
ssh aaron@dbserver
```
will use the static IP mapping, making it easier to connect without remembering complex IP addresses.
If you need reminders on available commands, simply type:
```bash theme={null}
ip
```
Press the Tab key twice to view available commands, and similarly for `nmcli`. A sample output for the `ip` command might be:
```bash theme={null}
[aaron@LFCS-CentOS ~]$ ip
address l2tp mroute nexthop tap xfrm
addrlabel link mrule ntable tcpmetrics token
fou macsec neighbour ntbl route tunnel
help maddress netconf rule ila monitor
netns sr vrf
```
***
## Conclusion
This guide has covered essential topics for configuring networking and hostname resolution on Linux both statically and dynamically. The areas discussed include:
| Topic | Key Task | Example Command/Action |
| -------------------------------- | --------------------------------------- | ---------------------------------------------------------- |
| Identifying interfaces | Listing network devices | `ip link show` or `ip a` |
| Viewing addresses | Displaying IP configuration | `ip address show` |
| Reviewing routes | Checking the system's routing table | `ip route show` or `ip r` |
| Dynamic vs. Static configuration | Configuring via DHCP or manual settings | Editing `/etc/sysconfig/network-scripts/ifcfg-` |
| Hostname resolution | Mapping names to IP; dynamic or static | Using DNS or `/etc/hosts` file |
| NetworkManager tools | Using nmtui and nmcli for configuration | `sudo nmtui`, `sudo nmcli device reapply enp0s3` |
By carefully following these steps, you can seamlessly manage network settings and hostname resolution on your Linux system. Continue exploring and practicing these configurations to ensure robust and reliable network management.
Happy networking!