Create delete and modify local groups and group memberships
Managing local groups and memberships on Linux for role assignment and permissions management, including creating, deleting, and modifying groups and users.
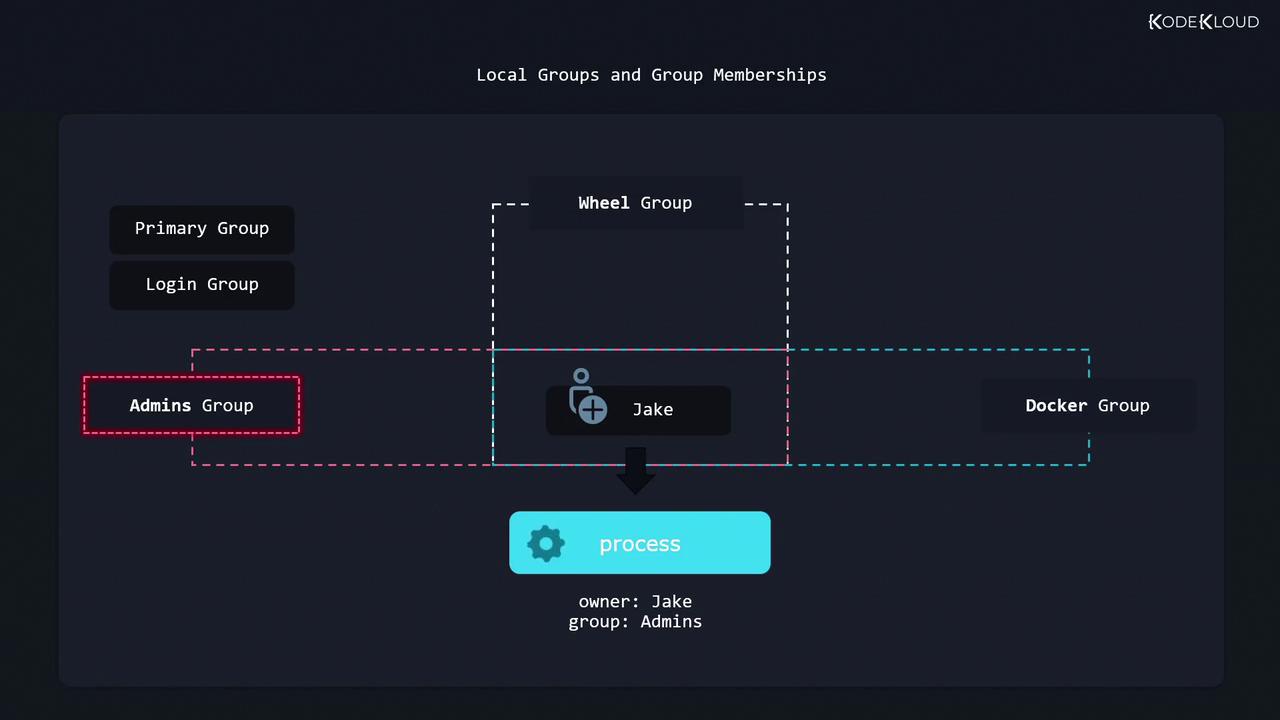
Managing local groups and their memberships on a Linux system is essential for efficient role assignment and permissions management. By organizing users into groups, you can easily grant or restrict access to files, directories, and system functions. For example, when multiple developers work on a shared project, creating a group (e.g., Developers) and assigning the relevant users to that group simplifies file ownership and permission adjustments.Groups also grant specific system privileges. Users in the wheel or sudo groups can perform administrative tasks, while members of the Docker group have permissions to manage Docker containers. Every user has a primary group (or login group) assigned at login, and can additionally belong to multiple secondary or supplementary groups.
When a user launches a program or creates a file, the system uses their primary group to determine default file ownership and process privileges. Secondary groups provide additional access without changing the primary group context.
Below are two common scenarios illustrating the role of primary groups:
When a user launches a program, the process runs with the privileges of their account and primary group.
When a user creates a file, it is automatically owned by their user account and their primary (login) group.
If you want to follow along with the exercises, start by creating a user called John and a new group named Developers. Use the following commands:
sudo useradd johnsudo groupadd developers
Next, add user John to the Developers group using the gpasswd command. Although the command name hints at password management, it is primarily used nowadays for modifying group memberships:
sudo gpasswd --add john developers
To confirm John’s group memberships, use the groups command. Notice that the first group listed is his primary (login) group while any additional groups are secondary:
groups john# Expected output:# john: john developers
There are situations where you might need to change a user’s primary group. By default, Linux creates a primary group with the same name as the user account. However, you can change this using the usermod command with the -g option. For instance, to change John’s primary group to Developers:
sudo usermod -g developers john
A user can have only one primary group but can belong to multiple secondary groups. Avoid confusing the lowercase -g option (for the primary group) with the uppercase -G option (for secondary groups). To minimize errors, consider using the long option —gid:
sudo usermod --gid developers john
It is also important to note the difference in syntax between gpasswd and usermod. The gpasswd command expects the username before the group name, whereas usermod requires the group option immediately preceding the username.If you need to rename an existing group, use the groupmod command with the —new-name option (or the short form -n). For example, to rename the developers group to programmers:
To delete a group, use the groupdel command. However, attempting to delete a group that is currently assigned as a user’s primary group will result in an error:
sudo groupdel programmers# Output: groupdel: cannot remove the primary group of user 'john'
To successfully delete the group, change the user’s primary group back to an appropriate group (e.g., the john group) before performing the deletion:
sudo usermod --gid john johnsudo groupdel programmers
There is no need to manually remove a user from a secondary group before deleting it.This concludes our lesson on managing local groups and group memberships. Be sure to practice these commands to solidify your understanding of Linux group management.For further reading, consider exploring these resources: