> ## Documentation Index
> Fetch the complete documentation index at: https://notes.kodekloud.com/llms.txt
> Use this file to discover all available pages before exploring further.
# Project KodeKloud e commerce application
> This guide covers the deployment and configuration of the KodeKloud eCommerce Application using a LAMP stack on a CentOS machine.
In this guide, we will walk through the deployment and configuration of the KodeKloud eCommerce Application—a fictional online store specializing in electronic devices. The application leverages a LAMP stack (Linux, Apache, MariaDB, PHP) on a CentOS machine. While the application is built around MySQL, our labs use MariaDB, a community fork of MySQL. You can substitute MySQL in your own environment if preferred.
## Deployment Overview
The deployment process is divided into several key steps:
1. Identify the system for deployment (using a CentOS machine).
2. Install and configure the Apache HTTP server.
3. Install and configure the MariaDB database (using MariaDB instead of MySQL).
4. Install and configure PHP to integrate smoothly with Apache.
5. Set up additional system requirements, such as firewall rules.
6. Download and configure the application code from Git.
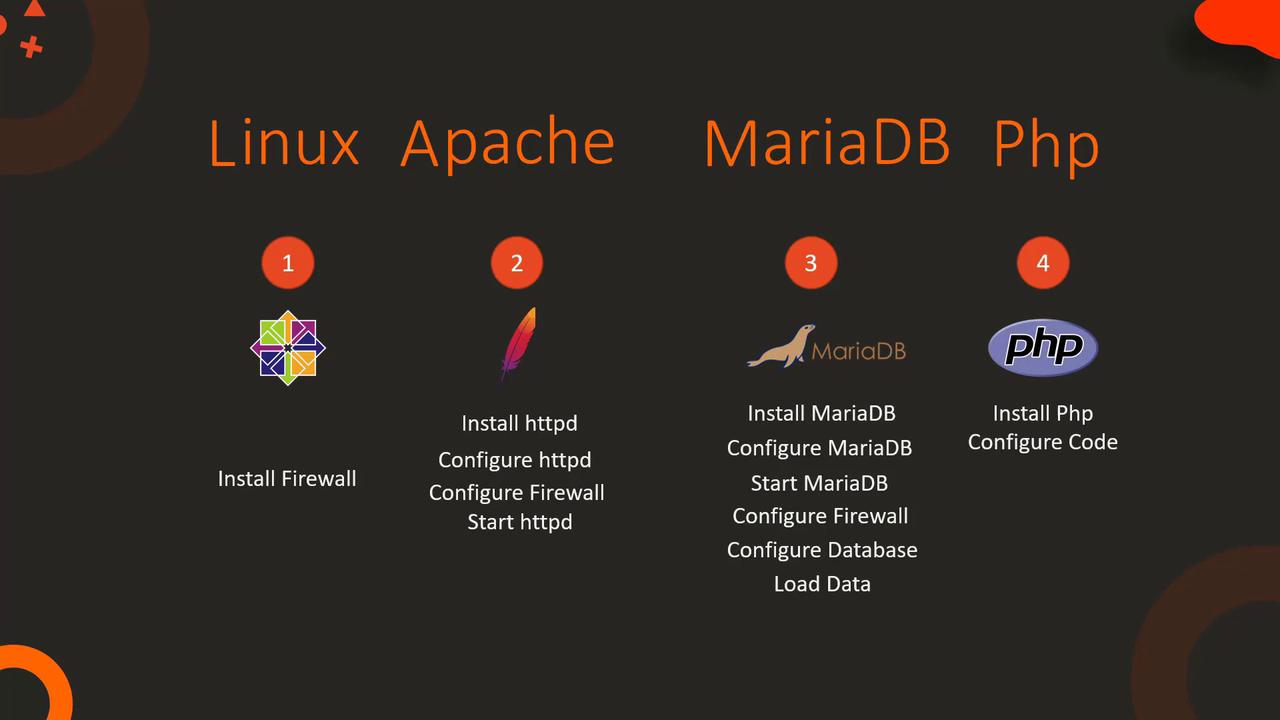
## Step 1: Firewall and Database Setup
Before installing application components, ensure all system prerequisites are met. Begin by setting up the firewall and configuring the MariaDB database:
1. Install and start the `firewalld` service.
2. Install and configure MariaDB by editing the `/etc/my.cnf` file for the correct port settings.
3. Start and enable the MariaDB service.
4. Add firewall rules to allow SQL access on port 3306.
5. Configure the database by creating the necessary user and database, then import inventory data.
6. Install Apache, PHP packages, and optionally Git to download the application code.
Below is the complete sequence of commands:
```bash theme={null}
$ sudo yum install firewalld
$ sudo service firewalld start
$ sudo systemctl enable firewalld
$ sudo yum install mariadb-server
$ sudo vi /etc/my.cnf # Configure the file with the correct port settings
$ sudo service mariadb start
$ sudo systemctl enable mariadb
$ sudo firewall-cmd --permanent --zone=public --add-port=3306/tcp
$ sudo firewall-cmd --reload
# Configure the database
$ mysql
MariaDB > CREATE DATABASE ecomdb;
MariaDB > CREATE USER 'ecomuser'@'localhost' IDENTIFIED BY 'ecompassword';
MariaDB > GRANT ALL PRIVILEGES ON *.* TO 'ecomuser'@'localhost';
MariaDB > FLUSH PRIVILEGES;
# Load inventory data
$ mysql < db-load-script.sql
```
Ensure that the `/etc/my.cnf` file is correctly updated with the appropriate port settings before starting MariaDB.
## Step 2: Apache and PHP Configuration
Next, configure Apache and PHP. This step involves the installation of necessary packages, updating Apache’s configuration to prioritize `index.php`, adjusting firewall rules for HTTP traffic, and cloning the application code from Git.
```bash theme={null}
$ sudo yum install -y httpd php php-mysql
$ sudo firewall-cmd --permanent --zone=public --add-port=80/tcp
$ sudo firewall-cmd --reload
$ sudo vi /etc/httpd/conf/httpd.conf
$ sudo service httpd start
$ sudo systemctl enable httpd
$ sudo yum install -y git
$ git clone https://github.com/.git /var/www/html/
$ curl http://localhost
```
This completes the deployment of the LAMP stack application on a single-node system.
## Multi-Node Deployment
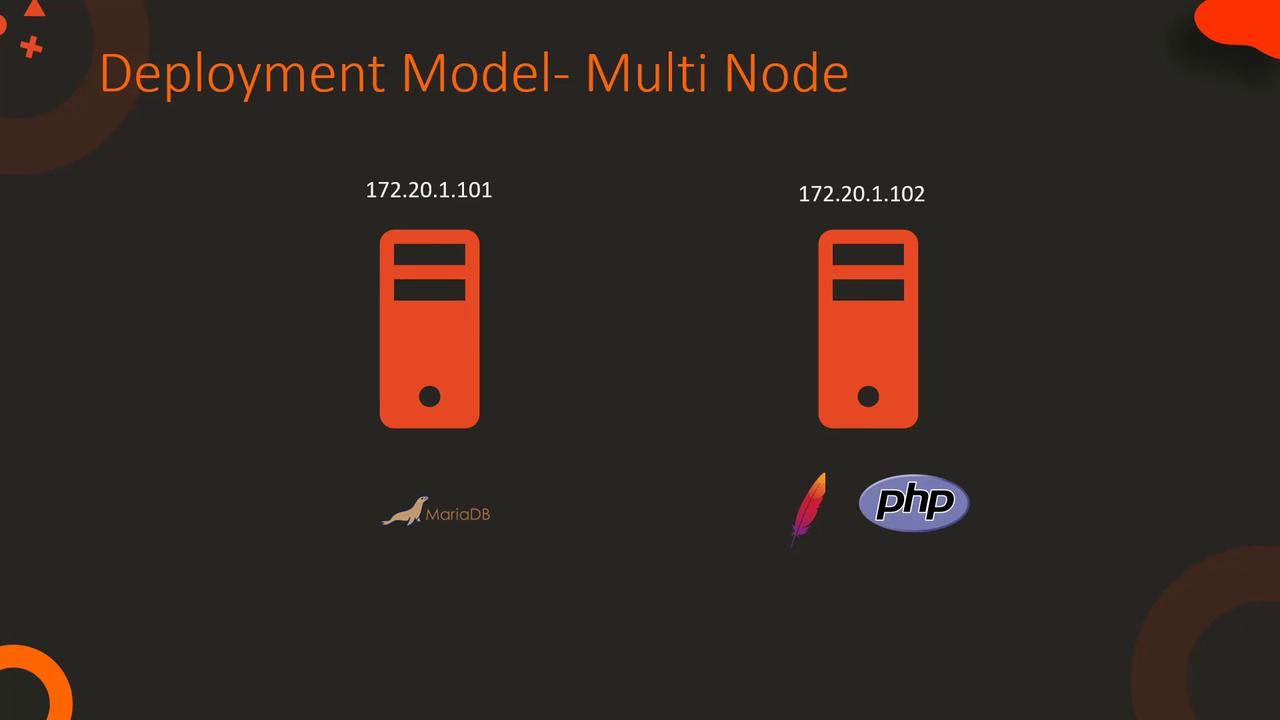
In a multi-node deployment scenario, the database and web server are hosted on separate nodes. The fundamental configuration steps remain the same, with an emphasis on connectivity settings. For example, when configuring the database, specify the web server's IP address for user access. Similarly, update the `index.php` file on the web server with the database server’s IP address.
### Configuring the Database for Multi-Node Setup
Execute the following commands to set up the database for a multi-node environment:
```sql theme={null}
$ mysql
MariaDB > CREATE DATABASE ecomdb;
MariaDB > CREATE USER 'ecomuser'@'172.20.1.102' IDENTIFIED BY 'ecompassword';
MariaDB > GRANT ALL PRIVILEGES ON *.* TO 'ecomuser'@'172.20.1.102';
MariaDB > FLUSH PRIVILEGES;
```
### Example PHP Code for Remote Database Connection
Below is a sample PHP code snippet that demonstrates how to connect to the remote database server:
```php theme={null}
$link = mysqli_connect('172.20.1.101', 'ecomuser', 'ecompassword');
if ($link) {
$res = mysqli_query($link, "SELECT * FROM products;");
while ($row = mysqli_fetch_assoc($res)) {
// Process each row as needed
}
}
```
## Detailed Example: index.php File
A crucial component of the application is the `index.php` file, which is responsible for establishing the database connection and rendering product information. In the following example, the connection to the MariaDB database is set up using the IP address, database name, user ID, and password:
```php theme={null}
$link = mysqli_connect('172.20.1.101', 'ecomuser', 'ecompassword', 'ecomdb');
if ($link) {
$res = mysqli_query($link, "SELECT * FROM products;");
while ($row = mysqli_fetch_assoc($res)) {
// Your code to display product information
}
}
```
For a live demonstration of product details rendering on the webpage, consider the expanded PHP snippet below:
```php theme={null}
$link = mysqli_connect('172.20.1.101', 'ecomuser', 'ecompassword', 'ecomdb');
if ($link) {
$res = mysqli_query($link, "SELECT * FROM products;");
while ($row = mysqli_fetch_assoc($res)) { ?>
'; ?>
Purchase at the lowest price $
Double-check the database credentials and IP addresses during configuration. Incorrect settings may lead to connection failures.
## Conclusion
After reviewing this setup and demonstration, proceed to your project labs to apply these configurations. Begin by setting up your project environment and ensure that each component operates correctly. This detailed guide has covered both single-node and multi-node deployment scenarios to match a range of real-world architectures.
For further reading, consider exploring the following resources:
* [Kubernetes Basics](https://kubernetes.io/docs/concepts/overview/what-is-kubernetes/)
* [Kubernetes Documentation](https://kubernetes.io/docs/)
* [Docker Hub](https://hub.docker.com/)
* [Terraform Registry](https://registry.terraform.io/)