> ## Documentation Index
> Fetch the complete documentation index at: https://notes.kodekloud.com/llms.txt
> Use this file to discover all available pages before exploring further.
# Sharding
> Explains database sharding, shard key strategies, hot shard and resharding problems, and solutions like consistent hashing plus tradeoffs and operational considerations
We added two replicas of our database and solved our read-scaling problem: reads are now distributed across three copies of the data. If the primary holds 1 TB, each replica also holds the same 1 TB. But what happens when we reach fifty million users and they upload billions of photos, comments, and likes? Eventually the dataset outgrows a single database machine.
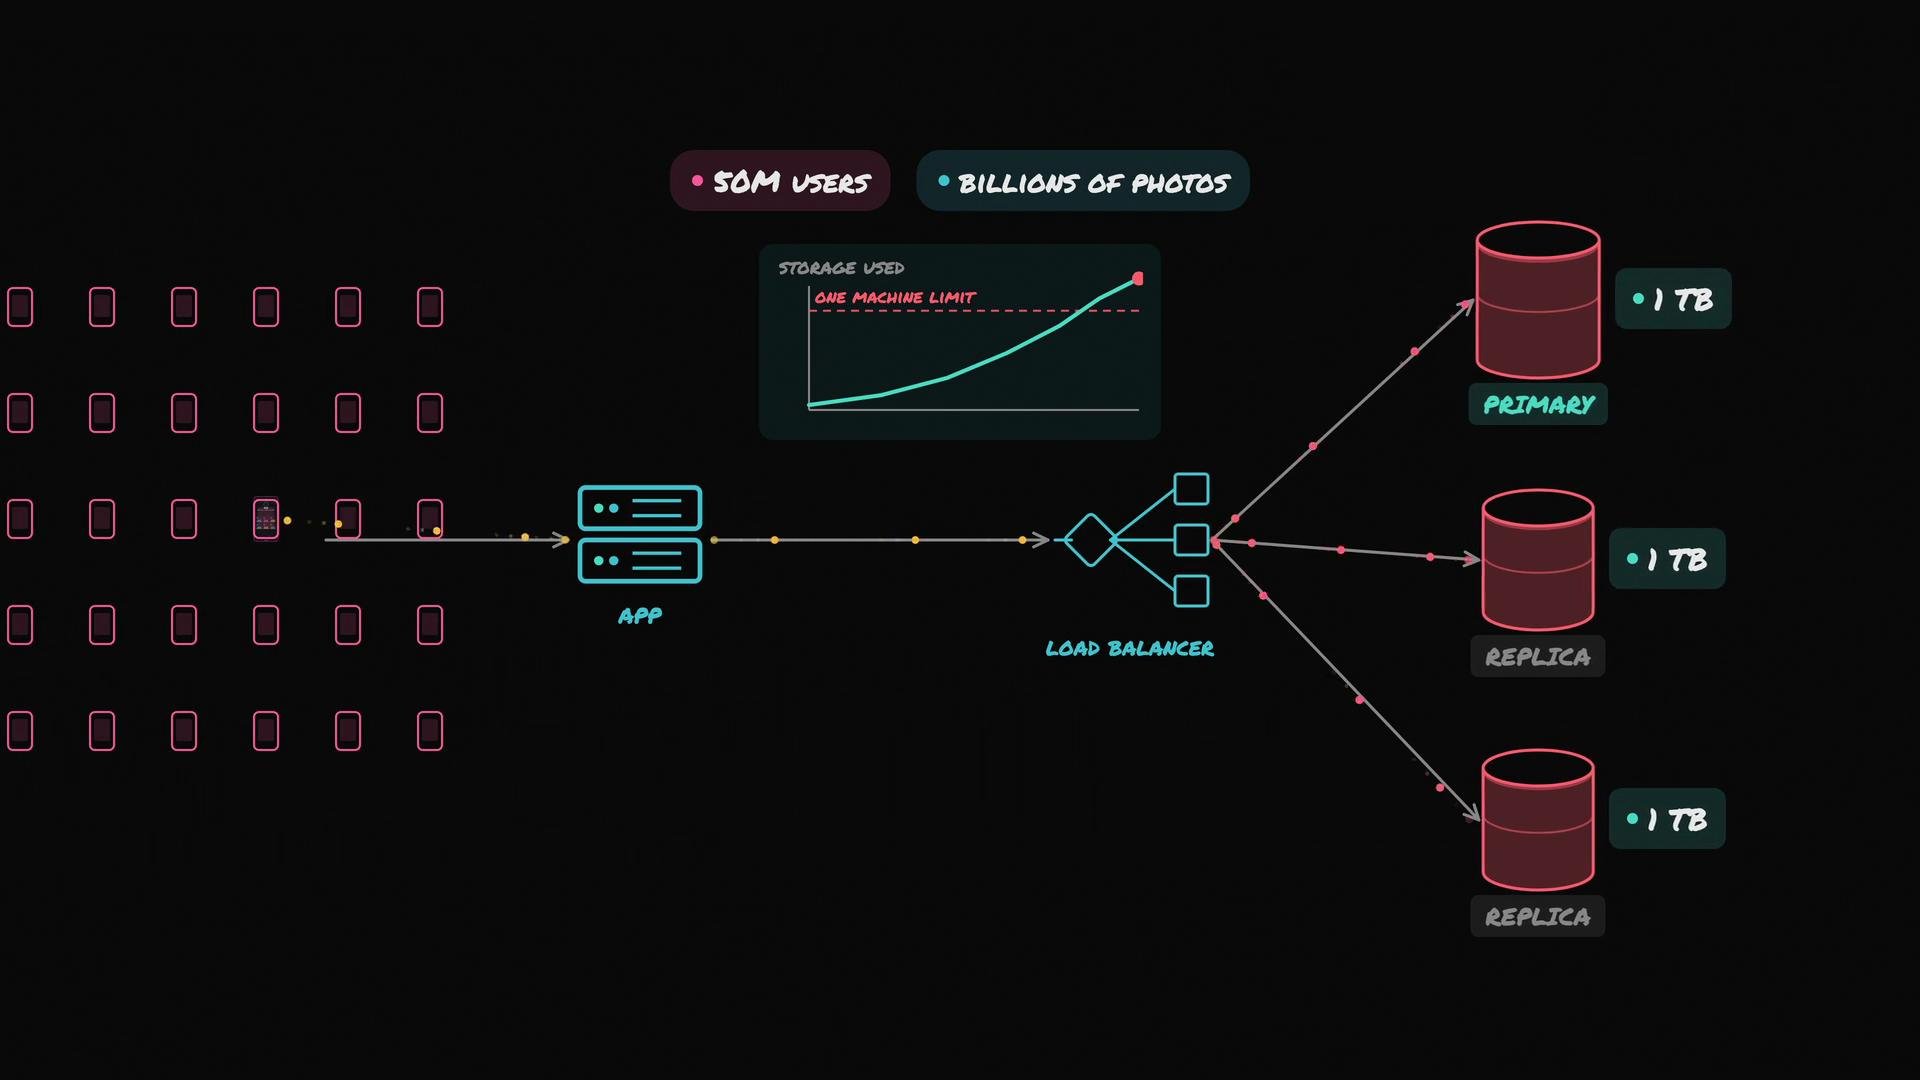 Replicas improve read throughput and availability, but they do not increase total storage capacity because each replica holds an identical copy. When data volume exceeds a single machine’s limits, we must partition the data across multiple database machines — this is sharding.
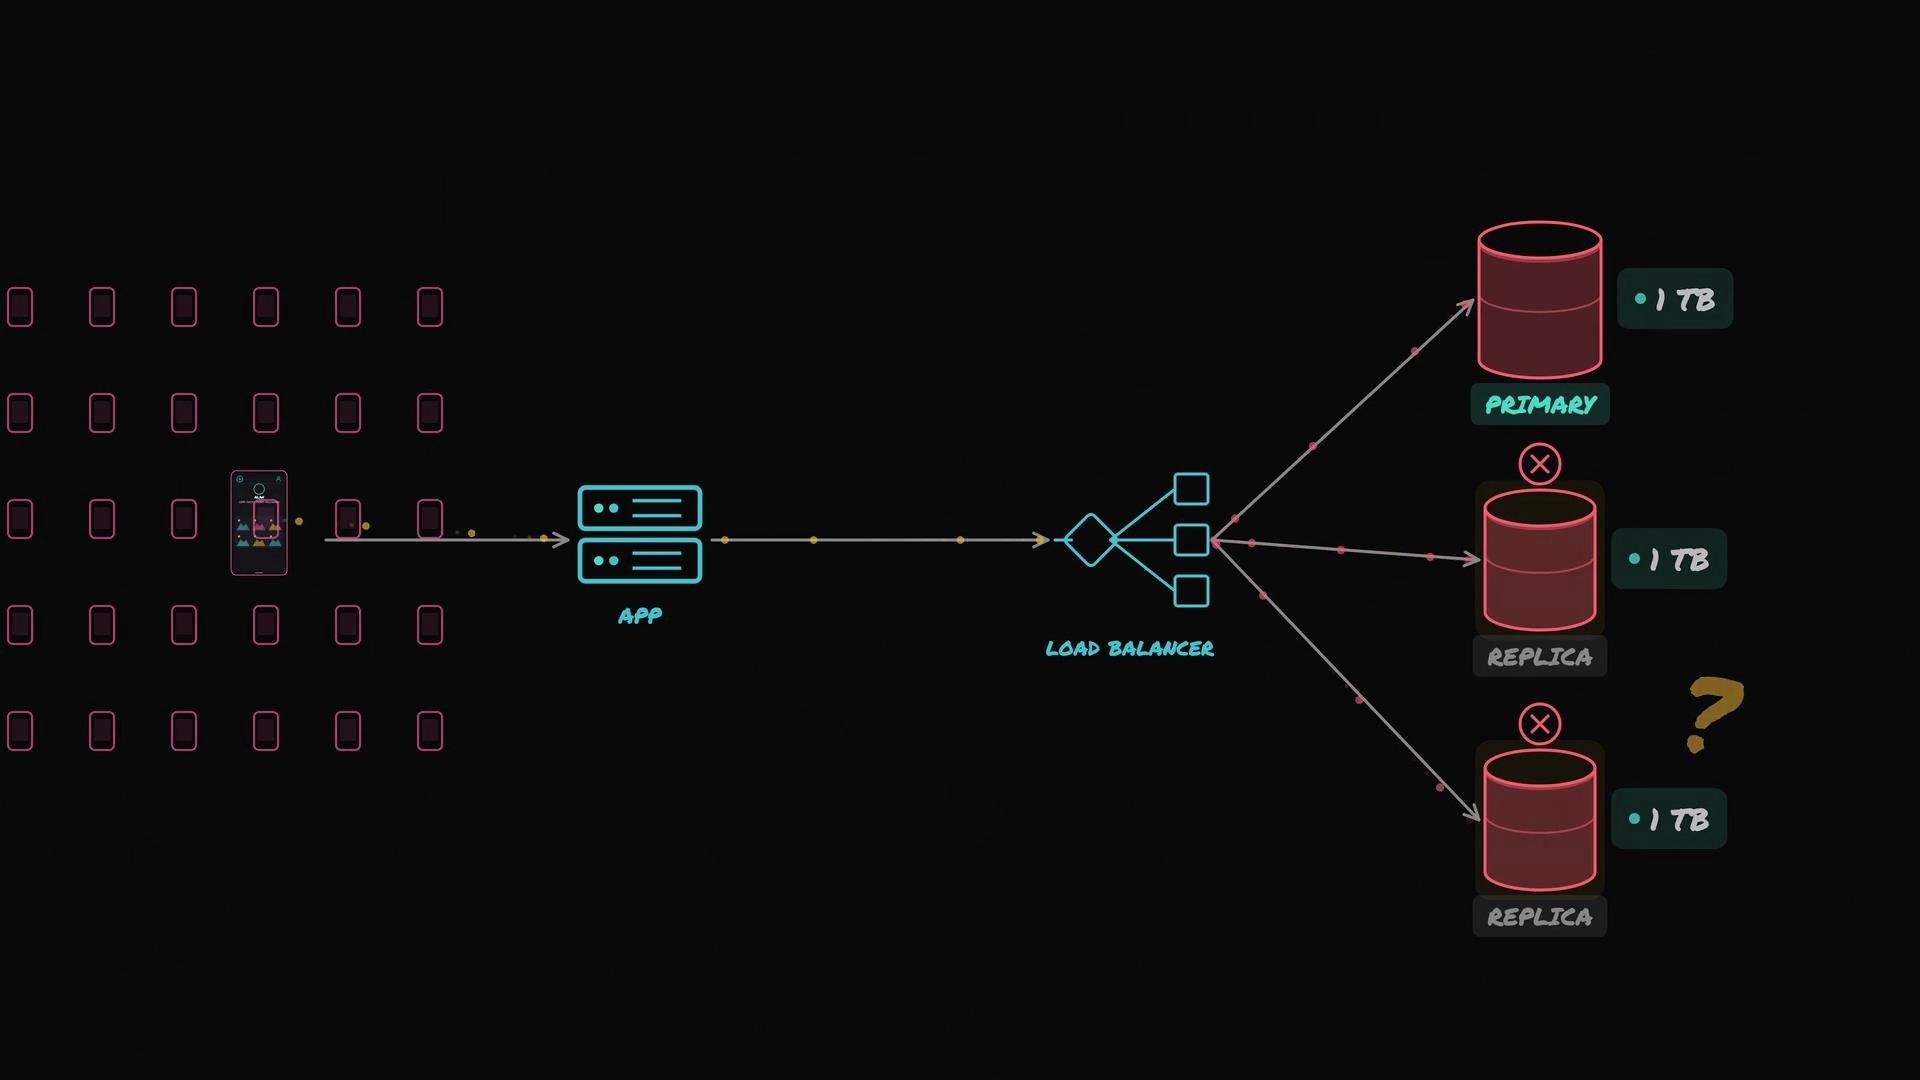 Sharding splits the dataset so each database server (a shard) holds a subset of the data. For example, with fifty million users we might use four shards: shard 0, shard 1, shard 2, and shard 3. No single shard holds the entire dataset; together the shards store everything. When capacity is reached, we add another shard.
A core question emerges: given a specific record (for example, user "Alan"), how do we deterministically find which shard stores that record? We need a fast mapping rule — the shard key — so we don’t search every shard.
Sharding splits the dataset so each database server (a shard) holds a subset of the data. For example, with fifty million users we might use four shards: shard 0, shard 1, shard 2, and shard 3. No single shard holds the entire dataset; together the shards store everything. When capacity is reached, we add another shard.
A core question emerges: given a specific record (for example, user "Alan"), how do we deterministically find which shard stores that record? We need a fast mapping rule — the shard key — so we don’t search every shard.
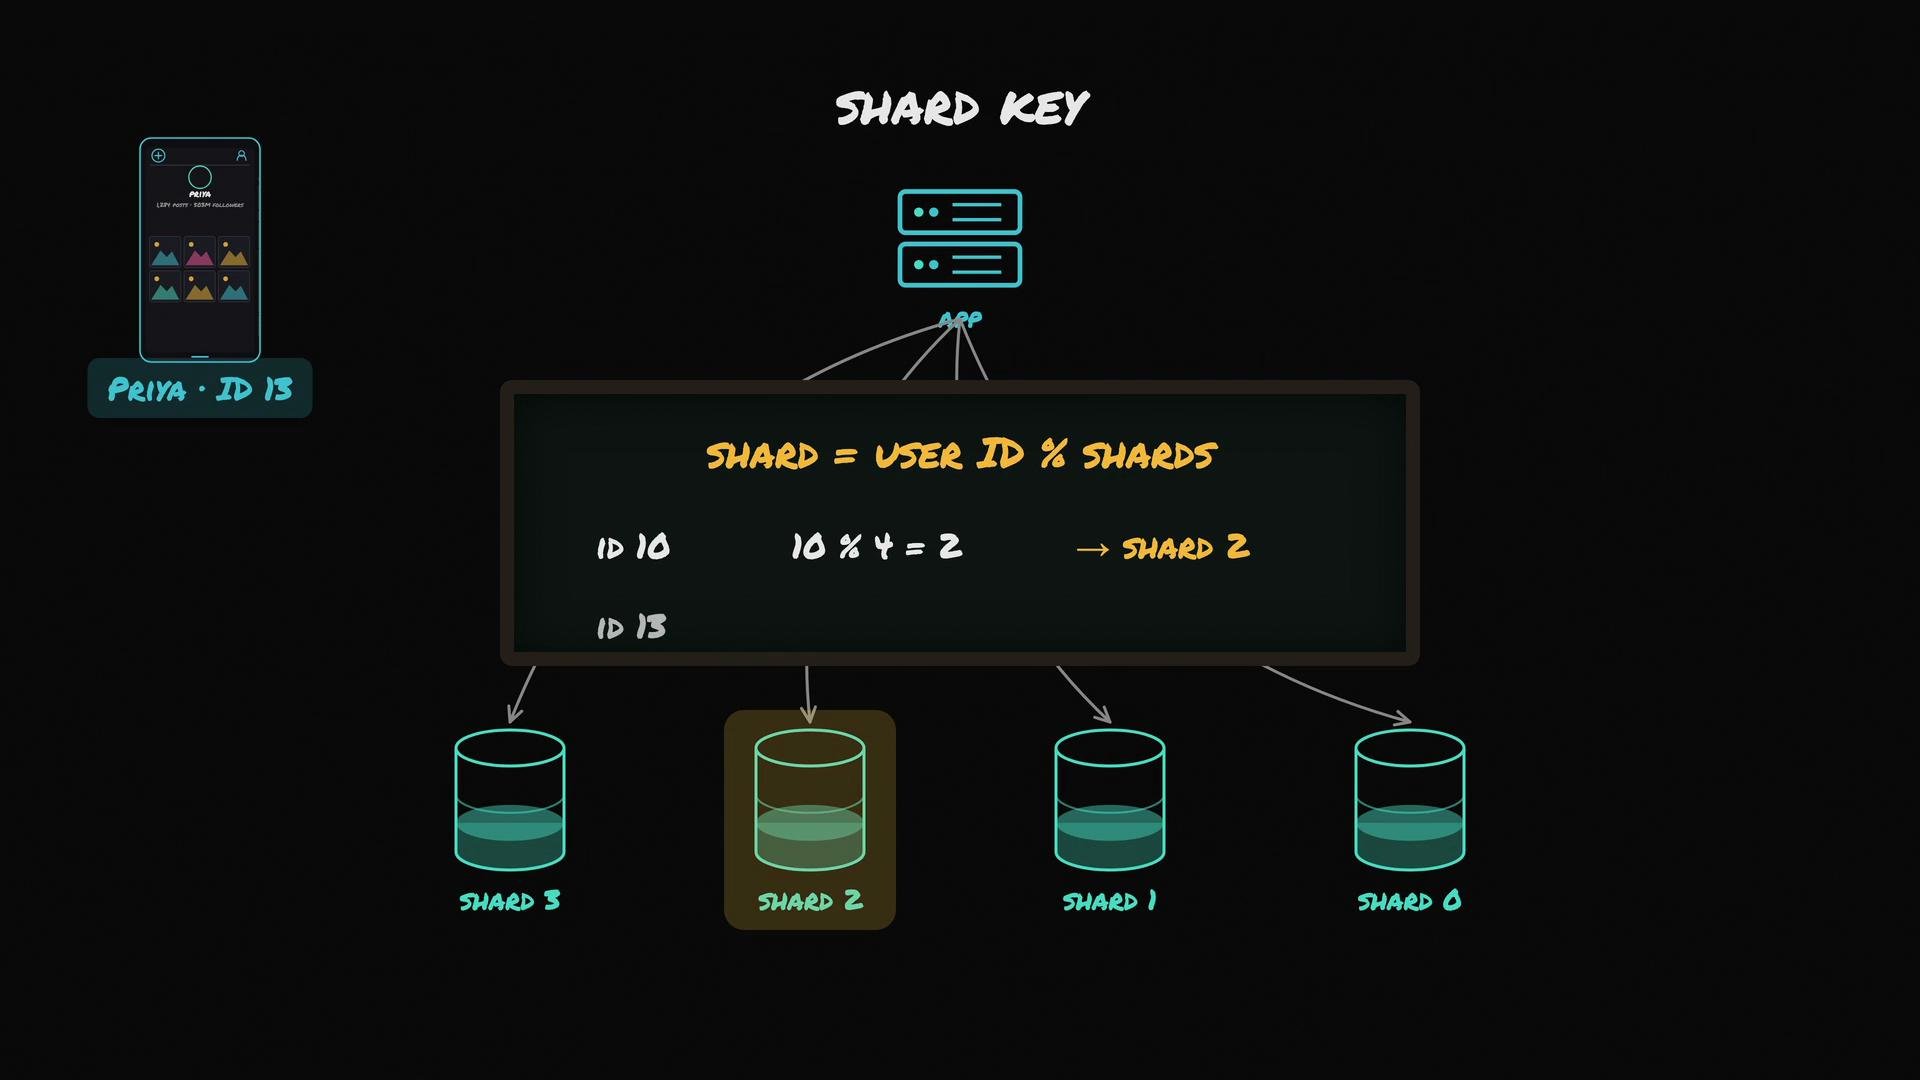
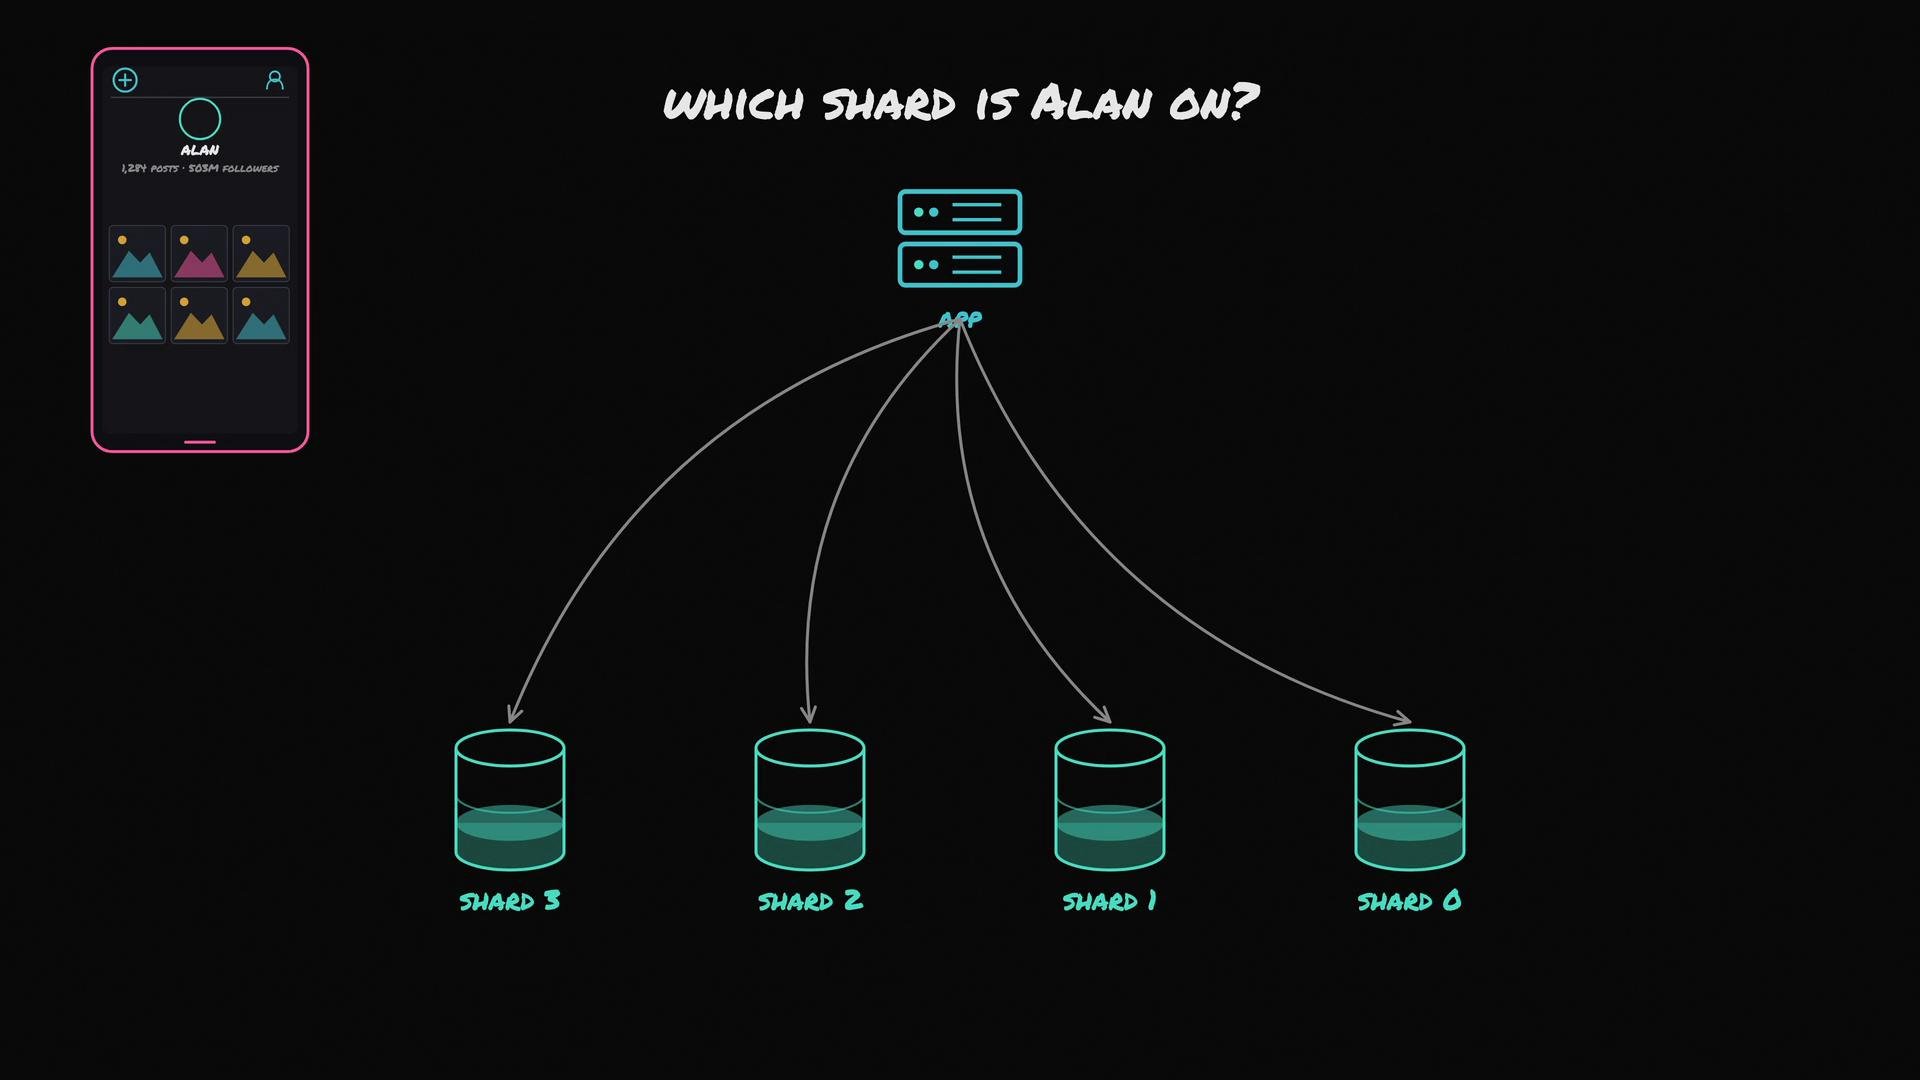 A common shard key for a photo app is `user_id`, since every user has a unique ID. A simple and fast sharding rule uses modulus division:
```text theme={null}
shard = user_id % number_of_shards
```
Examples:
* Alan’s ID = 10 → `10 % 4 = 2` → Alan stored on shard 2
* Another user ID = 13 → `13 % 4 = 1` → that user stored on shard 1
This calculation is cheap and can be performed by any application server.
A common shard key for a photo app is `user_id`, since every user has a unique ID. A simple and fast sharding rule uses modulus division:
```text theme={null}
shard = user_id % number_of_shards
```
Examples:
* Alan’s ID = 10 → `10 % 4 = 2` → Alan stored on shard 2
* Another user ID = 13 → `13 % 4 = 1` → that user stored on shard 1
This calculation is cheap and can be performed by any application server.
 Two important issues to consider with sharding:
1. Hot shards\
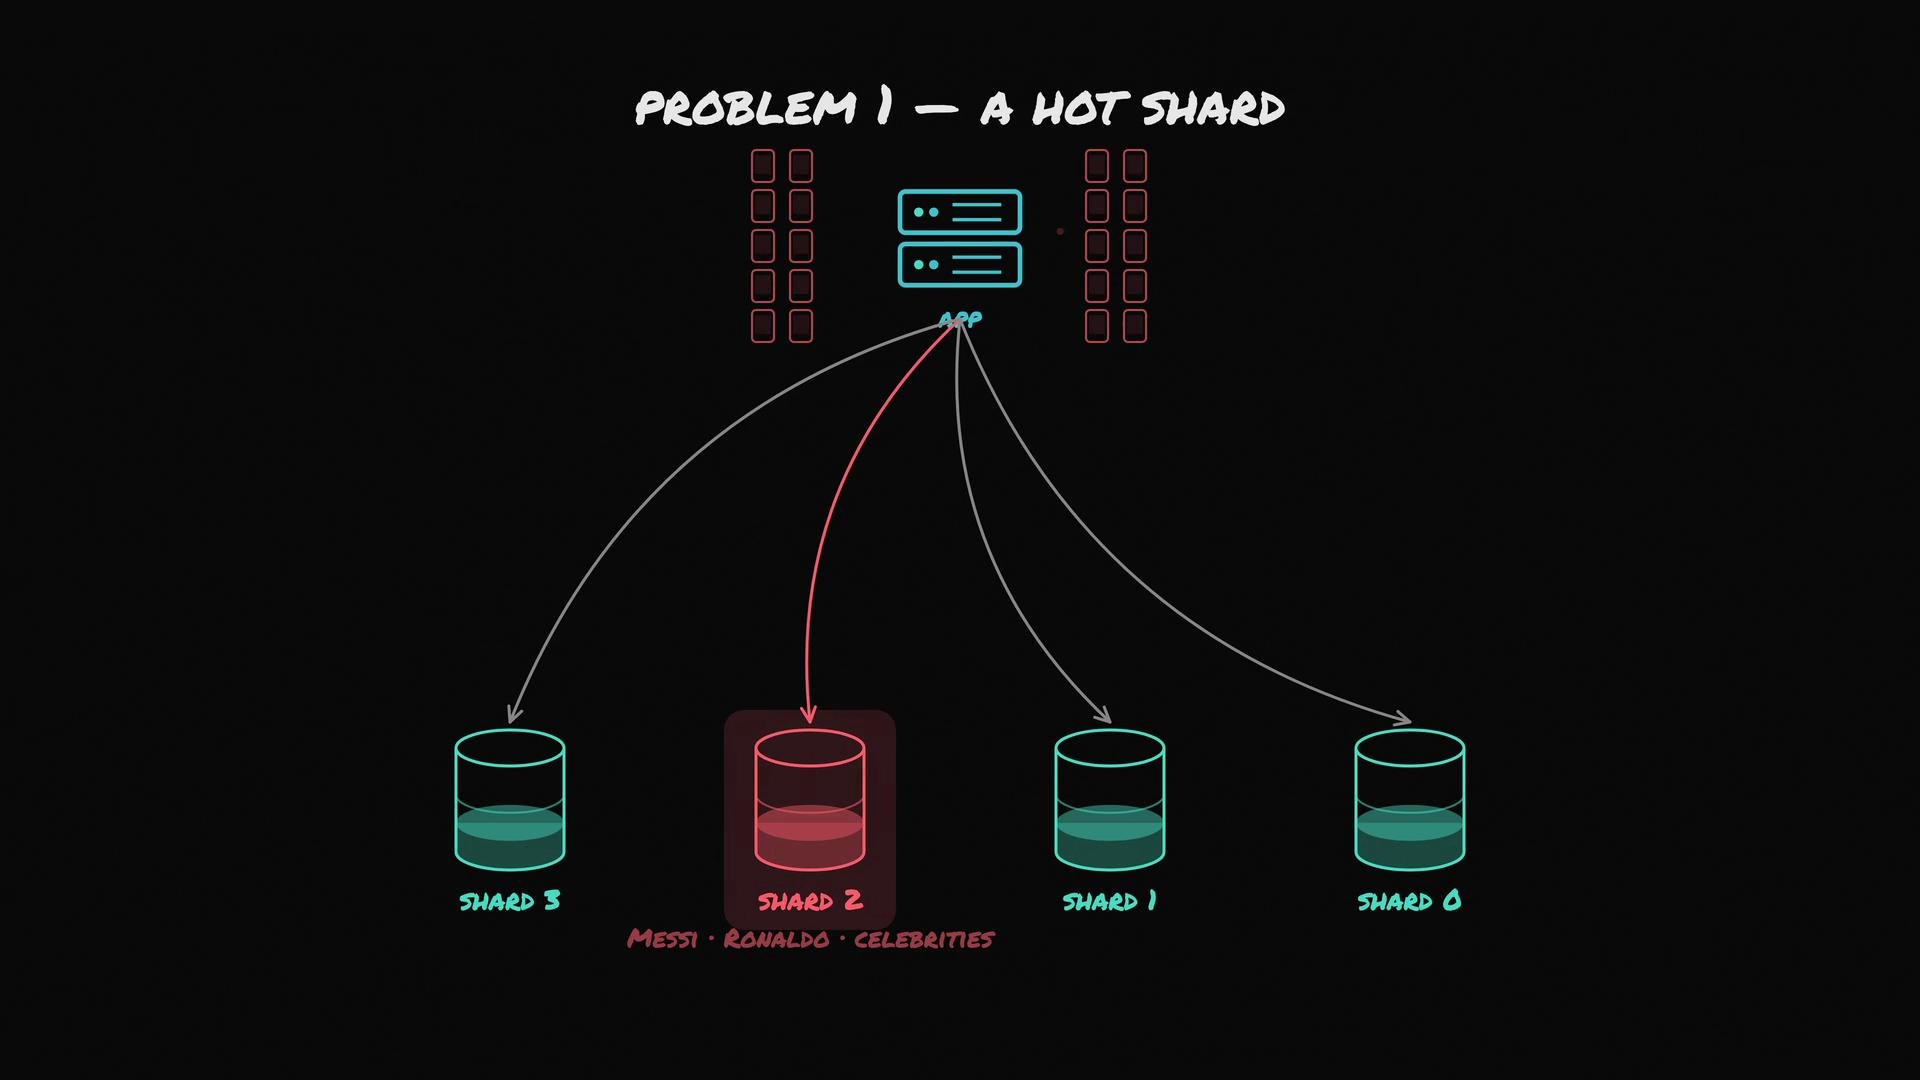
By unlucky distribution, many high-traffic users (e.g., celebrities) could be mapped to the same shard. If millions of users view those celebrity profiles, that shard becomes overloaded while others remain underutilized. Mitigations include choosing a shard key or hashing strategy that evens out access patterns, adding capacity, or using virtual nodes to spread load across physical machines.
Two important issues to consider with sharding:
1. Hot shards\
By unlucky distribution, many high-traffic users (e.g., celebrities) could be mapped to the same shard. If millions of users view those celebrity profiles, that shard becomes overloaded while others remain underutilized. Mitigations include choosing a shard key or hashing strategy that evens out access patterns, adding capacity, or using virtual nodes to spread load across physical machines.
 2. Resharding (rebalancing) pain with naive modulus sharding\
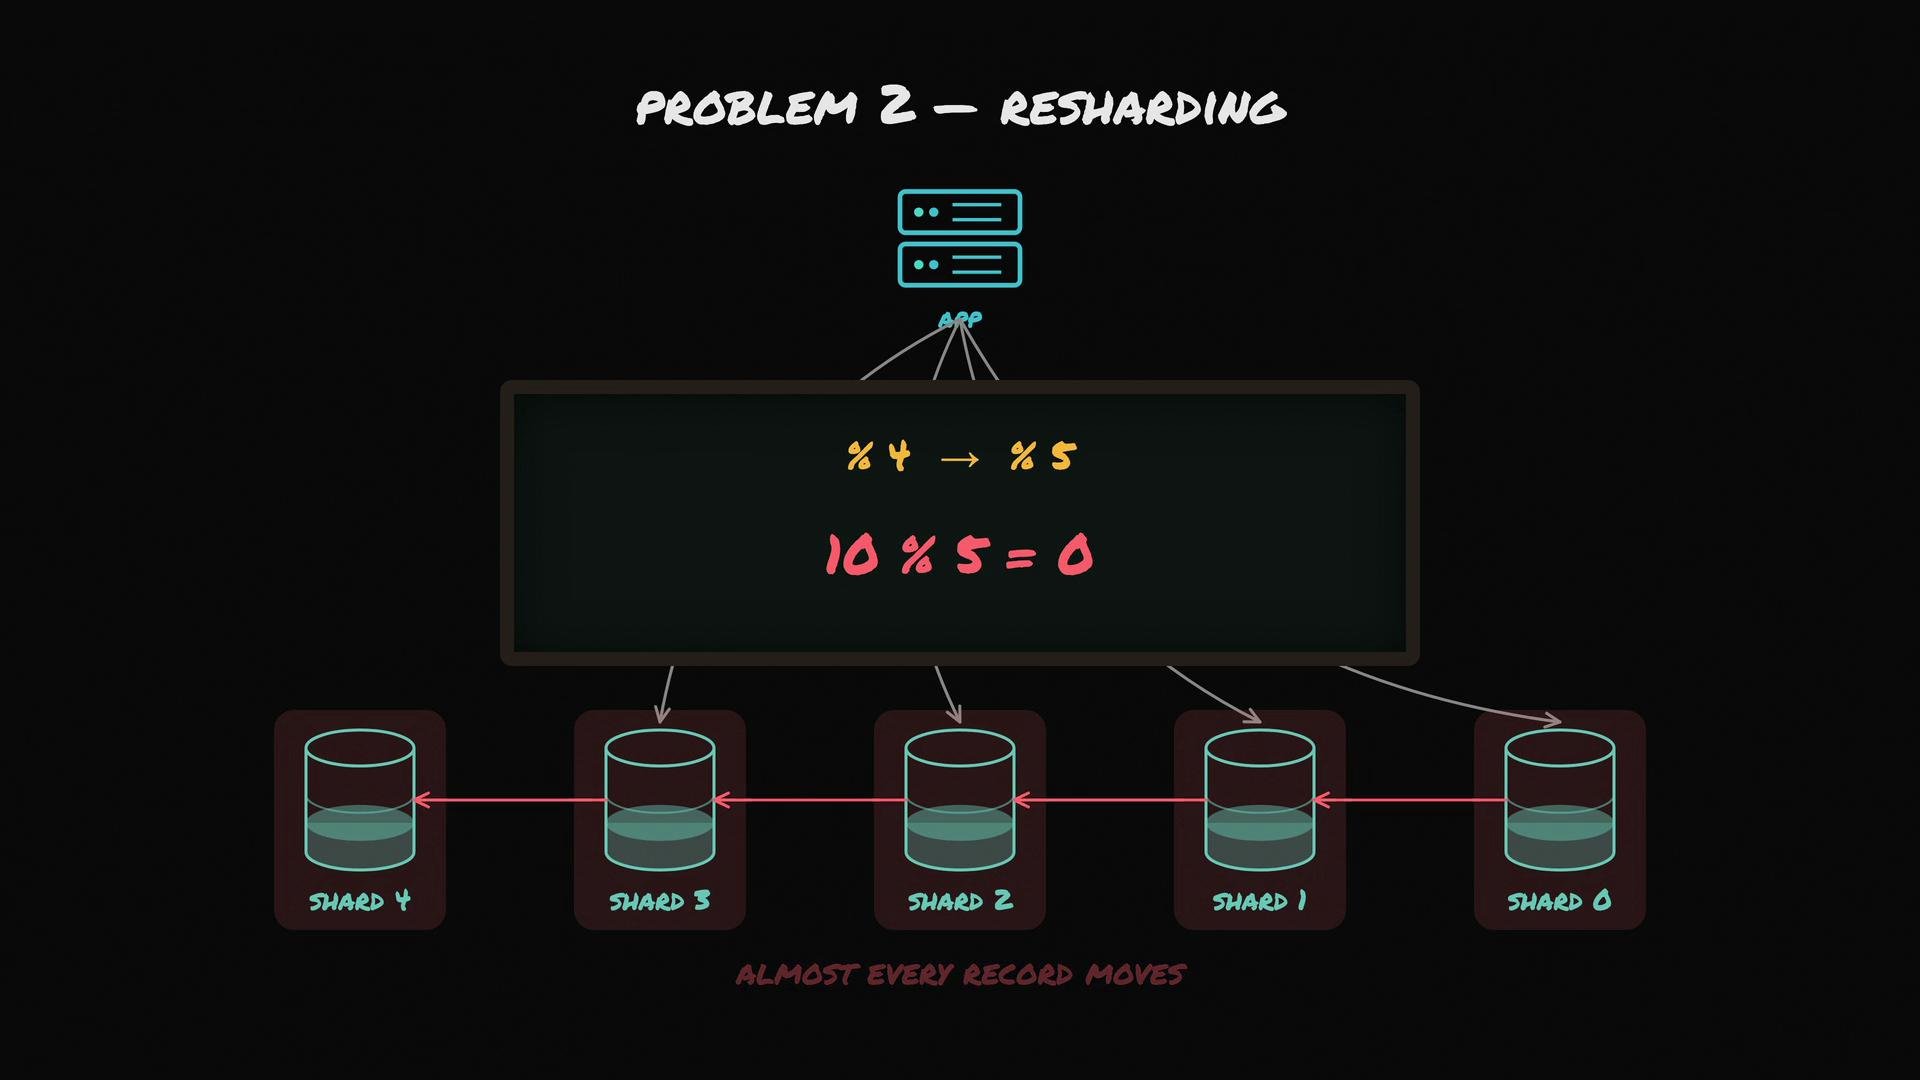
With modulus-based sharding, the mapping depends on the total number of shards. Changing the shard count (for example from 4 to 5) will change the remainder for almost every `user_id`. Alan moves from shard 2 to shard 0 (`10 % 4 = 2` → `10 % 5 = 0`), which implies massive data movement across nodes — costly and disruptive.
2. Resharding (rebalancing) pain with naive modulus sharding\
With modulus-based sharding, the mapping depends on the total number of shards. Changing the shard count (for example from 4 to 5) will change the remainder for almost every `user_id`. Alan moves from shard 2 to shard 0 (`10 % 4 = 2` → `10 % 5 = 0`), which implies massive data movement across nodes — costly and disruptive.
 Industry solution: consistent hashing\
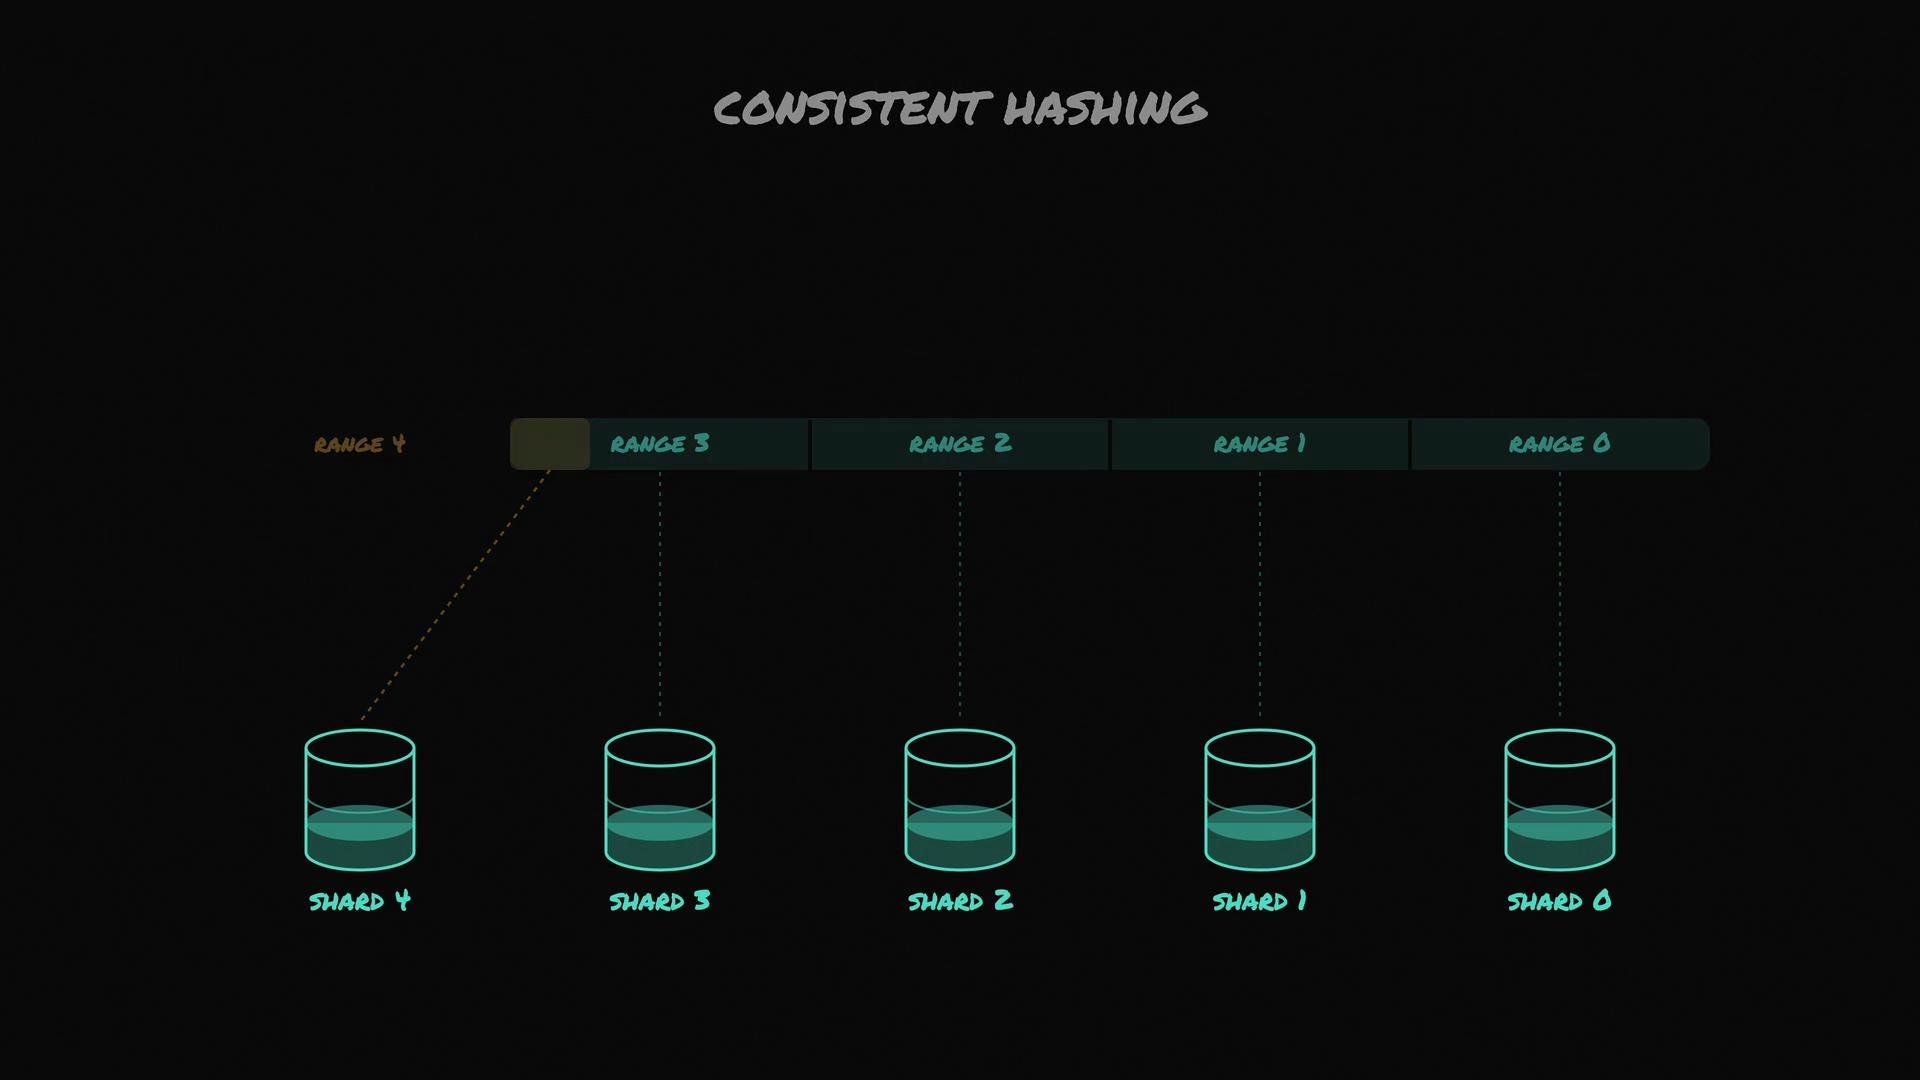
Consistent hashing maps both data keys and shard nodes onto a circular hash space (a hash ring). Each key is assigned to the first node encountered clockwise from the key’s hash. When a new shard joins, it only takes responsibility for a small range of keys (typically between its predecessor and itself), so most keys remain on their original shard. Using virtual nodes (multiple positions per physical node) smooths distribution and helps avoid hot spots.
Industry solution: consistent hashing\
Consistent hashing maps both data keys and shard nodes onto a circular hash space (a hash ring). Each key is assigned to the first node encountered clockwise from the key’s hash. When a new shard joins, it only takes responsibility for a small range of keys (typically between its predecessor and itself), so most keys remain on their original shard. Using virtual nodes (multiple positions per physical node) smooths distribution and helps avoid hot spots.
 Comparison of common sharding strategies
| Strategy | How it maps keys to shards | Pros | Cons |
| ------------------ | ------------------------------------------------------ | -------------------------------------------------------------------------- | ------------------------------------------------------------------------ |
| Modulus (hash % N) | `key % number_of_shards` | Simple, fast, easy to implement | Resharding moves most keys when N changes |
| Range-based | Keys split by value ranges (e.g., user IDs 0-1M) | Efficient range queries | Uneven distribution if data is skewed; hot shards possible |
| Consistent hashing | Key and nodes on hash ring; key -> next node clockwise | Minimal data movement on resharding; smooth rebalancing with virtual nodes | More complex to implement; needs good hashing and node management |
| Directory-based | Central mapping service records where each key lives | Flexible and supports arbitrary mapping | Single point of failure / lookup overhead; scaling the directory is hard |
Practical reminders
* Choose the shard key to align with your most frequent access patterns: storage balance, query efficiency, and joinability are all impacted.
* Sharding complicates cross-shard joins and multi-shard transactions. These require application-level coordination, two-phase commits, or compensating logic.
* Avoid premature sharding. Introduce sharding when a single machine can no longer handle your storage or throughput needs — sharding is difficult to undo.
Choose a shard key that matches your dominant access patterns. A poor shard key can create hot shards, hurt performance, and make queries or transactions inefficient.
Sharding adds operational complexity: monitor load distribution, plan for rebalancing, and test how your application handles partial failures and cross-shard operations.
Many modern databases provide built-in sharding and rebalancing support (for example, MongoDB, Cassandra, DynamoDB), which simplify deployment and maintenance. Regardless of the tooling you choose, sharding is a tradeoff: it increases scalability and capacity at the cost of added system complexity.
Links and references
* [MongoDB Sharding](https://www.mongodb.com/docs/manual/sharding/)
* [Apache Cassandra Documentation](https://cassandra.apache.org/doc/latest/)
* [Amazon DynamoDB Introduction](https://docs.aws.amazon.com/amazondynamodb/latest/developerguide/Introduction.html)
Comparison of common sharding strategies
| Strategy | How it maps keys to shards | Pros | Cons |
| ------------------ | ------------------------------------------------------ | -------------------------------------------------------------------------- | ------------------------------------------------------------------------ |
| Modulus (hash % N) | `key % number_of_shards` | Simple, fast, easy to implement | Resharding moves most keys when N changes |
| Range-based | Keys split by value ranges (e.g., user IDs 0-1M) | Efficient range queries | Uneven distribution if data is skewed; hot shards possible |
| Consistent hashing | Key and nodes on hash ring; key -> next node clockwise | Minimal data movement on resharding; smooth rebalancing with virtual nodes | More complex to implement; needs good hashing and node management |
| Directory-based | Central mapping service records where each key lives | Flexible and supports arbitrary mapping | Single point of failure / lookup overhead; scaling the directory is hard |
Practical reminders
* Choose the shard key to align with your most frequent access patterns: storage balance, query efficiency, and joinability are all impacted.
* Sharding complicates cross-shard joins and multi-shard transactions. These require application-level coordination, two-phase commits, or compensating logic.
* Avoid premature sharding. Introduce sharding when a single machine can no longer handle your storage or throughput needs — sharding is difficult to undo.
Choose a shard key that matches your dominant access patterns. A poor shard key can create hot shards, hurt performance, and make queries or transactions inefficient.
Sharding adds operational complexity: monitor load distribution, plan for rebalancing, and test how your application handles partial failures and cross-shard operations.
Many modern databases provide built-in sharding and rebalancing support (for example, MongoDB, Cassandra, DynamoDB), which simplify deployment and maintenance. Regardless of the tooling you choose, sharding is a tradeoff: it increases scalability and capacity at the cost of added system complexity.
Links and references
* [MongoDB Sharding](https://www.mongodb.com/docs/manual/sharding/)
* [Apache Cassandra Documentation](https://cassandra.apache.org/doc/latest/)
* [Amazon DynamoDB Introduction](https://docs.aws.amazon.com/amazondynamodb/latest/developerguide/Introduction.html)