> ## Documentation Index
> Fetch the complete documentation index at: https://notes.kodekloud.com/llms.txt
> Use this file to discover all available pages before exploring further.
# Telepresence Intercept
> Guide to creating and managing Telepresence intercepts that route Kubernetes service traffic to local processes for developing and debugging while preserving cluster services and using namespaces for isolation
This guide explains how to create and manage Telepresence intercepts to route traffic from a Kubernetes service to a process running on your local machine. Intercepts let you develop and debug services locally while other components remain deployed in the cluster.
Prerequisites:
* Telepresence Traffic Manager installed in the cluster.
* A running `telepresence connect` session from your laptop or local machine to the cluster.
You must run `telepresence connect` before creating any intercepts. Without an active connection, intercept commands will fail.
## How intercepts work (high level)
When you create an intercept for a deployment, Telepresence injects a traffic-agent (sidecar) into the target pod. That sidecar instructs the cluster to route requests destined for the service's port to your local machine. Service discovery and other cluster services continue to operate normally; Telepresence proxies the traffic from the cluster to the local process you specify.
Key concepts:
* traffic-agent (sidecar): a small proxy injected into the intercepted pod to reroute service traffic.
* Destination: the local address (e.g., `127.0.0.1:8000`) where cluster requests are forwarded.
* Intercept scope: you can intercept per Deployment/Workload and per service port.
## Create an intercept
The basic syntax maps a remote service port to a local port:
```bash theme={null}
telepresence intercept --port :
```
Example: intercept the `products-depl` deployment (service port `3000`) and forward it to port `8000` on your laptop:
```bash theme={null}
telepresence intercept products-depl --port 8000:3000
```
Tips:
* If the service exposes only a single port, Telepresence can often infer the service port; specifying it is optional.
* Format is `--port :`. You may reuse the same number for both sides, e.g. `3000:3000`.
* Intercepts create a traffic-agent sidecar in the intercepted pod to apply routing; the workload remains otherwise unchanged.
Common intercept commands:
| Action | Command |
| - | - |
| Create an intercept | `telepresence intercept products-depl --port 8000:3000` |
| List active intercepts | `telepresence list` |
| Remove an intercept | `telepresence leave ` |
## Example intercept output
When an intercept is successfully established, Telepresence prints details like the example below:
```text theme={null}
Using Deployment products-depl
Intercept name : products-depl
State : ACTIVE
Workload kind : Deployment
Destination : 127.0.0.1:8000
Service Port Identifier : 3000/TCP
Volume Mount Point : /tmp/telfs-1147625726
Intercepting : all TCP connections
```
Important fields:
| Field | Meaning |
| - | - |
| `State` | Should be `ACTIVE` when the intercept is working. |
| `Destination` | Local address where Telepresence forwards cluster traffic, e.g. `127.0.0.1:8000`. |
| `Service Port Identifier` | The port/protocol on the service in the cluster, e.g. `3000/TCP`. |
| `Intercept name` | Name of the intercept (often matches the deployment). |
## List active intercepts
To view current intercepts and their status:
```bash theme={null}
telepresence list
```
This shows active intercepts, their destination addresses, and the current state.
## Multiple intercepts and performance considerations
You can create multiple intercepts simultaneously. Example:
```bash theme={null}
telepresence intercept products-depl --port 8000:3000
telepresence intercept inventory-depl --port 9000:3000
```
Considerations when using multiple intercepts:
* Local port collisions: pick unique local ports — two processes cannot listen on the same port.
* Extra cluster hops: when an intercepted service calls another intercepted service, traffic may traverse the cluster twice:
1. Request enters cluster and is routed to `products` (intercepted to your laptop).
2. Your local `products` calls `inventory` using cluster DNS.
3. The call goes into the cluster and then is proxied back to your local `inventory` intercept.
* Latency: these extra hops can add latency. Telepresence does not automatically rewrite service discovery to force direct local-to-local calls; any DNS/hosts rewrites or local stubs must be managed by you.
If you need multiple services to talk directly on your machine during development, you'll typically need to adjust local host resolution or run a local stub that emulates the needed services. Telepresence will not automatically make intercepted services talk directly to other local processes.
## Collaboration and isolation
Intercepted traffic can be affected by other developers if they target the same service in the same namespace. To avoid confusion or accidental cross-traffic, use per-developer namespaces or personal deployments.
Benefits of using separate namespaces:
* Isolation of intercepts: your intercepts only affect workloads in your namespace.
* Reduced accidental interference between developers.
* Easier cleanup and targeted testing.
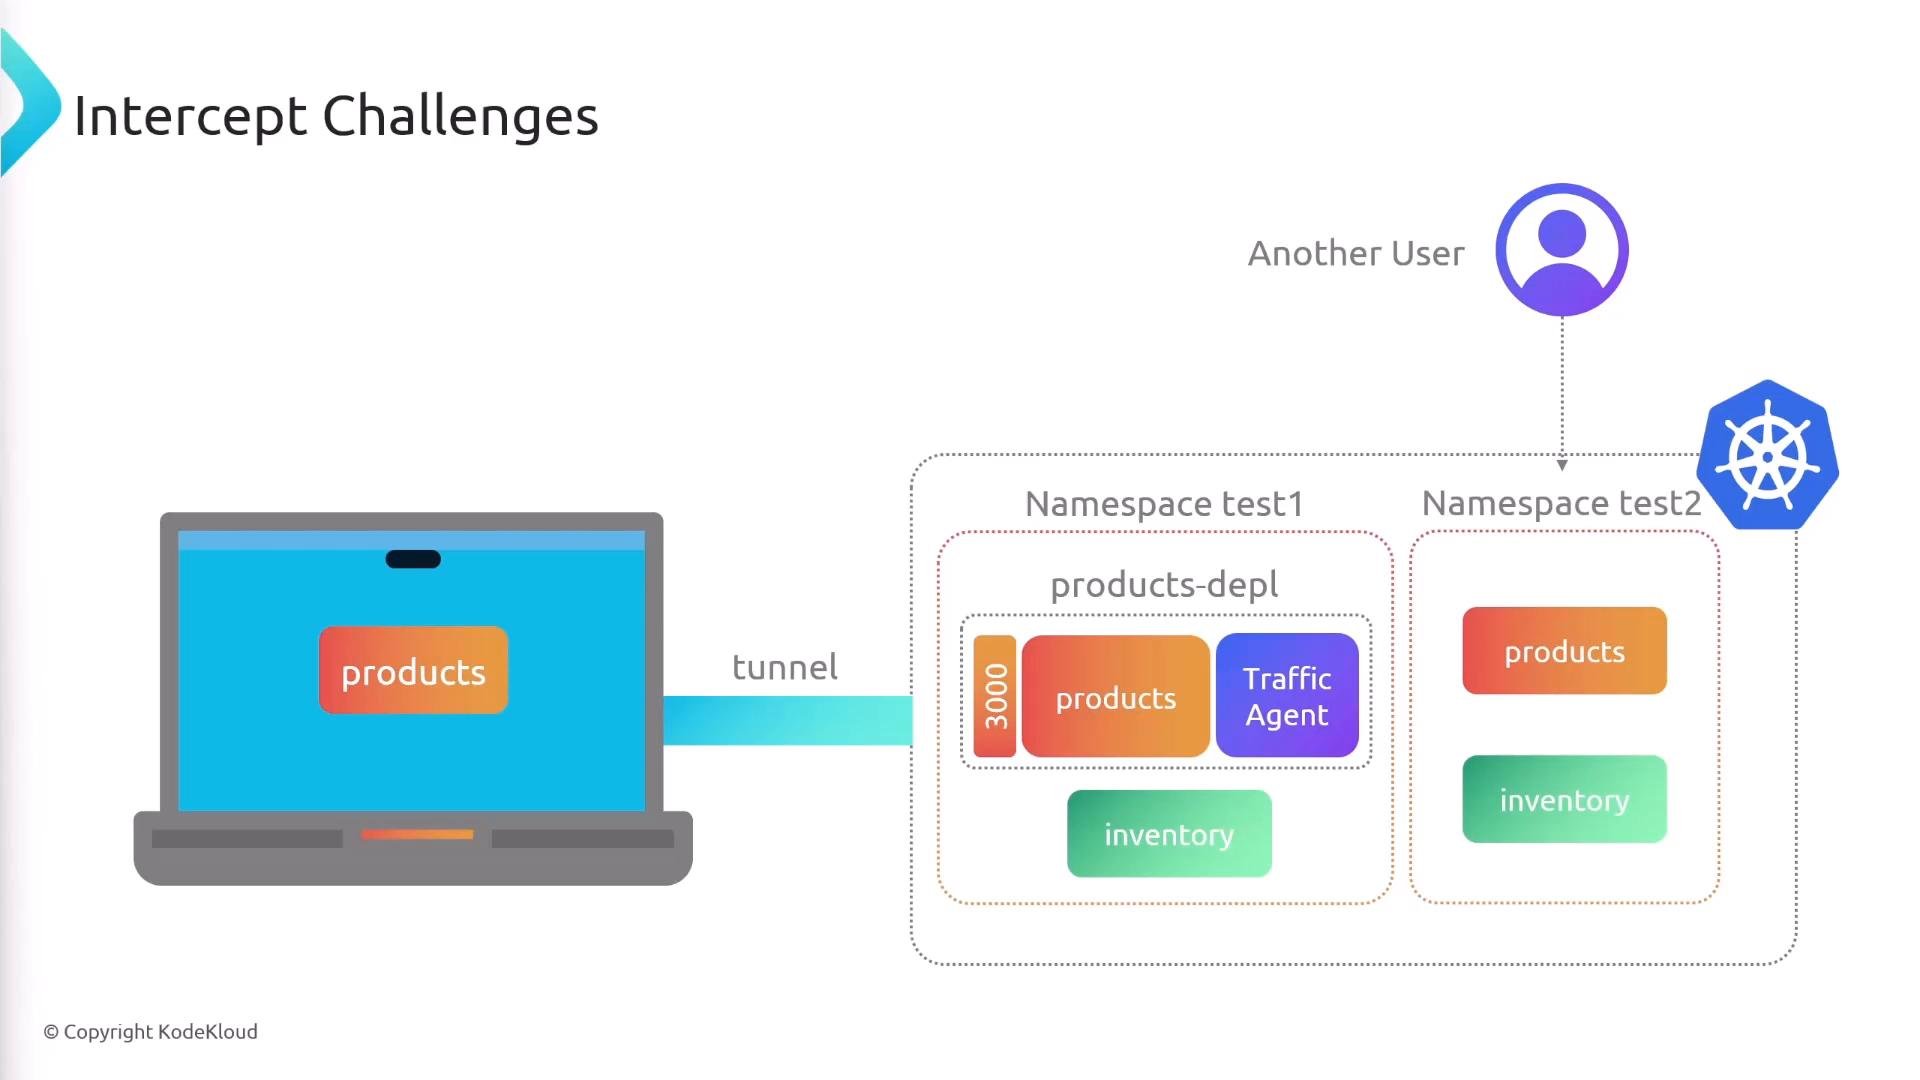 By scoping work to namespaces, each developer can intercept services in their own namespace without affecting others.
## Summary
* Start with `telepresence connect`.
* Create an intercept with `telepresence intercept --port :` to forward cluster traffic to a local process.
* Inspect active intercepts with `telepresence list`.
* Multiple intercepts are supported but can introduce extra cluster hops and latency.
* Use per-developer namespaces to reduce cross-traffic and accidental interference.
## Links and references
* Telepresence documentation: [https://www.telepresence.io/docs/](https://www.telepresence.io/docs/)
* Kubernetes concepts: [https://kubernetes.io/docs/concepts/overview/what-is-kubernetes/](https://kubernetes.io/docs/concepts/overview/what-is-kubernetes/)
* Telepresence GitHub: [https://github.com/telepresenceio/telepresence](https://github.com/telepresenceio/telepresence)
This documentation is built and hosted on [Mintlify](https://mintlify.com), a developer documentation platform.
By scoping work to namespaces, each developer can intercept services in their own namespace without affecting others.
## Summary
* Start with `telepresence connect`.
* Create an intercept with `telepresence intercept --port :` to forward cluster traffic to a local process.
* Inspect active intercepts with `telepresence list`.
* Multiple intercepts are supported but can introduce extra cluster hops and latency.
* Use per-developer namespaces to reduce cross-traffic and accidental interference.
## Links and references
* Telepresence documentation: [https://www.telepresence.io/docs/](https://www.telepresence.io/docs/)
* Kubernetes concepts: [https://kubernetes.io/docs/concepts/overview/what-is-kubernetes/](https://kubernetes.io/docs/concepts/overview/what-is-kubernetes/)
* Telepresence GitHub: [https://github.com/telepresenceio/telepresence](https://github.com/telepresenceio/telepresence)
This documentation is built and hosted on [Mintlify](https://mintlify.com), a developer documentation platform.