> ## Documentation Index
> Fetch the complete documentation index at: https://notes.kodekloud.com/llms.txt
> Use this file to discover all available pages before exploring further.
# Writing HCL Code
> Guide to writing Terraform HCL for Azure, covering provider and resource blocks, example configurations, the init/plan/apply workflow, state management, and VS Code setup
In this lesson we'll start writing real Terraform code using HCL (HashiCorp Configuration Language). Up to now you've learned what Terraform is and how it works conceptually — here we'll put that into practice by describing infrastructure as code. If this is your first time with Terraform, follow along: we'll build everything step by step and explain each line.
Terraform configuration typically follows three steps:
1. Tell Terraform which cloud/provider to talk to (provider block).
2. Define what you want to create (resource block).
3. Provide details about the resource (arguments).
Mastering these three building blocks lets you read and author most Terraform configurations with confidence.
## Minimal example: Create a Resource Group in Azure
This minimal configuration contains the provider, a resource block, and the arguments Terraform needs to create a resource group in Azure.
```hcl theme={null}
provider "azurerm" {
features {}
}
resource "azurerm_resource_group" "rg" {
name = "my-workshop-rg"
location = "East US"
}
```
* provider block: configures how Terraform talks to Azure.
* resource block: declares what to create.
* arguments: `name` and `location` define the resource properties.
## Terraform three-command workflow
After you write HCL, Terraform uses a simple workflow:
| Command | Purpose |
| ----------------- | -------------------------------------------------------------- |
| `terraform init` | Prepares the working directory and downloads provider plugins. |
| `terraform plan` | Shows what Terraform would change (a safety preview). |
| `terraform apply` | Executes the plan and creates/updates resources. |
Representative outputs you will commonly see are shown below.
Initialize the project (downloads providers):
```bash theme={null}
$ terraform init
Initializing provider plugins...
- Finding hashicorp/azurerm versions matching "latest"...
- Installing hashicorp/azurerm v4.28.0...
- Installed hashicorp/azurerm v4.28.0 (signed by HashiCorp)
Terraform has been successfully initialized!
```
Preview the changes with `plan`:
```bash theme={null}
$ terraform plan
Terraform used the selected providers to generate the following execution plan.
Resource actions are indicated with the following symbols:
+ create
Terraform will perform the following actions:
# azurerm_resource_group.rg will be created
+ resource "azurerm_resource_group" "rg" {
+ id = (known after apply)
+ location = "eastus"
+ name = "my-workshop-rg"
}
Plan: 1 to add, 0 to change, 0 to destroy.
```
Apply the plan to create resources:
```bash theme={null}
$ terraform apply
Terraform will perform the following actions:
# azurerm_resource_group.rg will be created
+ resource "azurerm_resource_group" "rg" {
+ id = (known after apply)
+ location = "eastus"
+ name = "my-workshop-rg"
}
Plan: 1 to add, 0 to change, 0 to destroy.
Do you want to perform these actions? only 'yes' will be accepted to approve.
Enter a value: yes
azurerm_resource_group.rg: Creating...
azurerm_resource_group.rg: Creation complete after 28s [id=/subscriptions/1b228746-75fd-46ed-8a6b-6a9066d6d3a3/resourceGroups/my-workshop-rg]
Apply complete! Resources: 1 added, 0 changed, 0 destroyed.
```
We won't deeply cover `terraform validate` and `terraform fmt` here — for now remember that the HCL code declares desired state, and Terraform's commands make and reconcile those changes.
## Provider block details
The provider block configures how Terraform communicates with an external system — in this case Azure via the AzureRM provider.
```hcl theme={null}
provider "azurerm" {
features {}
}
```
The `features {}` block is required by the AzureRM provider and enables provider defaults. You can supply credentials in the provider block (for example `subscription_id`), but it's common and recommended to authenticate via environment variables, Azure CLI (`az login`), or managed identities for automation scenarios.
Example with `subscription_id` embedded (less common for production):
```hcl theme={null}
provider "azurerm" {
features {}
subscription_id = "1b228746-75fd-46ed-8a6b-6a9066d6d3a3"
}
```
## Resource block details
A resource block declares the infrastructure to create. The syntax pattern is:
`resource "_" "" { ... }`
* `_`: the resource type, for example `azurerm_storage_account`.
* ``: a local reference used inside Terraform configurations (this name is not visible to Azure).
Example: create an Azure Storage Account. Arguments define properties like name, location, tier, and replication.
```hcl theme={null}
resource "azurerm_storage_account" "storage" {
name = "workshopstorage185784"
resource_group_name = "my-workshop-rg"
location = "East US"
account_tier = "Standard"
account_replication_type = "LRS"
}
```
Some arguments are required and others optional. Always check the provider documentation for required fields and recommended defaults.
## Quick reference: workspace and main.tf
Set up a workspace folder (for example `first-code`) and add `main.tf`. You can keep everything in `main.tf` while learning, and later split into multiple files and modules.
Example `main.tf` combining provider and resource group:
```hcl theme={null}
provider "azurerm" {
features {}
subscription_id = "1b228746-75fd-46ed-8a6b-6a9066d6d3a3"
}
resource "azurerm_resource_group" "rg" {
name = "kodekloud-tf-rg"
location = "eastus"
}
```
Steps to run locally in VS Code / Terminal:
1. Save your files before running Terraform commands (`Ctrl+S` / `Cmd+S`).
2. From the directory containing `main.tf`, run `terraform init`. This downloads the provider plugin into the `.terraform` directory.
3. Run `terraform plan` to preview changes.
4. Run `terraform apply` to create the resources (type `yes` when prompted, or use `-auto-approve` for automation).
Representative success output from `terraform init`:
```bash theme={null}
$ terraform init
Terraform has been successfully initialized!
```
Representative `terraform plan` output:
```bash theme={null}
$ terraform plan
Terraform will perform the following actions:
# azurerm_resource_group.rg will be created
+ resource "azurerm_resource_group" "rg" {
+ id = (known after apply)
+ location = "eastus"
+ name = "kodekloud-tf-rg"
}
Plan: 1 to add, 0 to change, 0 to destroy.
```
Apply to create the resource group:
```bash theme={null}
$ terraform apply
Do you want to perform these actions? only 'yes' will be accepted to approve.
Enter a value: yes
azurerm_resource_group.rg: Creating...
azurerm_resource_group.rg: Creation complete after 28s [id=/subscriptions/1b228746-75fd-46ed-8a6b-6a9066d6d3a3/resourceGroups/kodekloud-tf-rg]
Apply complete! Resources: 1 added, 0 changed, 0 destroyed.
```
## Getting started in Visual Studio Code
Before you start writing HCL, ensure:
* Terraform is installed and available in your `PATH`.
* You're authenticated to Azure CLI via `az login` and have a subscription selected (`az account show`).
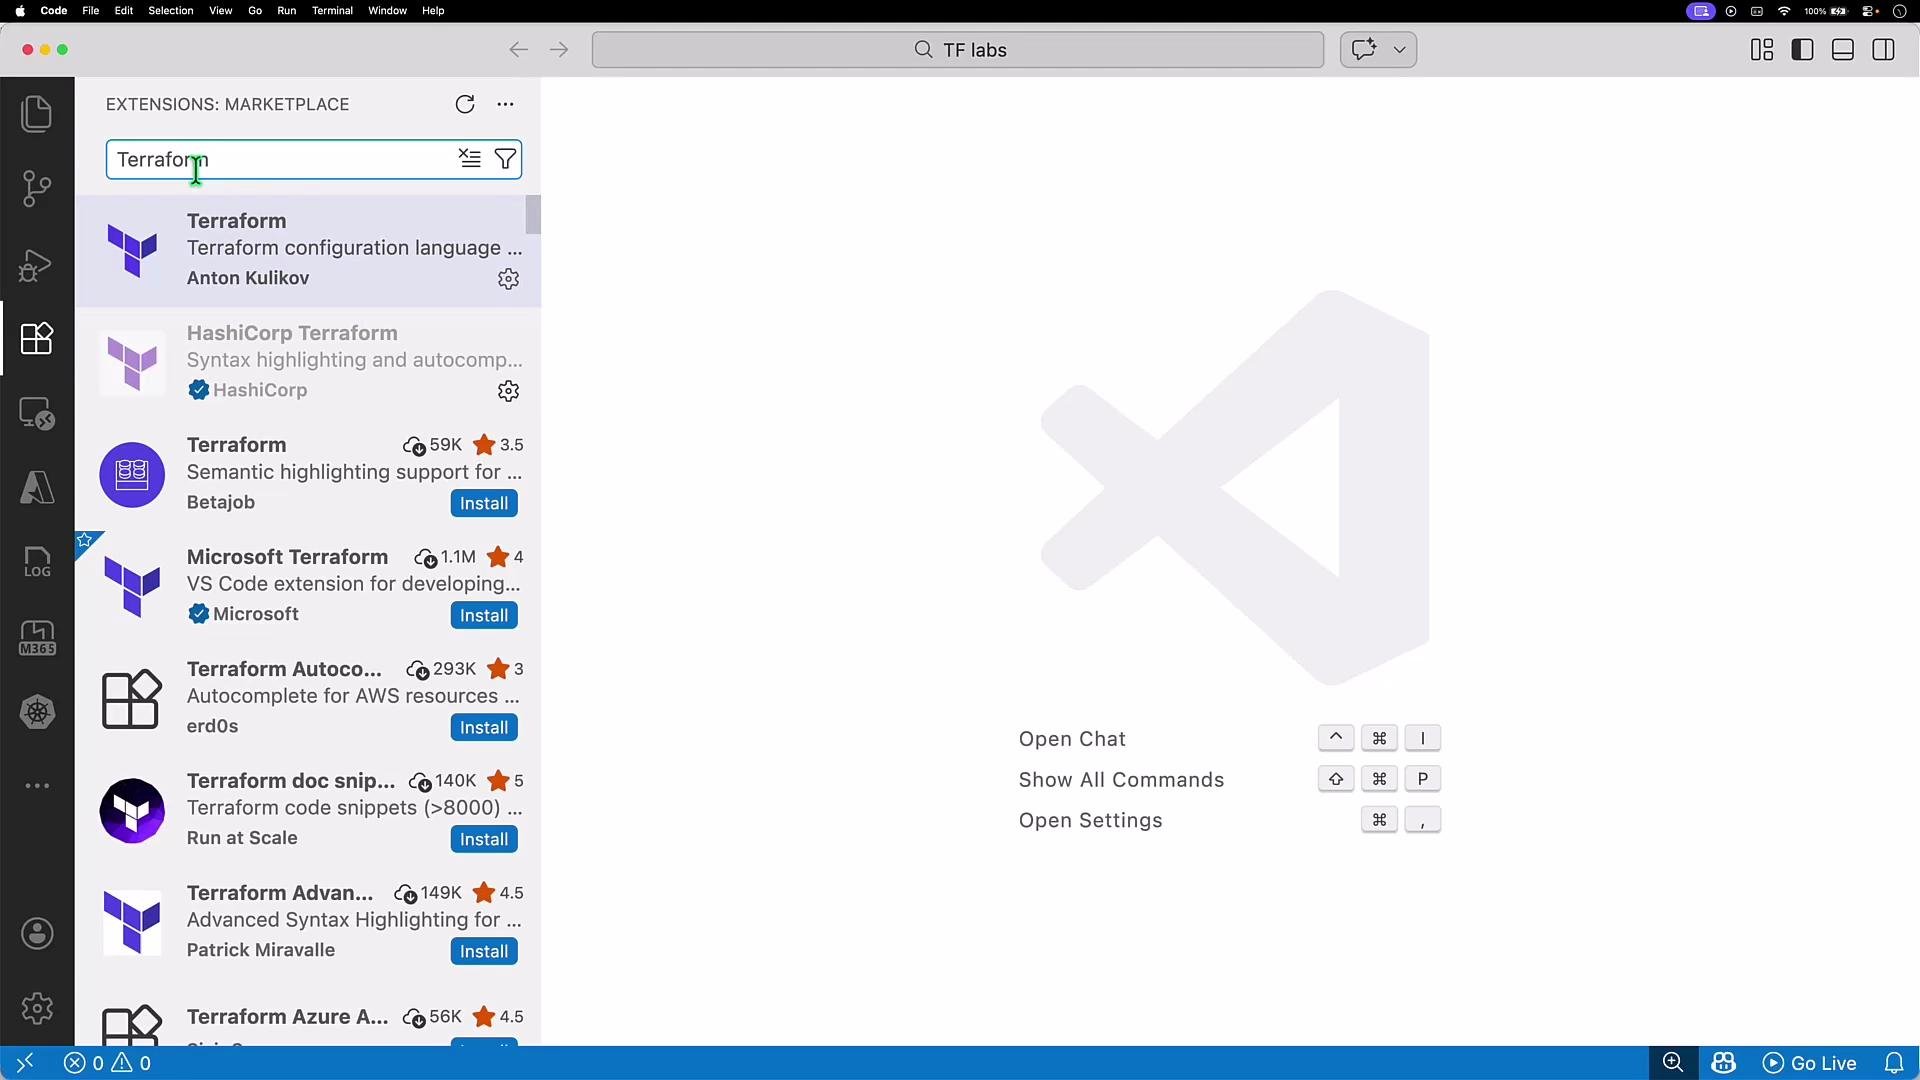
* Optionally, install the HashiCorp Terraform extension for VS Code to get syntax highlighting and IntelliSense. There are also third-party extensions — only install from trusted sources.
 Running `az account show` returns account details similar to this (trimmed output):
```json theme={null}
$ az account show
{
"environmentName": "AzureCloud",
"id": "1b228746-75fd-46ed-8a6b-6a9066d6d3a3",
"isDefault": true,
"name": "PenTest Lab 2",
"state": "Enabled",
"tenantId": "1e0fa212-37dc-45f5-bb0f-b60687cac64b",
"user": {
"type": "user"
}
}
```
## State file and drift detection
Terraform stores the state of managed resources in the state file (by default `terraform.tfstate`) inside your workspace. This file maps Terraform resources to real-world objects and is essential for planning and updates.
Key points:
* Deleting the state file causes Terraform to "forget" the resources it manages — future plans may attempt to recreate them.
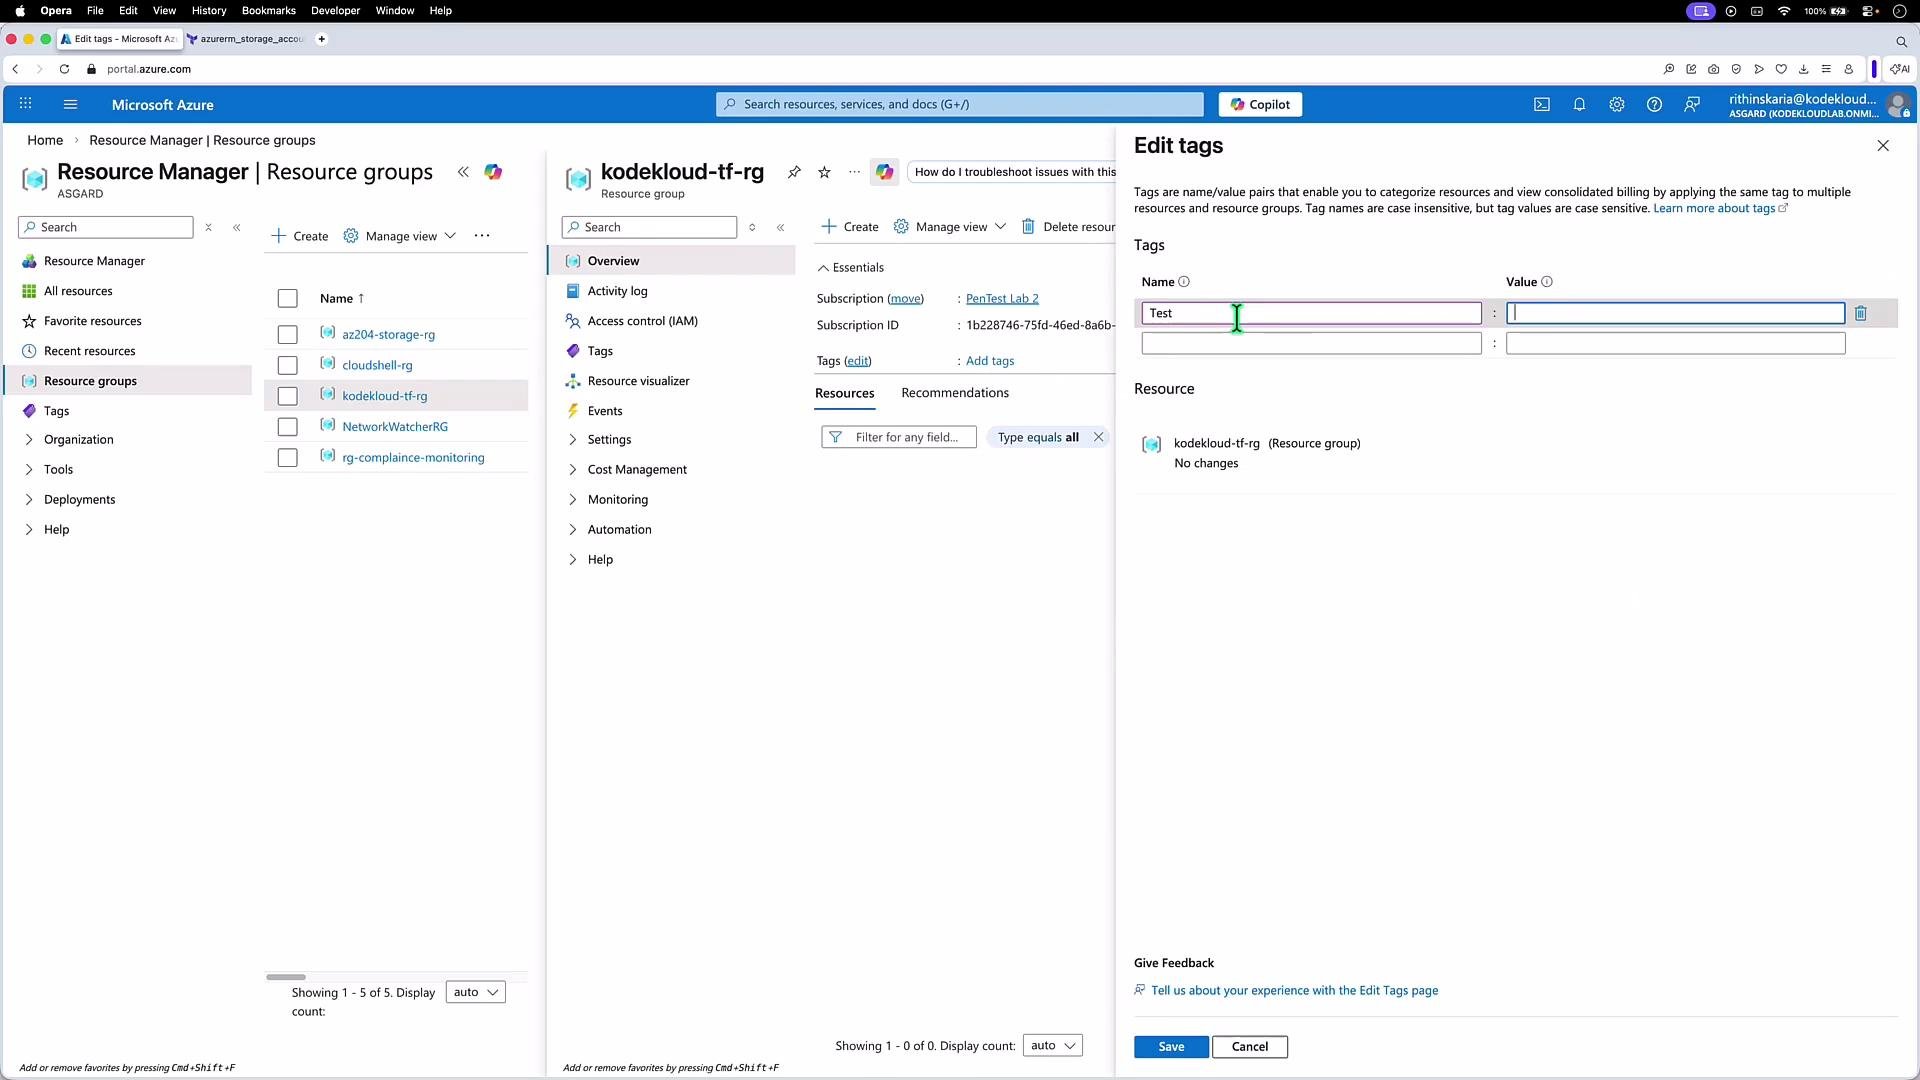
* If a resource is modified outside Terraform (for example, changing tags in the Azure Portal), the next `terraform plan` will detect this drift and display the changes needed to reconcile the infrastructure with your code.
Example workflow: add a tag to the resource group in the Azure Portal, then run `terraform plan`. Terraform will detect the difference and propose the actions to match the declared configuration.
Running `az account show` returns account details similar to this (trimmed output):
```json theme={null}
$ az account show
{
"environmentName": "AzureCloud",
"id": "1b228746-75fd-46ed-8a6b-6a9066d6d3a3",
"isDefault": true,
"name": "PenTest Lab 2",
"state": "Enabled",
"tenantId": "1e0fa212-37dc-45f5-bb0f-b60687cac64b",
"user": {
"type": "user"
}
}
```
## State file and drift detection
Terraform stores the state of managed resources in the state file (by default `terraform.tfstate`) inside your workspace. This file maps Terraform resources to real-world objects and is essential for planning and updates.
Key points:
* Deleting the state file causes Terraform to "forget" the resources it manages — future plans may attempt to recreate them.
* If a resource is modified outside Terraform (for example, changing tags in the Azure Portal), the next `terraform plan` will detect this drift and display the changes needed to reconcile the infrastructure with your code.
Example workflow: add a tag to the resource group in the Azure Portal, then run `terraform plan`. Terraform will detect the difference and propose the actions to match the declared configuration.
 When Terraform refreshes state (during `plan` or `apply`), it compares actual resources in Azure with the local state and the configuration declared in HCL, and then reconciles them according to your code.
## Helpful references and next topics
* Official provider documentation:
* azurerm\_resource\_group: [https://registry.terraform.io/providers/hashicorp/azurerm/latest/docs/resources/resource\_group](https://registry.terraform.io/providers/hashicorp/azurerm/latest/docs/resources/resource_group)
* azurerm\_storage\_account: [https://registry.terraform.io/providers/hashicorp/azurerm/latest/docs/resources/storage\_account](https://registry.terraform.io/providers/hashicorp/azurerm/latest/docs/resources/storage_account)
* Recommended next topics to learn: variables, outputs, modules, remote state backends, and best practices for structuring Terraform projects.
| Topic | Why it matters |
| ------------------- | --------------------------------------------------------------- |
| Variables & Outputs | Make configurations reusable and expose values between modules. |
| Modules | Reuse infrastructure patterns across projects. |
| Remote State | Share state safely across teams and CI/CD. |
| Best practices | Improve maintainability, security, and collaboration. |
Tip: Use the official HashiCorp Terraform extension for VS Code to get verified tooling and IntelliSense. If you use third-party extensions, ensure they come from trusted sources.
When Terraform refreshes state (during `plan` or `apply`), it compares actual resources in Azure with the local state and the configuration declared in HCL, and then reconciles them according to your code.
## Helpful references and next topics
* Official provider documentation:
* azurerm\_resource\_group: [https://registry.terraform.io/providers/hashicorp/azurerm/latest/docs/resources/resource\_group](https://registry.terraform.io/providers/hashicorp/azurerm/latest/docs/resources/resource_group)
* azurerm\_storage\_account: [https://registry.terraform.io/providers/hashicorp/azurerm/latest/docs/resources/storage\_account](https://registry.terraform.io/providers/hashicorp/azurerm/latest/docs/resources/storage_account)
* Recommended next topics to learn: variables, outputs, modules, remote state backends, and best practices for structuring Terraform projects.
| Topic | Why it matters |
| ------------------- | --------------------------------------------------------------- |
| Variables & Outputs | Make configurations reusable and expose values between modules. |
| Modules | Reuse infrastructure patterns across projects. |
| Remote State | Share state safely across teams and CI/CD. |
| Best practices | Improve maintainability, security, and collaboration. |
Tip: Use the official HashiCorp Terraform extension for VS Code to get verified tooling and IntelliSense. If you use third-party extensions, ensure they come from trusted sources.