Kubernetes for the Absolute Beginners - Hands-on Tutorial
Microservices Architecture
Demo Deploying voting app on Kubernetes with Deployments
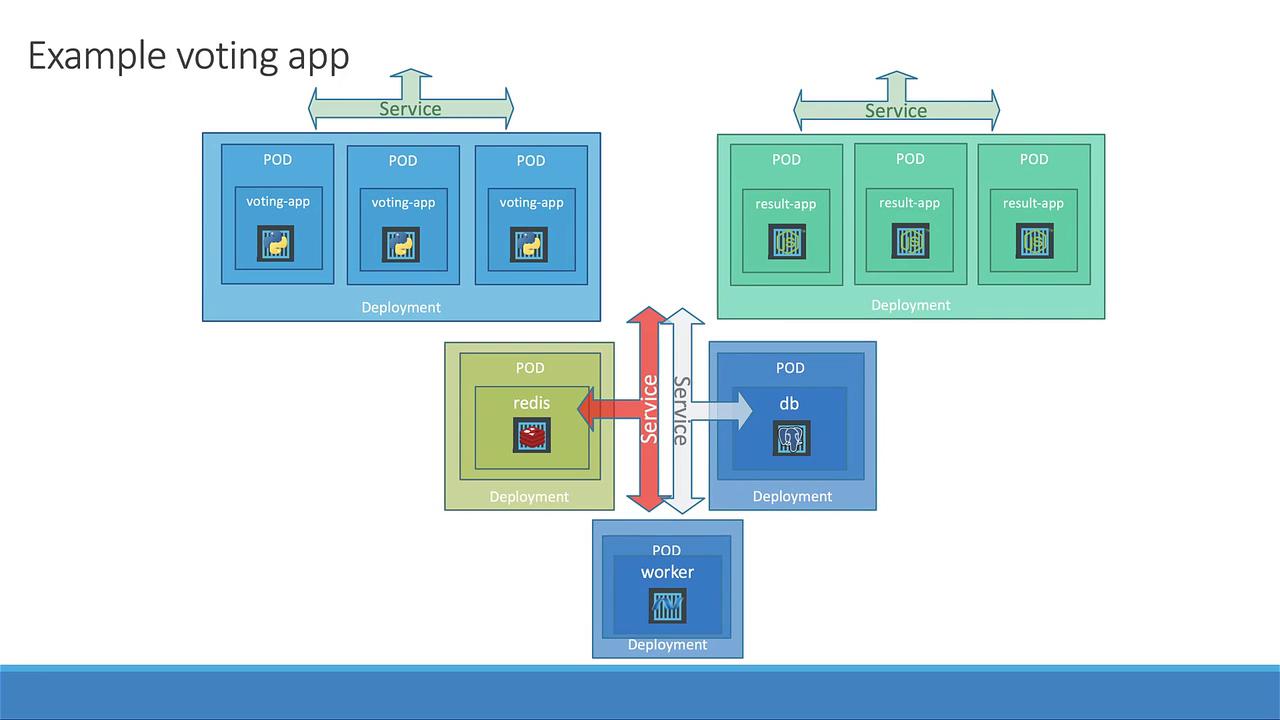
In this lesson, we enhance the initial demo—which deployed Pods and Services directly—by leveraging Kubernetes Deployments. This improved approach addresses the challenges of scaling and updating applications without downtime. By using Deployments, you can automate the management of ReplicaSets, making it simple to scale, roll out updates, and perform rollbacks while retaining a history of revisions.
Note
Deploying individual Pods limits your ability to easily increase the number of service instances or update the container image without downtime. Using Deployments streamlines these processes.
In the upgraded setup, each application component—including the front-end apps (voting and results), databases, and worker applications—is encapsulated within its own Deployment. The project directory now hosts both the original Pod and Service definition files, along with new files for the Deployments.
Voting App Deployment
We begin by defining a basic Pod for the voting app:
apiVersion: v1
kind: Pod
metadata:
name: voting-app-pod
labels:
name: voting-app-pod
app: demo-voting-app
spec:
containers:
- name: voting-app
image: kodekloud/examplevotingapp_vote:v1
ports:
- containerPort: 80
Then, create a Deployment file (votingapp-deployment.yaml
) based on this pod template. Adjust the API version to apps/v1
, change the kind to Deployment, and add the selector
and replicas
fields:
apiVersion: apps/v1
kind: Deployment
metadata:
name: voting-app-deploy
labels:
name: voting-app-deploy
app: demo-voting-app
spec:
replicas: 1
selector:
matchLabels:
name: voting-app-pod
app: demo-voting-app
template:
metadata:
name: voting-app-pod
labels:
name: voting-app-pod
app: demo-voting-app
spec:
containers:
- name: voting-app
image: kodekloud/examplevotingapp
ports:
- containerPort: 80
This configuration allows you to start with a single replica on your cluster for resource efficiency, with the option to scale up as needed.
Redis Deployment
Begin with the original Redis Pod definition:
# redis-pod.yaml
apiVersion: v1
kind: Pod
metadata:
name: redis-pod
labels:
app: demo-voting-app
spec:
containers:
- name: redis
image: redis
ports:
- containerPort: 6379
Then, create the Redis Deployment (redis-deploy.yaml
) using the same template as the voting app deployment. Update the component names, labels, and container details accordingly:
# redis-deploy.yaml
apiVersion: apps/v1
kind: Deployment
metadata:
name: redis-deploy
labels:
name: redis-deploy
app: demo-voting-app
spec:
replicas: 1
selector:
matchLabels:
name: redis-pod
app: demo-voting-app
template:
metadata:
name: redis-pod
labels:
name: redis-pod
app: demo-voting-app
spec:
containers:
- name: redis
image: redis
ports:
- containerPort: 6379
PostgreSQL Deployment
Transform the PostgreSQL Pod into a Deployment. First, consider the original PostgreSQL Pod definition with environment variables:
apiVersion: v1
kind: Pod
metadata:
name: postgres-pod
labels:
name: postgres-pod
app: demo-voting-app
spec:
containers:
- name: postgres
image: postgres
ports:
- containerPort: 5432
env:
- name: POSTGRES_USER
value: "postgres"
- name: POSTGRES_PASSWORD
value: "postgres"
Now, create the PostgreSQL Deployment (postgres-deploy.yaml
). Ensure that the selector matches the Pod template labels:
apiVersion: apps/v1
kind: Deployment
metadata:
name: postgres-deploy
labels:
name: postgres-deploy
app: demo-voting-app
spec:
replicas: 1
selector:
matchLabels:
name: postgres-pod
app: demo-voting-app
template:
metadata:
name: postgres-pod
labels:
name: postgres-pod
app: demo-voting-app
spec:
containers:
- name: postgres
image: postgres
ports:
- containerPort: 5432
env:
- name: POSTGRES_USER
value: "postgres"
- name: POSTGRES_PASSWORD
value: "postgres"
Worker App Deployment
For the worker application, start with its Pod definition:
apiVersion: v1
kind: Pod
metadata:
name: worker-app-pod
labels:
name: worker-app-pod
app: demo-voting-app
spec:
containers:
- name: worker-app
image: kodekloud/examplevotingapp
Then, create a corresponding Deployment (worker-app-deploy.yaml
). Update the names, labels, and selectors as required:
apiVersion: apps/v1
kind: Deployment
metadata:
name: worker-app-deploy
labels:
name: worker-app-deploy
app: demo-voting-app
spec:
replicas: 1
selector:
matchLabels:
name: worker-app-pod
app: demo-voting-app
template:
metadata:
name: worker-app-pod
labels:
name: worker-app-pod
app: demo-voting-app
spec:
containers:
- name: worker-app
image: kodekloud/examplevotingapp
Result App Deployment
Similarly, convert the result application from a Pod to a Deployment. Create the file result-app-deploy.yaml
, update the names and labels from the original Pod definition, and ensure that the template matches the selector criteria.
Your project directory should now include files similar to the following:
voting-app-pod.yaml
result-app-pod.yaml
redis-pod.yaml
postgres-pod.yaml
redis-service.yaml
postgres-service.yaml
voting-app-service.yaml
result-app-service.yaml
worker-app-pod.yaml
voting-app-deploy.yaml
redis-deploy.yaml
postgres-deploy.yaml
worker-app-deploy.yaml
result-app-deploy.yaml
Deploying on Kubernetes
Before creating the new Deployments and Services, ensure that any previously created resources are removed. Verify by running:
kubectl get pods
Once the cluster is clean, proceed with the deployments.
Creating the Voting App Deployment
Deploy the voting app using the command below:
kubectl create -f voting-app-deploy.yaml
Verify the deployment:
kubectl get deployment
Expected output:
NAME READY UP-TO-DATE AVAILABLE AGE
voting-app-deploy 1/1 1 1 19s
Deploying Redis, PostgreSQL, and Their Services
First, deploy Redis and its service:
kubectl create -f redis-deploy.yaml
kubectl create -f redis-service.yaml
Then, deploy PostgreSQL and its service:
kubectl create -f postgres-deploy.yaml
kubectl create -f postgres-service.yaml
Confirm that all Pods are running:
kubectl get pods
Sample output:
NAME READY STATUS RESTARTS AGE
postgres-deploy-847c9c8d8f-dzk8m 1/1 Running 0 19s
redis-deploy-5b479fbfd5-ndxbn 1/1 Running 0 27s
voting-app-deploy-7775f98f7d-2xdlz 1/1 Running 0 56s
Deploying Worker and Result Applications
Deploy the worker application (which does not have an associated Service):
kubectl create -f worker-app-deploy.yaml
Next, deploy the result application and its service:
kubectl create -f result-app-deploy.yaml
kubectl create -f result-app-service.yaml
Finally, check that all Deployments and Services are active:
kubectl get deployments,svc
Example output:
NAME READY UP-TO-DATE AVAILABLE AGE
deployment.apps/postgres-deploy 1/1 1 1 91s
deployment.apps/redis-deploy 1/1 1 1 99s
deployment.apps/result-app-deploy 1/1 1 1 18s
deployment.apps/voting-app-deploy 1/1 1 1 2m8s
deployment.apps/worker-app-deploy 1/1 1 1 45s
NAME TYPE CLUSTER-IP EXTERNAL-IP PORT(S) AGE
service/db ClusterIP 10.107.65.177 <none> 5432/TCP 88s
service/kubernetes ClusterIP 10.96.0.1 <none> 443/TCP 2d1h
service/redis ClusterIP 10.104.71.94 <none> 6379/TCP 95s
service/result-service NodePort 10.105.105.132 <none> 80:3005/TCP 15s
service/voting-service NodePort 10.100.70.146 <none> 80:3004/TCP 119s
Accessing the Front-End Applications
Use Minikube to retrieve the URLs for the voting and result services:
minikube service voting-service --url
minikube service result-service --url
# Expected output: http://192.168.99.101:30005
Open these URLs in your web browser to interact with the voting app. Load balancing within the Deployment ensures that different pods serve your requests.
Scaling the Voting App Deployment
Scaling the voting application is straightforward with Deployments. For example, to increase the number of voting app replicas from one to three, run:
kubectl scale deployment voting-app-deploy --replicas=3
After scaling, verify the status:
kubectl get deployments
Refresh the voting service URL in your browser several times to observe that requests are being handled by multiple pods, confirming that the scaling is effective.
This lesson demonstrates how Kubernetes Deployments simplify application management by enabling effortless scaling, rolling updates, and high availability. Happy deploying, and see you in the next lesson!
Watch Video
Watch video content