This article demonstrates using AWS CodeBuild for automated linting and testing in a development workflow with a sample application.
In this lesson, we demonstrate how to work with AWS CodeBuild using an application similar to one previously deployed on Elastic Beanstalk. The sample app has been slightly modified to illustrate how automated linting and testing can enhance your development workflow.
Enhancing code quality and functionality is made easier with automated linting and testing tools. In this example, we use automated tests and linters to ensure our code meets best practices and functions as intended.For instance, consider the following scenario. When you execute these commands:
Copy
st-1) took 6srm -rf .git/courses-sanjeev-desktop\aws-developer-associate\codePipeline via v20.12.1 on (us-eas)t-1) git statusfatal: not a git repository (or any of the parent directories): .gitcourses-sanjeev-desktop\aws-developer-associate\codePipeline via v20.12.1 on (us-eas)t-1)
the system indicates that the Git repository has been removed, showing that commands are being run outside a Git-managed project.Tools for linting and testing ensure that automated tests—executed by running npm run test—correctly report whether the code passes or fails. After executing tests, you might see output similar to:
Copy
> Elastic-Beanstalk-Sample-App@0.0.1 testjest --ciPASS ./add.test.js ✓ adds 1 + 2 to equal 3 (2 ms)Test Suites: 1 passed, 1 totalTests: 1 passed, 1 totalSnapshots: 0 totalTime: 0.319 s, estimated 1 sRan all test suites.courses-sanjeev-desktop\aws-developer-associate\codePipeline via v20.12.1 on (us-eaa) took 2s
A deliberate bug can be introduced to trigger test failures. For example, modifying the function as follows:
Even if one log sample still shows a passing status, eventually running:
Copy
> jest --ci PASS /add.test.js ✓ adds 1 + 2 to equal 3 (2 ms)Test Suites: 1 passed, 1 totalTests: 1 passed, 1 totalSnapshots: 0 totalTime: 0.319 s, estimated 1 sRan all test suites.
and then executing:
Copy
> npm run test
will reveal failing tests if the bug is not fixed. Restoring the code (changing it back to num1 + num2) causes the tests to pass again.Linting, on the other hand, inspects your code for adherence to best practices. For example, the following code:
PASS ./add.test.js✓ adds 1 + 2 to equal 3 (2 ms)Test Suites: 1 passed, 1 totalTests: 1 passed, 1 totalSnapshots: 0 totalTime: 0.33 s, estimated 1 sRan all test suites.courses-sanjeev-desktop\aws-developer-associate\codePipeline via v20.12.1 on (us-eaa) took 2s
Running the linting command (npm run lint) may reveal issues. For example, errors like an undefined variable named test or expect, and an unused variable (body), are flagged:
Copy
st-1) took 2snpm run lint> Elastic-Beanstalk-Sample-App@0.0.1 lint> eslint -C:\Users\sanjee\OneDrive\Documents\courses-sanjeev-desktop\aws-developer-associate\codePipeline\add.test.js 3:3 error 'test' is not defined no-undef 4:3 error 'expect' is not defined no-undefC:\Users\sanjee\OneDrive\Documents\courses-sanjeev-desktop\aws-developer-associate\codePipeline\app.js 15:19 error 'body' is assigned a value but never used no-unused-vars 19:21 error Unexpected constant condition no-constant-condition✖ 4 problems (4 errors, 0 warnings)
Consider the following snippet from the application code:
Copy
const server = http.createServer(function (req, res) { if (req.method === "POST") { let body = ""; req.on("data", function (chunk) { body += chunk; }); } req.on("end", function () { // Handle end of request });});
Linting this code may flag issues such as unused variables or constant conditions if not handled properly. After correcting these issues, running npm run lint confirms that the code adheres to established best practices.
To ensure every change is validated, developers should run both linting and tests. By pushing code to CodeCommit, you can configure CodeBuild to run these checks automatically, streamlining your deployment process.
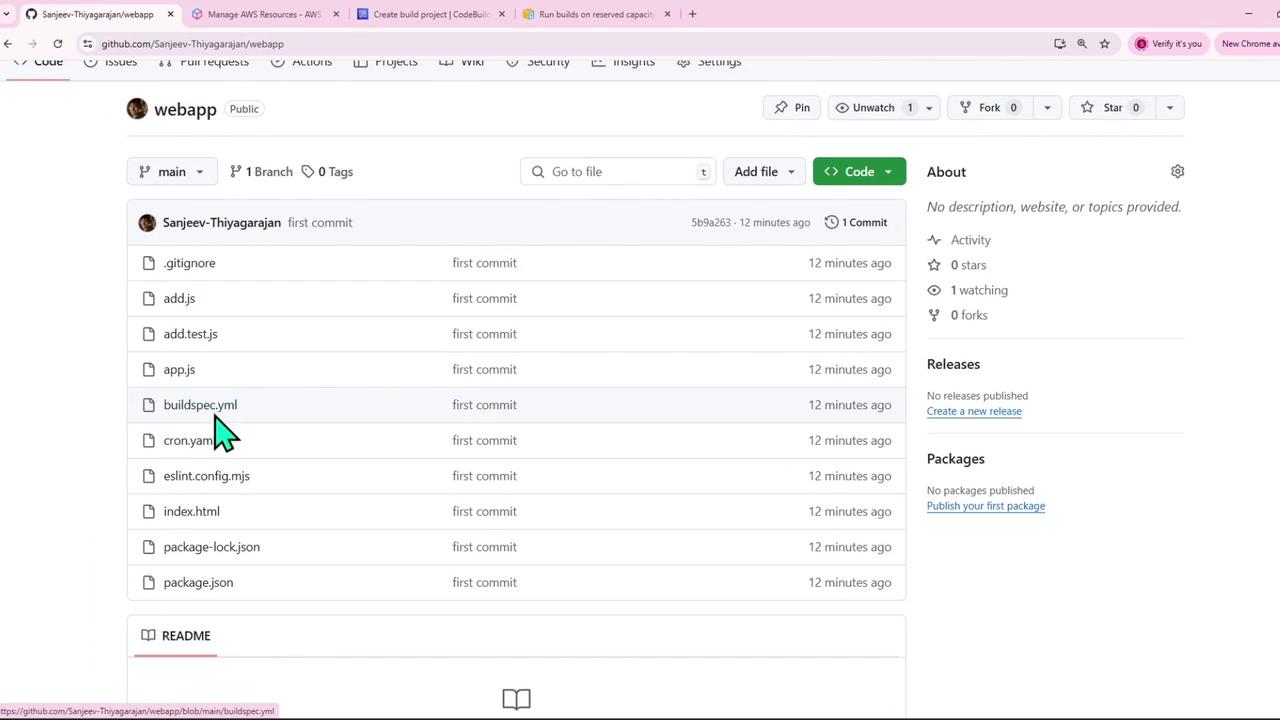
Begin by creating a repository in CodeCommit. For instance, name the repository “webapp”. Follow these steps to add files to Git and push the initial commit:
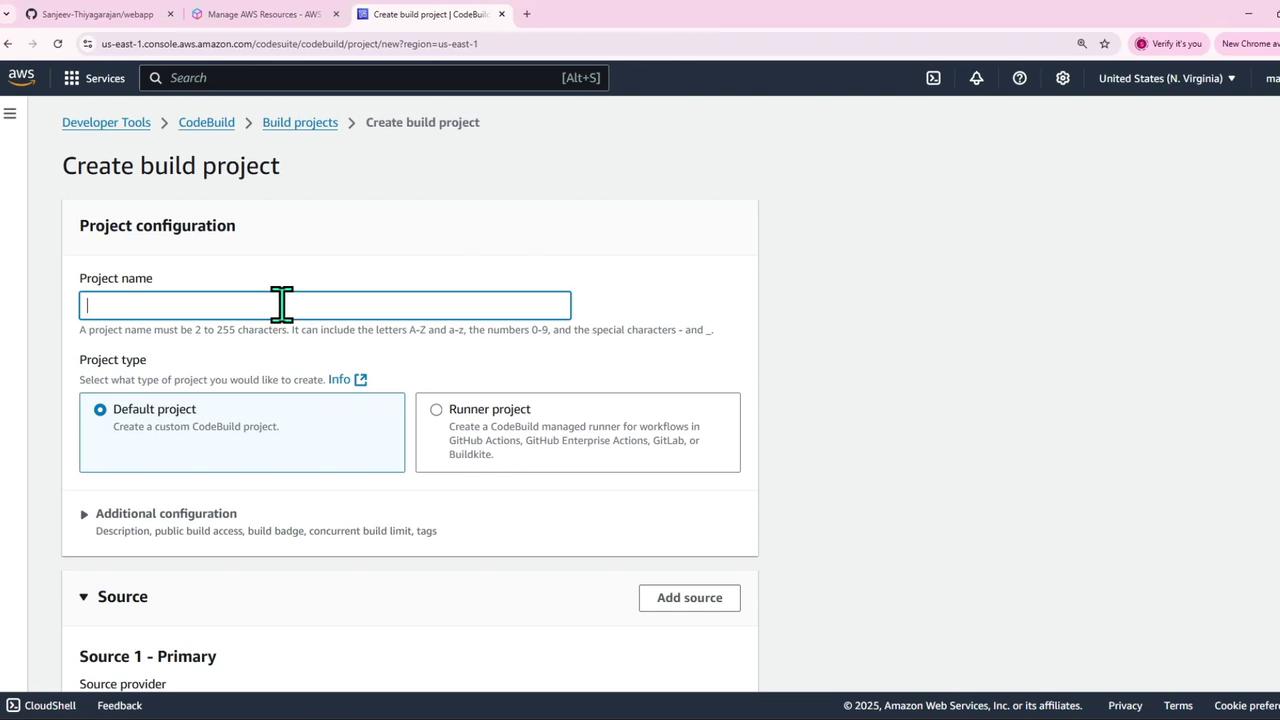
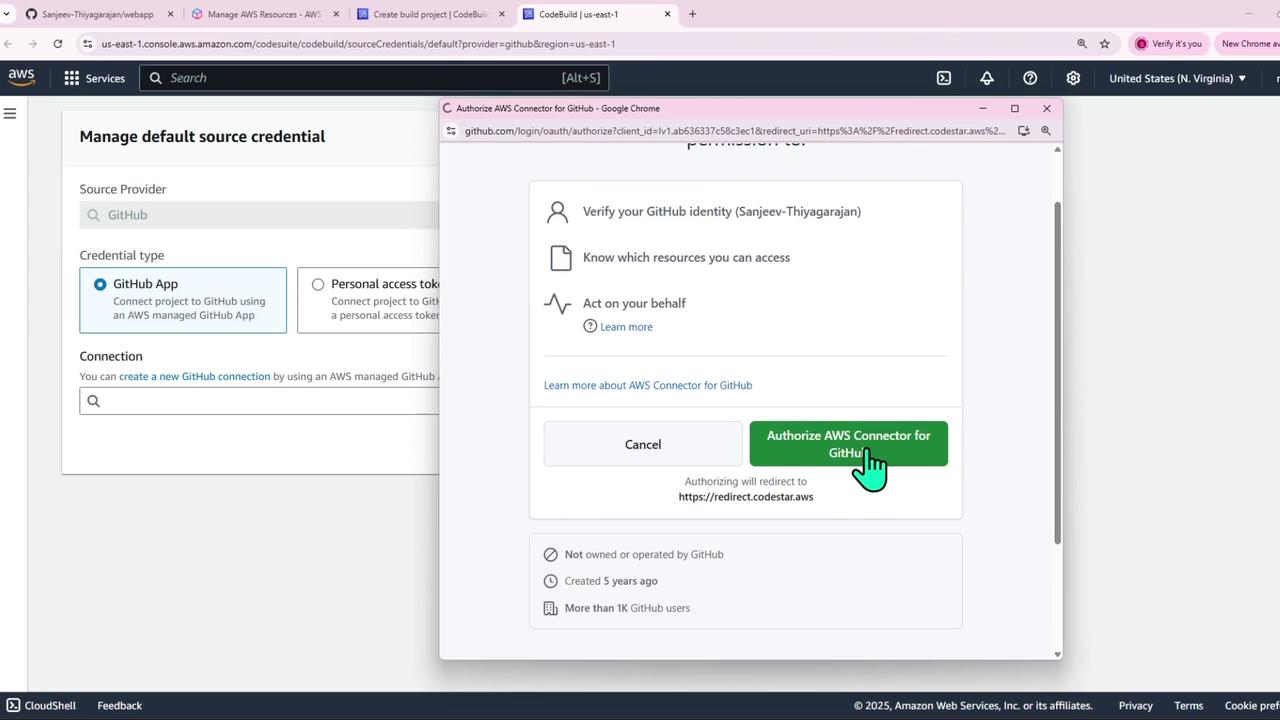
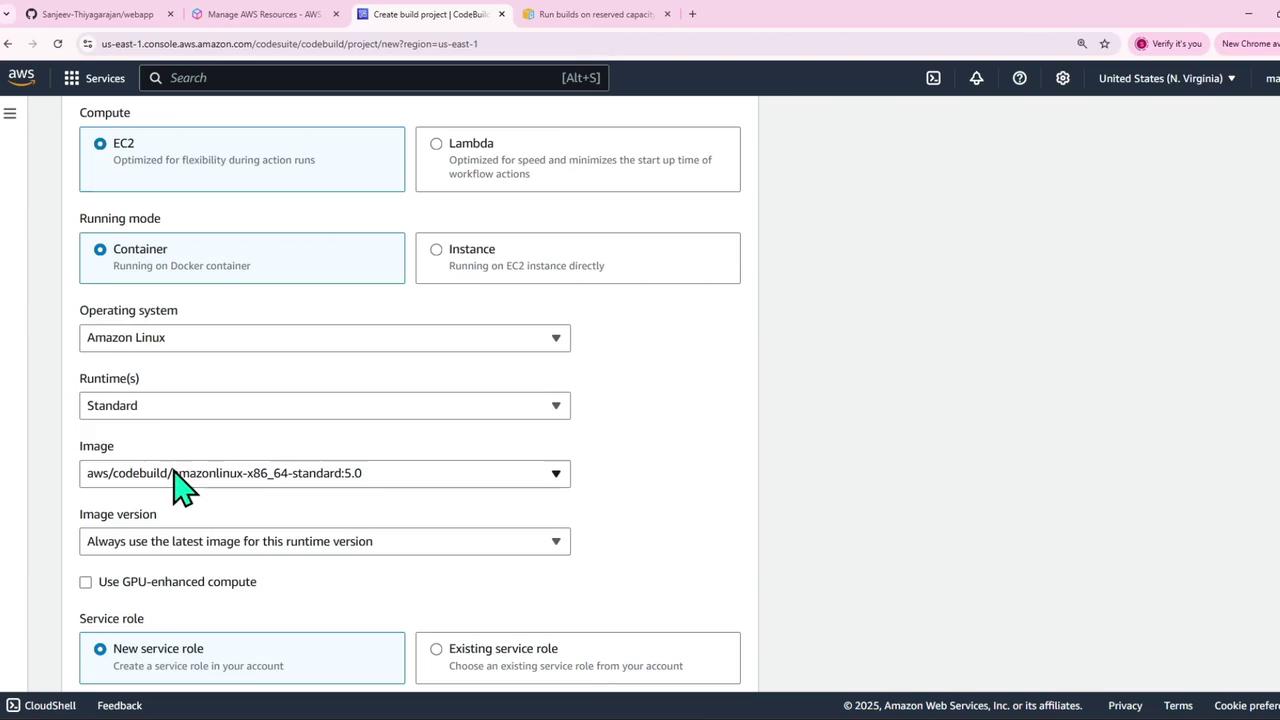
After setting up your repository, navigate to the CodeBuild service and create a new project (e.g., “webapp-CodeBuild”). Adjust the following settings:
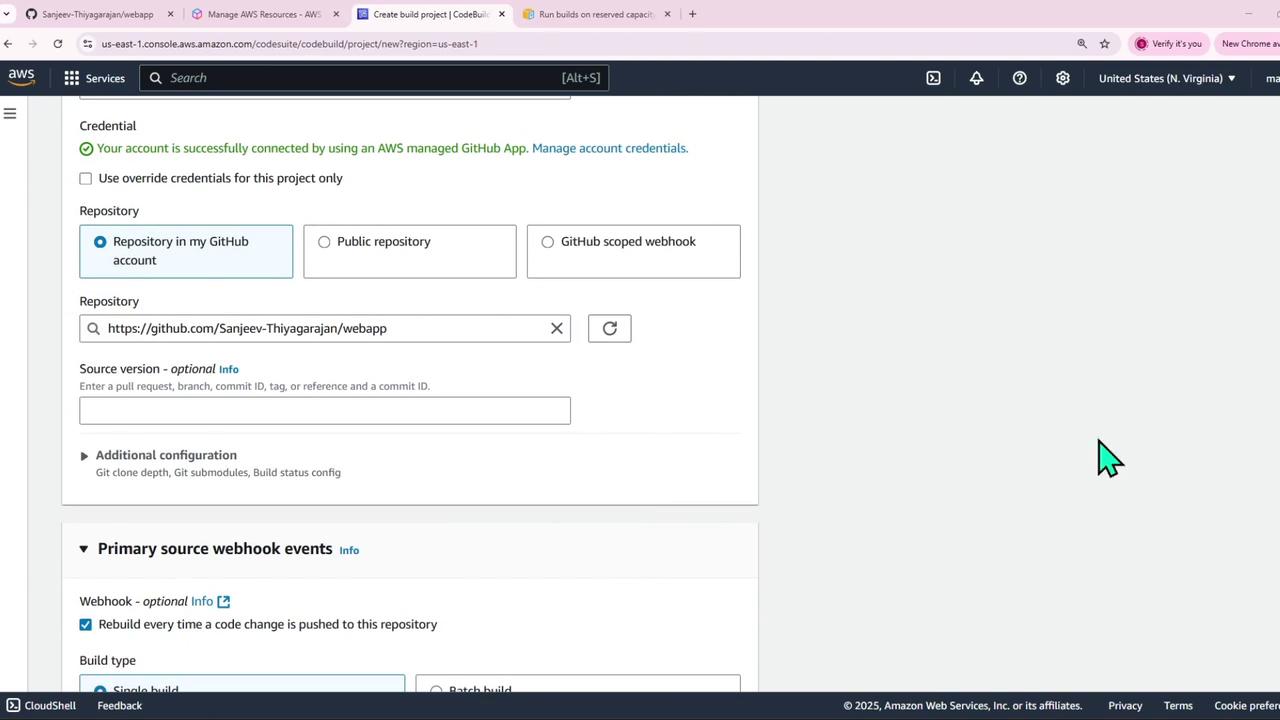
Source: Select CodeCommit and choose the “webapp” repository with the main branch.
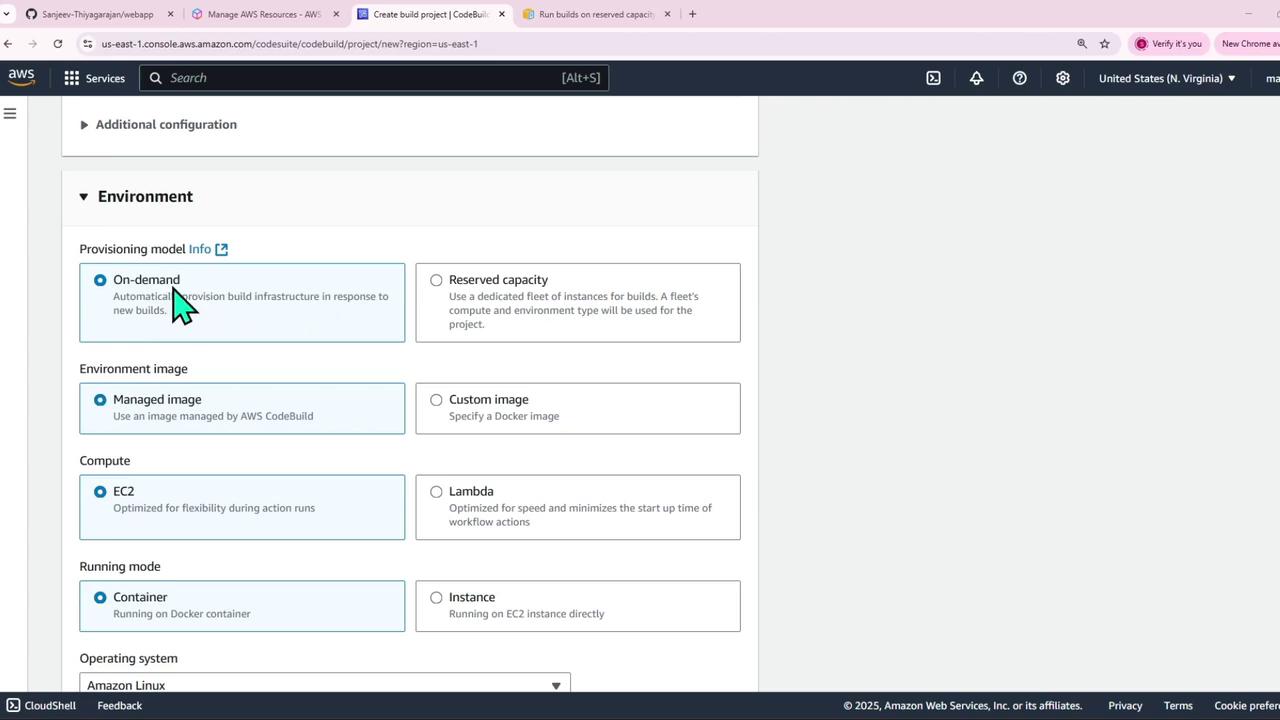
Environment: Choose a managed image. For example, run the build on EC2 with Amazon Linux using the latest Node.js version (e.g., Node.js 20).
Service Role: Create a new service role.
Build Specifications: Supply build commands either directly or by using a buildspec file.
Below is an example of a buildspec.yaml file that installs dependencies, performs linting and testing, and defines post-build actions:
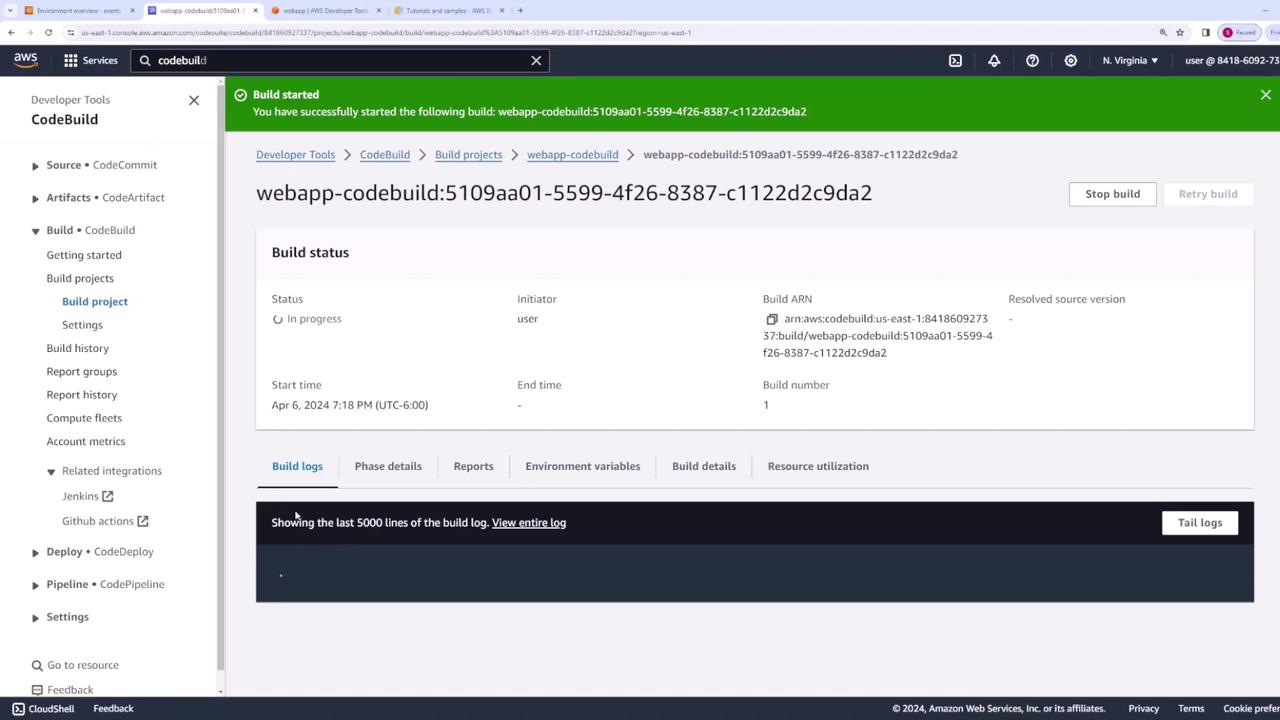
Once the project is configured, start the build. The CodeBuild logs will display phases such as installing Node.js, running npm install, executing linting with npm run lint, and running tests with npm run test. If any phase fails (for instance, due to failing tests), CodeBuild halts further execution, and the build fails.Several images below illustrate the configuration steps:
After adding the buildspec.yaml file to your repository (using git add, git commit, and git push), CodeBuild detects the file and automatically starts a new build. For example, the logs might display:
This configuration ensures that all repository files are packaged and passed along as artifacts for deployment.Additional diagrams illustrate the process:
Once the build completes successfully—with all linting and testing passing—you will see detailed logs showing the duration of each phase.
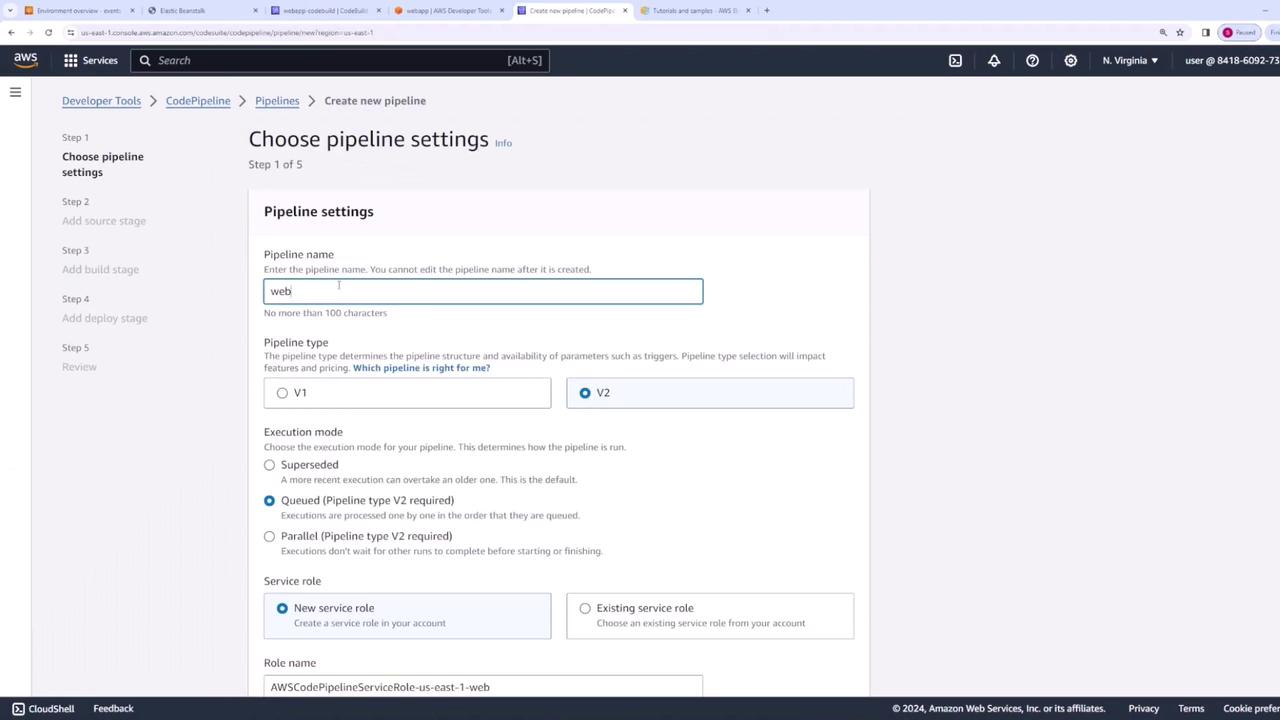
To fully automate your deployment process, integrate CodeBuild with CodePipeline. With this integration, every code change pushed to CodeCommit automatically triggers a CodeBuild run that performs linting and testing. If the build passes, CodePipeline then deploys the resulting artifact to your Elastic Beanstalk environment.Follow these steps to configure the pipeline:
Create a Pipeline:
In CodePipeline, create a new pipeline (for example, “webapp-pipeline”).
Source Stage: Set to CodeCommit and select your repository.
Build Stage: Specify AWS CodeBuild and choose the “webapp-CodeBuild” project.
Deploy Stage: Use Elastic Beanstalk as the deploy provider and select your existing application and environment.
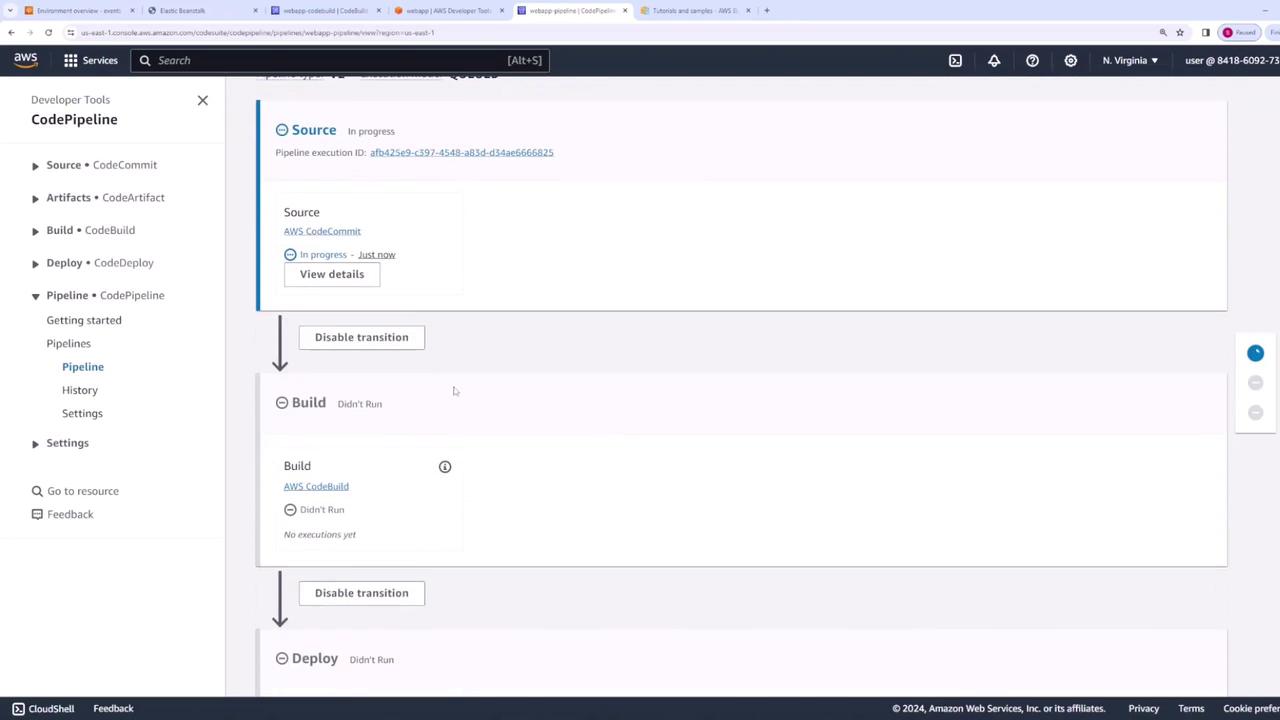
The following diagram shows a typical CodePipeline setup:
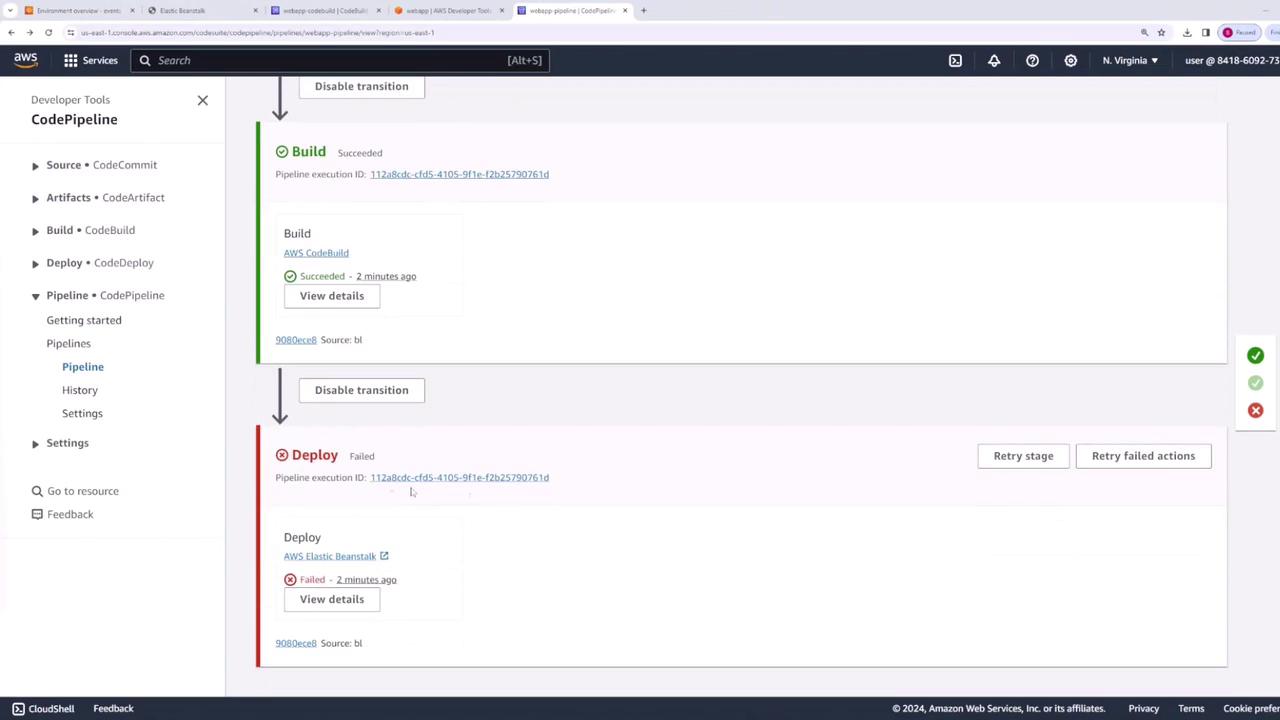
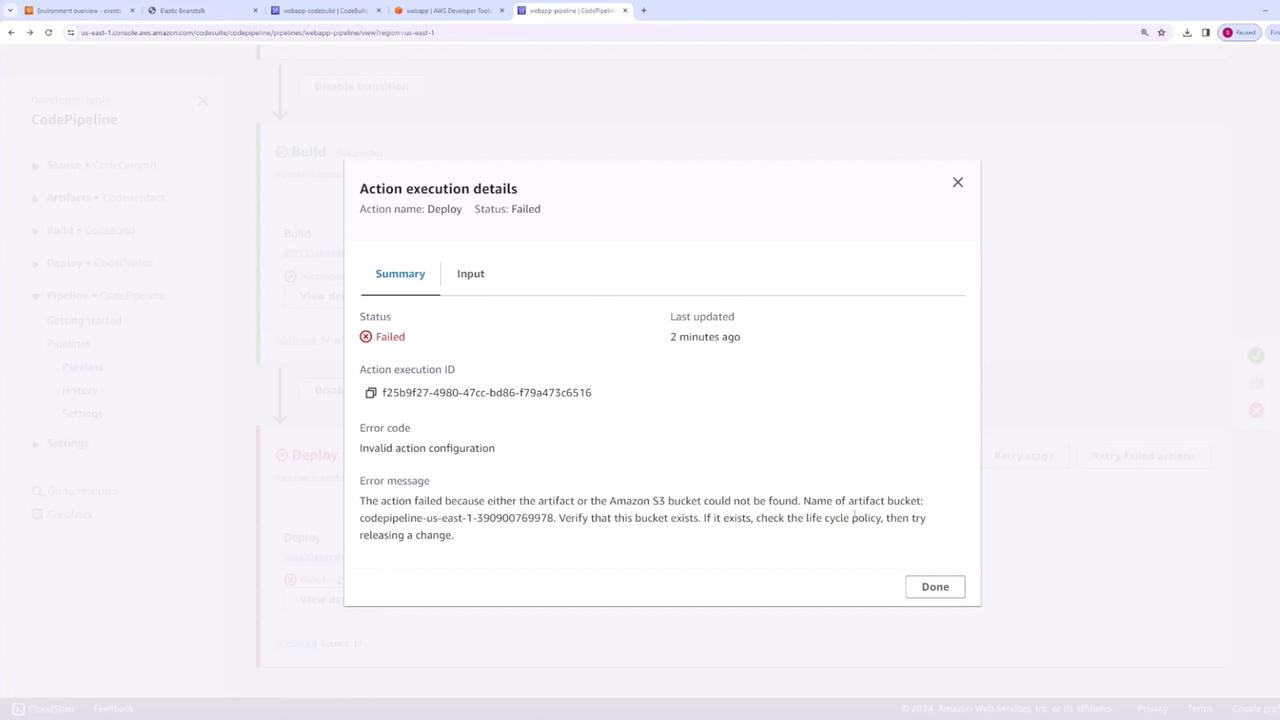
Initially, if the deploy stage is configured to use a build artifact that isn’t generated, deployment may fail with an error like:
Copy
[Container] ... Phase context status code: YAML_FILE_ERROR Message: YAML file does not exist
To resolve this, update your buildspec.yaml file to define an artifact by adding an artifacts section:
Copy
artifacts: files: - '**/*'
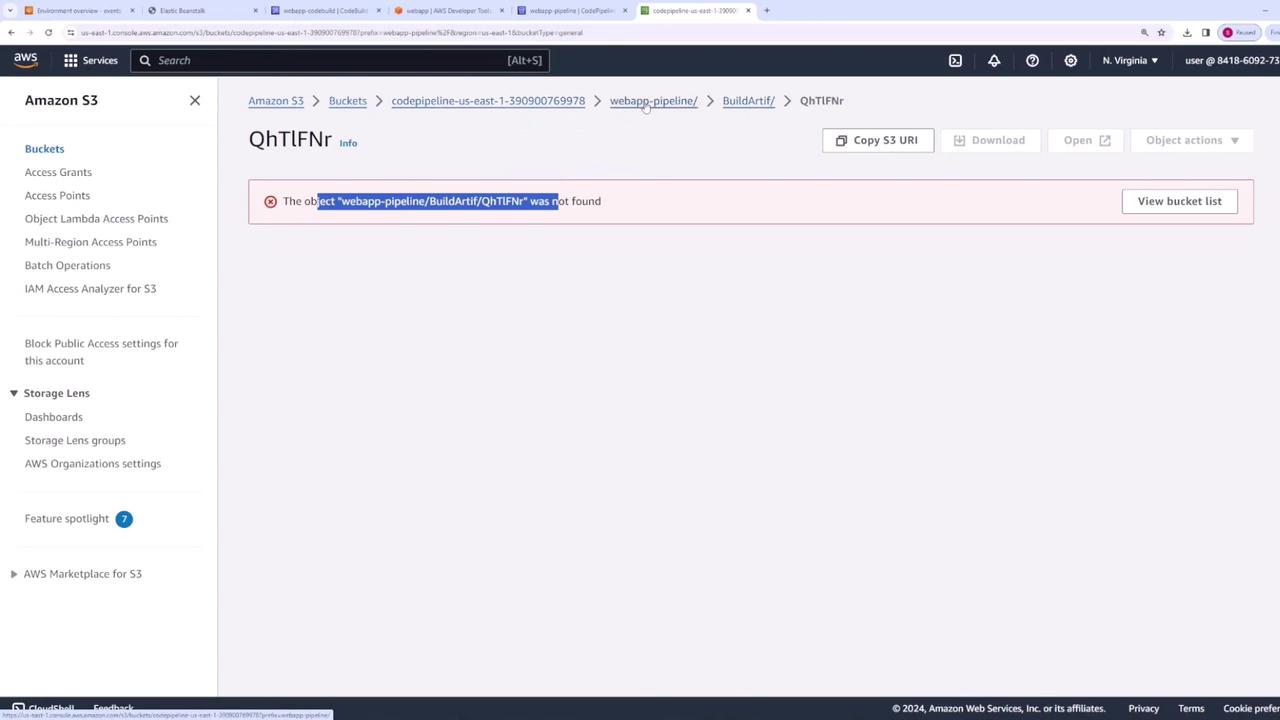
After pushing the updated file to CodeCommit, CodeBuild produces an artifact containing all necessary production files. You can further refine this by pruning unnecessary files (such as test files or ESLint configurations) to ensure that only production-relevant code is deployed.Additional images detail the pipeline configuration and troubleshooting steps:
After updating the input artifact settings in CodePipeline to match the build artifact and committing the changes, trigger another run by pushing a new commit. For example, updating an HTML file to display version information can confirm that the new artifact is deployed correctly.If a build failure occurs—such as a introduced bug that causes npm run test to fail—CodeBuild stops the pipeline, and the previous stable version remains deployed. The logs will indicate the failure, and no new deployment is made.Consider this example HTML snippet from before a failed deployment:
Copy
<html> <head></head> <body> <div class="textColumn"> <h1>This is v3</h1> <p>Your first AWS Elastic Beanstalk Node.js application is now running on your own dedicated environment in the AWS Cloud</p> <p>This environment is launched with Elastic Beanstalk Node.js Platform</p> </div> <div class="linksColumn"> </div> </body></html>
Since the build phase fails when tests do not pass, the deployed version remains unchanged in your Elastic Beanstalk environment.
This lesson demonstrated how to integrate automated linting and testing using CodeBuild and how to automate these checks using CodePipeline with CodeCommit and Elastic Beanstalk. By using a buildspec.yaml file, you ensure that your code quality is verified with every commit, effectively preventing broken code from reaching production.Happy coding and enjoy your streamlined workflow!