This article demonstrates using AWS Systems Manager to manage EC2 instances automatically and effectively.
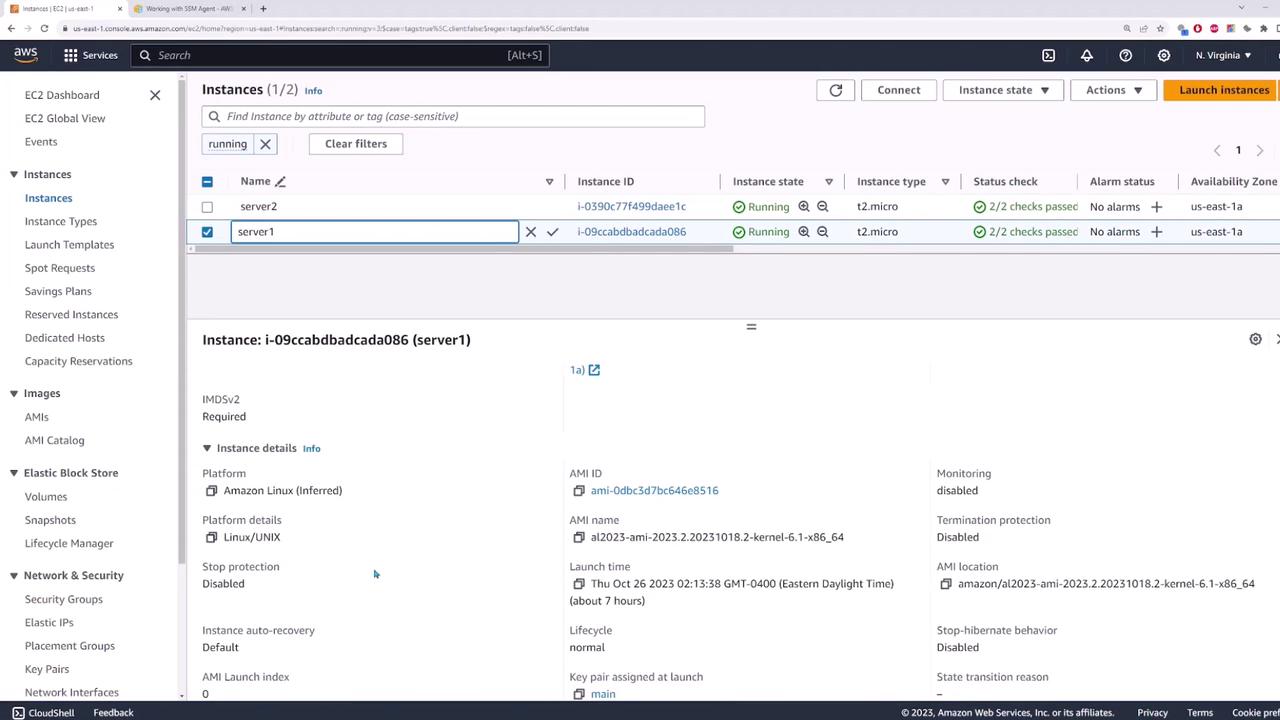
In this lesson, we demonstrate how to use AWS Systems Manager (SSM) to automatically manage your EC2 instances. In our demo environment, we have two servers—server one and server two. Follow along to learn how to get started with Systems Manager quickly and effectively.Before you begin, note that an SSM Agent must be installed on each EC2 instance for Systems Manager to function correctly. For installation instructions on various operating systems, refer to the official AWS documentation. For instance, Amazon Linux 2 and Amazon Linux 2023 images usually have the SSM Agent pre-installed, eliminating the need for a manual setup.
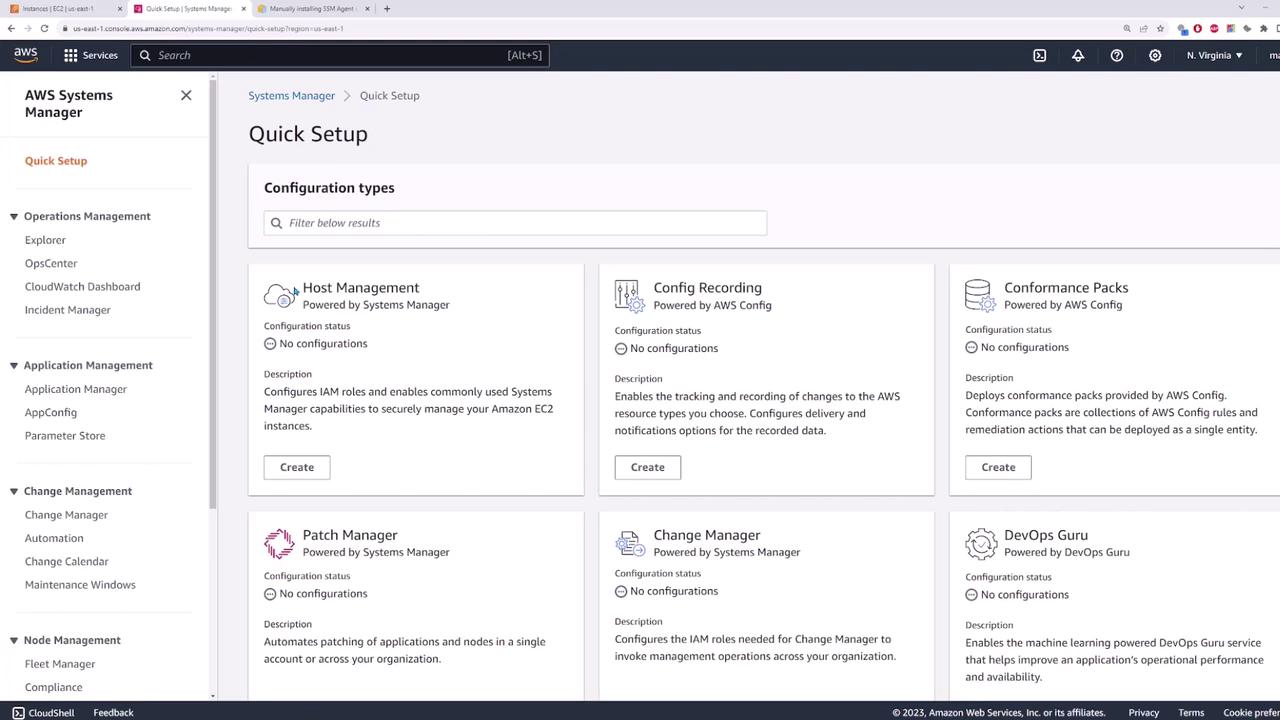
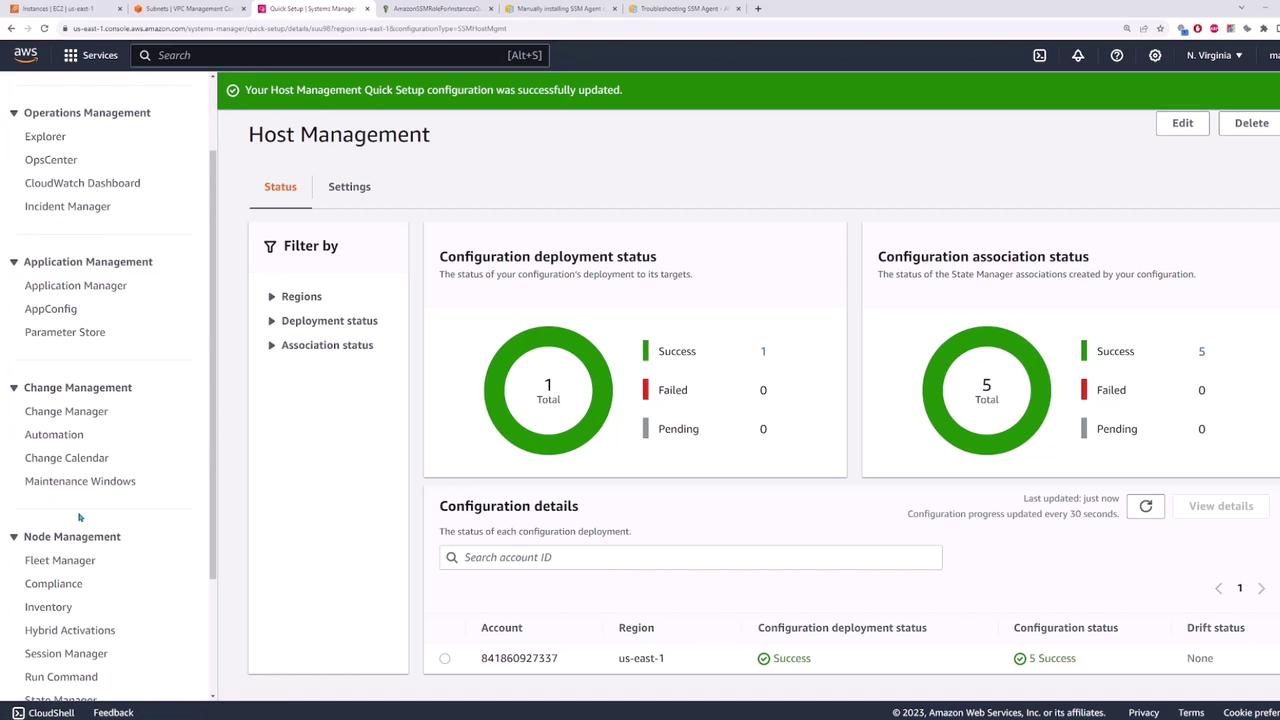
To begin, navigate to the Systems Manager page in the AWS Management Console. Search for “Systems Manager” and open the service. Click on Quick Setup to start configuring host management for automatic EC2 instance management.
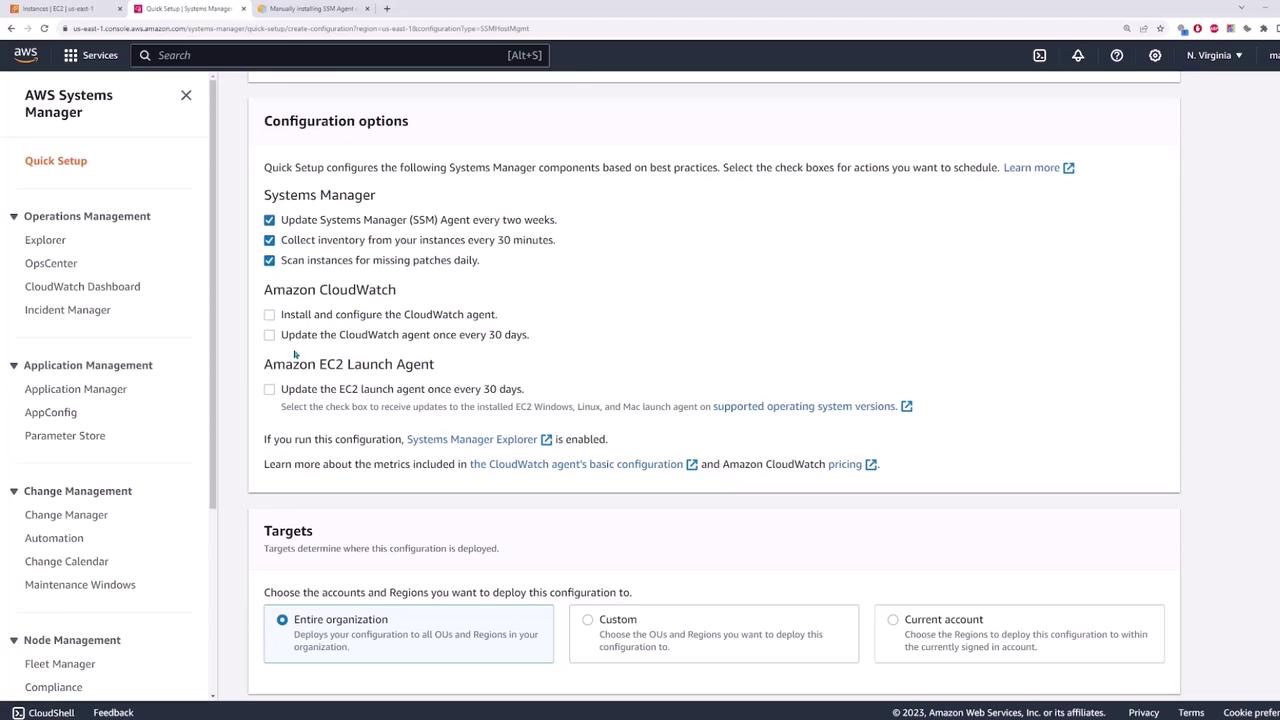
When you click Create, you’ll see several configuration options. For example, you can enable the Systems Manager Agent to update automatically every two weeks, collect inventory every 30 minutes, and schedule a daily scan for missing patches. You can also configure the CloudWatch agent and the EC2 launch agent (both with default 30-day update cycles).
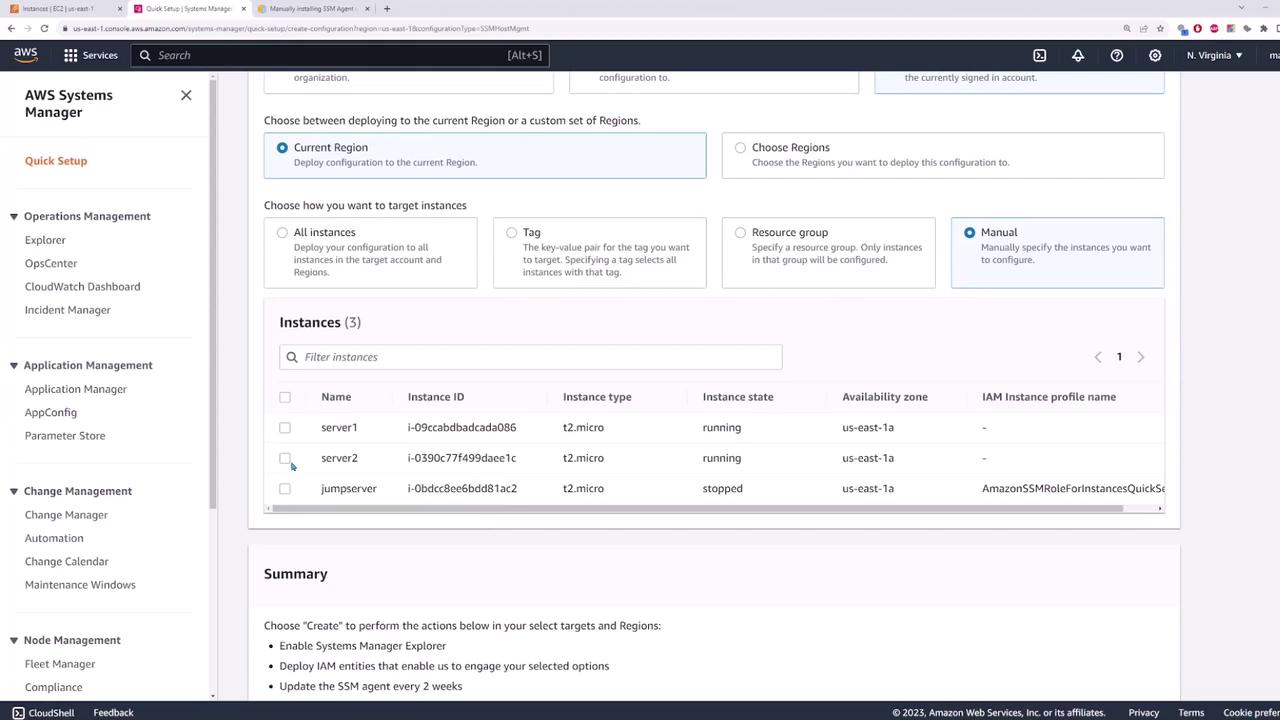
Under the targets section, you can deploy the configuration to your entire organization, the current account, or a customized selection. For this demo, select the current account and limit the deployment to the current region (e.g., Northern Virginia, US East 1). You may choose to manage all instances automatically, filter instances by a tag or resource group, or manually select specific instances. In this example, manually choose server one and server two.
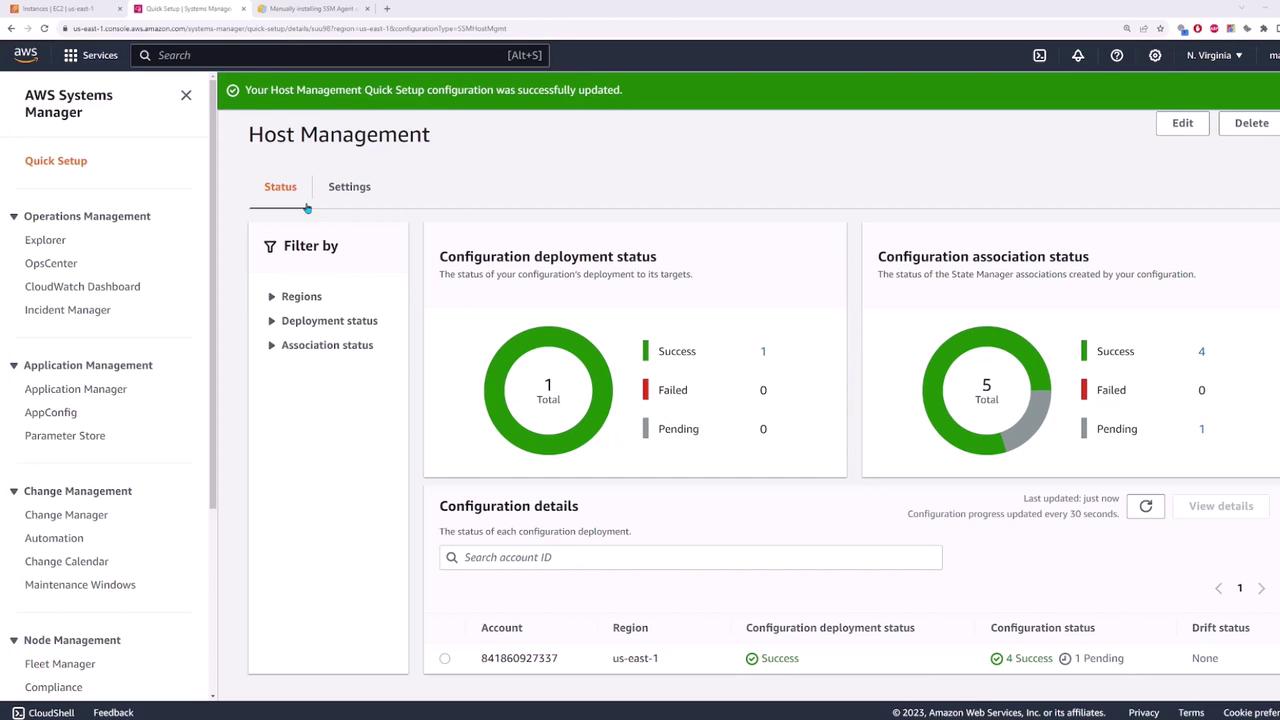
After selecting your instances, click Create. When the deployment completes, a success status is displayed. The process automatically creates the required IAM roles and assigns the necessary instance profile to your EC2 instances. To verify this, select an EC2 instance, go to Actions > Security > Modify IAM Role, and confirm that a role (e.g., “Amazon SSM Quick Setup”) is assigned.
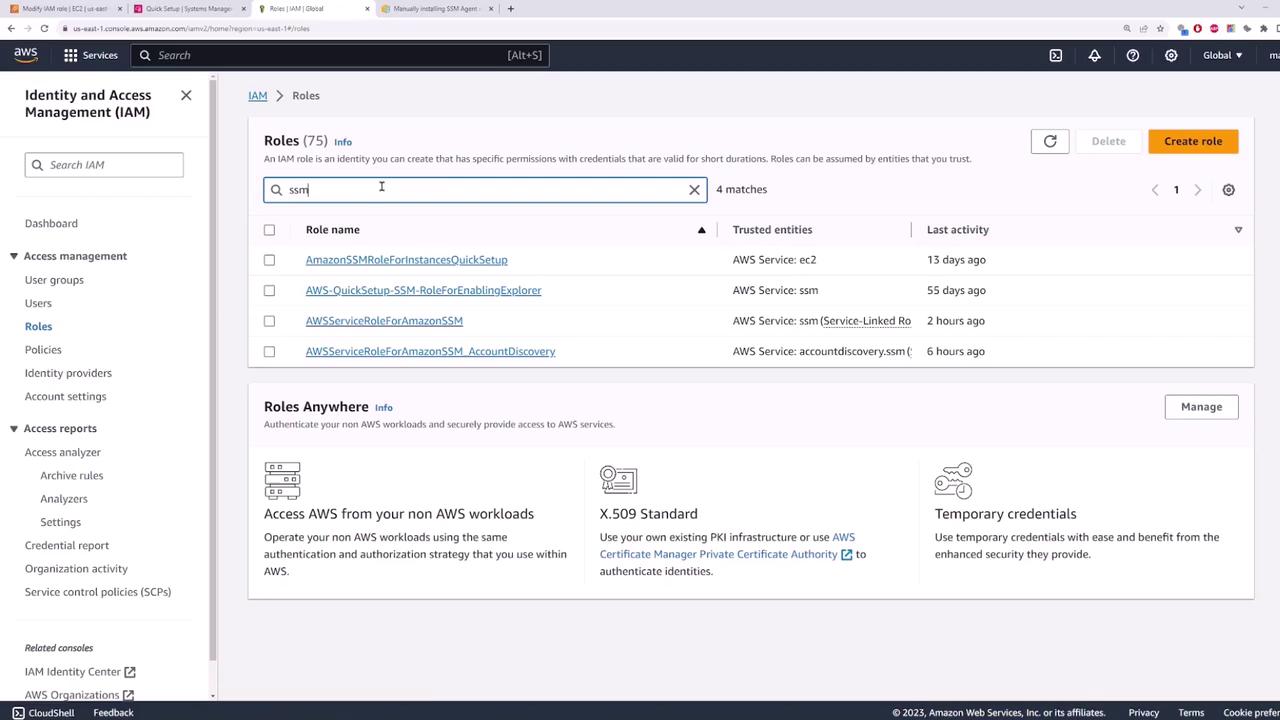
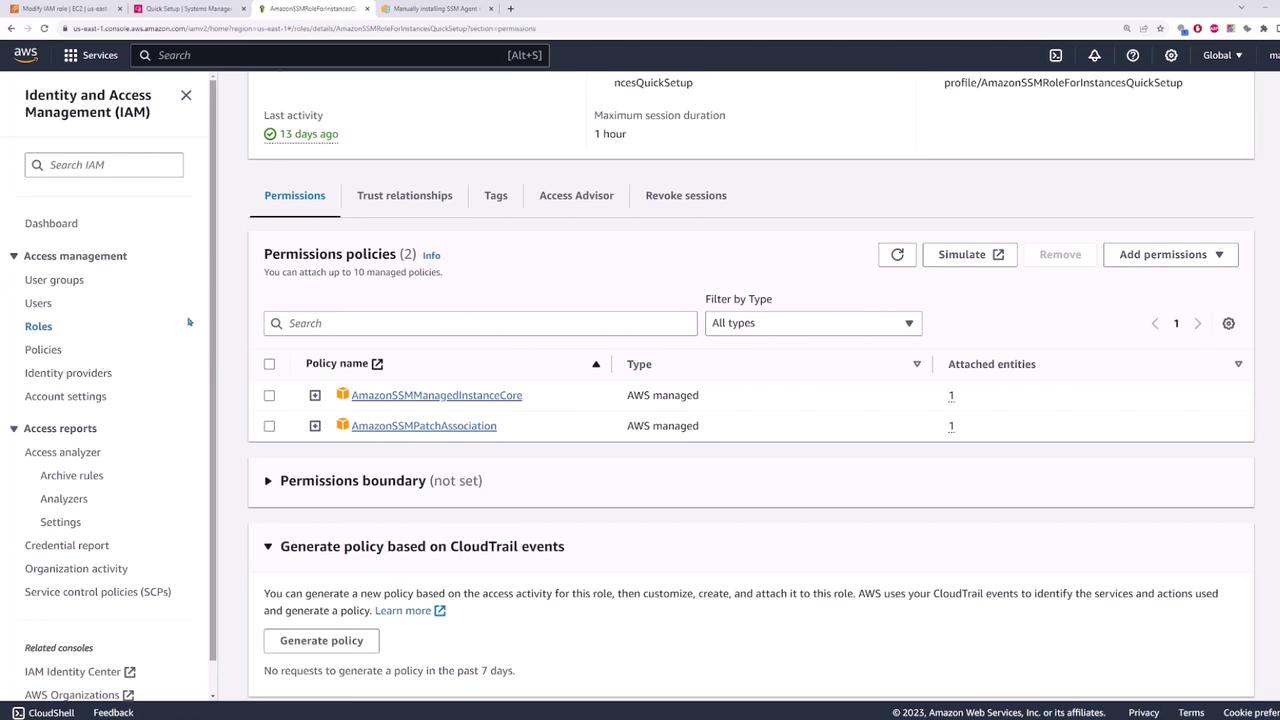
You can also review the assigned roles in the IAM console. Searching for “ssm” in the Roles section will display roles such as SSMManagedInstanceCore and SSMPatchAssociation, which are essential for proper Systems Manager operation.
Ensure that the IAM roles have the correct permissions to allow Systems Manager functions.
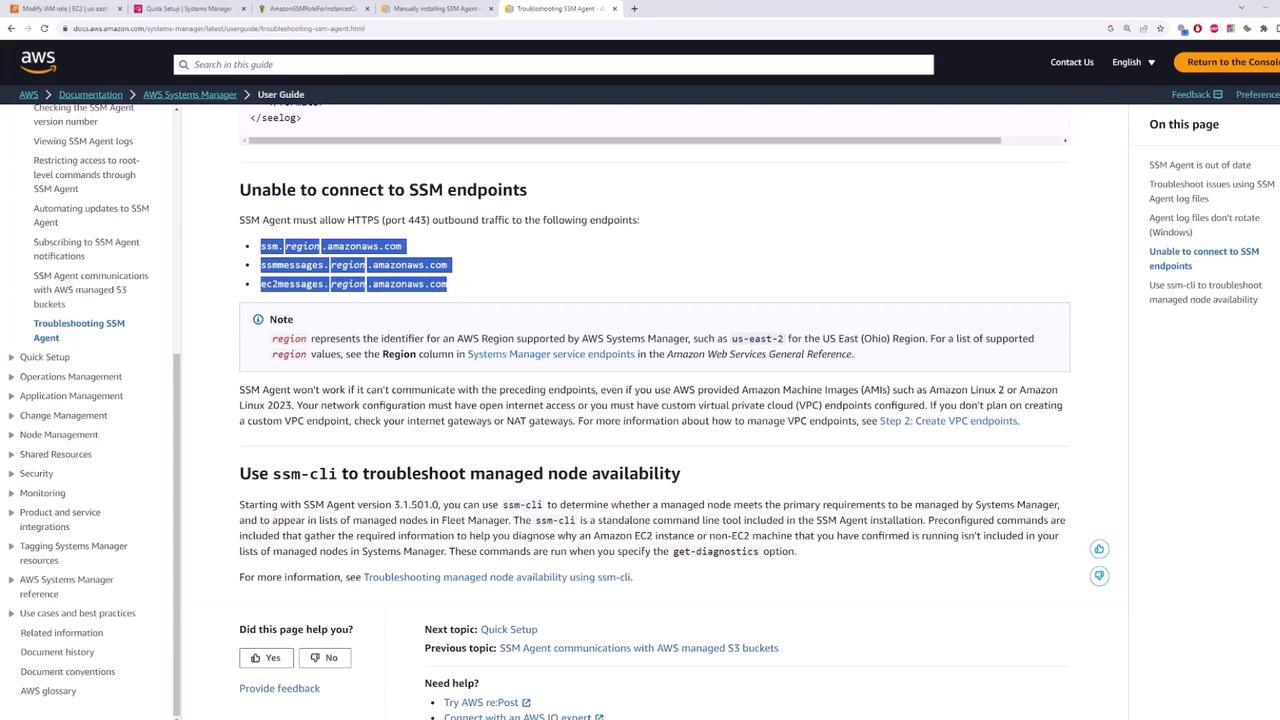
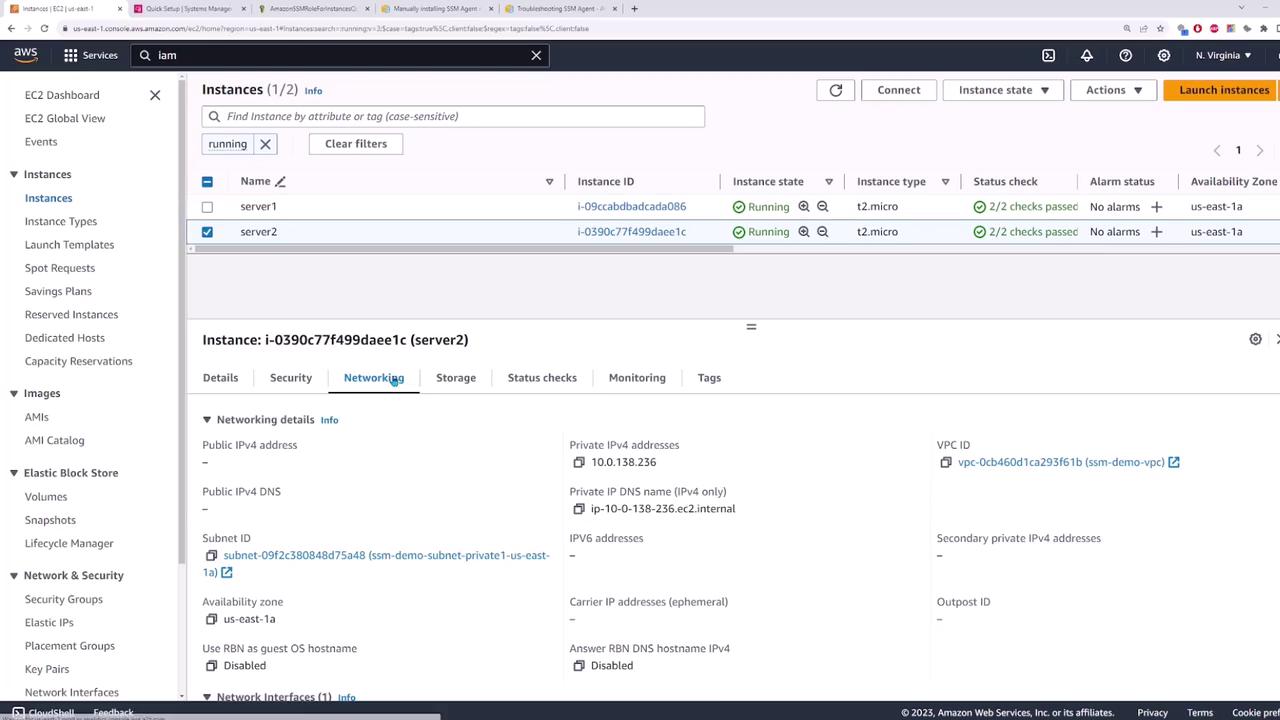
Your EC2 instances need outbound access on port 443 to communicate with SSM endpoints. For instances in a private subnet, configure outbound connectivity using a NAT Gateway. If your instances are in a public subnet, verify that the security group settings allow outbound internet traffic.
For example, when reviewing server one’s network settings, a default route pointing to a NAT Gateway confirms that outbound connectivity—and access to SSM endpoints—is available.
Once Systems Manager is configured and the instances are online, navigate to Fleet Manager under Node Management. This dashboard gives you an overview of all managed nodes. Verify that server one and server two are running and having an “online” ping status, which confirms they are ready for further operations.
A key feature of Systems Manager is Session Manager, which allows you to securely connect to your EC2 instances—even those without public IP addresses. To initiate a session, navigate to the Session Manager section or select Connect from the EC2 page. This opens a terminal window directly connected to your instance.
When connected via Session Manager, you can execute commands on the instance. For example, running ls -la lists the directory contents, confirming that you are interacting with the instance’s operating system. This remote connectivity eliminates the need for configuring a separate jump server.Below is a sample session output:
Copy
Session ID: root-0727dd5ffdb946ed1Instance ID: i-0390c77f499daee1c-rwxr-xr-x. 1 root root 31912 Oct 10 17:08 x86_energy_perf_policy-rwxr-xr-x. 1 root root 66200 Jan 30 2023 xargs-rwxr-xr-x. 1 root root 30518 Jan 28 2023 xgettextlrwxrwxrwx. 1 root root 24 Jan 26 2023 xmlcatalog -> /usr/bin/xmlcatalog-rwxr-xr-x. 1 root root 83264 Sep 26 2018 xmlwf-rwxr-xr-x. 1 root root 41376 Jan 29 2023 xzlrwxrwxrwx. 1 root root 29 Jan 29 2023 xzcat -> xzlrwxrwxrwx. 1 root root 30 Jan 29 2023 xzcmp -> xzdiff-rwxr-xr-x. 1 root root 16368 Jan 29 2023 xzdec-rwxr-xr-x. 1 root root 18712 Jan 29 2023 xzgrep -> xzgrep-rwxr-xr-x. 1 root root 5908 Jan 29 2023 xzgrep-rwxr-xr-x. 1 root root 32816 Jan 29 2023 xzless-rwxr-xr-x. 1 root root 48408 Jan 29 2023 xzmorelrwxrwxrwx. 1 root root 27 Jan 15 2023 ypdomainname -> hostname-rwxr-xr-x. 1 root root 1993 Feb 3 2023 yum -> dnf-3-rwxr-xr-x. 1 root root 1988 Feb 3 2023 xcat-rwxr-xr-x. 1 root root 6464 Feb 3 2023 zcmp-rwxr-xr-x. 1 root root 28616 Feb 3 2023 zdump-rwxr-xr-x. 1 root root 5608 Feb 3 2023 zegrep-rwxr-xr-x. 1 root root 25408 Feb 3 2023 zfgrep-rwxr-xr-x. 1 root root 50768 Feb 3 2023 zgrep-rwxr-xr-x. 1 root root 74144 Jan 29 2023 zipcloak-rwxr-xr-x. 1 root root 2996 Feb 3 2023 zipinfo-rwxr-xr-x. 1 root root 20158 Jan 29 2023 zipgrep-rwxr-xr-x. 1 root root 1676 Jan 29 2023 zipsplit-rwxr-xr-x. 1 root root 85098 Jan 26 21:31 zstdlrwxrwxrwx. 1 root root 27 Jun 14 2022 zstdcat -> zstdlrwxrwxrwx. 1 root root 37 Jun 14 2022 zstdless -> zstdlrwxrwxrwx. 1 root root 37 Jun 14 2022 zstdmt -> zstd
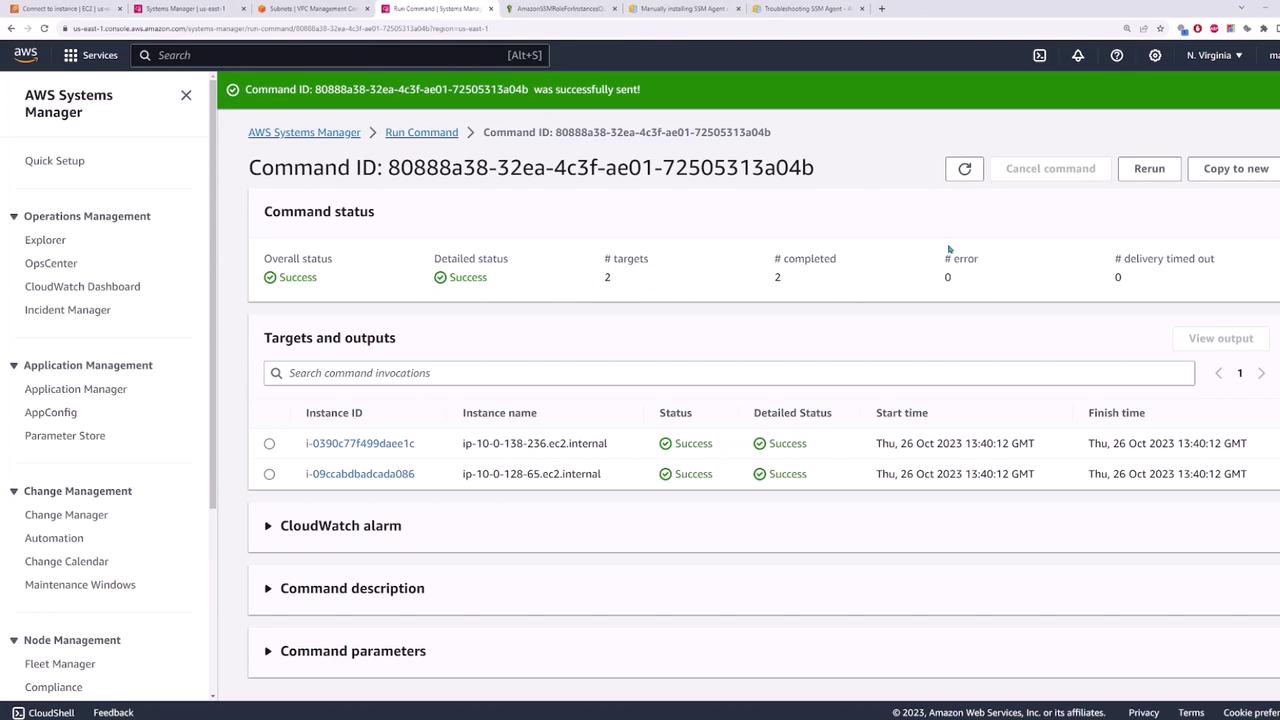
Another powerful feature of Systems Manager is the Run Command, which allows you to execute commands simultaneously across multiple EC2 instances. This is especially handy when managing large fleets—for example, creating a new user on hundreds of instances in one go.To inspect the current users via Session Manager, you might run:
Copy
sh-5.2$ less /etc/passwd
A sample output may include:
Copy
root:x:0:0:root:/root:/bin/bashdaemon:x:1:1:daemon:/sbin/nologinadm:x:3:4:adm:/var/adm:/sbin/nologinlp:x:4:7:lp:/var/spool/lpd:/sbin/nologinsync:x:5:0:sync:/bin/syncshutdown:x:6:0:shutdown:/sbin/shutdownhalt:x:7:0:halt:/sbin/haltoperator:x:8:0:operator:/root:/sbin/nologingames:x:12:12:games:/usr/games:/sbin/nologinftp:x:14:50:ftp User:/var/ftp:/sbin/nologinnobody:x:65534:65534:Kernel Overflow User:/sbin/nologindbus:x:81:81:system message bus:/usr/bin/nologinsystemd-network:x:192:192:System Network Management:/usr/sbin/nologinsystemd-resolve:x:193:193:systemd Resolver:/usr/sbin/nologinsystemd-timesync:x:995:993:systemd Time Synchronization:/usr/sbin/nologinchrony:x:994:994:chrony system user:/var/lib/chrony:/sbin/nologinec2-user:x:1001:1001:EC2 Default User:/home/ec2-user:/bin/bashssm-user:x:1001:1001:/home/ssm-user:/bin/bash
To create a new user across your instances, navigate back to Systems Manager and select Run Command under Node Management. Search for a document related to “create user”—the default version typically works well. When prompted, provide the following parameters:
Username: code cloud
Description: code cloud account
Create home directory: Yes
Perform action: Yes
Then, manually specify the target instances (e.g., server one and server two) and click Run. The command will execute across your selected instances and create the new user.
After execution, the dashboard will display the command status, including details on target count, completed tasks, and confirmation that no errors occurred.
To verify that the new user has been created, log in to one of the EC2 instances (for example, server one) via Session Manager and run:
Copy
ls -l /etc/passwd
You should notice an entry for the new user, which confirms that the configuration has been successfully propagated. Repeat this verification step on server two to ensure consistency across your instances.
This lesson illustrated how AWS Systems Manager simplifies the management of EC2 instances by offering secure connectivity via Session Manager and centralized configuration management using Run Command. With just a few clicks, you can ensure consistent configurations across a fleet of servers, whether you manage a handful or thousands.There are many additional Systems Manager features—such as change management, application management, and operational management—that can further streamline your operations. Explore these features to maximize your cloud management efficiency.Happy managing!