AZ-204: Developing Solutions for Microsoft Azure

Discovering Azure Message Queues

Exploring Service Bus Message Payloads and Serialization

This article delves into two critical aspects of Azure Service Bus messaging: message routing with correlation patterns and payload serialization. By understanding these topics, you can design highly effective messaging systems that efficiently manage high volumes of data.


Message Routing and Correlation Patterns

Azure Service Bus supports various messaging patterns to suit different application requirements, from simple request replies to more complex workflows. Below are the key routing and correlation patterns you can leverage:

Simple Request/Reply

The Simple Request/Reply pattern involves a publisher sending a message to a queue where a consumer processes it and responds directly. This is ideal for scenarios requiring an immediate response, such as querying inventory status.

Multicast Request/Reply

In the Multicast Request/Reply pattern, a message is sent to a topic, and multiple subscribers independently process it. This pattern is useful when multiple systems need to act on the same information, such as when an update notification must be sent to several services.

Multiplexing

Multiplexing enables multiple streams of related messages to be processed through a single queue or subscription. For instance, an e-commerce system can handle both order and shipping messages in one flow, thereby improving processing efficiency.

Multiplexed Request/Reply

The Multiplexed Request/Reply pattern extends multiplexing by supporting multiple reply messages for each request within a stream. This pattern works well in complex workflows with multi-step interactions where each step may produce a distinct response.

The image describes four types of message routing and correlation: Simple Request/Reply, Multicast Request/Reply, Multiplexing, and Multiplexed Request/Reply, each with a brief explanation.

Note

Understanding the different routing patterns helps you choose the best approach for your messaging needs, ensuring both efficiency and scalability in your system.


Message Serialization

Serialization is essential to converting objects to a format that can be transmitted over the network and then deserialized reliably on the receiving end. Azure Service Bus supports several serialization methods:

Content-Type Property

This property specifies the payload format (e.g., JSON or XML), allowing the receiver to deserialize messages correctly.

Service-Based API in .NET Framework

The Service Bus API for the .NET Framework allows you to create a brokered message by directly passing .NET objects. This approach simplifies sending complex objects by automatically converting them to the correct message format.

Legacy SBMP Protocol Serialization

With the legacy SBMP protocol, objects are serialized using a binary serializer. You also have the option to use a custom serializer, tailoring serialization to specific use cases.

AMQP Protocol Serialization

AMQP, an industry-standard protocol, serializes objects into a byte stream ensuring interoperability with various messaging systems that support AMQP.

The image is an infographic titled "Payload Serialization," describing four aspects: Content Type Property, Service Bus API (.NET Framework), Serialization (SBMP Protocol), and Serialization (AMQP Protocol). Each section briefly explains its function in serialization processes.

Tip

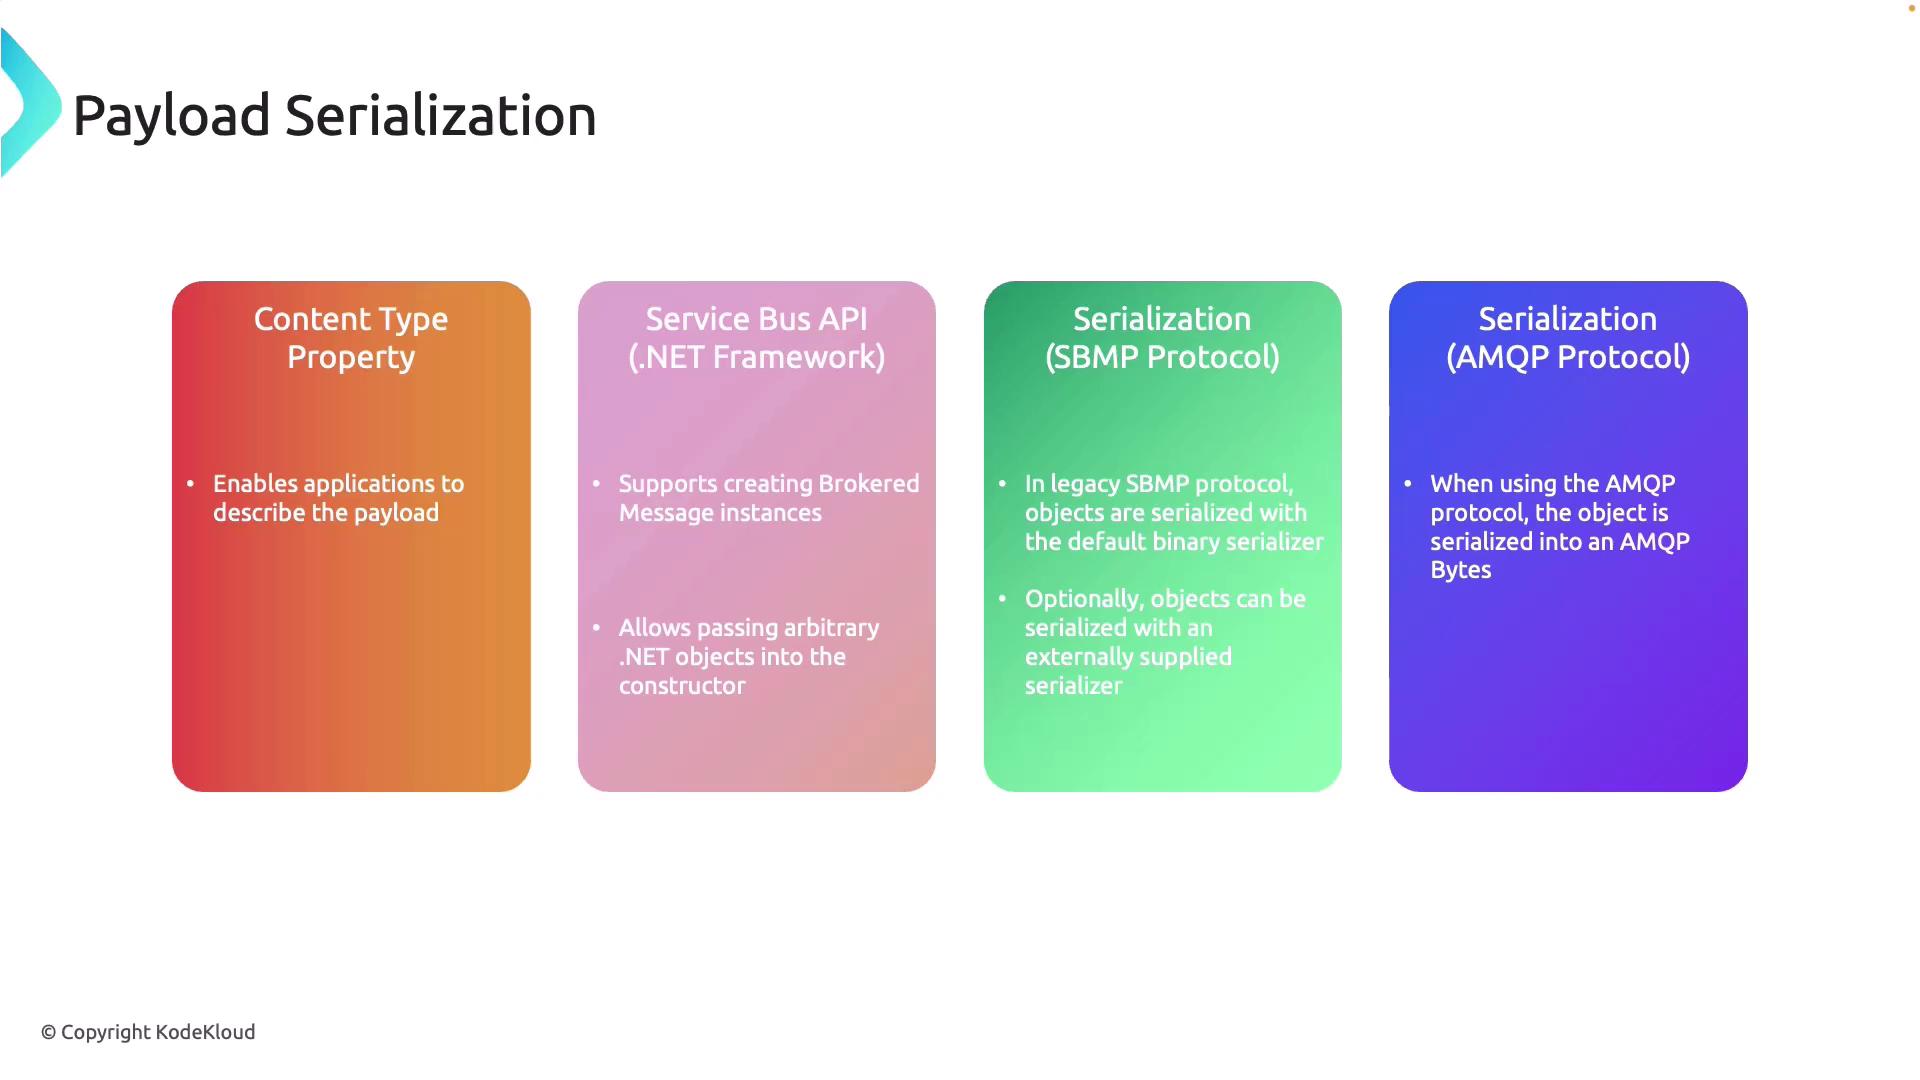
Choosing the appropriate serialization method is crucial for ensuring that your messaging system is both efficient and robust. Evaluate your system's needs based on data complexity and interoperability requirements.

To summarize, selecting the right routing pattern and serialization method is key for achieving effective communication in Azure Service Bus. These techniques will help optimize both performance and scalability in your messaging solutions.


Azure Portal Walkthrough

Follow these steps to create a Service Bus instance and explore sending and receiving messages via the .NET SDK.

  1. Open the Azure Portal and search for "Service Bus."
  2. Create a Service Bus namespace with the following settings:
    • Resource Group: RG-AZ204-ServiceBus
    • Namespace Name: Choose a unique name (e.g., AZ204-SV-Hub09) to register under servicebus.windows.net.
    • Tier: Basic (suitable for simple messaging scenarios)

The image shows a configuration screen for creating a new namespace in a cloud service, with options for subscription, resource group, namespace name, location, and pricing tier. There is also a section for geo-replication settings.

  1. Navigate to the Advanced > Networking section and select public access (note that private endpoints require a higher tier).
  2. After validation, deploy the Service Bus.
  3. Once deployed, capture both the Service Bus name and the connection string (using either the root Shared Access Signature with manage, send, and listen permissions, or a custom one for specific actions).

Setting Up the Queue and Code Walkthrough

After deploying your Service Bus instance, create a queue (e.g., Q01) for your messaging operations. The default settings such as queue size, maximum delivery count, dead lettering, and partitioning are generally sufficient for initial testing.

The image shows the Microsoft Azure portal interface for creating a Service Bus queue, with options to set the queue name, size, and other configurations. The left panel displays various Azure services and settings.

Below is the code walkthrough for sending and receiving messages with the .NET SDK.

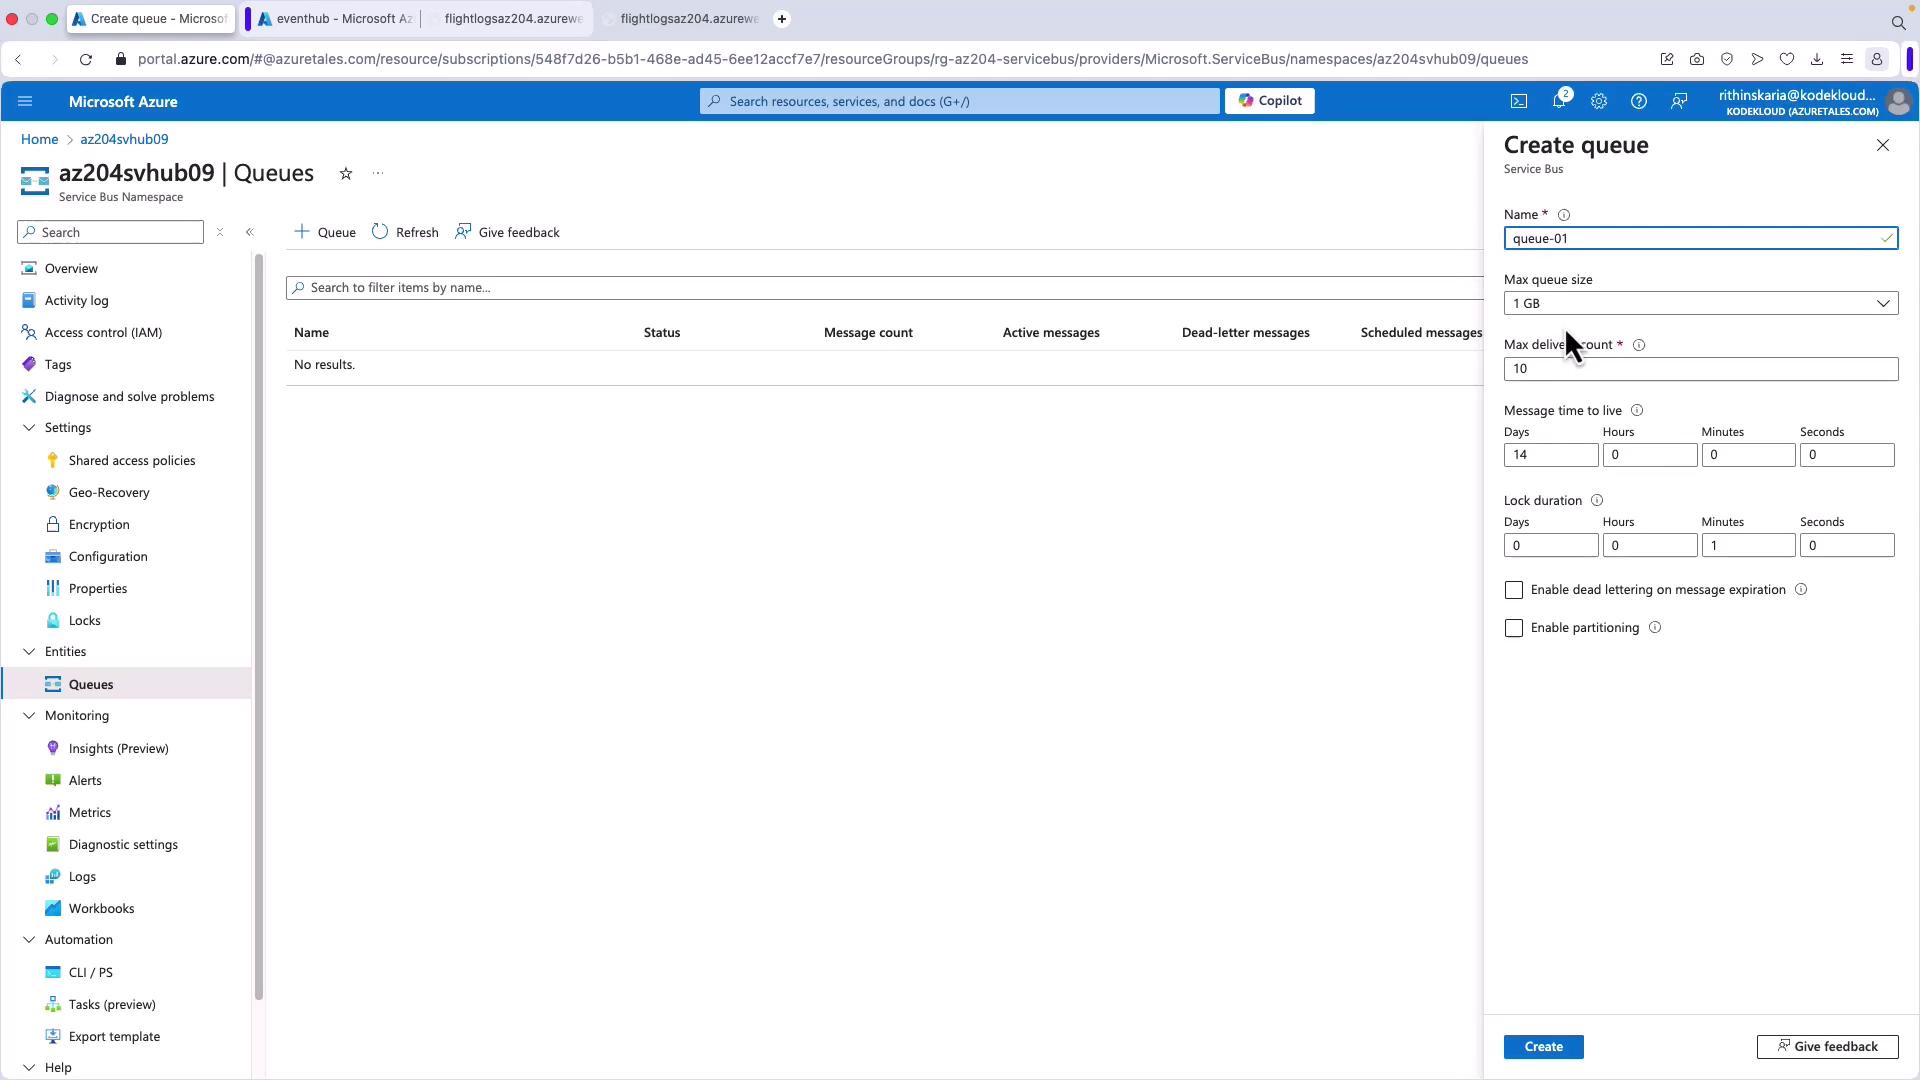
Main Application Code

This section prompts the user to choose between sending or receiving a message:

using System;
using System.Threading.Tasks;
using Azure.Messaging.ServiceBus;

class Program
{
    private const string connectionString = "Endpoint=sb://az204svhub09.servicebus.windows.net/;SharedAccessKeyName=RootManageSharedAccessKey;SharedAccessKey=BbM4cPwJBpThed0w/oQULE5KLR3DvocM";
    private const string queueName = "queue-01"; // Replace with your Queue name

    static async Task Main(string[] args)
    {
        Console.WriteLine("Azure Service Bus Demo: Send or Receive Messages");
        Console.WriteLine("Choose an option:");
        Console.WriteLine("1. Send a message");
        Console.WriteLine("2. Receive messages");

        var input = Console.ReadLine();

        if (input == "1")
        {
            await SendMessageAsync();
        }
        else if (input == "2")
        {
            await ReceiveMessagesAsync();
        }
        else
        {
            Console.WriteLine("Invalid input. Exiting...");
        }
    }
}

Sending a Message

The following method prompts the user for a message and sends it asynchronously:

static async Task SendMessageAsync()
{
    await using var client = new ServiceBusClient(connectionString);
    ServiceBusSender sender = client.CreateSender(queueName);
    
    Console.WriteLine("Enter the message to send:");
    string? messageBody = Console.ReadLine();
    ServiceBusMessage message = new ServiceBusMessage(messageBody);
    
    await sender.SendMessageAsync(message);
    Console.WriteLine($"Sent message: {messageBody}");
}

Receiving Messages

This method sets up a processor to handle incoming messages and errors. It processes messages by converting them to strings and completes each message after processing:

static async Task ReceiveMessagesAsync()
{
    await using var client = new ServiceBusClient(connectionString);
    ServiceBusProcessor processor = client.CreateProcessor(queueName, new ServiceBusProcessorOptions());

    processor.ProcessMessageAsync += MessageHandler;
    processor.ProcessErrorAsync += ErrorHandler;

    await processor.StartProcessingAsync();

    Console.WriteLine("Receiving messages... Press any key to stop.");
    Console.ReadKey();
    await processor.StopProcessingAsync();
    Console.WriteLine("Stopped receiving messages.");
}

static async Task MessageHandler(ProcessMessageEventArgs args)
{
    string body = args.Message.Body.ToString();
    Console.WriteLine($"Received message: {body}");
    await args.CompleteMessageAsync(args.Message);
}

static Task ErrorHandler(ProcessErrorEventArgs args)
{
    Console.WriteLine($"Error occurred: {args.Exception.Message}");
    return Task.CompletedTask;
}

Running the Application

After saving your changes, run the application using the following command:

dotnet run

The console will display options to either send or receive messages:

Azure Service Bus Demo: Send or Receive Messages
Choose an option:
1. Send a message
2. Receive messages

When you opt for sending a message, enter your desired text (e.g., "Hello there!"). In a separate instance or after restarting the application, choose the receive option to view the message. The console output should resemble the following:

Sent message: Hello there!

And when receiving:

Receiving messages... Press any key to stop.
Received message: Hello there!

Pro Tip

Running both send and receive operations concurrently can help test and validate the end-to-end messaging flow in your application.


Next Steps

This demonstration covered the fundamentals of Azure Service Bus messaging. In future discussions, we will extend these concepts to explore Azure Blob Storage, further enhancing your cloud messaging and storage solutions.

Happy learning!

Watch Video

Watch video content

Previous
Discovering Service Bus Queues Topics and Subscriptions