This article explains the process of upgrading a Kubernetes cluster, focusing on control plane components and strategies for upgrading master and worker nodes.
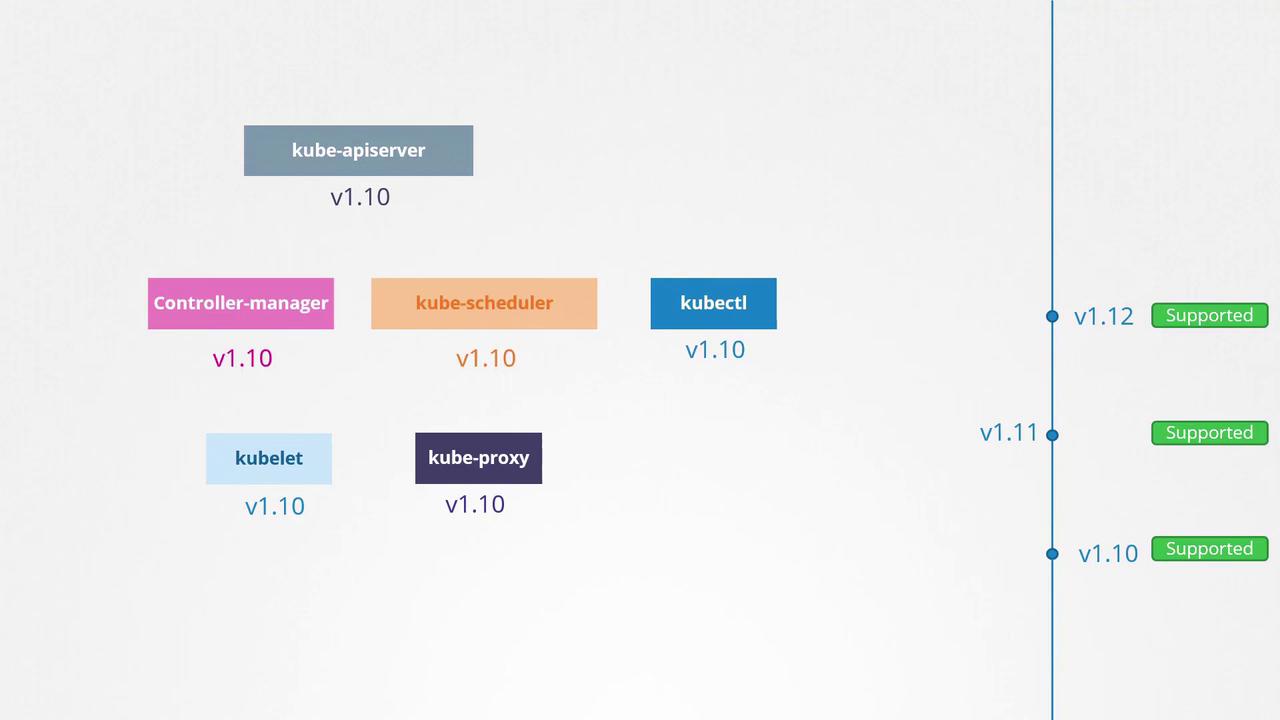
Welcome to this article on upgrading a Kubernetes cluster. Here, we will explain the upgrade process focusing on the core control plane components, while keeping external dependencies like ETCD and CoreDNS aside. In a previous article, we discussed how Kubernetes manages software releases and how its components can have independent versioning.It is important to note that not all components are required to run on the same version. Although different components can operate on varying release versions, the Kube API Server remains the primary control plane component that all others communicate with. Consequently, no component should ever run on a version higher than the API Server. For example:
The controller manager and scheduler may be one version lower than the API Server.
The Kubelet and Kube Proxy components may be two versions lower than the API Server.
For instance, if the API Server is at version 1.10, then:
The controller manager and scheduler can run on version 1.10 or 1.9.
The Kubelet and Kube Proxy can run on version 1.8.
Running any component on a version higher than the API Server (e.g., 1.11 when the API Server is 1.10) is not recommended.
The Kube Control utility is an exception and may run on a version that is higher, lower, or the same as the API Server. This flexibility supports live, rolling upgrades where components can be upgraded individually.
Suppose you’re running Kubernetes 1.10, and new releases 1.11 and 1.12 are available. Kubernetes officially supports up to the three most recent minor versions. With 1.12 as the latest, the supported versions are 1.12, 1.11, and 1.10. When version 1.13 is released, only 1.13, 1.12, and 1.11 will be supported. It is advisable to upgrade your cluster to the next release before support for your current version is dropped.An effective upgrade strategy is to upgrade one minor version at a time (e.g., upgrade from 1.10 to 1.11, then from 1.11 to 1.12, and finally from 1.12 to 1.13) rather than attempting a large jump between versions. Keep in mind that the upgrade process may vary depending on your cluster setup. Managed Kubernetes services (such as Google Kubernetes Engine) offer a simple upgrade interface, while clusters deployed using tools like kubeadm or manual installation require more hands-on management.
Consider a production cluster with master and worker nodes running version 1.10. The upgrade process generally involves two major steps:
Upgrading the master nodes.
Upgrading the worker nodes.
During the master node upgrade, control plane components (such as the API server, scheduler, and controller managers) experience a brief interruption. Although management functionality (like kubectl commands or scaling deployments) is paused, the worker nodes continue to run and deliver applications. However, keep in mind that if any pods fail during this period, they might not be restarted automatically. Once the master upgrade is complete, normal control plane operations resume.After the master nodes are upgraded (for example, moving from version 1.10 to 1.11 while the worker nodes are still at 1.10), the next step is to upgrade the worker nodes. There are several strategies for this:
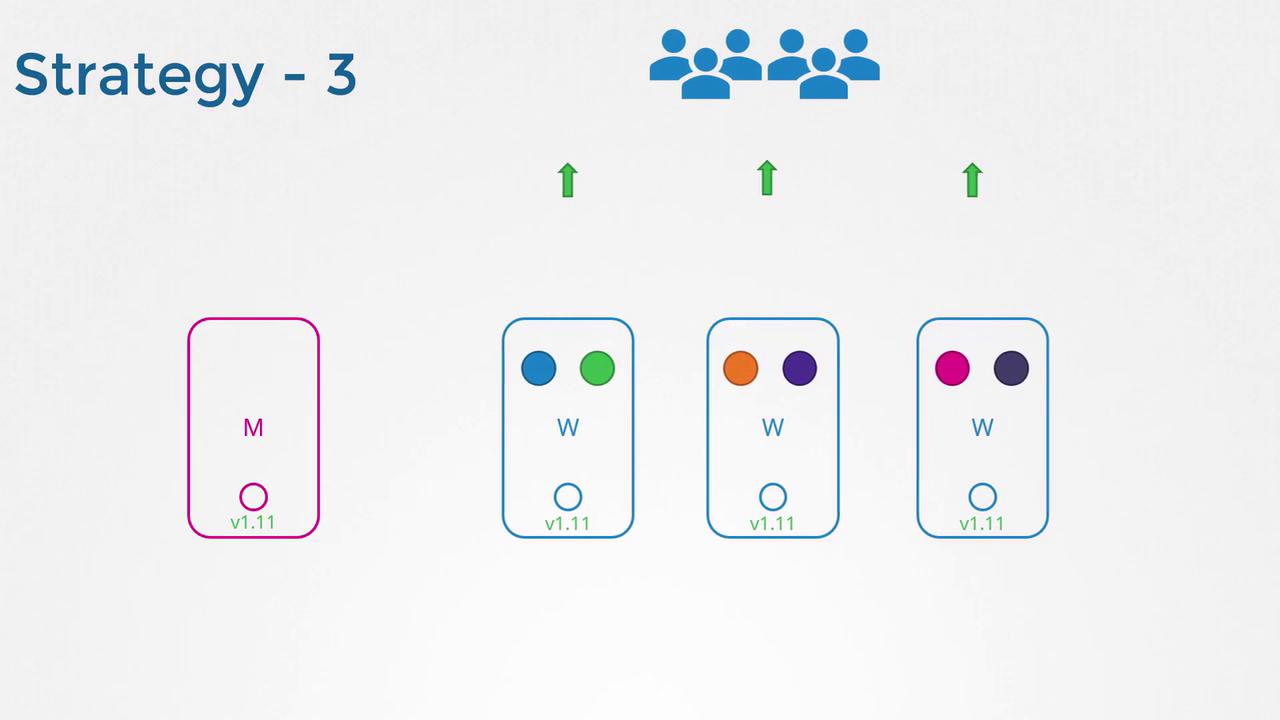
Upgrade all worker nodes simultaneously (which may result in downtime).
Upgrade one worker node at a time, allowing workloads to be shifted and ensuring continuous service.
Add new nodes with the updated software version, migrate workloads to these new nodes, and then decommission the older nodes.
Suppose you want to upgrade your cluster from version 1.11 to 1.13. The kubeadm tool simplifies planning and executing cluster upgrades. To start, run:
Copy
kubeadm upgrade plan
This command provides useful information such as:
The current cluster version.
The version of the kubeadm tool.
The latest stable version of Kubernetes.
A list of control plane components along with their current versions and the target upgrade versions.
Remember that after upgrading the control plane components, you must manually upgrade the kubelet on each node—kubeadm does not manage kubelet upgrades. Also, the kubeadm tool itself should be upgraded before initiating the cluster upgrade.Because upgrades are performed one minor version at a time, if you’re on version 1.11 and wish to reach 1.13, you must first upgrade to 1.12. The process is as follows:
Upgrade the kubeadm tool to version 1.12.
Upgrade the cluster using the command provided by the upgrade plan (e.g., “kubeadm upgrade apply v1.12.0”). This command downloads the necessary images and upgrades the control plane components.
Below is an example of upgrading the control plane components using kubeadm:
Copy
apt-get upgrade -y kubeadm=1.12.0-00kubeadm upgrade apply v1.12.0# Output:# [upgrade/successful] SUCCESS! Your cluster was upgraded to "v1.12.0". Enjoy!# [upgrade/kubelet] Now that your control plane is upgraded, please proceed with upgrading your kubelets if you haven't already done so.
After this step, the control plane components are updated to 1.12. Note that if you run:
Copy
kubectl get nodes
the master node might still appear as 1.11 because this command displays the version of the kubelet registered on the node, not necessarily the API Server version. The next step is to upgrade the kubelet on the node. In clusters deployed with kubeadm, kubelets run on master nodes to manage control plane pods. (For clusters set up manually, master nodes might not run kubelets.) Upgrade the kubelet by using your package manager and then restart the kubelet service. Once you complete these actions and verify using:
Copy
kubectl get nodes
you should see the master node running 1.12 while the worker nodes continue on 1.11.
Upgrading worker nodes should be done one at a time. The recommended approach is to drain one worker node to ensure the applications remain available on other nodes. Use the following command to cordon the node and safely evict pods:
Copy
kubectl drain node-1
After draining the node, upgrade the kubeadm and kubelet packages on the worker node using the same process as with the master node. Update the configuration with the kubeadm upgrade command, restart the kubelet service, and finally mark the node as schedulable with:
Copy
kubectl uncordon node-1
Repeat this procedure for each worker node until the entire cluster is updated. When upgrading from 1.11 to 1.12 and eventually to 1.13, follow this process consistently.
In this article, we outlined the process of upgrading a Kubernetes cluster using kubeadm, focusing on two key scenarios: upgrading the control plane (master nodes) and safely upgrading worker nodes without affecting application availability. For best practices, consider testing the upgrade process in a non-production environment to simulate live upgrades and ensure zero downtime for your users.Good luck with your Kubernetes cluster upgrade!For more information on Kubernetes best practices and upgrade strategies, please refer to the Kubernetes Documentation.