This article explains how Kubernetes Service Cluster IP facilitates stable pod-to-pod communication in microservices-based applications.
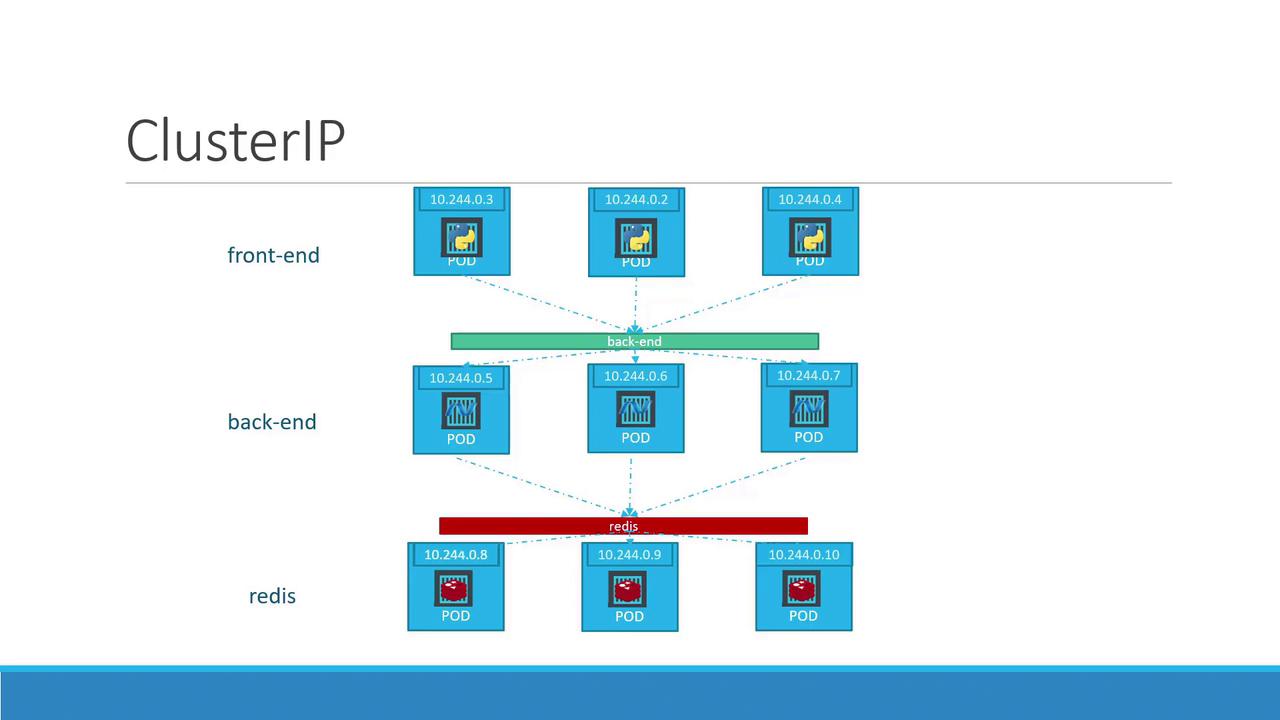
Welcome to this lesson on Kubernetes Service Cluster IP. In this guide, we explain how Cluster IP streamlines connectivity within a full-stack web application by providing a stable interface for pod-to-pod communication.A typical microservices-based application consists of several pods. Some pods host a front-end web server, while others run a back-end server; additional pods manage services like a key-value store using Redis or persistent databases like MySQL. The front-end pods need to communicate with the back-end services, and the back-end servers must interact with databases and caching mechanisms.Because pods receive dynamic IP addresses that can change when they are recreated, relying on these IPs for internal communication is impractical. Moreover, when a front-end pod (for example, with IP 10.244.0.3) needs to connect to a back-end service, there arises the issue of determining which pod should handle the request. Kubernetes solves this challenge by grouping related pods under a single service. This service provides a fixed Cluster IP or a service name, allowing other pods to access them without worrying about individual IPs. The service automatically load-balances incoming requests among the available pods.For instance, by creating a service for the back-end pods, you can group them together under one interface. Similarly, services can be set up for Redis or other application tiers, ensuring that each layer can scale independently without disrupting internal connectivity.
Each service in Kubernetes is automatically assigned an IP and DNS name within the cluster. This Cluster IP should be used by other pods when accessing the service, ensuring consistent and reliable connectivity.
Below is a sample YAML configuration for creating a service named “back-end”. This service exposes port 80 on the Cluster IP, forwarding requests to the back-end pods that match the specified labels (app: myapp and type: back-end). The targetPort is set to 80, matching the port where the back-end container listens:
After deploying the service, verify its status with:
Copy
kubectl get services
The output should resemble the following:
Copy
NAME TYPE CLUSTER-IP EXTERNAL-IP PORT(S) AGEkubernetes ClusterIP 10.96.0.1 <none> 443/TCP 16dback-end ClusterIP 10.106.127.123 <none> 80/TCP 2m
With this setup, components of your application can access the back-end service using either its Cluster IP or its DNS service name, ensuring uninterrupted connectivity even as individual pods scale dynamically.This concludes the lesson. Thank you for reading, and we look forward to seeing you in the next lesson.