CKA Certification Course - Certified Kubernetes Administrator
Networking
CNI weave
Welcome to this comprehensive guide on the Weaveworks CNI plugin. In this lesson, we’ll explore how this solution works, its architecture, and how it compares to a custom CNI script integrated into Kubelet.
Previously, we examined a custom CNI script that handled networking tasks through commands similar to the following:
./net-script.sh add <container> <namespace>
# Create veth pair
# Attach veth pair
# Assign IP Address
# Bring Up Interface
ip -n <namespace> link set ……
# Delete veth pair
ip link del ……
Instead of using our custom approach, the Weave plugin automates and streamlines the network setup. Let's dive in to understand how Weave functions.
Manual Networking vs. Weave CNI
In traditional networking, the routing table on each host maps different networks. When a packet moves from one pod to another, it usually exits through the network and is directed by a router to the destination node hosting the target pod. Although this works well in small-scale networks, scaling to hundreds of nodes and pods makes managing numerous routing table entries extremely challenging.
Imagine a Kubernetes cluster as a company with different office sites (nodes). Each office has various departments (pods). Initially, a package (packet) may be delivered using a simple routing method. However, as the company expands across regions and countries, maintaining a comprehensive routing table becomes unmanageable.
Note
Think of Weave as a specialized shipping service. It deploys dedicated agents (pods) at each node that collectively form a peer-to-peer network, ensuring efficient communication and accurate routing in a large-scale environment.
How Weave Works
The Weave CNI plugin deploys an agent on each Kubernetes node. These agents exchange information about nodes, networks, and pods to maintain a complete topology of the cluster. Each node runs a Weave bridge, allowing dynamic IP address assignment. In the upcoming practice lesson, you will determine the exact range of IP addresses assigned by Weave.
Keep in mind that a pod may be connected to multiple bridge networks (e.g., both the Weave bridge and the Docker bridge). The container's routing configuration controls the path a packet follows, and Weave ensures that each pod has the correct route through its assigned agent. When sending a packet to a pod on another node, Weave intercepts, encapsulates, and routes it using updated source and destination details. At the destination node, the corresponding Weave agent decapsulates the packet and delivers it to the intended pod.
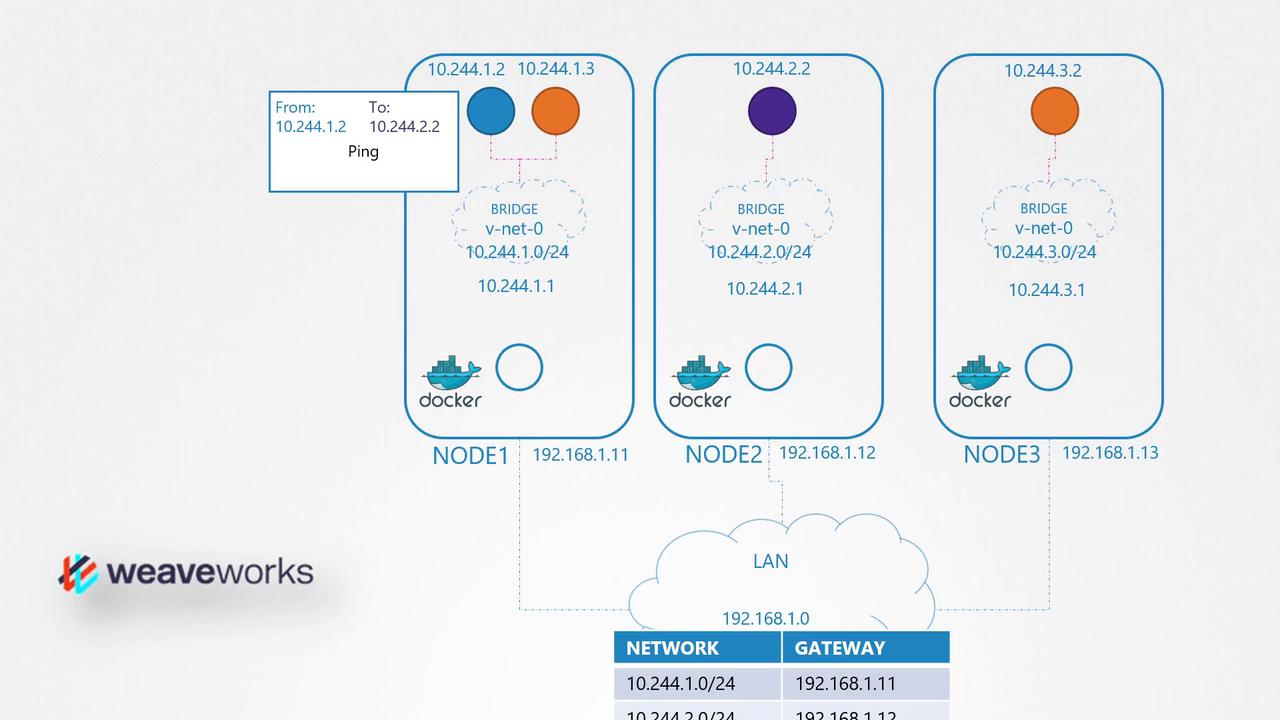
Network Diagrams
The following diagram illustrates a network setup with multiple Docker nodes, each residing in its own subnet, interconnected using Weaveworks to manage container networking:
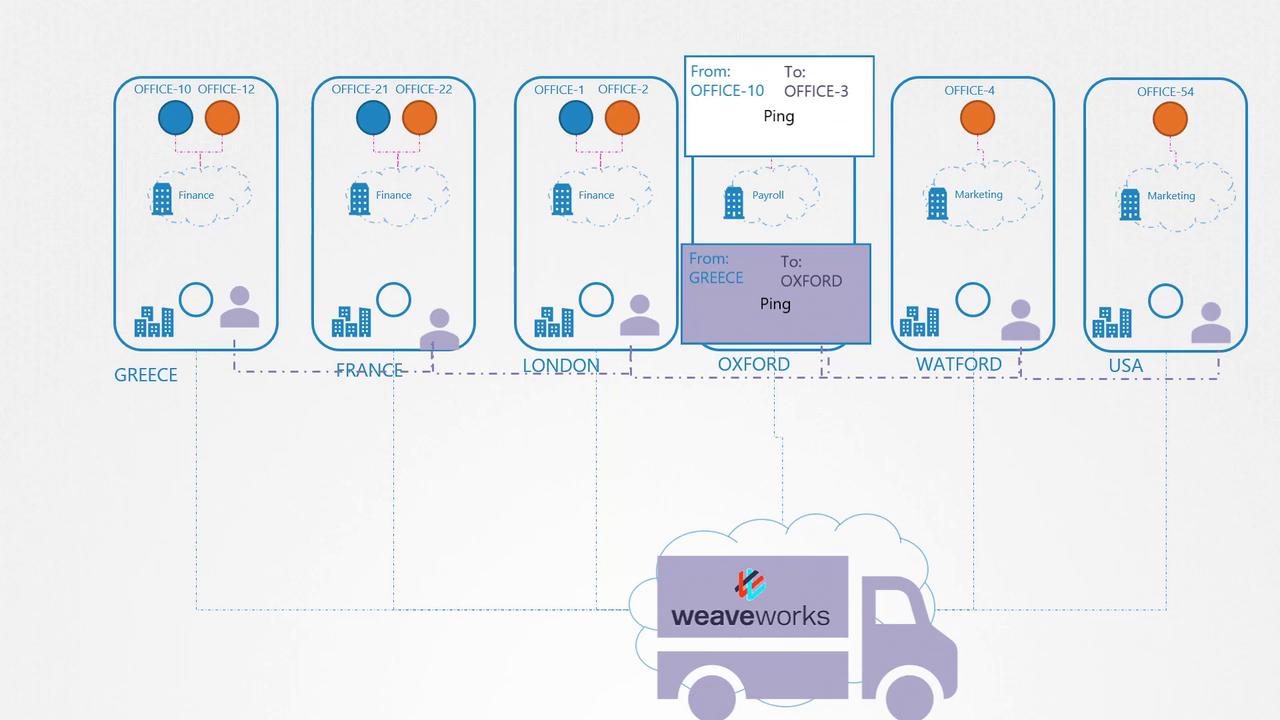
A subsequent diagram further explains this concept by representing a network of offices across several countries. This diagram highlights the connections and data flow with a Weaveworks truck illustration:
Deploying Weave on a Kubernetes Cluster
Deploying Weave on a Kubernetes cluster is straightforward. Once you have set up your base Kubernetes environment—with nodes, inter-node networking, and control plane components—you can deploy the Weave plugin using a single command. This command deploys the necessary components (Weave peers) as pods on every node, often configured via a DaemonSet.
Here's an example command to inspect the routing settings within a running pod:
kubectl exec busybox -- ip route
default via 10.244.1.1 dev eth0
To deploy the Weave components, run:
kubectl apply -f "https://cloud.weave.works/k8s/net?k8s-version=$(kubectl version | base64 | tr -d '\n')"
The output should confirm successful deployment:
serviceaccount/weave-net created
clusterrole.rbac.authorization.k8s.io/weave-net created
clusterrolebinding.rbac.authorization.k8s.io/weave-net created
role.rbac.authorization.k8s.io/weave-net created
rolebinding.rbac.authorization.k8s.io/weave-net created
daemonset.extensions/weave-net created
If you are using kubeadm along with the Weave plugin, you will see the Weave peers as pods on each node. For troubleshooting or further verification, list the pods in the kube-system namespace:
kubectl get pods -n kube-system
Note
For more detailed troubleshooting steps and configuration options, refer to the Weaveworks documentation.
Conclusion
This guide has covered the basics of the Weaveworks CNI plugin, including its operational model and deployment process on a Kubernetes cluster. Future articles will delve deeper into IP address management and explore how IPs are assigned to pods and containers within the cluster.
Embrace Weave to simplify your network configuration and ensure seamless communication across your Kubernetes environment.
Watch Video
Watch video content
Practice Lab
Practice lab