CKA Certification Course - Certified Kubernetes Administrator

Scheduling

Configuring Scheduler Profiles

In this lesson, we dive into the concept of scheduler profiles and their configuration in Kubernetes. We will start with a refresher on how the Kubernetes scheduler functions, illustrated by a simple example where a pod is scheduled to one of several available nodes.

How Scheduling Works

When a pod is defined, it enters a scheduling queue along with other pending pods. Consider a pod that requires 10 CPU; it will only be scheduled on nodes with at least 10 available CPUs. Additionally, pods with higher priorities are placed at the beginning of the queue. For instance, the following pod definition uses a high-priority class:

apiVersion: v1
kind: Pod
metadata:
  name: simple-webapp-color
spec:
  priorityClassName: high-priority
  containers:
    - name: simple-webapp-color
      image: simple-webapp-color
      resources:
        requests:
          memory: "1Gi"
          cpu: 10

Before using this priority, you must create a priority class with a specific name and a priority value. Assigning a value like 1,000,000, for example, grants a very high priority. This ensures that pods with higher priorities are scheduled ahead of those with lower ones.

Scheduling Phases

After being queued, pods progress through several phases:

  1. Filter Phase: Nodes that cannot meet the pod's resource requirements (e.g., nodes lacking 10 CPUs) are filtered out.
  2. Scoring Phase: Remaining nodes are scored based on resource availability after reserving the required CPU. For example, a node with 6 CPUs left scores higher than one with only 2.
  3. Binding Phase: The pod is assigned to the node with the highest score.

Key Scheduler Plugins

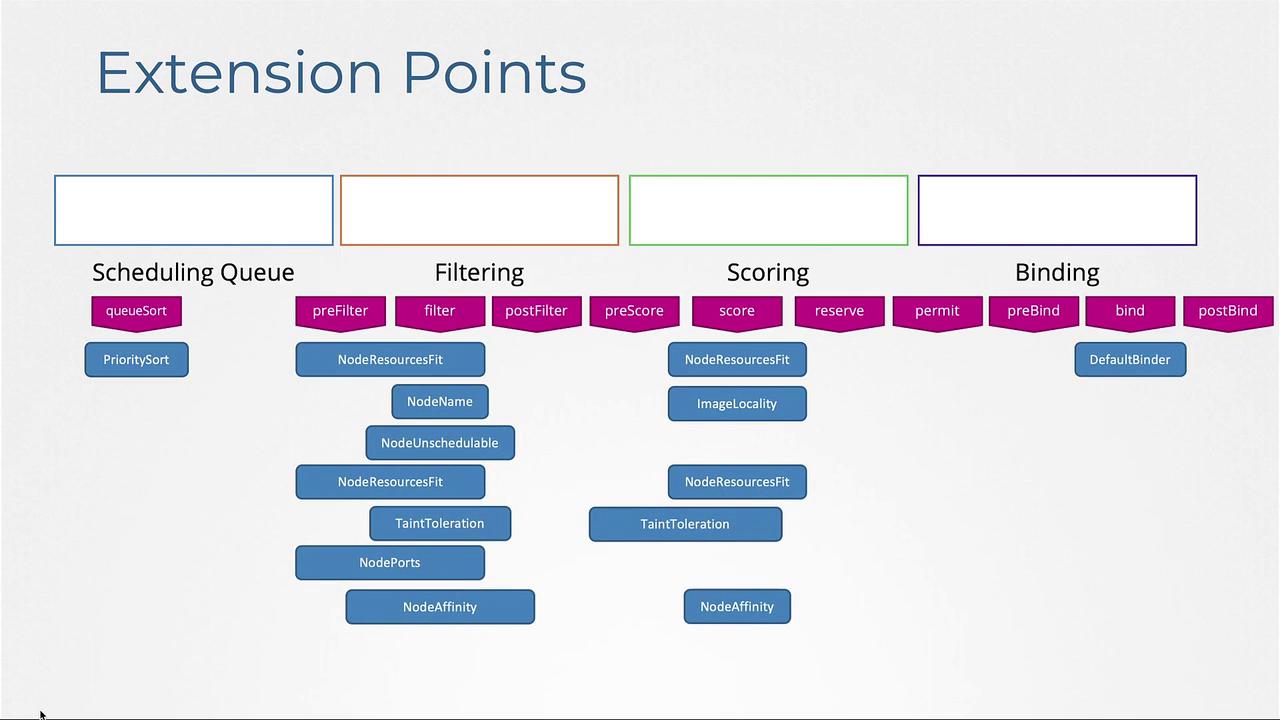
Several scheduler plugins play critical roles during these phases:

  • Priority Sort Plugin: Sorts pods in the scheduling queue according to their priority.

  • Node Resources Fit Plugin: Filters out nodes that do not have the needed resources.

  • Node Name Plugin: Checks for a specific node name in the pod specification and filters nodes accordingly.

  • Node Unschedulable Plugin: Excludes nodes marked as unschedulable. For instance, running commands like drain or cordon will set the unschedulable flag. An example node description is:

    controlplane ~ → kubectl describe node controlplane
    Name:               controlplane
    Roles:              control-plane
    CreationTimestamp:  Thu, 06 Oct 2022 06:19:57 -0400
    Taints:             node.kubernetes.io/unschedulable:NoSchedule
    Unschedulable:      true
    Lease:
    
  • Scoring Plugins: During the scoring phase, plugins (such as the Node Resources Fit and Image Locality plugins) assess each node's suitability. They assign scores rather than outright rejecting nodes.

  • Default Binder Plugin: Finalizes the scheduling process by binding the pod to the selected node.

Note

Kubernetes emphasizes extensibility, allowing you to modify the scheduling process via extension points at stages such as queueing, filtering, scoring, and binding.

The following image outlines the various extension points of the Kubernetes scheduler, including processes like the scheduling queue, filtering, scoring, and binding phases:

The image outlines Kubernetes scheduler extension points: Scheduling Queue, Filtering, Scoring, and Binding, with specific functions like queueSort, preFilter, and bind.

Customizing Scheduler Behavior with Profiles

Rather than running separate scheduler binaries (like default scheduler, MyScheduler, and MyScheduler2) with distinct configuration files, Kubernetes 1.18 introduced support for multiple scheduling profiles within a single scheduler binary. This approach minimizes operational overhead and prevents potential race conditions that can arise when multiple processes schedule workloads on the same node.

Profile Configuration

Each scheduler profile is defined within the scheduler configuration file and behaves like an independent scheduler. For example, here are several configuration snippets:

# my-scheduler-2-config.yaml
apiVersion: kubescheduler.config.k8s.io/v1
kind: KubeSchedulerConfiguration
profiles:
  - schedulerName: my-scheduler-2
  - schedulerName: my-scheduler-3
# my-scheduler-config.yaml
apiVersion: kubescheduler.config.k8s.io/v1
kind: KubeSchedulerConfiguration
profiles:
  - schedulerName: my-scheduler
# scheduler-config.yaml
apiVersion: kubescheduler.config.k8s.io/v1
kind: KubeSchedulerConfiguration
profiles:
  - schedulerName: default-scheduler

Each profile allows you to customize plugin configurations. For instance, you could disable specific plugins or enable custom ones. Below is an example where the "my-scheduler-2" profile disables the TaintToleration plugin and enables two custom plugins (MyCustomPluginA and MyCustomPluginB). Additionally, the "my-scheduler-3" profile disables all preScore and score plugins:

apiVersion: kubescheduler.config.k8s.io/v1
kind: KubeSchedulerConfiguration
profiles:
  - schedulerName: my-scheduler-2
    plugins:
      score:
        disabled:
          - name: TaintToleration
        enabled:
          - name: MyCustomPluginA
          - name: MyCustomPluginB
  - schedulerName: my-scheduler-3
    plugins:
      preScore:
        disabled:
          - name: '*'
      score:
        disabled:
          - name: '*'
  - schedulerName: my-scheduler-4

In the plugins section, specify the extension point and then enable or disable plugins by name (or using a wildcard pattern).

Tip

This flexible configuration allows you to tailor the scheduling behavior to meet your unique workload requirements by selectively enabling or disabling plugins across different profiles.

Summary

This lesson provided an overview of Kubernetes scheduling and scheduler profiles. We covered:

  • The phases of scheduling: queueing, filtering, scoring, and binding.
  • The role of various scheduler plugins and extension points.
  • How to configure multiple scheduler profiles within a single scheduler binary to customize scheduling behavior.

For further reading, consider exploring the official documentation on Kubernetes Scheduling and multi-scheduler profiles.

That’s all for this lesson. See you in the next one!

Watch Video

Watch video content

Previous
Solution Multiple Scheduler