Certified Kubernetes Application Developer - CKAD
Services Networking
Services
Hello and welcome to this lesson! I’m Mumshad Mannambeth, and today we’re diving into Kubernetes services for beginners. Kubernetes services are essential as they enable seamless communication between various application components, both internally and externally. They make it possible for different parts of your application—for instance, front-end pods, back-end processors, and external data connectors—to interact without being directly coupled.
Understanding the Need for Services
Imagine you've deployed a pod running a web application. While pods can communicate internally over the cluster network, external access presents a challenge. Consider this scenario:
- The Kubernetes node’s IP address is 192.168.1.2.
- Your laptop’s IP address is 192.168.1.10 (on the same network).
- The internal pod network falls under the 10.244.0.0/24 range, and the pod’s IP is 10.244.0.2.
Since your laptop is on a different network than the pod, directly pinging or accessing 10.244.0.2 won’t work.
One workaround is to SSH into the Kubernetes node and then access the pod using a command like:
curl http://10.244.0.2
This command, for example, might return:
Hello World!
Warning
Using SSH to access node-hosted pods is not ideal for production environments due to security and management challenges.
Introducing the Kubernetes Service
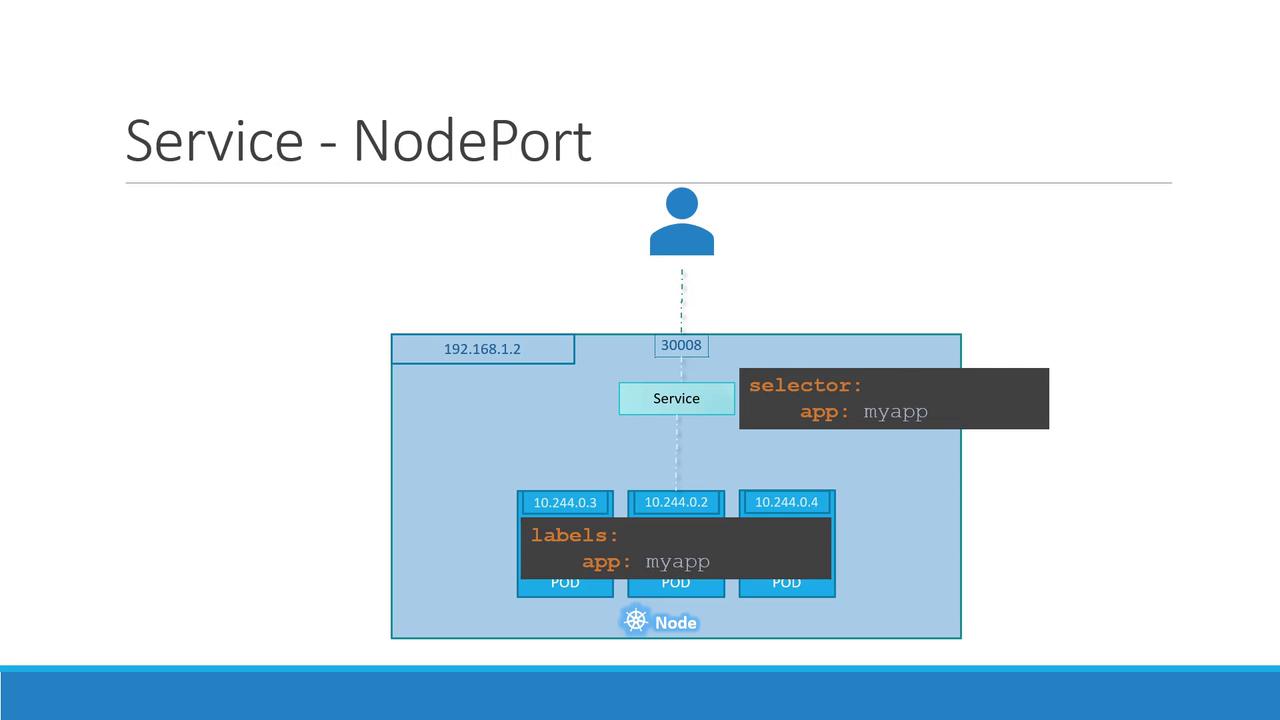
Rather than relying on SSH, Kubernetes services provide a robust solution. A service acts as an intermediary by listening on a designated port on the node and forwarding requests to the respective pod.
For instance, if you run:
curl http://192.168.1.2:30008
This will fetch the web page by mapping the node's port (30008) to the pod's port, and the service performing this task is known as a NodePort service.
Types of Kubernetes Services
Kubernetes supports multiple service types:
| Service Type | Description | Example Use Case |
|---|---|---|
| NodePort | Exposes a pod on a port on each node. | External access to a web server. |
| ClusterIP | Creates a virtual IP inside the cluster to facilitate pod-to-pod communication. | Inter-service communication between front-end and back-end. |
| LoadBalancer | Provisions a load balancer from supported cloud providers for distributing traffic. | Production environments requiring high availability. |
In this lesson, we'll focus on NodePort services.
How NodePort Works
A NodePort service maps three key ports:
- Target Port: The port on the pod where the web server is running (e.g., port 80).
- Service Port: The port defined on the service object (typically also set to 80).
- Node Port: The port on the Kubernetes node used for external access (e.g., 30008).
Note
Node ports must be within the valid range of 30000 to 32767.
Using a NodePort service, external users can access the application by hitting the node's IP address combined with the node port, simplifying external access.
Creating a NodePort Service
To create a NodePort service, define its configuration in a YAML file. This file should include key components such as:
- API version
- Kind
- Metadata
- Spec (including service type, ports, and selectors)
Below are examples of how you can define a NodePort service and its associated pod.
Service Definition (service-definition.yml)
apiVersion: v1
kind: Service
metadata:
  name: myapp-service
spec:
  type: NodePort
  ports:
    - targetPort: 80
      port: 80
      nodePort: 30008
  selector:
    app: myapp
    type: front-end
Pod Definition (pod-definition.yml)
apiVersion: v1
kind: Pod
metadata:
  name: myapp-pod
  labels:
    app: myapp
    type: front-end
spec:
  containers:
    - name: nginx-container
      image: nginx
In these YAML files, the service is linked to the pod by matching the labels (app: myapp and type: front-end).
Deploying and Verifying the Service
After preparing the YAML files, deploy the service with the following command:
kubectl create -f service-definition.yml
To verify its creation, execute:
kubectl get services
You should see output similar to:
NAME            TYPE        CLUSTER-IP      EXTERNAL-IP   PORT(S)          AGE
kubernetes      ClusterIP   10.96.0.1       <none>        443/TCP          16d
myapp-service   NodePort    10.106.127.123  <none>        80:30008/TCP     5m
Now, you can access your web application externally using:
curl http://192.168.1.2:30008
This command returns the HTML content of the web page hosted by your pod.
Scaling and Production Considerations
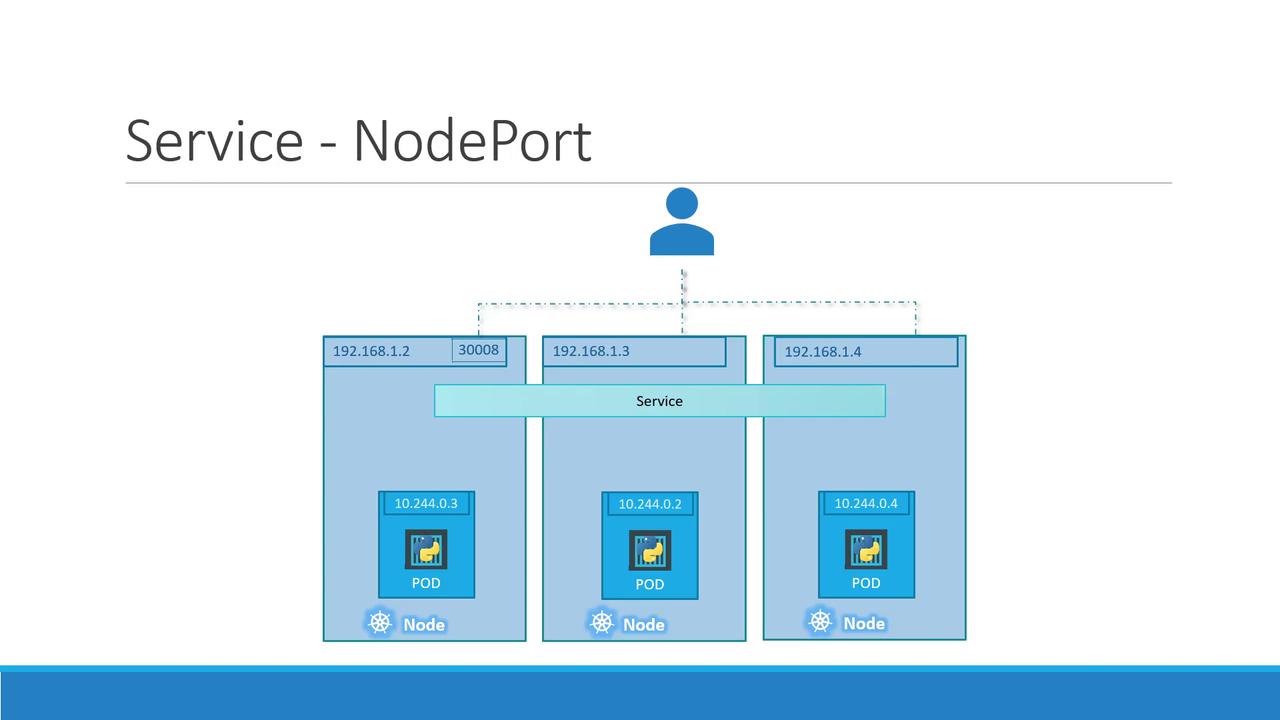
In production, you might run multiple instances of your web application to ensure high availability and load distribution. When pods with the same labels (e.g., app: myapp) are running across several nodes, the NodePort service will distribute requests randomly among them.
Kubernetes automatically updates the service endpoints as pods are added or removed. Moreover, when pods are deployed across multiple nodes, the same node port is accessible on all nodes. This ensures that you can use any node’s IP address with the defined port to reach your application.
Key Takeaway
Whether you have a single pod on one node or multiple pods spread across several nodes, the service definition remains the same. This flexibility is at the heart of Kubernetes’ design, enabling dynamic scaling and simplified load balancing.
Next Steps
This concludes our detailed lesson on Kubernetes services with a focus on NodePort. Now, let's move on to the demonstration where you'll see these concepts in action.


Watch Video
Watch video content