Learn how to whitelist allowed registries in Kubernetes to prevent unauthorized container images from being deployed and enhance cluster security.
In this lesson, learn how to whitelist allowed registries in a Kubernetes cluster to prevent unauthorized container images from being deployed. By default, any user with cluster access can deploy pods with images from any registry—even untrusted sources. This can compromise your cluster’s security. The following sections explain how to enforce governance rules to restrict container images to approved registries only.
Deploying an image with known vulnerabilities may expose other applications on the cluster to risk. An attacker could leverage these vulnerabilities to gain access to the underlying operating system. For enhanced security, it is vital to restrict container images to trusted registries.
Using Admission Controllers to Restrict Registries
One effective method is to use Kubernetes admission controllers. When a pod creation request is made, it is processed through several stages: authentication, authorization, and admission control. By deploying a validating admission webhook server, you can inspect each incoming request and verify that the container image originates from an approved registry. If not, the webhook will reject the request with a clear error message.For example, consider the following Python code snippet that demonstrates an admission webhook allowing only images from “internal-registry.io”:
Copy
@app.route("/validate", methods=["POST"])def validate(): image_name = request.json["request"]["object"]["spec"]["containers"][0]["image"] status = True message = "" if "internal-registry.io" not in image_name: message = "You can only use images from the internal-registry.io" status = False return jsonify( { "response": { "allowed": status, "uid": request.json["request"]["uid"], "status": {"message": message}, } } )
Ensure that your validating webhook server is highly available. This prevents disruptions in pod creation if the webhook becomes unreachable.
An alternative approach is to deploy Open Policy Agent (OPA) with a validating webhook. By leveraging OPA’s Rego language, you can write custom policies that allow container images only from trusted registries. The example below denies any image that does not begin with “internal-registry.io/“:
Copy
package kubernetes.admissiondeny[msg] { input.request.kind.kind == "Pod" image := input.request.object.spec.containers[_].image not startswith(image, "internal-registry.io/") msg := sprintf("Image '%s' is not from a trusted registry", [image])}
Using the Built-In ImagePolicyWebhook Admission Controller
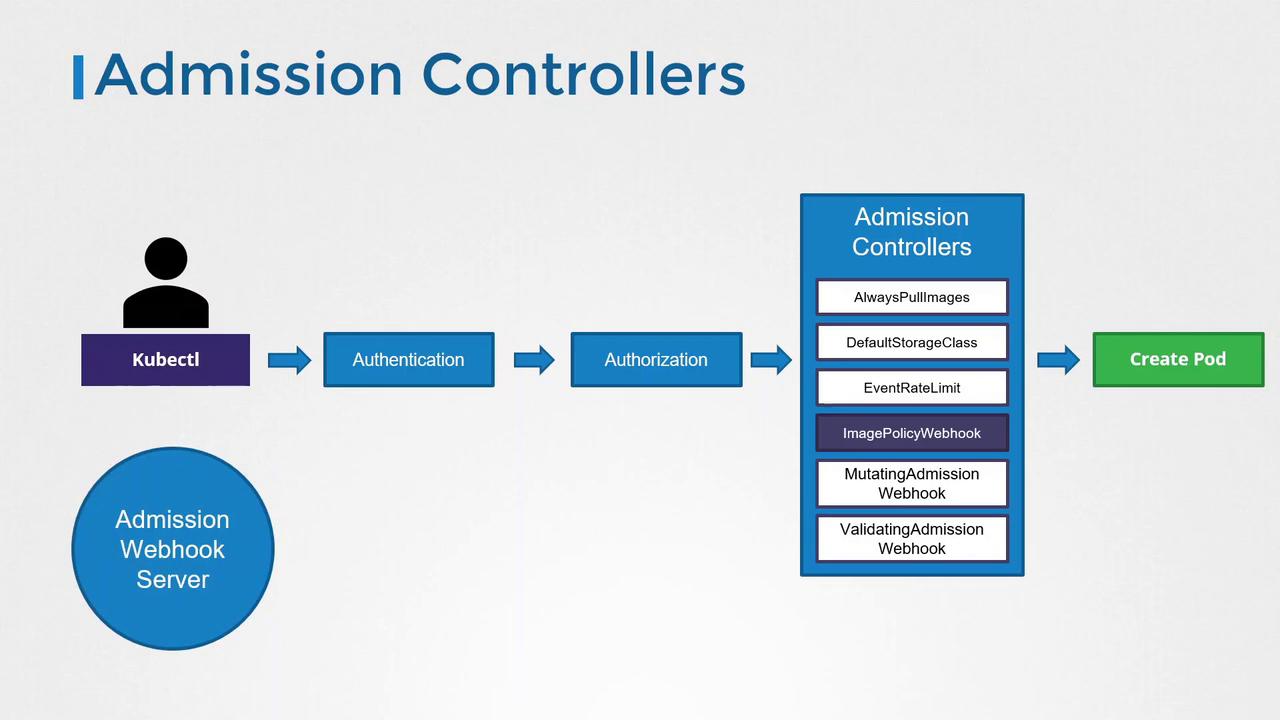
The Kubernetes API server includes a built-in admission controller called ImagePolicyWebhook. This controller works with an external webhook server to enforce image policy rules using an admission configuration file.The diagram below illustrates the Kubernetes admission control process. It covers the steps from executing kubectl commands through authentication, authorization, and admission controller validations, culminating in pod creation:
An admission configuration file provides the necessary details for connecting to the webhook server. It includes a reference to a KubeConfig file for authentication credentials along with parameters such as TTLs, retry backoff intervals, and default behaviors. For example:
If the admission webhook server is unreachable, setting defaultAllow: true permits pod creation unless the webhook explicitly denies it. Adjust this setting based on your security requirements.
A typical KubeConfig file referenced above might look like this:
Enabling the ImagePolicyWebhook in the kube-apiserver
After preparing the admission configuration file, you need to enable the ImagePolicyWebhook admission controller in the kube-apiserver. This is achieved by adding it to the enabled admission plugins flag and specifying the path to the configuration file through the admission control config file flag.For example, if the kube-apiserver runs as a service, you can configure it with the following flags:
With these configurations, the ImagePolicyWebhook admission controller ensures that only container images from approved registries are used when creating pods. This significantly strengthens the overall security posture of your Kubernetes cluster.
That concludes this lesson. Proceed to the hands-on labs to practice these configurations and further solidify your understanding of securing Kubernetes clusters.