Docker - SWARM | SERVICES | STACKS - Hands-on

Docker Architecture in Depth

Storage and Filesystems

Hello and welcome to this technical deep-dive into Docker's storage architecture and file systems. My name is Mumshad Mannambeth, and in this lesson we will explore how Docker manages data on the host and the intricacies of container file systems. We will investigate the folder structure created by Docker, the layered image architecture, the copy-on-write mechanism, and various storage drivers.

When Docker is installed, it sets up a folder structure at /var/lib/docker that contains several subdirectories such as aufs, containers, images, and volumes. These directories are critical because they store all Docker-related data, including files for images, running containers, and persistent volumes. For example, files related to containers reside in the containers folder, while image files are stored in the images folder.

A person stands beside a diagram illustrating a file system structure, including directories like "aufs," "containers," "image," and "volumes," on a blue background.

Docker Image Layered Architecture

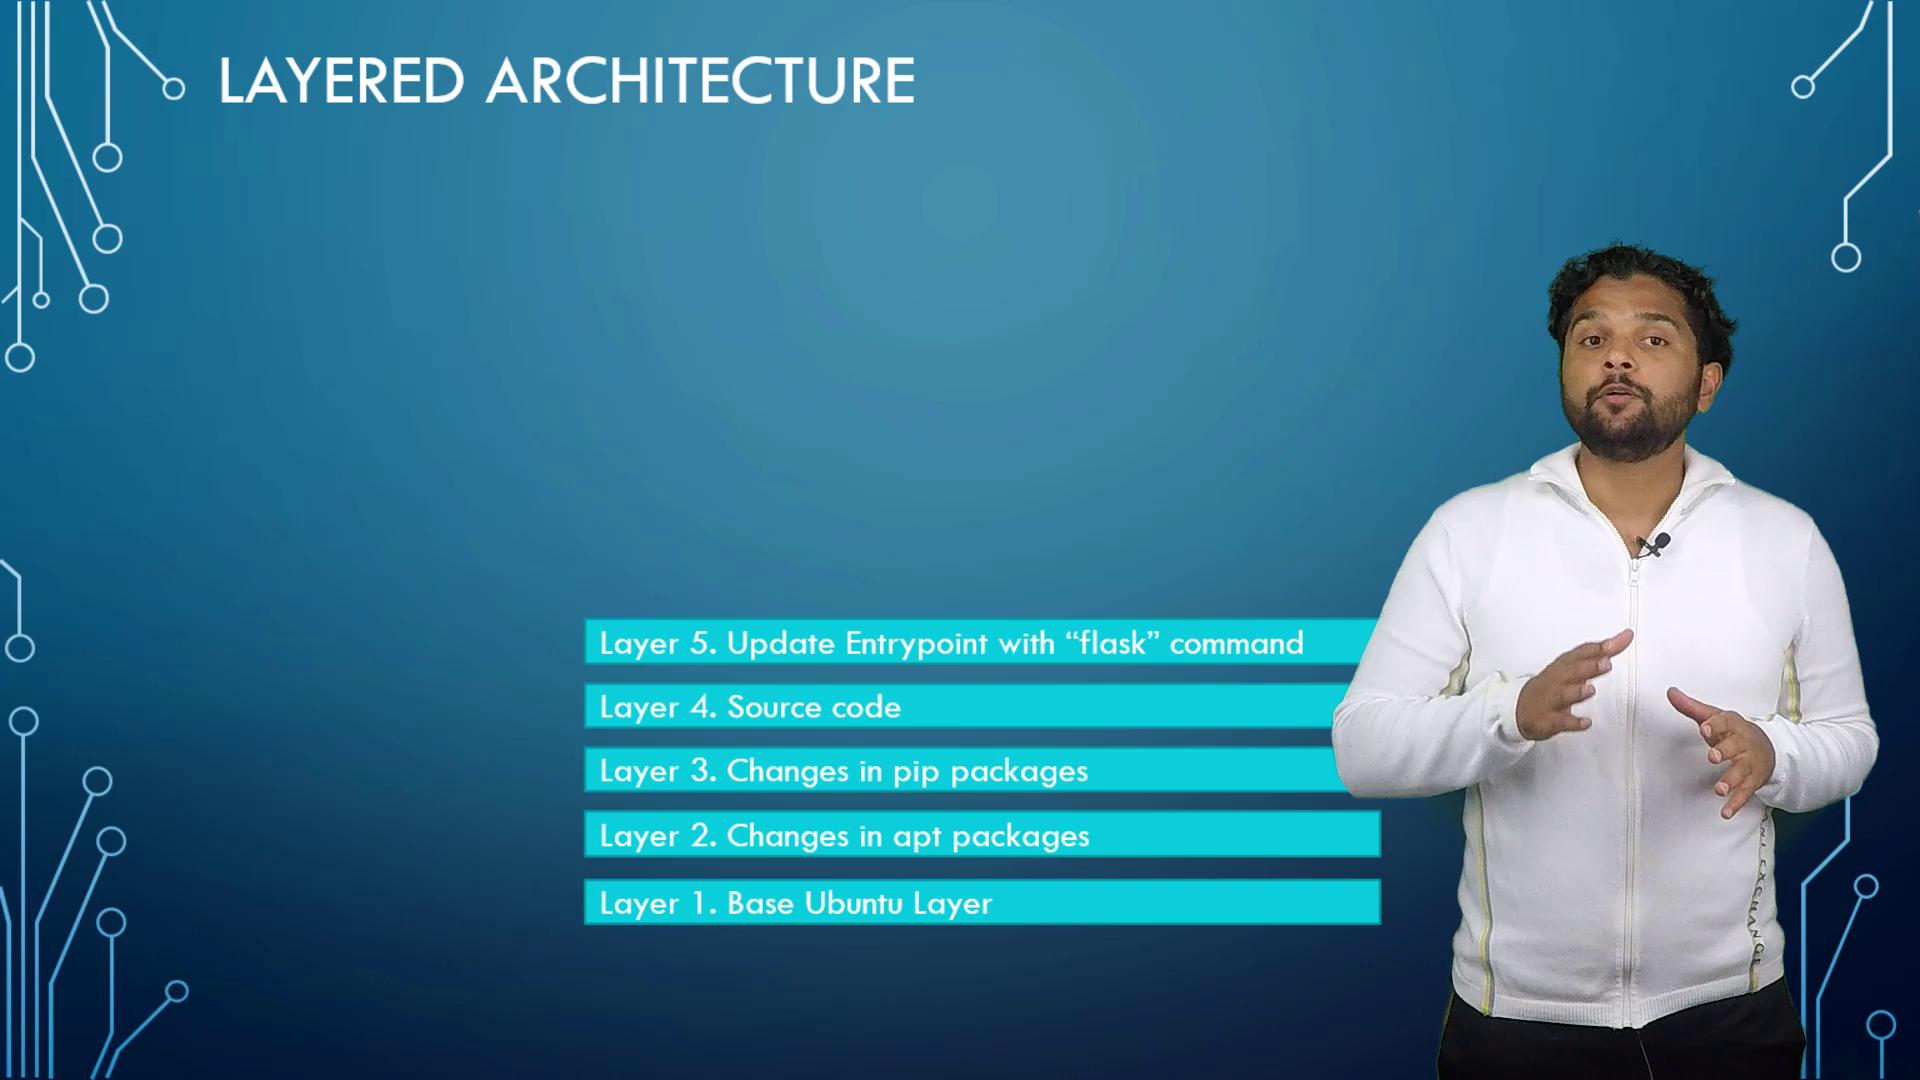
Docker images use a layered architecture. Every instruction in a Dockerfile results in the creation of a new layer that only contains the changes from the previous one. Consider the following example Dockerfile:

FROM Ubuntu

RUN apt-get update && apt-get -y install python
RUN pip install flask flask-mysql
COPY . /opt/source-code
ENTRYPOINT FLASK_APP=/opt/source-code/app.py flask run

Build this image with the command:

docker build -t mmumshad/my-custom-app .

In this build:

  1. The base Ubuntu image (~120 MB) is established.
  2. A subsequent layer installs APT packages (around 300 MB).
  3. Additional layers add Python dependencies.
  4. The application source code is injected.
  5. Lastly, the entry point is configured.

Because Docker caches these layers, a similar Dockerfile—even if only differing in the source code and entry point—can reuse the cached layers for the base image, package installations, and dependencies. For instance, another Dockerfile might look like:

FROM Ubuntu

RUN apt-get update && apt-get -y install python
RUN pip install flask flask-mysql
COPY app2.py /opt/source-code
ENTRYPOINT FLASK_APP=/opt/source-code/app2.py flask run

Build this second image using:

docker build -t mmumshad/my-custom-app-2 .

Docker reuses the first three layers and only builds the layers that include the new source code and entry point. This efficient caching mechanism accelerates builds and conserves disk space.

The layered structure from bottom up is as follows:

  1. Base Ubuntu image
  2. Installed packages
  3. Python dependencies
  4. Application source code
  5. Entry point configuration

The image shows a person explaining a layered architecture with five layers, including Ubuntu base, package changes, source code, and entry point updates.

Once the build is complete, the image layers are read-only. When you run a container using the 
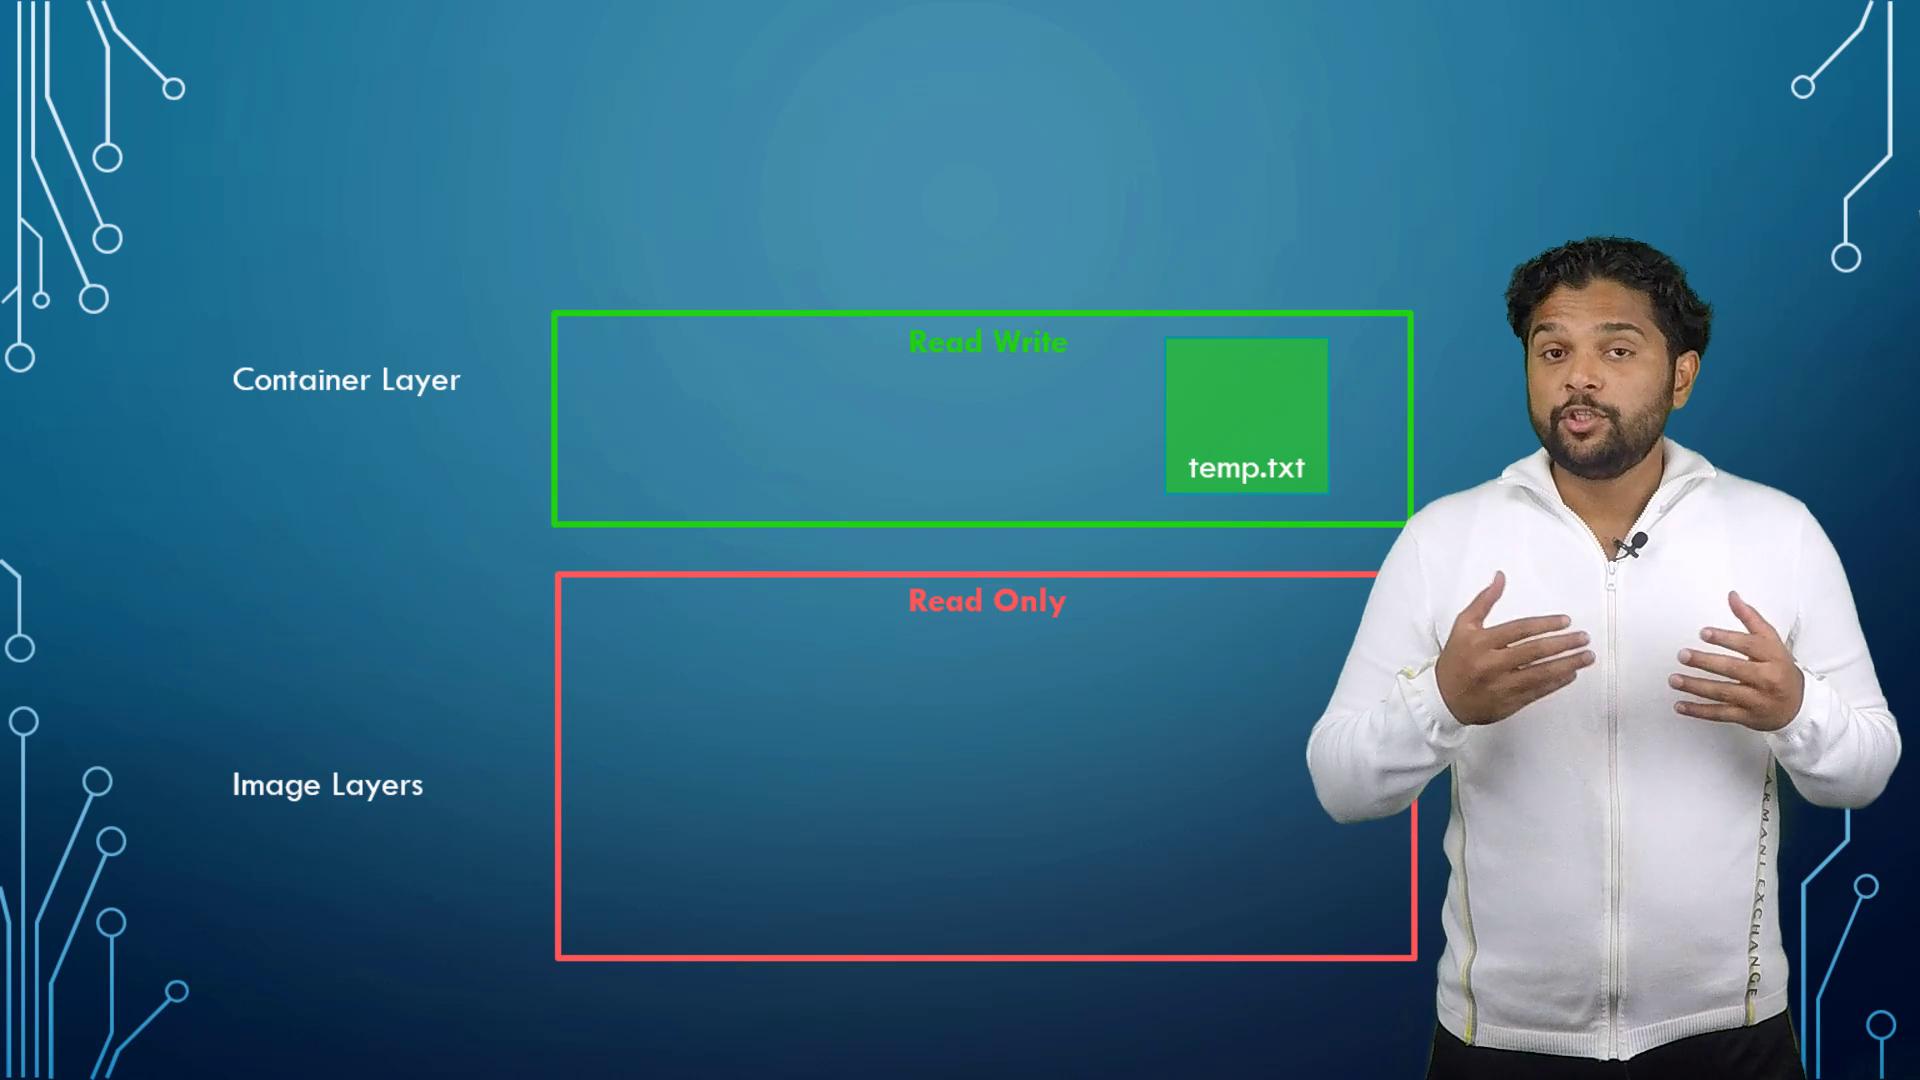
docker run command, Docker mounts a new writable layer on top of these image layers. This writable layer manages any changes made during runtime—such as log files, temporary files, or user modifications. For instance, if you log into a container and create a file (like temp.txt), that file is stored in the writable layer:

docker run -it mmumshad/my-custom-app bash
# Inside the container:
touch temp.txt

A person is explaining container layers, with a diagram showing "Read Write" and "Read Only" sections, and a file named "temp.txt" in the writable area.

Even though image layers are immutable, Docker uses a "copy-on-write" mechanism to enable modifications. In this process, if you attempt to change a file within an image layer (such as editing app.py), Docker first copies the file to the writable layer and then applies your modifications. This method ensures that the original image remains unchanged while allowing each container to keep its own changes.

The image explains the "Copy-On-Write" concept, showing container and image layers with read-write and read-only files, alongside a person presenting.

Note

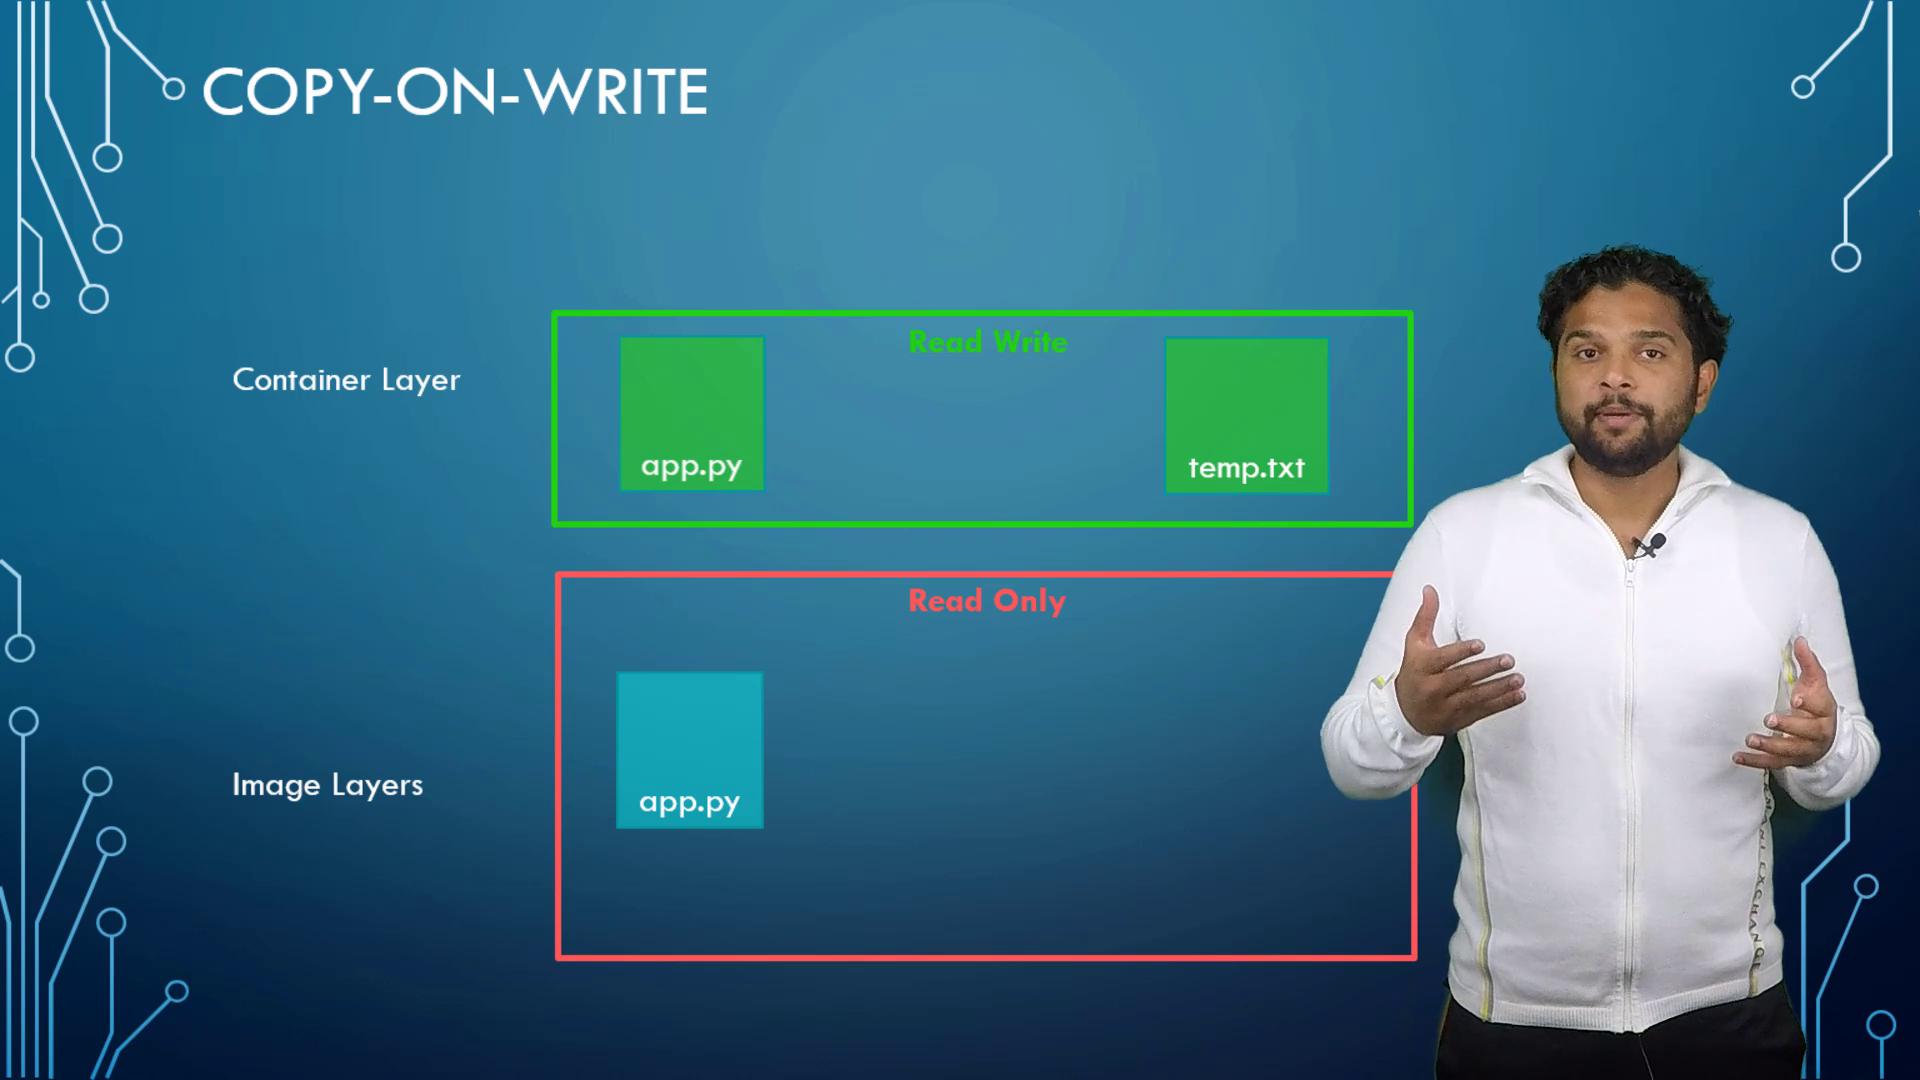
When a container is removed, its writable layer, along with all modifications, is deleted. To preserve critical data, such as database files, mount an external volume.

Persisting Data with Volumes and Bind Mounts

Persisting data is crucial for stateful applications. To create a volume:

docker volume create data_volume

This command creates a volume directory under /var/lib/docker/volumes. Then, run a container with the volume mounted to a specific directory:

docker run -v data_volume:/var/lib/mysql mysql

In this example, MySQL writes data to data_volume, ensuring data persistence even if the container is removed. Docker will also automatically create the volume if it does not exist, and you can verify this by listing the contents of /var/lib/docker/volumes.

Alternatively, if you prefer using an existing directory on the Docker host (for example, /data/mysql), use a bind mount:

docker run -v /data/mysql:/var/lib/mysql mysql

This maps the host directory directly to the container.

Note

Although the -v flag is widely used for mounting volumes, the newer --mount option is preferred for its explicit syntax. For example:

docker run --mount type=bind,source=/data/mysql,target=/var/lib/mysql mysql

Docker Storage Drivers

The layered architecture, writable container layers, and copy-on-write features are all made possible by Docker storage drivers. Popular storage drivers include:

Storage DriverDescriptionCommon Use Case
AUFSAdvanced multi-layer union filesystemDefault on Ubuntu
BTRFSModern Copy-on-Write filesystemAdvanced usage scenarios
VFSSimple filesystem used for debuggingLimited to specific cases
Device MapperUses Linux's device-mapperFedora/CentOS defaults
Overlay/Overlay2Efficient copy-on-write driversModern Linux distributions

The choice of storage driver depends on your host operating system and performance requirements. For instance, Ubuntu generally uses AUFS by default, whereas Fedora or CentOS might lean towards Device Mapper. Docker automatically selects the most optimized driver for your system, although you can configure a specific driver if needed.

A person stands beside a list of storage drivers on a blue background, including AUFS, ZFS, BTRFS, Device Mapper, Overlay, and Overlay2.

This concludes our exploration of Docker's storage and file system architecture. For further reading on these storage drivers and additional Docker concepts, please refer to the official Docker Documentation.

See you in the next lesson.

Watch Video

Watch video content

Previous
Demo PID Namespaces