Recap: Docker Run vs Docker Compose
Earlier lessons covered how to launch a Docker container using thedocker run command. For more complex applications involving multiple services, Docker Compose simplifies orchestration by allowing you to define all the required services and configurations in a single YAML file (commonly named docker-compose.yml). You can then start the entire stack with:
The Sample Voting Application
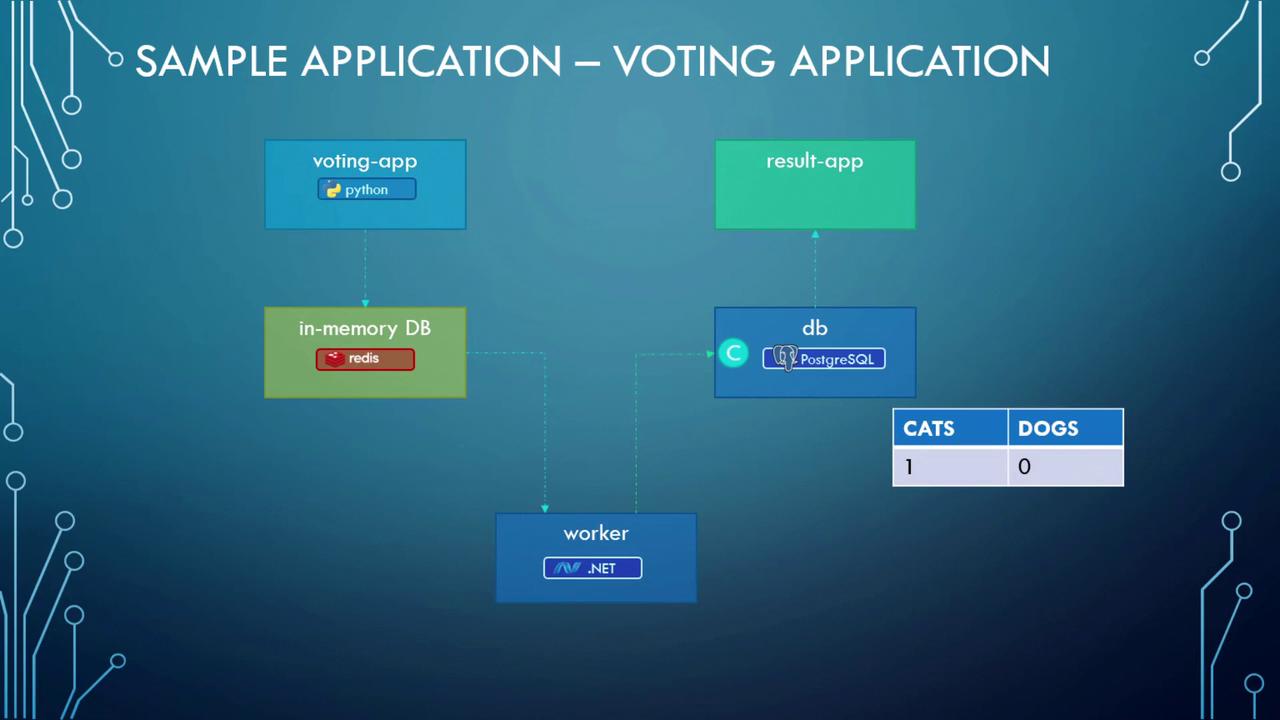
We will use a popular voting application to illustrate a multi-service Docker setup. This sample architecture demonstrates various Docker features and best practices.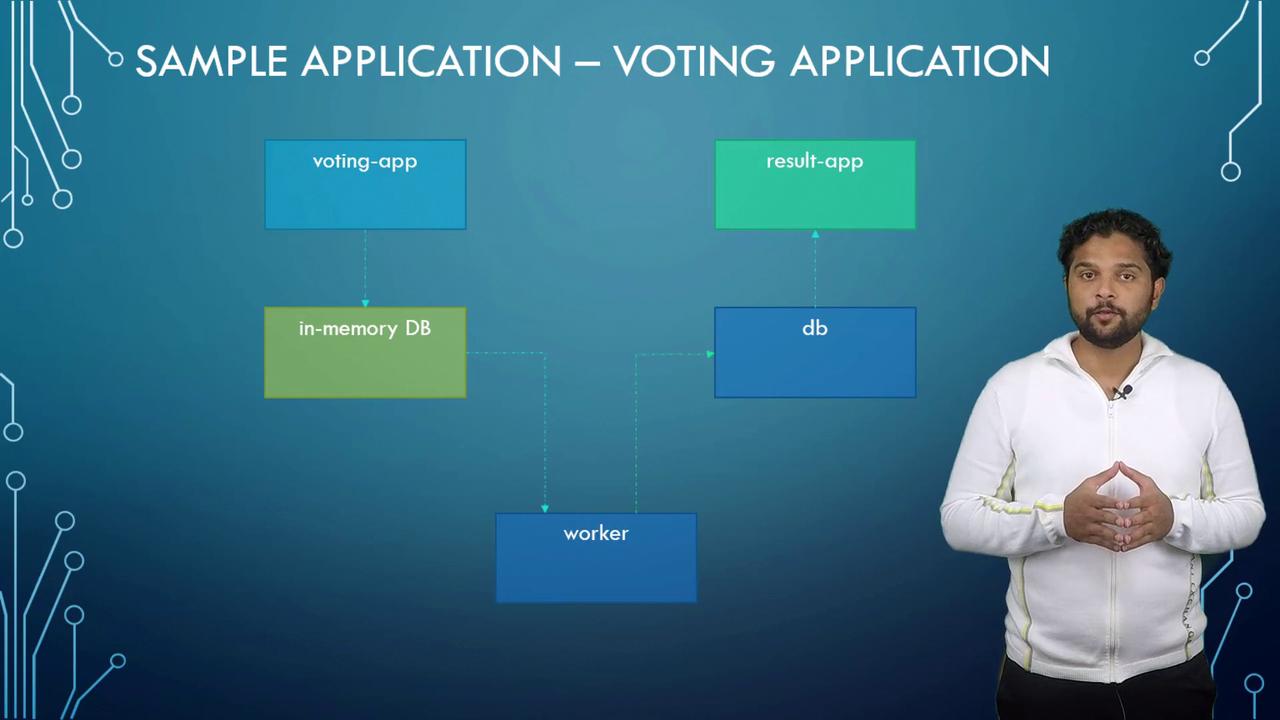
Application Overview
The voting application comprises the following primary components:- Voting App: A Python-based web application that lets users vote (e.g., select between cat or dog). Votes are temporarily stored in Redis.
- Redis: Acts as an in-memory database to hold votes temporarily.
- Worker: A .NET application that processes votes from Redis and updates a persistent PostgreSQL database.
- PostgreSQL: Stores vote counts permanently.
- Result App: A Node.js-based web application that reads vote data from PostgreSQL and displays the results.
Deploying the Application on a Single Docker Host
First, deploy each service using individual Docker run commands. Assume that all images have been built and are available on Docker Hub or your private registry. We will start with the data layer:- Redis Instance: Run the Redis container in detached mode and name it “redis”.
- PostgreSQL Instance: Run the PostgreSQL container (version 9.4) in detached mode and name it “db”.
- Voting App: Run the voting app container, name it “vote”, and map container port 80 to host port 5000.
- Result App: Run the result-app container, name it “result”, and map container port 80 to host port 5001.
- Worker Service: Run the worker container and name it “worker”.
The Linking Problem
Even though all containers are running, they cannot communicate by default. For example, the voting app does not know which Redis instance to connect to, and similarly, other containers remain isolated. Container linking solves this issue. To link the voting app to the Redis container, modify the vote container’s command to include the--link option:
/etc/hosts file inside the voting app container to map the hostname “redis” to the Redis container’s internal IP address. Similarly, link containers for the result app and worker:
Note that container linking is now deprecated. Modern Docker networking and Swarm features provide more robust and flexible ways for container communication.
Converting Docker Run Commands to a Docker Compose File
Once you are comfortable with the Docker run commands, the next step is to translate them into a Docker Compose file. This involves:- Defining entries for each service with the same container names as used in your Docker run commands.
- Specifying the Docker images or build instructions.
- Configuring port mapping using the
portsproperty. - Including the
linksoption where necessary.
image key with a build key as follows:
docker-compose up with this file will build the images (if required) and start the containers with the defined configurations.
Evolving Compose File Versions
Docker Compose file formats have evolved through three primary versions:- Version 1: Had limitations such as no support for custom networks and no control over container startup order.
- Version 2: Introduced several improvements, including a dedicated
servicessection, explicit version declaration (e.g.,version: '2'), enhanced networking features, and thedepends_onoption to control the order in which services start. - Version 3: Builds upon version 2 while adding support for Docker Swarm. In version 3, you declare the version at the top (e.g.,
version: '3') and define services under theservicessection. Some options have been modified or removed; please refer to the official documentation for a detailed comparison.
Docker Compose Networking
Enhance your Docker Compose setup by segregating external user traffic from internal service communication. For this scenario, we will define two distinct networks:- Front End Network: Dedicated to external (user-generated) traffic.
- Back End Network: Facilitates internal communication between services.
Conclusion
You now have a detailed overview of Docker Compose—from using basic container linking to translating Docker run commands into a Compose file, and from exploring Compose file versions to implementing advanced networking. Put this knowledge into practice, and try building your own Compose files and networking configurations.