Docker Training Course for the Absolute Beginner

Docker Engine Storage

Docker Storage

Welcome to this lesson on advanced Docker concepts. In this article, we dive into Docker storage drivers and file systems, exploring how Docker manages data storage and container file systems. Learn where Docker stores its files, how it structures data, and how to handle persistent data effectively.

Docker's File Storage Architecture

When Docker is installed, it establishes a directory structure typically at /var/lib/docker. This root directory contains several subdirectories that serve different purposes:

  • containers: Stores files related to running containers.
  • images: Contains image-related files.
  • volumes: Holds data for Docker volumes.
  • overlay2: Manages the overlay filesystem for layering.

Note

Each of these directories plays a crucial role in container management. Understanding their function can help troubleshoot and optimize your Docker environment.

Docker's Layered Architecture

Docker images are constructed using a layered approach. Each instruction in a Dockerfile creates a distinct layer that only contains changes from the previous layer. For example, consider the following Dockerfile:

FROM ubuntu

RUN apt-get update && apt-get -y install python
RUN pip install flask flask-mysql
COPY . /opt/source-code
ENTRYPOINT ["flask", "run"]

Build the image using:

docker build -t mummshad/my-custom-app .

In this Dockerfile:

  • Base Image: The first layer pulls the Ubuntu base image.
  • APT Packages: The second layer installs necessary APT packages.
  • Python Packages: The third layer installs Python packages required by the application.
  • Source Code: The fourth layer copies your application code into the container.
  • Entrypoint: The final layer sets the container's entry point.

Because each layer contains only the incremental changes, their sizes reflect only the modifications from the previous layer. For instance, even if the base Ubuntu image is large, layers that add extra packages or code remain relatively small.

Reusing Layers Across Images

Docker optimizes builds by reusing layers that remain unchanged between images. Consider a scenario with two nearly identical applications:

# Dockerfile for the first application
FROM ubuntu
RUN apt-get update && apt-get -y install python
RUN pip install flask flask-mysql
COPY . /opt/source-code
ENTRYPOINT ["flask", "run"]
# Dockerfile for the second application
FROM ubuntu
RUN apt-get update && apt-get -y install python
RUN pip install flask flask-mysql
COPY app2.py /opt/source-code
ENTRYPOINT ["flask", "run"]

Build the images using:

docker build -t mummshad/my-custom-app -f Dockerfile .
docker build -t mummshad/my-custom-app-2 -f Dockerfile2 .

Since the first three layers are identical in both Dockerfiles, Docker reuses the cached layers, significantly speeding up the build process and saving disk space. Even when updating application code, only the modified layers are rebuilt.

Understanding Image Layers

Visualize the image layers from the base to the top:

  1. Base Ubuntu layer.
  2. APT package installation.
  3. Python and Flask dependencies.
  4. Application source code.
  5. Entrypoint setup.

Once built, these layers are read-only. When you run a container from the image, Docker adds a new, writable layer on top. This writable layer captures any changes made during runtime—be it log files or temporary modifications. For instance, executing:

docker run mummshad/my-custom-app

Within the container, if you modify a file (for example, creating 
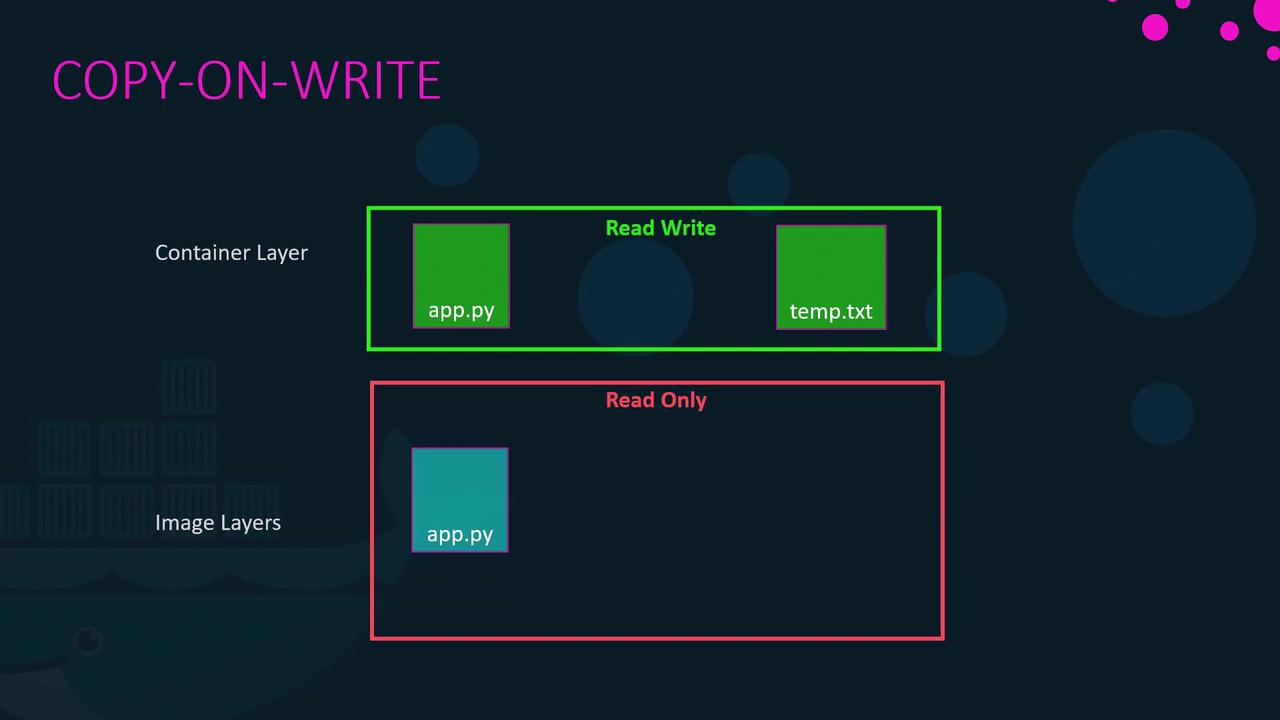
temp.txt), Docker uses a copy-on-write mechanism: it copies the original file to the writable layer and then applies any changes. When the container stops or is removed, this writable layer is also discarded.

The image illustrates the "Copy-On-Write" concept, showing a container layer with read-write access and image layers with read-only access, featuring files like app.py and temp.txt.

Managing Persistent Data with Volumes

To ensure data persists beyond the lifecycle of a container, Docker offers volumes. Volumes are independent storage units, separate from the container's ephemeral writable layer.

Creating and Using Volumes

  1. Create a Volume:

    docker volume create data_volume
    
  2. Run a Container with a Volume:

    docker run -v data_volume:/var/lib/mysql mysql
    

If you specify a volume that does not yet exist, such as data_volume2, Docker will automatically create it and mount it:

docker run -v data_volume2:/var/lib/mysql mysql

Alternatively, you can use bind mounts to link a specific host directory to the container, for instance:

docker run -v /data/mysql:/var/lib/mysql mysql

Using the --mount Option

While the -v syntax is common, the newer and preferred method is using the --mount option, which provides a more explicit and versatile configuration:

docker run \
  --mount type=bind,source=/data/mysql,target=/var/lib/mysql \
  mysql

Docker Storage Drivers

Docker storage drivers manage the layered filesystem, create writable layers, and implement the copy-on-write mechanism. Popular storage drivers include AUFS, VTRFS, VFS, Device Mapper, Overlay, and Overlay2. The default driver is determined by your operating system and kernel support. For instance, modern Ubuntu installations often use Overlay2, while Fedora or CentOS might use Device Mapper.

Each driver offers different performance and stability characteristics, so it’s essential to choose the one that best meets your application needs. For more detailed insights on these storage drivers, please refer to their official documentation.

The image lists storage drivers: AUFS, ZFS, BTRFS, Device Mapper, Overlay, and Overlay2, with a whale graphic in the background.

Note

For further reading on Docker storage drivers and optimization tips, consult the official Docker documentation.

This concludes our deep dive into Docker storage and its underlying architecture. We hope this lesson has provided valuable insights into managing Docker file systems and persistence. Happy containerizing, and see you in the next lesson!

Watch Video

Watch video content

Practice Lab

Practice lab

Previous
Docker Engine