This article explores slices in Go, detailing their structure, creation, manipulation, and usage in programming.
In this lesson, we will explore slices in Go—a flexible and powerful alternative to arrays. Slices in Go represent continuous segments of an underlying array and provide access to a numbered sequence of elements. Unlike arrays, slices are dynamically sized, allowing you to easily add or remove elements as needed.A slice consists of three key components:
Pointer: Refers to the first accessible element in the underlying array (which may not be the first element of the entire array).
Length: The number of elements contained in the slice.
Capacity: The total number of elements in the underlying array starting from the first element in the slice.
For example, a slice with a length of 4 and a capacity of 5 will allow the functions len and cap to retrieve these values respectively.
Declaring a slice in Go is straightforward and similar to creating an array—except that you do not need to specify its size. When you declare a slice, the compiler creates an underlying array and returns a reference to it. For instance, to create an integer slice named grades with the values 10, 20, and 30:
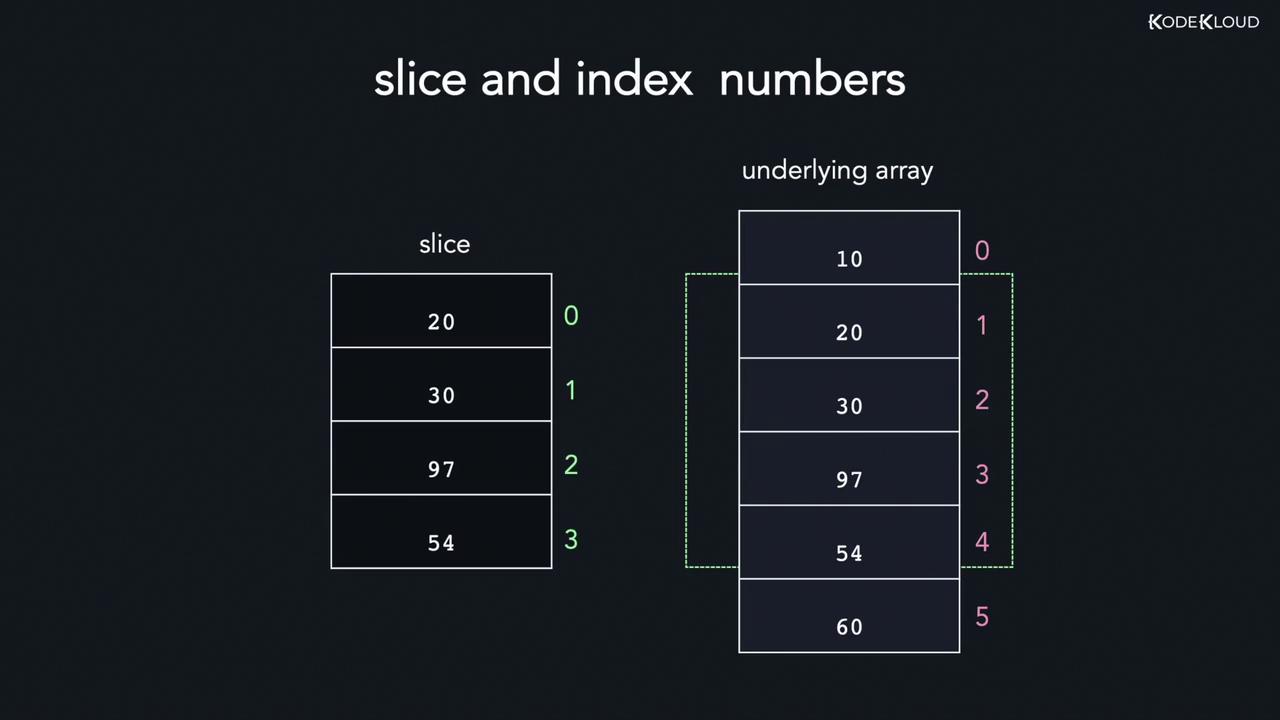
A slice is essentially a reference to an underlying array. You can construct a slice from an array by specifying a start index and an end index. The slice starts at the given start index and includes elements up to, but not including, the end index. For example:
If you omit the lower bound, it defaults to 0. Similarly, omitting the upper bound causes the slice to include the entire array.Consider the following example where an array with 10 elements is sliced from index 1 to 8 (which includes indices 1 through 7):
Another method to create a slice is by using the built-in make function. This function requires the data type, initial length, and capacity. The syntax is:
The make function allocates an underlying array of the specified capacity and returns a slice that refers to it. This approach is especially useful when you want to create an empty slice with a predetermined capacity.For example, this code creates a slice with a length of 5 and a capacity of 8, printing its contents, length, and capacity:
The default zero value for integers is 0. When working with arrays, remember that the array’s capacity is equal to its length. However, for slices, the capacity begins from the first element accessed in the underlying array.
Consider the following example, which compares the capacities of an array and a slice derived from that array:
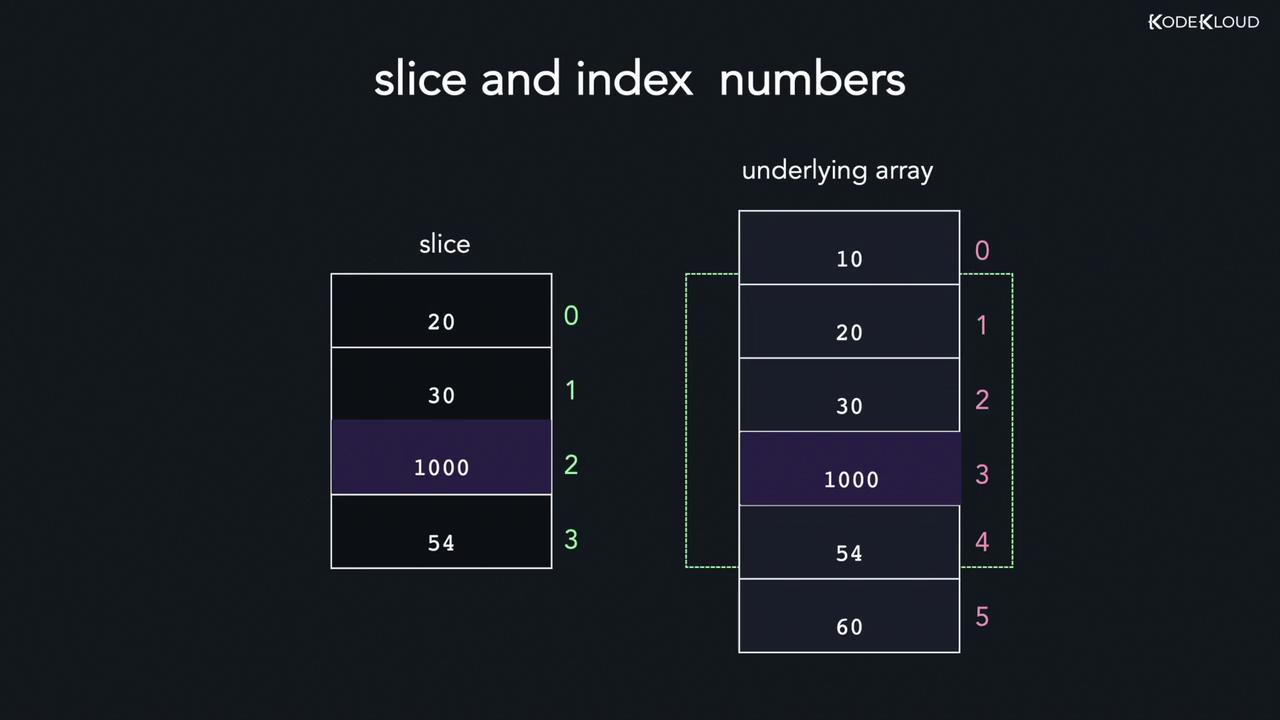
Because a slice is a reference to an underlying array, modifying an element in the slice will also modify the corresponding element in the array. However, keep in mind that the slice maintains its own indexing starting at 0; therefore, the index in the slice does not always match the index in the underlying array.
Below is an example that demonstrates modifying a slice and how the change reflects in the underlying array:
Copy
package mainimport "fmt"func main() { arr := [5]int{10, 20, 30, 40, 50} // Create a slice containing indices 0, 1, and 2. slice := arr[:3] fmt.Println("Before modification:") fmt.Println("Array:", arr) fmt.Println("Slice:", slice) // Modify the element at index 1 in the slice. slice[1] = 9000 fmt.Println("After modification:") fmt.Println("Array:", arr) fmt.Println("Slice:", slice)}
After you run the program, you’ll see that the change in the slice directly affects the underlying array.
Appending new elements to a slice is done using the built-in append function. This function takes the original slice followed by new values, and returns a new slice containing both the existing and added elements. If the underlying array lacks sufficient capacity, a new, larger array is allocated—often doubling the previous capacity.The syntax of the append function is as follows:
Copy
// General syntax:func append(s []T, vs ...T) []T// Example usage:slice = append(slice, 10, 20, 30)
Consider this scenario: You start with an underlying array and create a slice from index 1 to 3 (which has a length of 2 and capacity of 3). Then, you append the element 900:
Copy
slice := arr[1:3]slice_1 := append(slice, 900)
If you need to append more elements (for example, -90 and 500), and if the original capacity is insufficient, the append function allocates a new array with increased capacity. The following complete example demonstrates this behavior:
Go provides a built-in copy function to copy elements from one slice to another. This function returns the number of elements that were successfully copied, which is the minimum of the lengths of the source and destination slices. The syntax is:
Looping through a slice is similar to iterating over an array. The range keyword offers a concise way to access both the index and value of each element in the slice. Here’s an example:
Copy
package mainimport "fmt"func main() { arr := []int{10, 20, 30, 40, 50} for index, value := range arr { fmt.Println(index, "=>", value) }}
If you only need the values and not the indices, you can use the underscore (_) to ignore the index:
Copy
package mainimport "fmt"func main() { arr := []int{10, 20, 30, 40, 50} for _, value := range arr { fmt.Println(value) }}
Output:
Copy
>>> go run main.go1020304050
That covers the basics of slices in Go. With these examples and explanations, you are now ready to implement slices effectively in your Go programs. Happy coding!