Jenkins Project: Building CI/CD Pipeline for Scalable Web Applications
Docker
Demo Configuring Jenkins Pipeline with Docker
In this lesson, you'll learn how to configure a Jenkins pipeline integrated with Docker, enabling continuous integration and deployment for your applications. Before you start, ensure Docker is installed on your Jenkins server so that it can access the Docker CLI. For installation instructions, please refer to the Docker documentation page.
Prerequisite
Make sure Docker is installed and properly configured on your Jenkins server before proceeding.
Setting Up Jenkins Credentials
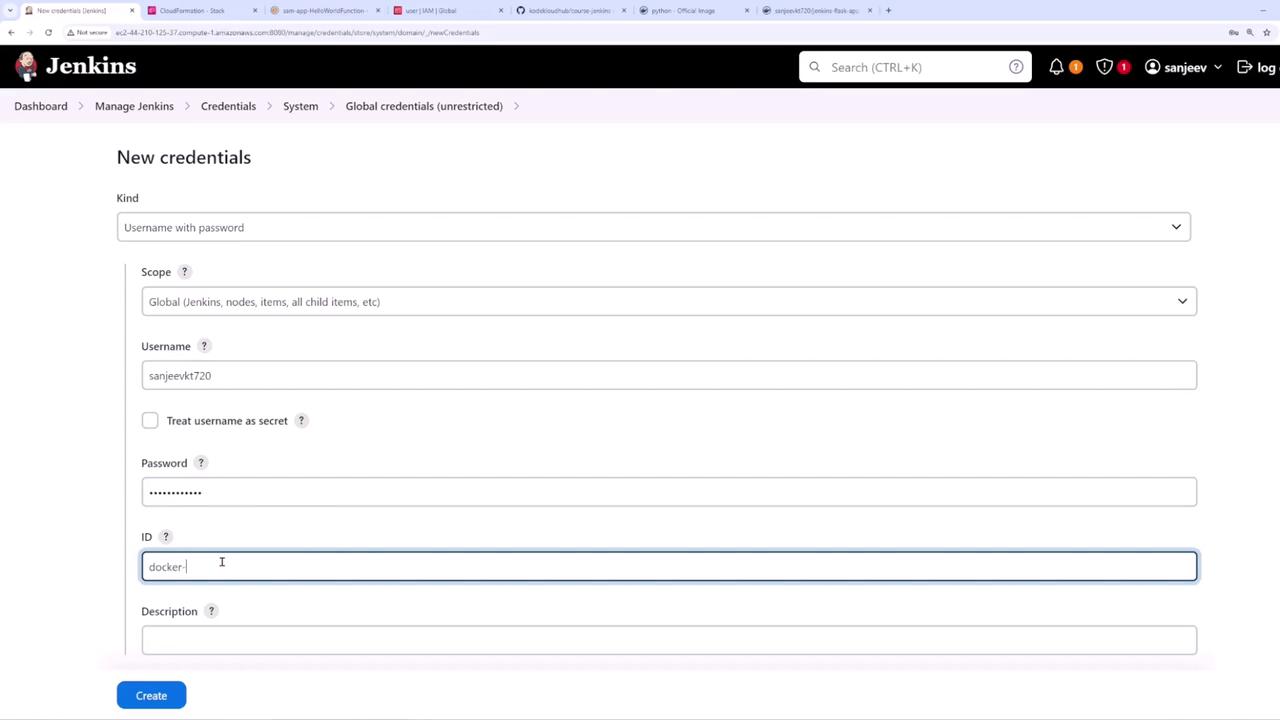
The first step is to configure Jenkins with your Docker Hub credentials. Create credentials within Jenkins using the "Username with password" type. Enter your Docker Hub account name as the username and your Docker Hub password as the password. In this example, the credentials are named "Docker creds".
Creating a New Pipeline
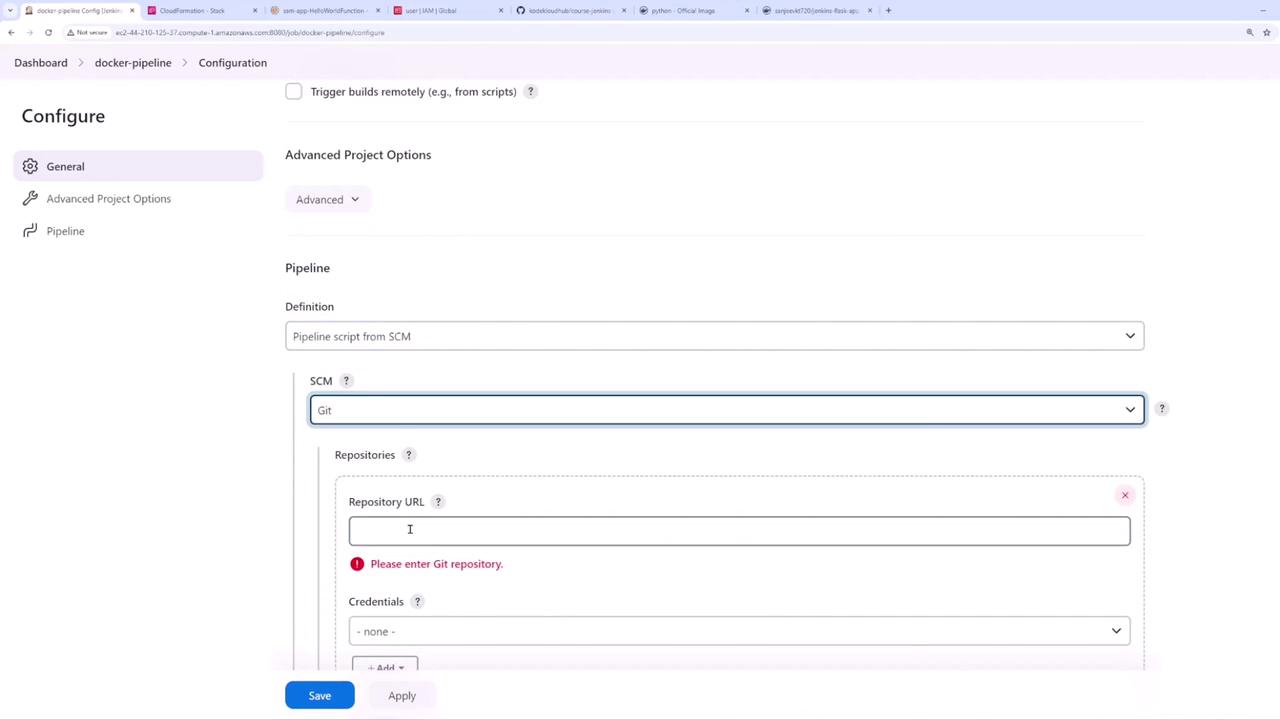
Next, navigate back to the Jenkins dashboard and create a new pipeline named "Docker pipeline". In the pipeline configuration screen, make the following selections:
- Enable "GitHub hook trigger for GITScm polling".
- Choose "Pipeline script from SCM".
- Select Git as your SCM and provide the URL of your repository.
- Set the branch to "main" and keep the default path to your Jenkinsfile.
The Jenkinsfile Pipeline Script
Your repository must contain a Jenkinsfile that defines the pipeline stages. In this example, the pipeline executes the following tasks:
- Installs dependencies using pip.
- Runs tests with pytest.
- Logs into Docker Hub using the credentials configured earlier.
- Builds a Docker image.
- Pushes the Docker image to Docker Hub.
Below is an improved and consolidated version of the Jenkinsfile:
pipeline {
agent any
environment {
IMAGE_TAG = "sanjeevkt720/jenkins-flask-app:${GIT_COMMIT}"
}
stages {
stage('Setup') {
steps {
sh 'pip install -r requirements.txt'
}
}
stage('Test') {
steps {
sh 'pytest'
}
}
stage('Login to Docker Hub') {
steps {
withCredentials([usernamePassword(credentialsId: 'docker-creds',
usernameVariable: 'USERNAME',
passwordVariable: 'PASSWORD')]) {
sh 'echo $PASSWORD | docker login -u $USERNAME --password-stdin'
echo 'Logged in successfully'
}
}
}
stage('Build Docker Image') {
steps {
sh 'docker build -t $IMAGE_TAG .'
echo 'Docker image built successfully'
sh 'docker image ls'
}
}
stage('Push Docker Image') {
steps {
sh 'docker push $IMAGE_TAG'
}
}
}
}
Once you commit this Jenkinsfile to your repository and push your changes, Jenkins will automatically trigger the pipeline. The pipeline will:
- Check out your code.
- Install required packages.
- Run unit tests using pytest.
- Log into Docker Hub.
- Build a Docker image.
- Push the newly built image to your Docker Hub repository.
Build Output Examples
During the build process, you may see console outputs such as the following when installing dependencies:
pip install -r requirements.txt
Defaulting to user installation because normal site-packages is not writable
Requirement already satisfied: blinker==1.7.0 in /var/lib/jenkins/.local/lib/python3.9/site-packages (from -r requirements.txt (line 1)) (1.7.0)
Requirement already satisfied: cachetools==5.2.1 in /var/lib/jenkins/.local/lib/python3.9/site-packages (from -r requirements.txt (line 2)) (5.2.1)
Requirement already satisfied: certifi==2023.11.17 in /var/lib/jenkins/.local/lib/python3.9/site-packages (from -r requirements.txt (line 3)) (2023.11.17)
Requirement already satisfied: charset-normalizer==3.3.2 in /var/lib/jenkins/.local/lib/python3.9/site-packages (from -r requirements.txt (line 4)) (3.3.2)
Requirement already satisfied: click==8.1.7 in /var/lib/jenkins/.local/lib/python3.9/site-packages (from -r requirements.txt (line 5)) (8.1.7)
Requirement already satisfied: colorama==0.4.6 in /var/lib/jenkins/.local/lib/python3.9/site-packages (from -r requirements.txt (line 6)) (0.4.6)
Requirement already satisfied: Flask==2.3.3 in /var/lib/jenkins/.local/lib/python3.9/site-packages (from -r requirements.txt (line 7)) (2.3.3)
Requirement already satisfied: itsdangerous==2.1.2 in /var/lib/jenkins/.local/lib/python3.9/site-packages (from -r requirements.txt (line 8)) (2.1.2)
Requirement already satisfied: Jinja2==3.1.5 in /var/lib/jenkins/.local/lib/python3.9/site-packages (from -r requirements.txt (line 9)) (3.1.5)
Requirement already satisfied: MarkupSafe==2.1.3 in /var/lib/jenkins/.local/lib/python3.9/site-packages (from -r requirements.txt (line 10)) (2.1.3)
Requirement already satisfied: numpy==1.24.4 in /var/lib/jenkins/.local/lib/python3.9/site-packages (from -r requirements.txt (line 11)) (1.24.4)
Requirement already satisfied: requests==2.28.1 in /var/lib/jenkins/.local/lib/python3.9/site-packages (from -r requirements.txt (line 12)) (2.28.1)
Requirement already satisfied: Werkzeug==2.3.4 in /var/lib/jenkins/.local/lib/python3.9/site-packages (from -r requirements.txt (line 13)) (2.3.4)
Requirement already satisfied: urllib3==1.26.15 in /var/lib/jenkins/.local/lib/python3.9/site-packages (from -r requirements.txt (line 14)) (1.26.15)
Requirement already satisfied: zipp==3.15.0 in /var/lib/jenkins/.local/lib/python3.9/site-packages (from -r requirements.txt (line 15)) (3.15.0)
When building the Docker image, you may see output similar to the following:
+ docker build -t sanjaevtkt720/jenkins-flask-app:9e287c436a97b9b2e16822545590dcdc2f0130 .
# building with "default" instance using docker driver
#1 [internal] load build definition from Dockerfile
#1 transferring dockerfile: 2768 done
#1 DONE 0.0s
#2 [internal] load metadata for docker.io/library/python:3.12.0b3-alpine3.18
#2 DONE 0.1s
#3 [1/5] FROM docker.io/library/python:3.12.0b3-alpine3.18@sha256:f25344e7b996d66770c4e08aed2c51d1778288fd45884669f6a6d68af46c
#3 CACHED
#4 [internal] load .dockerignore
#4 transferring context: 1398 done
#4 DONE 0.0s
#5 [internal] load build context
#5 transferring context: 175.92kB 0.0s done
#5 DONE 0.0s
#6 [2/5] COPY ./application
#6 DONE 0.0s
#7 [3/5] WORKDIR /application
#7 DONE 0.1s
#8 [4/5] COPY requirements.txt .
#8 DONE 0.0s
Once the image is built, the pipeline pushes it to Docker Hub. You can also push the image manually with a command like:
docker push sanjeevkt720/jenkins-flask-app:e787c436a79bb92e1c822545f59d0dc2f130
A typical push output might include:
The push refers to repository [docker.io/sanjeevkt720/jenkins-flask-app]
d182718f0571: Preparing
b257846d686b: Preparing
feb5cabfe56d: Preparing
b831d4be96e5: Preparing
8a328213b96e: Preparing
cd18a2bc1cce: Preparing
78a82283f2c8: Waiting
cb72ec1da28c: Waiting
78a82283f2c8: Layer already exists
Verifying the Commit and Docker Image Tag
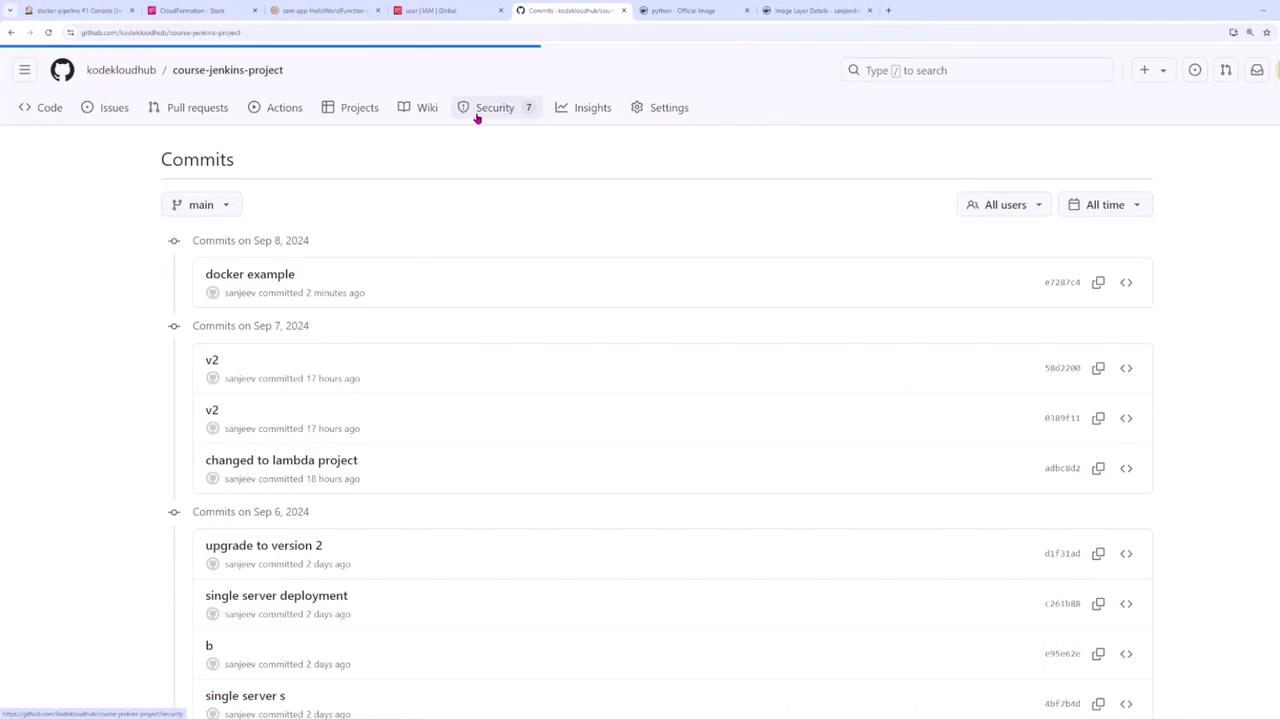
Tagging your Docker images with the Git commit hash creates a direct link between the image and a specific commit in your repository. This makes it easy to track deployments back to the source code changes. For example, checking the commit history on GitHub can help you verify that the correct changes have been deployed.
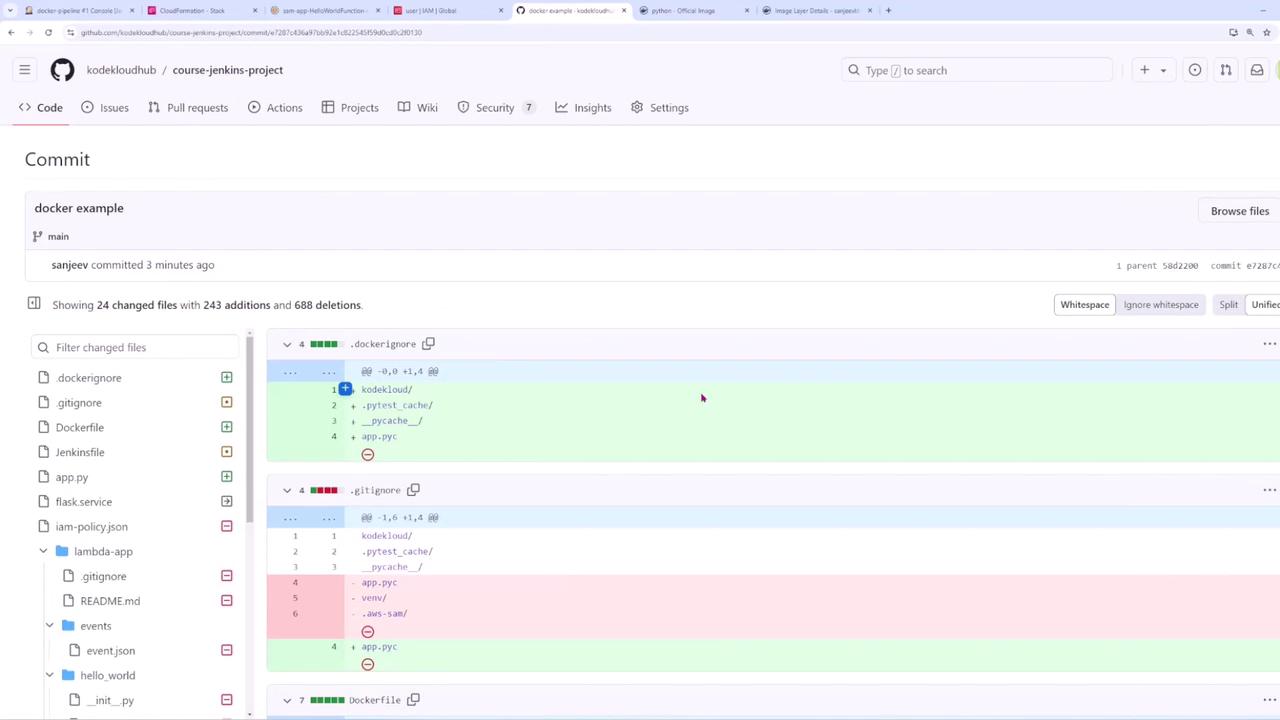
If you view a commit diff, you might see something like this:
After making changes (for example, updating the version to "version four"), commit and push the modifications. Jenkins will trigger another build, and your updated Docker image—now tagged with the new commit hash—will be pushed to Docker Hub.
Viewing the Docker Image on Docker Hub
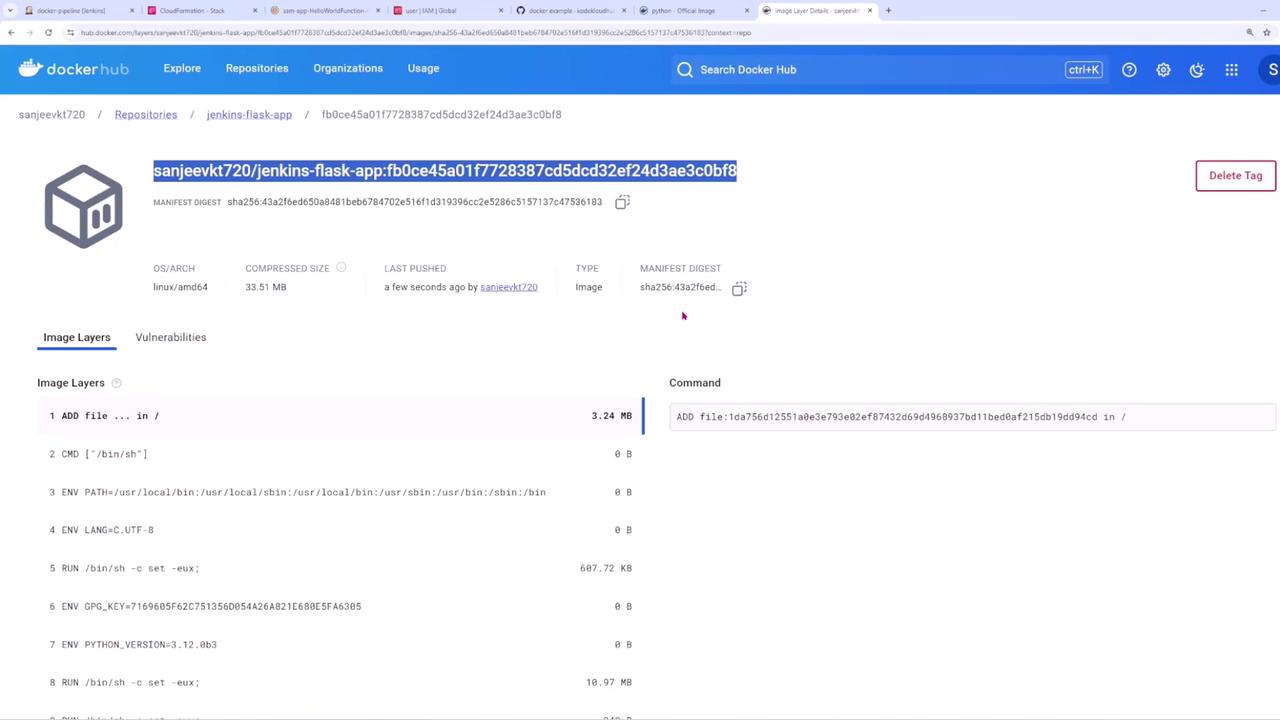
Finally, you can verify the pushed Docker image on Docker Hub. The Docker Hub interface displays details such as the manifest digest, OS/architecture, compressed size, and image layers.
This completes the process of integrating Docker into your Jenkins CI/CD pipeline, enabling streamlined testing, building, and deployment of your applications.
Watch Video
Watch video content
Practice Lab
Practice lab