This article explores Kubernetes scheduler profiles and their configuration through practical examples of Pod scheduling in a cluster.
In this article, we explore scheduler profiles and the inner workings of the Kubernetes scheduler using a practical example where a Pod is scheduled to one of four nodes in a Kubernetes cluster.
Each node in the cluster has a defined amount of available CPU. As Pods are created, they enter a scheduling queue where they are arranged based on the priority specified in their configuration. In this scenario, our Pod is assigned a high priority by using a PriorityClass object. Here is an example of how to create such a PriorityClass:
Copy
apiVersion: scheduling.k8s.io/v1kind: PriorityClassmetadata: name: high-priorityvalue: 1000000globalDefault: falsedescription: "This priority class should be used for XYZ service pods only."
High-priority settings ensure that Pods with this classification are placed at the front of the scheduling queue.
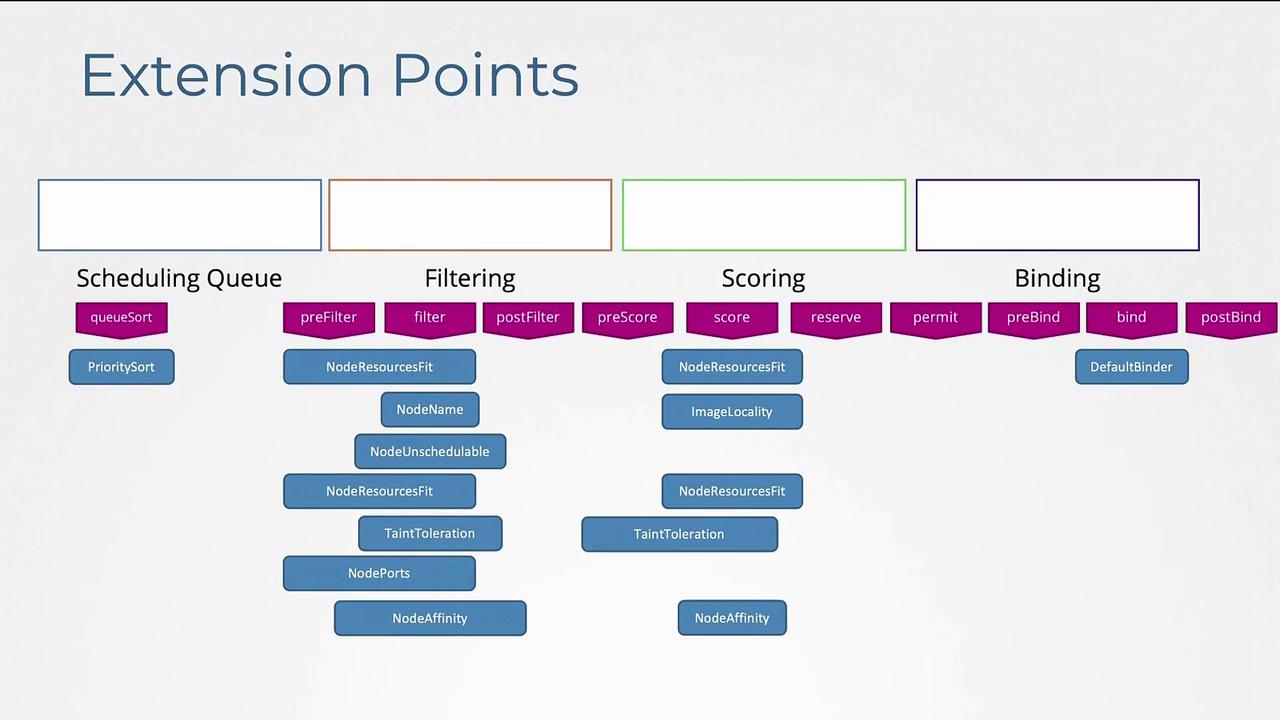
The Pod scheduling process comprises three main phases:
Filter Phase:
In this phase, the scheduler eliminates nodes that do not satisfy the Pod’s resource requirements. For instance, if the first two nodes do not have the needed 10 CPU units available, they are filtered out.
Scoring Phase:
Nodes that pass the filter phase are then scored. The scheduler assigns each node a score based on factors such as the remaining CPU after allocating the Pod’s requirements. For example, if one node has 2 CPU units remaining while another has 6, the latter will receive a higher score.
Binding Phase:
In the final phase, the Pod is assigned to the node with the best score during the binding process.
Plugins are integral to the Kubernetes scheduling process. Here are some examples:
Priority Sort Plugin:
During the scheduling queue phase, this plugin orders Pods based on their assigned priority.
Node Resources Fit Plugin:
This plugin is active during the filter phase to exclude nodes lacking sufficient resources. Additionally, during the scoring phase, this plugin re-evaluates nodes based on free resources.
Node Unschedulable Plugin:
This plugin ensures that nodes marked as unschedulable do not have Pods assigned. For example, running the command:
confirms that the node unschedulable plugin prevents Pod scheduling on such nodes.
Image Locality Plugin:
This plugin is a soft preference during the scoring phase, favoring nodes that already contain the required container image.
Default Binder Plugin:
In the binding phase, this plugin finalizes the Pod-to-node assignment.
Kubernetes’ extensible design lets you customize active plugins at each extension point, including pre-filter, filter, post-filter, pre-score, score, reserve, pre-bind, and post-bind. You can also integrate custom plugins to meet specific requirements.
Kubernetes’ extensibility is further demonstrated by its support for multiple scheduler profiles within a single scheduler binary. This feature, introduced in Kubernetes 1.18, simplifies process maintenance and reduces race conditions by eliminating the need for separate scheduler binaries (such as default scheduler, my-scheduler, and my-scheduler2).Consider the following configuration files that define separate scheduler configurations with unique scheduler names:
Each scheduler profile functions as an independent scheduler within the same binary. To further customize these profiles, you can manipulate the plugin settings by disabling default plugins or enabling custom ones. Below is a sample configuration showcasing these customizations:
Under the plugins section for each profile, you can specify which extension points to modify and choose to selectively enable or disable plugins by name or using a pattern.