Linux Foundation Certified System Administrator (LFCS)
Operations Deployment
Installing an Operating System on a Virtual Machine
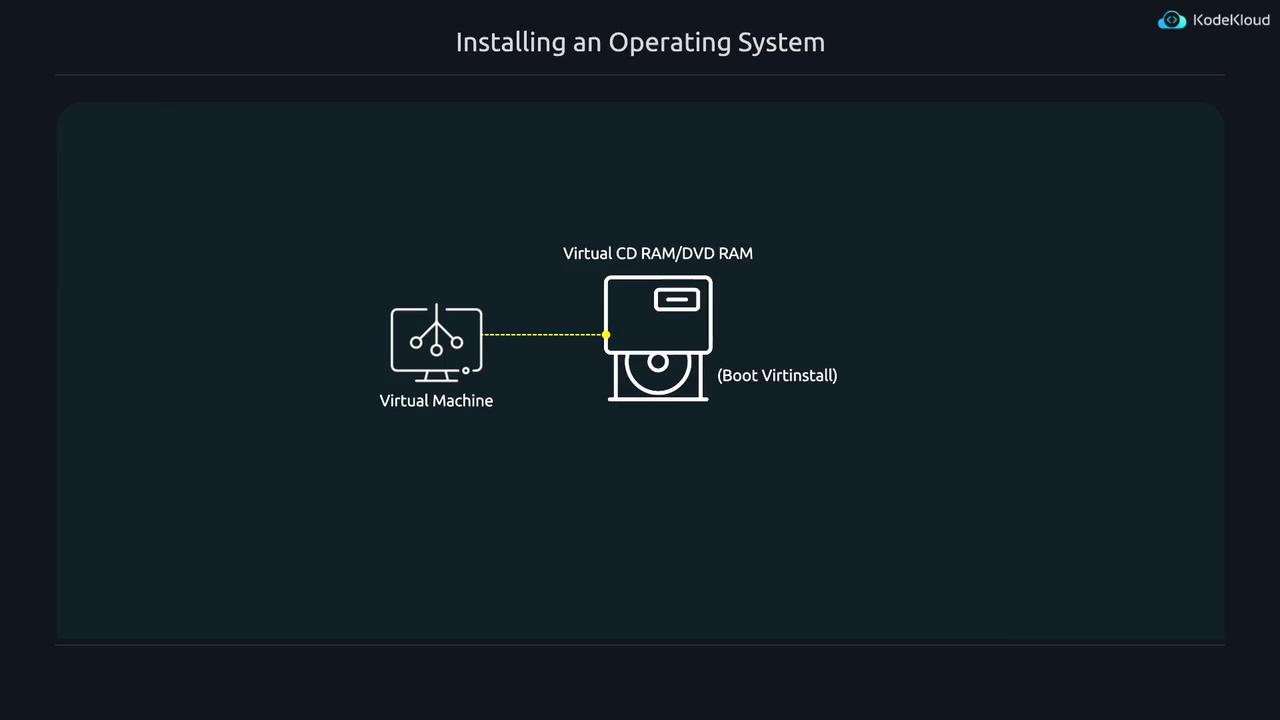
Cloud images with pre-installed operating systems can simplify deployments by eliminating the OS installation step. However, in some cases, you may want to perform a fresh operating system installation on a virtual machine. This guide explains how to set up a virtual machine using a virtual CD-ROM/DVD-ROM and an empty disk image, then install an operating system using the virt-install tool.
Overview of the Process
The installation process involves the following key differences compared to importing a pre-built disk image:
- The
--import
option is omitted because no pre-installed operating system exists. - The
--disk
option uses the syntaxsize=10
(or another size) to create a new disk image with a specified capacity. - The
--location
option points to an ISO file or a URL serving as a virtual installation medium. - The
--graphics none
option enforces a text-mode installation. - The
--extra-args "console=ttyS0"
option configures the Linux kernel to expose a serial console, enabling text-based interactions without a graphical interface.
Example: ISO-Based Installation
Below is a sample command demonstrating the installation process using an ISO-based installer:
jeremy@kodekloud:~$ virt-install --osinfo debian12 --name debian1 --memory 1024 --vcpus 1 --disk size=1 --location /var/lib/libvirt/boot/debian12-netinst.iso --graphics none --extra-args "console=ttyS0"
The virt-install command begins by downloading necessary installation files and proceeds with the configured setup. An extended version of the command is shown below:
jeremy@kodekloud:~$ virt-install --osinfo debian12 --name debian1 --memory 1024 --vcpus 1 --disk size=1 \
--location https://deb.debian.org/debian/dists/bookworm/main/installer-amd64/ --graphics none --extra-args "console=ttyS0"
Starting install...
Retrieving 'linux'
Retrieving 'initrd.gz'
Allocating 'virtinst-pf4uz7u7-linux' | 3.5 MB 00:00:00 ...
Transferring 'virtinst-pf4uz7u7-linux' | 37 MB 00:00:07 ...
Allocating 'virtinst-ig_4_4kj-initrd.gz' | 0 B 00:00:00 ...
Transferring 'virtinst-ig_4_4kj-initrd.gz' | 0 B 00:00:00 ...
Allocating 'debian1.qcow2'
As the setup continues, kernel output is generated, displaying messages similar to the following:
[ 4.397242] pci_bus 0000:00: resource 1 [mem 0xfba00000-0xfbbffffff]
[ 4.407563] pci_bus 0000:00: resource 2 [mem 0xfd800000-0xfd9fffff 64bit pref]
[ 4.419329] pci_bus 0000:00: resource 0 [io 0xb000-0xbfff]
[ 4.429093] pci_bus 0000:00: resource 1 [mem 0xfb800000-0xfb9ffffff]
[ 4.437697] pci_bus 0000:00: resource 0 [mem 0xfd600000-0xfd7fffff 64bit pref]
[ 4.450549] pci_bus 0000:00: resource 0 [io 0xd000-0xdfff]
[ 4.459376] pci_bus 0000:00: resource 2 [mem 0xfb600000-0xfb7fffff 64bit pref]
[ 4.466932] pci_bus 0000:00: resource 2 [mem 0xfd5dffff-0xfd5fffff]
[ 4.475681] pci_bus 0000:00: resource 0 [io 0xe000-0xefff]
[ 4.487983] pci_bus 0000:00: resource 1 [mem 0xfb400000-0xfb5ffffff]
[ 4.498927] pci_bus 0000:00: resource 2 [mem 0xfd200000-0xfd3ffffff 64bit pref]
[ 4.511739] pci_bus 0000:00: resource 0 [io 0xf000-0xefff]
[ 4.516685] pci_bus 0000:00: resource 1 [mem 0xfb200000-0xfb3ffffff]
[ 4.525543] pci_bus 0000:00: resource 2 [mem 0xfd200000-0xfd1ffffff 64bit pref]
[ 4.542764] ACPI: \_SB_.GSIF: Enabled at IRQ 21
[ 4.554507] pci 0000:02:00.0: quirk_usb_early_handoff+0x0/0x750 took 11764 usecs
[ 4.566288] PCI: CLS 0 bytes, default 64
[ 4.572174] Trying to unpack rootfs image as initramfs...
[ 4.583343] clocksource: tsc: mask: 0xfffffffffffffffe max_cycles: 0x23f39a1d859, max_idle_ns: 44079
[ 4.616550] Initialise system trusted keyrings
[ 4.631830] Key type blacklist registered
[ 4.640054] workingset: timestamp_bits=36 max_order=18 bucket_order=0
[ 4.671611] zbud: loaded
[ 4.676112] integrity: Platform Keyring initialized
[ 4.691762] integrity: Machine keyring initialized
[ 4.703957] Key type asymmetric registered
[ 4.719768] Asymmetric key parser 'x509' registered
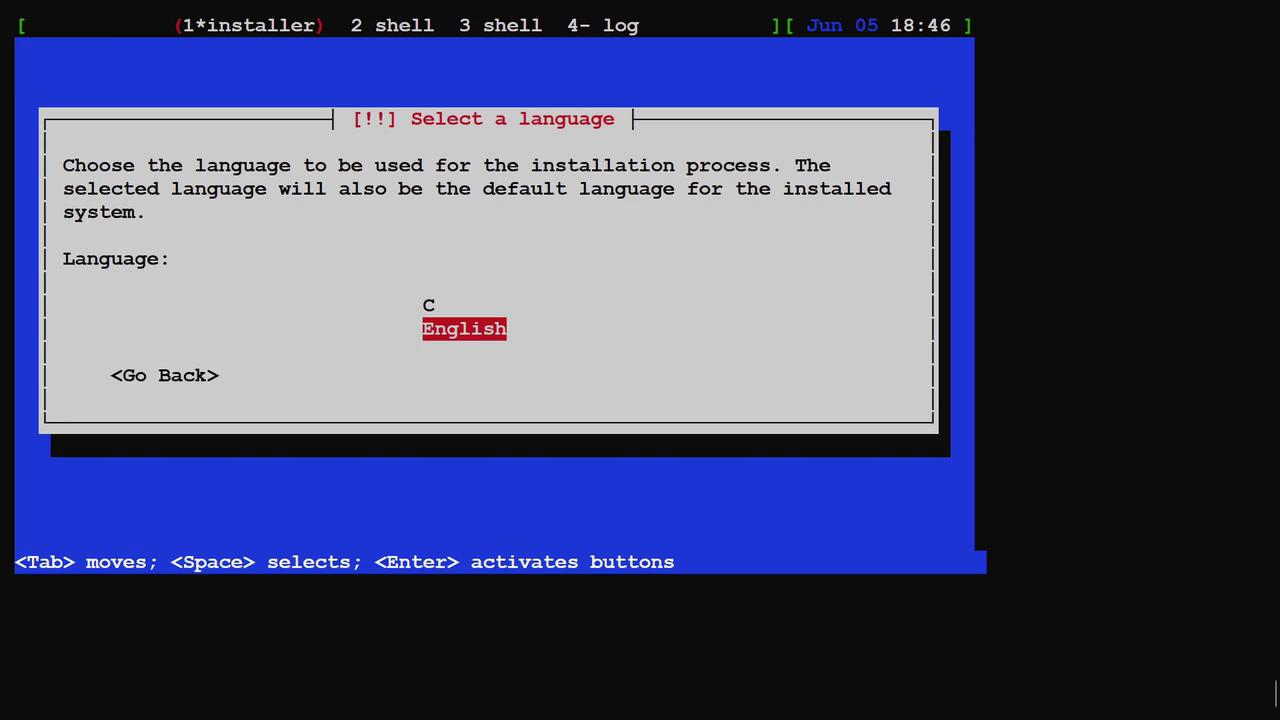
After the kernel completes its startup messages, the system boots directly into the Debian installer. In text-based terminal environments, the display might sometimes seem misaligned. Since the installation interface is minimal, not all languages or options may be available. You can simply press Enter to accept the default options during the initial setup.
Stopping the Process
For demonstration purposes, this guide stops at the installer boot stage. Continuing the process would trigger additional downloads and extended waiting times. If you wish to cancel the installation, press Ctrl+] to exit the terminal session.
Please note that terminal outputs may sometimes appear distorted. In such situations, using the clear command might not fully resolve display issues.
Summary
This guide demonstrated how to create a virtual machine and perform a complete operating system installation from scratch using the virt-install tool. While pre-built cloud images are generally more efficient, understanding this process is valuable for instances that require a fresh installation setup.
This concludes the demonstration.
Watch Video
Watch video content
Practice Lab
Practice lab