Microsoft Azure Security Technologies (AZ-500)

Perimeter Security

Create User Defined Routes and Network Virtual Appliances

In this guide, you will learn how to create user-defined routes (UDRs) and configure network virtual appliances (NVAs) on Azure. We begin by exploring system routes in a virtual network and then demonstrate how to override them with UDRs to enforce traffic inspection by a firewall.

Key Concepts

  • Understand how system routes enable default intra-VNet communication.
  • Learn how to override system routes with UDRs to force traffic through NVAs.
  • Configure DNAT and application rules on your firewall to control inbound and outbound traffic.

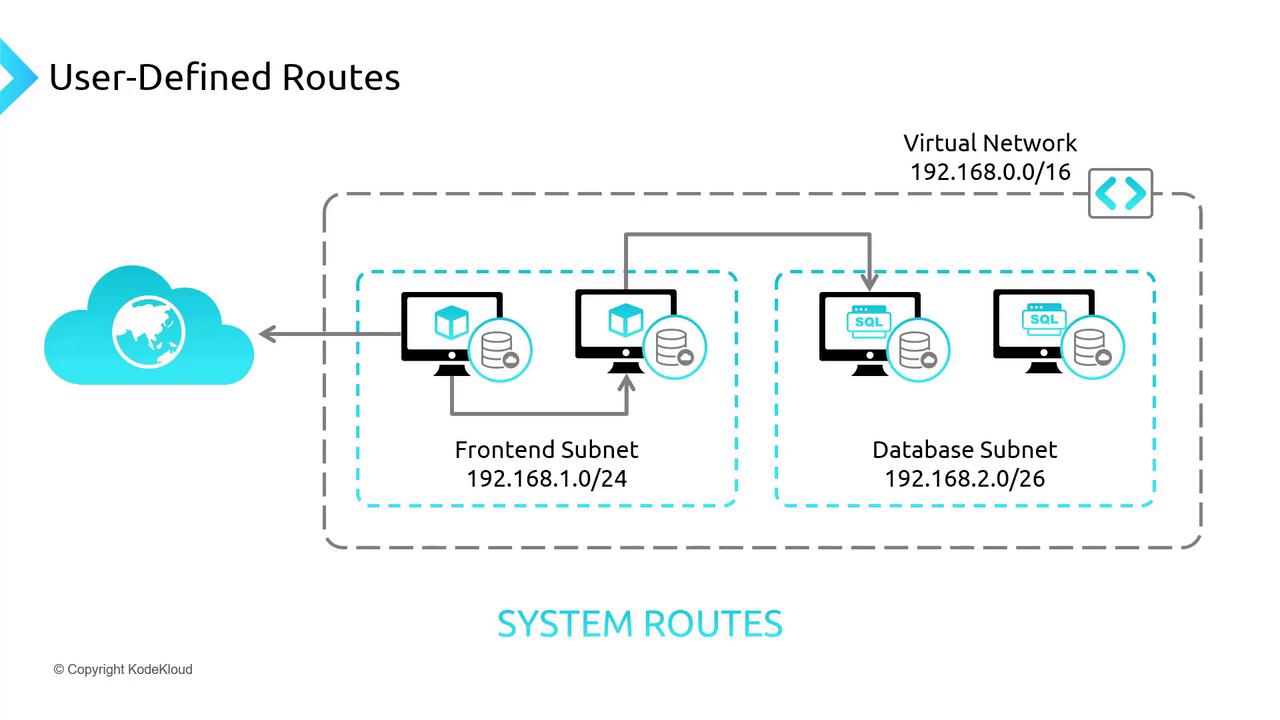
Understanding System Routes

In a typical virtual network, subnets such as a front-end subnet and a database subnet inherently communicate using system routes. These routes allow:

  • Communication between machines within the same subnet.
  • Traffic exchange between machines across different subnets within the same virtual network.
  • Virtual machines (VMs) to initiate outbound communication to the Internet (e.g., for updates or NTP), even when inbound Internet traffic is blocked by default (unless explicitly allowed via network security rules).

The image illustrates a network diagram showing user-defined routes within a virtual network. It includes a frontend subnet and a database subnet, each with specific IP address ranges, connected to a cloud.

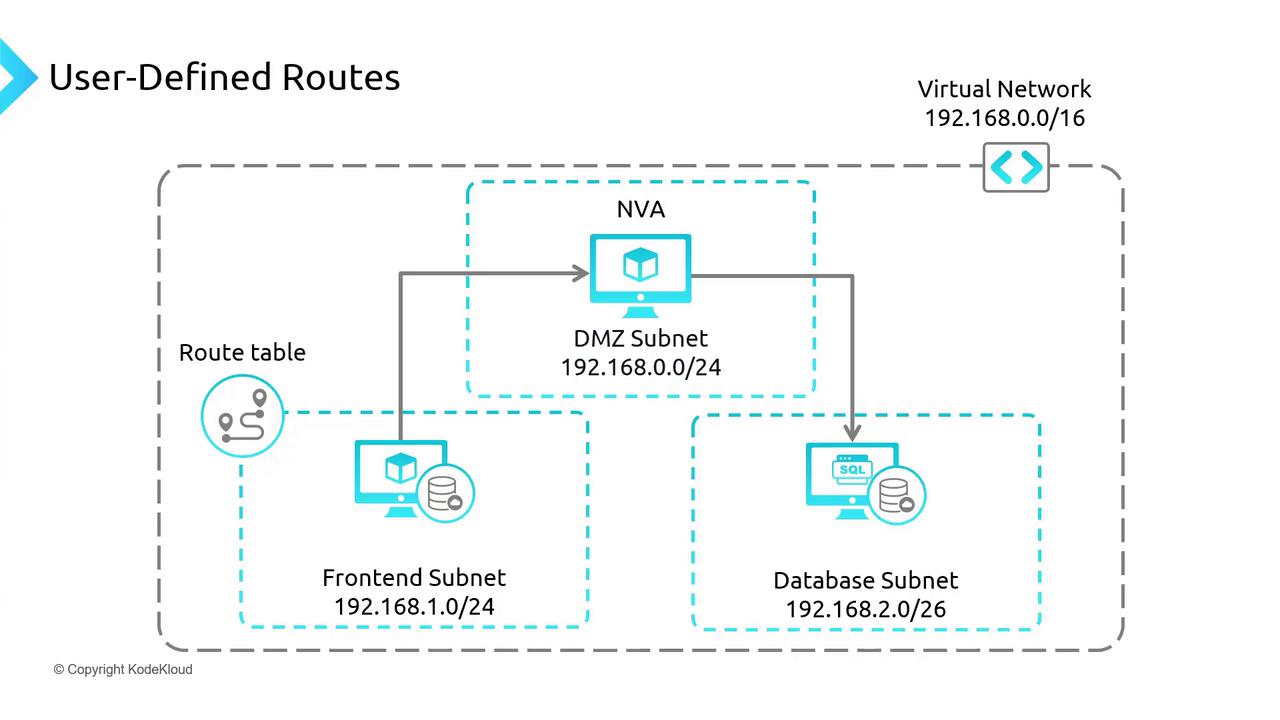
Overriding System Routes with User-Defined Routes

There are scenarios where the default system routes need to be overridden. For example, to ensure that traffic from the front-end subnet does not directly reach the database subnet, you can force traffic to pass through a firewall (NVA) for inspection. This is done by deploying an NVA (e.g., Palo Alto, FortiGate, Cisco, or Azure Firewall) in a dedicated subnet and configuring a route table to redirect the traffic.

The route table configuration typically includes:

  • Redirecting traffic destined for a specific subnet (e.g., database subnet 192.168.2.0/26) to the NVA.
  • Allowing only permitted traffic, as specified by firewall rules, to reach the database subnet.

The image illustrates a network diagram of user-defined routes within a virtual network, showing a DMZ subnet, frontend subnet, and database subnet, each with specific IP ranges. It includes a route table and a network virtual appliance (NVA) for managing traffic flow.

When connecting multiple virtual networks—for instance, within a hub-and-spoke architecture—it is essential to enforce route tables in the spoke networks to ensure that all traffic flows through the designated firewall for proper security enforcement.

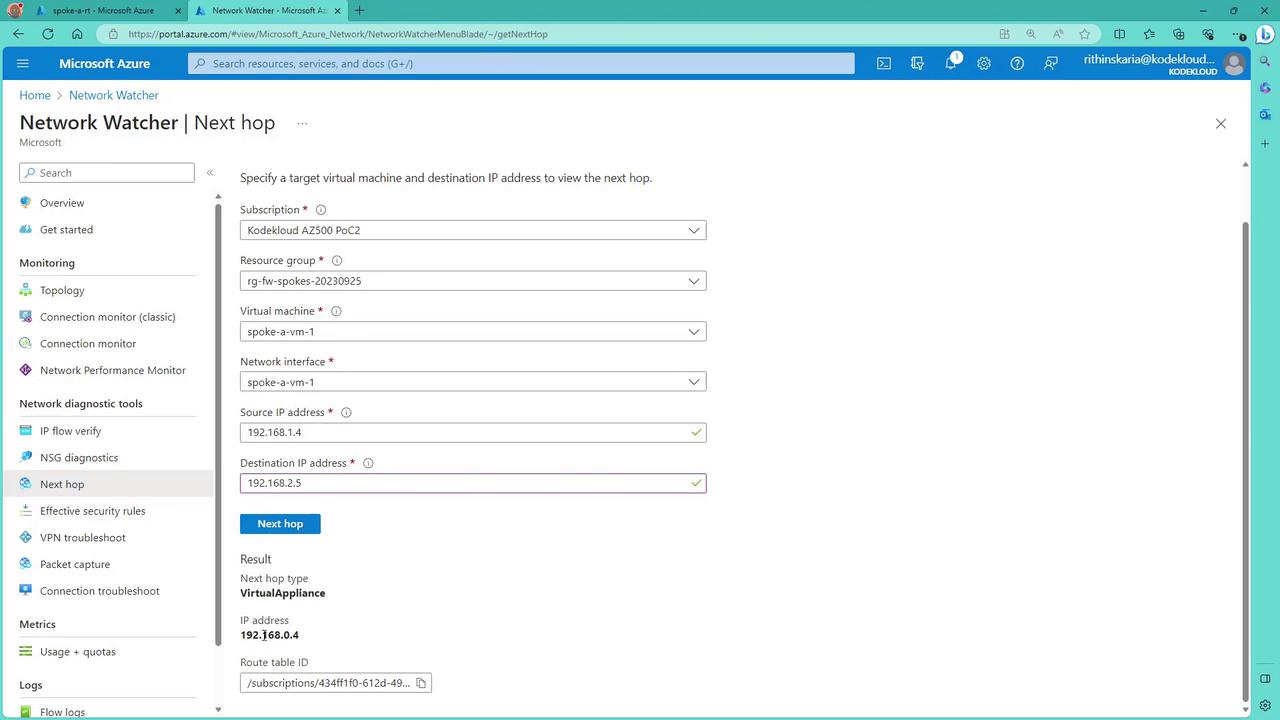
Demonstration via the Azure Portal

Let's explore the process using the Azure portal. In this example, two spoke virtual networks are paired with a hub network where the firewall resides. Initially, traffic within a spoke network (e.g., Spoke A) leverages system routes.

The image shows a Microsoft Azure portal page displaying a list of virtual networks under the "Virtual networks" section. It includes details like network names, resource groups, locations, and subscriptions.

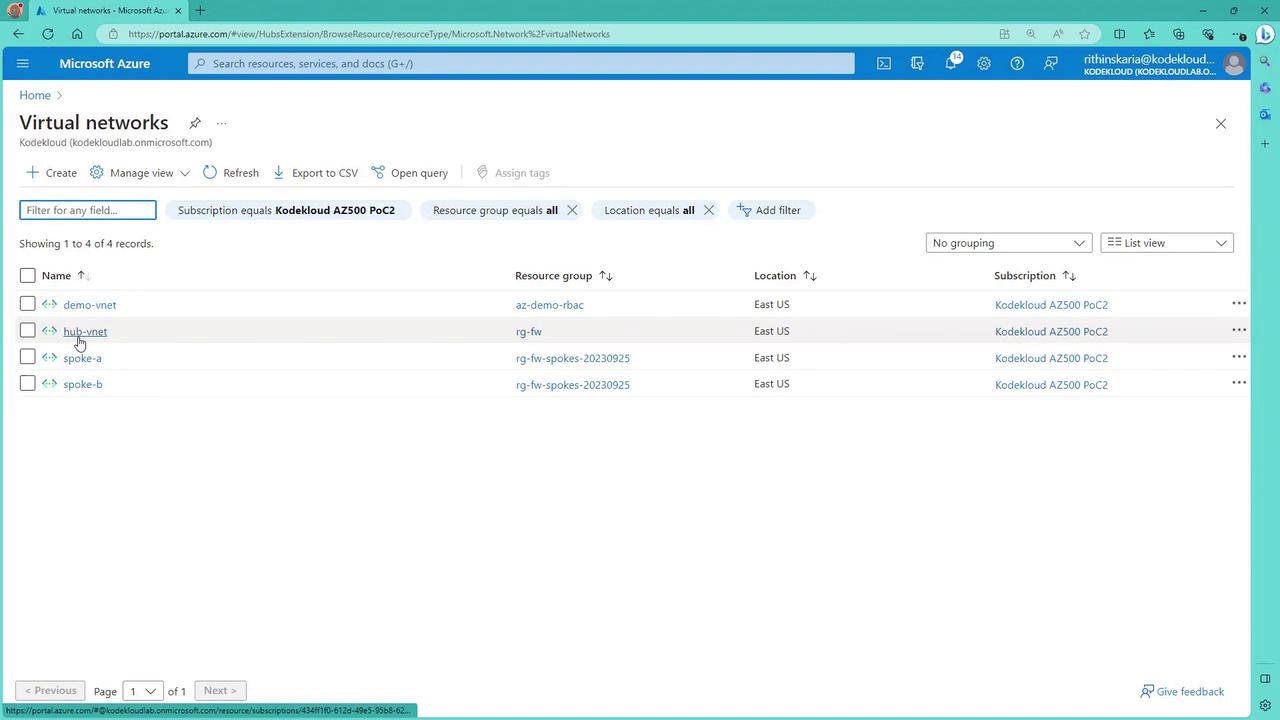
Testing VM Connectivity

Consider Spoke A, which contains two VMs. To connect to one of these VMs via SSH using its public IP, run:

PS C:\Users\RiithinSkeria\Documents\kodekoud-az500\070-Perimeter Security> .\firewall-prep-infra.ps1
WARNING: The names of some imported commands from the module 'Microsoft.Azure.PowerShell.Cmdlets.Netwo ...
Adding spoke-b network configuration
Adding resource group : rg-fw-spokes-20230925
Setting up NSG to allow SSH traffic to VMs
Creating spoke-b-vm-1
spoke-b-vm-1 FQDN: spoke-b-vm-1-d3de8f.eastus.cloudapp.azure.com
spoke-a-vm-2 FQDN : spoke-a-vm-2-123857.eastus.cloudapp.azure.com
Creating spoke-b-vm-2
...
PS C:\Users\RiithinSkeria\Documents\kodekoud-az500\070-Perimeter Security> ssh [email protected]
The authenticity of host '20.172.243.161 (20.172.243.161)' can't be established.
ED25519 key fingerprint is SHA256:nhhXsJuBmDbTsF0uwexxQ/dosrj53n4uBks2sBQN0.
Are you sure you want to continue connecting (yes/no/[fingerprint])? yes
Warning: Permanently added '20.172.243.161' (ED25519) to the list of known hosts.
[email protected]'s password:

Once logged in, testing outbound connectivity—such as using curl www.google.com—will confirm Internet access:

kodecloud@spoke-a-vm-1:~$ curl www.google.com

Additionally, VMs within the same virtual network can communicate directly. For example, running the following command to ping another machine:

ping 192.168.1.5
PING 192.168.1.5 (192.168.1.5): 56 data bytes
64 bytes from 192.168.1.5: icmp_seq=1 time=2.43 ms
64 bytes from 192.168.1.5: icmp_seq=2 time=83 ms
...

To force specific VM traffic through the firewall, you must apply a UDR by performing these steps:

  1. Create a route table.
  2. Add routes that redirect traffic to the firewall’s IP when specific destination criteria are met.
  3. Associate the route table with the target subnet.

The image shows a Microsoft Azure portal interface for creating a route table, with fields for project and instance details such as subscription, resource group, region, and name.

After configuring and associating the route table, use the Network Watcher tool (Next Hop) to verify that traffic meant for a specific destination (e.g., 1.1.1.1) is routed through the firewall instead of following the system route.

The image shows a Microsoft Azure Network Watcher interface, specifically the "Next hop" tool, where a user is specifying a target virtual machine and destination IP address to view the next hop details. The result indicates the next hop type as "VirtualAppliance" with an IP address of 192.168.0.4.

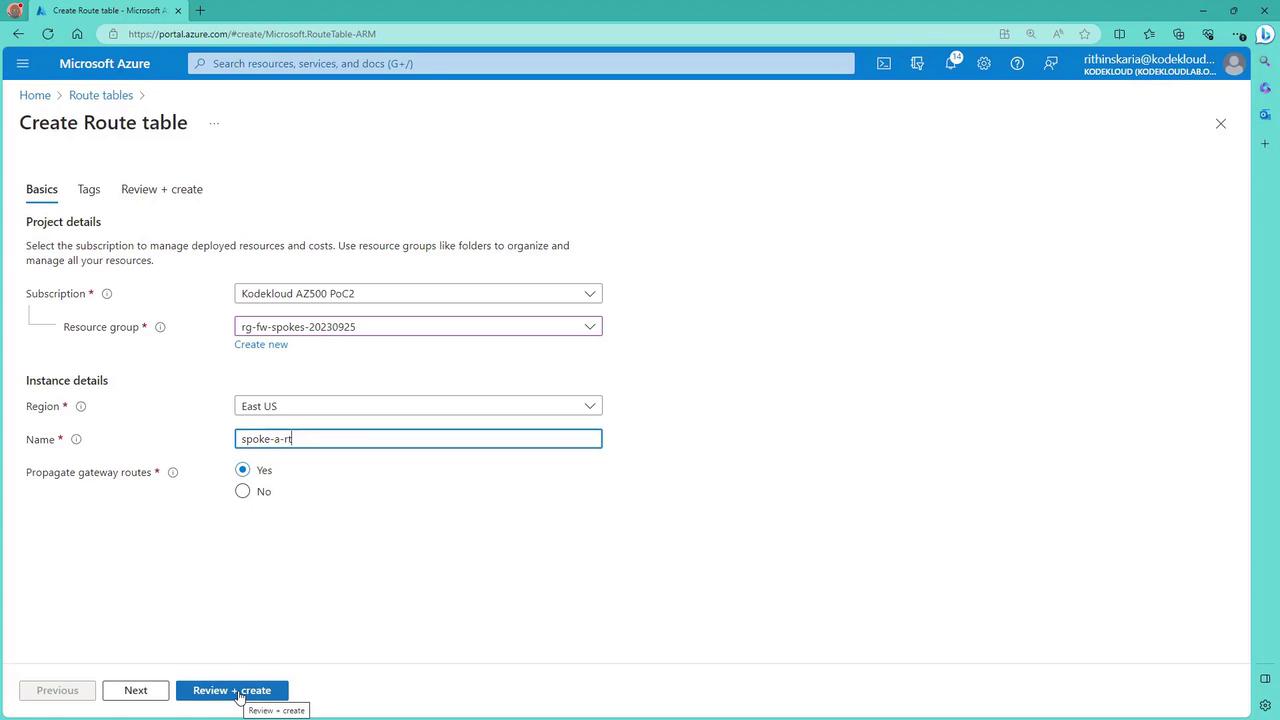
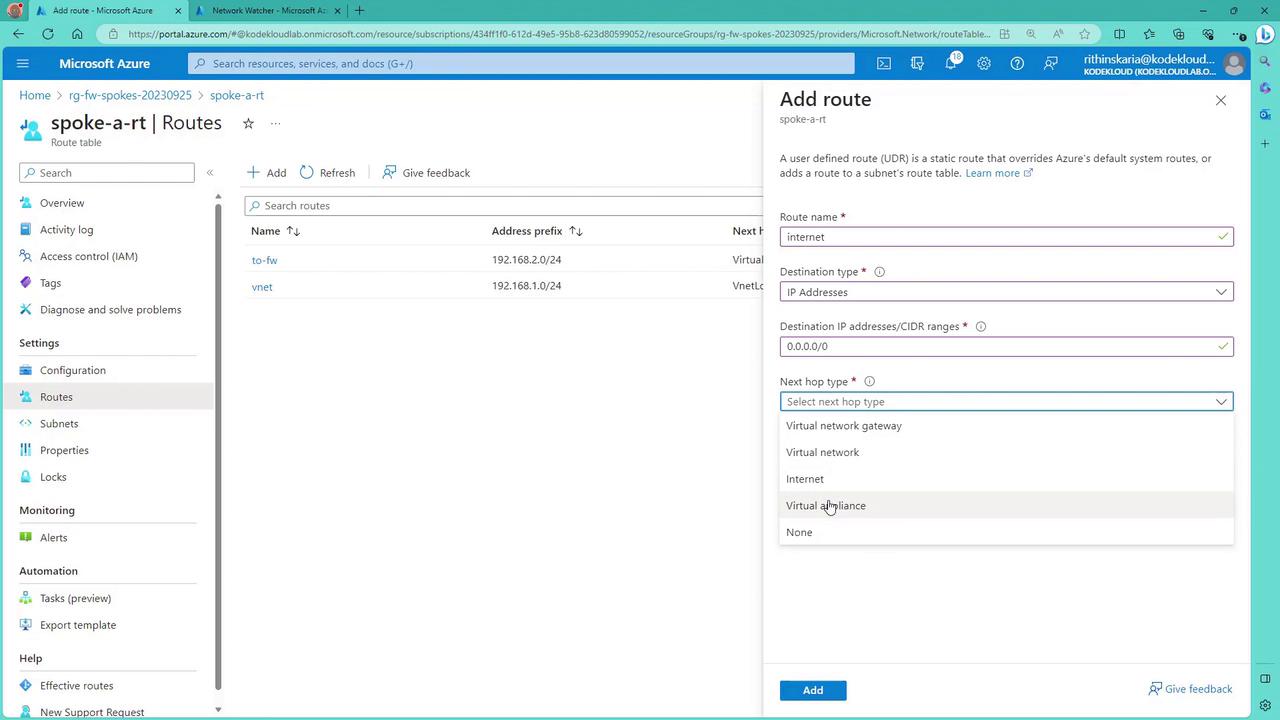
Configuring the Route Table for Firewall Traffic

In the route table for Spoke A, you can configure multiple routes such as:

  • A route for traffic destined for the database subnet (e.g., destination 192.168.2.0/24), which sends traffic through the virtual appliance (firewall).
  • A route for internal virtual network communication (e.g., destination 192.168.1.0/24) that continues to use the virtual network’s internal routing.
  • A catch-all route (e.g., destination 0.0.0.0/0) to force Internet-bound traffic through the firewall, if required.

After configuring these routes, use Network Watcher’s Next Hop tool to confirm the effective path for various destinations.

The image shows a Microsoft Azure portal interface where a user is adding a route to a route table, configuring settings such as route name, destination type, and next hop type.

Once the new routing is applied, any attempt to access the Internet from the VM will initially be blocked by the firewall (as inbound traffic is blocked by default):

PS C:\Users\RithinSkaria> ssh [email protected]
key_exchange_identification: read: Connection reset
Connection reset by 20.172.243.161 port 22
PS C:\Users\RithinSkaria>

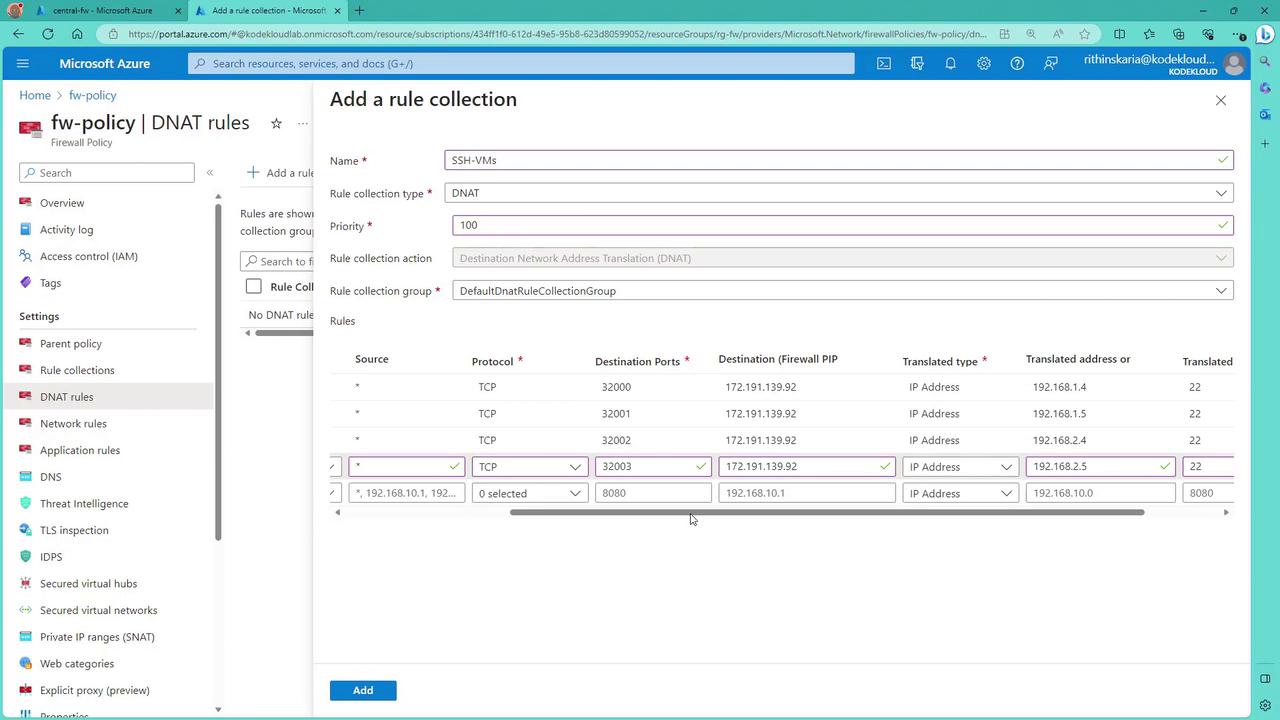
Configuring DNAT and Application Rules on the Firewall

Since the firewall blocks unsolicited inbound connections, you must configure DNAT (Destination Network Address Translation) rules to allow traffic—such as SSH—to reach the VMs behind the firewall. For example, you can create a DNAT rule so that when a request targets the firewall’s public IP on port 32000, it is forwarded to port 22 of a VM in Spoke A.

For Spoke A VM1, the DNAT rule could be:

  • Source: Any
  • Protocol: TCP
  • Destination: Firewall’s public IP on port 32000
  • Translation: Forward to 192.168.1.4 on port 22

Similarly, a DNAT rule for Spoke A VM2 might use port 32001:

# Sample DNAT rule configuration for Spoke A VM1 and VM2
# VM1: Public IP <firewall_public_ip>:32000 -> 192.168.1.4:22
# VM2: Public IP <firewall_public_ip>:32001 -> 192.168.1.5:22

After deploying these rules via the Azure portal, establish SSH connections using the firewall’s public IP address and the specified port numbers:

ssh kodekloud@<firewall_public_ip> -p 32000

You will be prompted for a password, and upon success, you will connect to Spoke A VM1. Repeat the process for Spoke A VM2 using port 32001.

The image shows a Microsoft Azure portal interface where a user is adding a DNAT rule collection named "SSH-VMs" with specific rules for TCP protocols, destination ports, and translated IP addresses. The interface includes fields for rule collection type, priority, and action.

Additionally, you may need to configure application rules on the firewall to manage domain-based traffic. For instance, you could block all outbound web traffic by default and then allow access selectively via application rules. In one scenario, an application rule was added to permit access to www.google.com for one VM while denying it for another:

# Testing web access from a VM behind the firewall
kodekloud@spoke-a-vm-1:~$ curl www.google.com
Action: Deny. Reason: No rule matched. Proceeding with default action.

To allow web access, adjust the Azure Firewall configuration by adding an application rule collection (e.g., named "SpokeA Domains") with a defined priority (e.g., 200) and specify:

  • Source: Any (or a specific source IP)
  • Protocols: HTTP, HTTPS
  • Destination Type: FQDN (e.g., *.google.com)

After applying this rule, test connectivity again. If configured correctly, one VM might access www.google.com while another could be restricted or allowed access to a different domain (e.g., www.microsoft.com).

The image shows a Microsoft Azure portal page displaying DNAT rules for a firewall policy, listing several SSH-VM rules with details like source, port, protocol, and translated addresses.

Alternatively, network rules can also be used to manage communications (e.g., between spokes via the firewall) within a hub-spoke architecture.

Conclusion

By overriding default system routes with user-defined routes and configuring both DNAT and application rules on the firewall, you can enforce tighter network controls and direct traffic through NVAs as required. This approach ensures that all network communications—whether internal or outbound—adhere to the security policies set in your Azure environment.

Happy configuring!

Watch Video

Watch video content

Previous
Configure Forced Tunneling