Every OpenTofu configuration uses a state file to track and manage resources. By default, there’s a single workspace named default . To create multiple environments (for example, development and production) from the same configuration directory, you can use workspaces to isolate state files.
Listing the Default Workspace Run:
$ tofu workspace list
* default
The asterisk (*) indicates the currently active workspace.
Creating and Switching Workspaces Create and switch to new workspaces:
$ tofu workspace new production
Created and switched to workspace "production"!

$ tofu workspace new development
Created and switched to workspace "development"!
Each workspace has its own isolated state. New workspaces start empty until you run tofu apply.
Listing again shows the active workspace:
$ tofu workspace list
default
production
* development
Workspace Commands Reference Command Description tofu workspace listList all available workspaces tofu workspace new <name>Create and switch to a new workspace tofu workspace select <name>Switch to an existing workspace
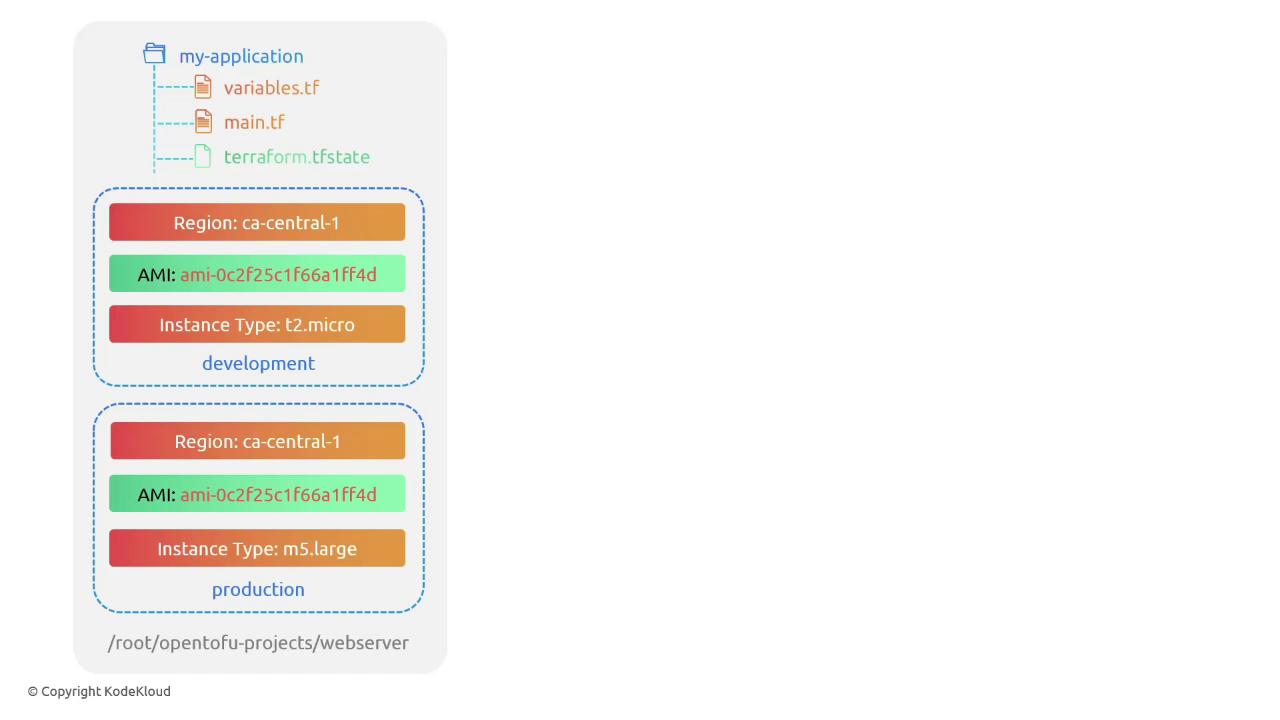
Using Workspaces in Configuration Suppose your project directory at /root/opentofu/projects/webserver defines an AWS EC2 instance. You need:
Development : t2.microProduction : m5.largeRegion : ca-central-1AMI : same for both environments
Update variables.tf to define instance_type as a map:
variable "ami" { default = "ami-24e140119877avm" } variable "region" { default = "ca-central-1" } variable "instance_type" { type = map ( string ) default = { development = "t2.micro" production = "m5.large" } }
In main.tf, use lookup with terraform.workspace and add dynamic tags:
resource "aws_instance" "webserver" { ami = var . ami instance_type = lookup (var . instance_type , terraform . workspace ) tags = { Environment = terraform.workspace } }
Verifying Workspace Values Open the OpenTofu console to inspect workspace-specific values:
$ tofu console > terraform.workspace development > lookup( var.instance_type, terraform.workspace ) t2.micro $ tofu workspace select production > terraform.workspace production > lookup( var.instance_type, terraform.workspace ) m5.large
Applying Changes per Workspace In the development workspace:
$ tofu workspace select development
$ tofu apply
OpenTofu will plan:
  # aws_instance.webserver will be created
  + resource "aws_instance" "webserver" {
      + ami           = "ami-24e140119877avm"
      + instance_type = "t2.micro"
      + tags = {
          + "Environment" = "development"
        }
    }
Switch to production and apply:
$ tofu workspace select production
$ tofu apply
OpenTofu will plan:
  # aws_instance.webserver will be created
  + resource "aws_instance" "webserver" {
      + ami           = "ami-24e140119877avm"
      + instance_type = "m5.large"
      + tags = {
          + "Environment" = "production"
        }
    }
Local State File Organization When using local state, OpenTofu organizes workspace-specific state under terraform.tfstate.d:
$ ls
main.tf    provider.tf    terraform.tfstate.d    variables.tf

$ tree terraform.tfstate.d/
terraform.tfstate.d/
├── development
│   └── terraform.tfstate
└── production
    └── terraform.tfstate

2 directories, 2 files
Each subdirectory holds the terraform.tfstate file for its workspace.
That’s it for this lesson. See you in the next one!