Prometheus Certified Associate (PCA)
Prometheus Fundamentals
AuthenticationEncryption
In this lesson, you will learn how to secure communications between your Prometheus server and its targets by configuring both authentication and TLS encryption. This guide helps ensure that only authorized users or systems can access your metrics and that data remains secure in transit.
Below are two primary challenges along with their solutions:
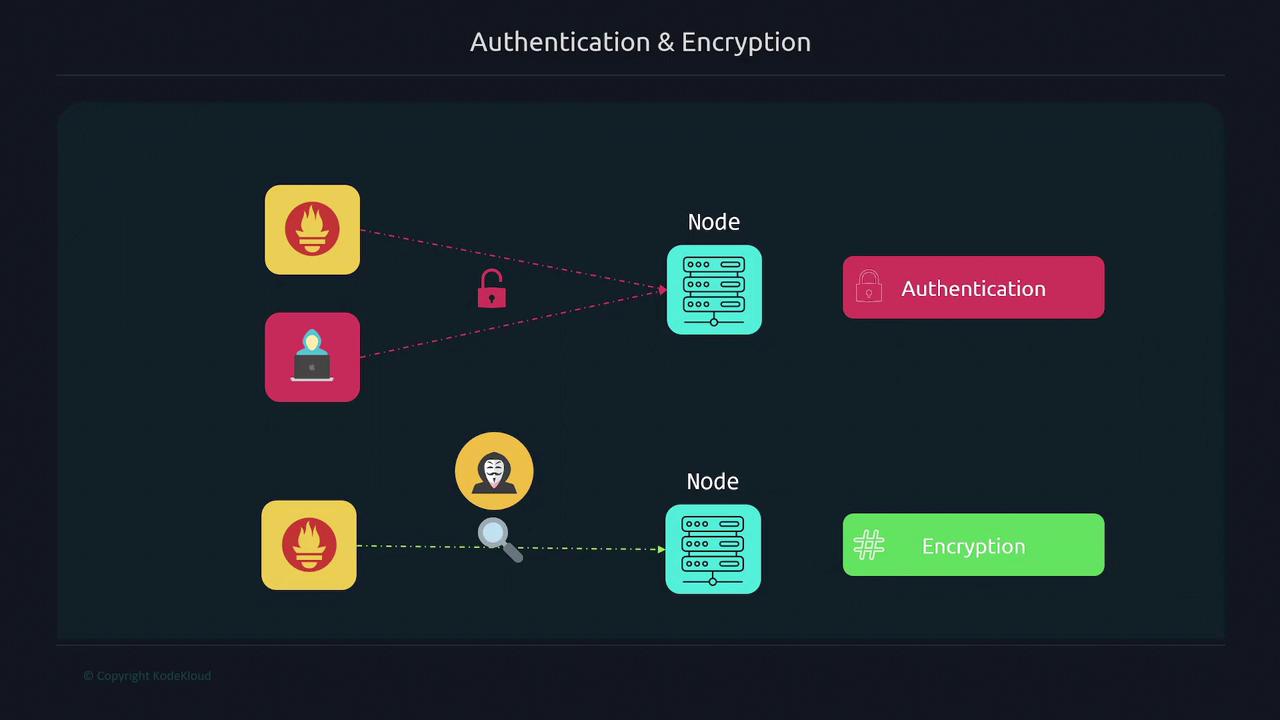
- Without authentication, any entity with access to your target can scrape the metrics, potentially exposing sensitive data.
- Without encryption, data traveling between Prometheus and the target is sent as plain text and is vulnerable to interception.
Encrypting traffic with TLS ensures that even if someone sniffs the network, they will only see encrypted data. The diagram below outlines the authentication and encryption processes between nodes:
Below, follow the steps to set up encryption and authentication.
1. Generating Certificates
To enable secure TLS communications, you first need to generate a certificate. The example below uses OpenSSL to create a self-signed certificate valid for one year. (You can also use a certificate from providers like Let's Encrypt, VeriSign, or another Certificate Authority based on your organization's requirements.)
$ sudo openssl req -new -newkey rsa:2048 -days 365 -nodes -x509 \
-keyout node_exporter.key -out node_exporter.crt \
-subj "/C=US/ST=California/L=Oakland/O=MyOrg/CN=localhost" \
-addext "subjectAltName = DNS:localhost"
After running the command, you should see the following files:
node_exporter.crt
(the certificate)node_exporter.key
(the private key)
You can verify the files by listing the directory contents:
$ ls -l
-rw-r--r-- 1 user2 user2 11357 Dec 5 2021 LICENSE
-rwxr-xr-x 1 user2 user2 18228926 Dec 5 2021 node_exporter
-rw-r--r-- 1 root root 1326 Sep 5 18:04 node_exporter.crt
-rw------- 1 root root 1700 Sep 5 18:04 node_exporter.key
2. Configuring Node Exporter with TLS
Next, create a config.yml
file for the Node Exporter that includes TLS settings. This configuration is similar to Prometheus’s configuration file but is specific to Node Exporter.
tls_server_config:
cert_file: node_exporter.crt
key_file: node_exporter.key
Open the config.yml
for editing:
$ vi config.yml
Then, start the Node Exporter process with the new configuration:
$ ./node_exporter --web.config=config.yml
You should see output confirming that TLS is enabled:
ts=2022-09-05T22:26:53.965Z caller=node_exporter.go:115 level=info collector=zfs
ts=2022-09-05T22:26:53.966Z caller=node_exporter.go:199 level=info msg="Listening on" address=:9100
ts=2022-09-05T22:26:53.966Z caller=tls_config.go:228 level=info msg="TLS is enabled." http2=true
Note
Ensure the config.yml
file is placed in the same directory as your certificate and key files.
3. Organizing Configuration Files
It is a best practice to store configuration files within the /etc
directory. Follow these steps:
- Create a folder for Node Exporter configurations under
/etc
. - Move the certificate and key files to this folder.
- Copy the configuration file to the same folder.
- Update folder permissions to allow the Node Exporter user to access these files.
$ sudo mkdir /etc/node_exporter
$ mv node_exporter.* /etc/node_exporter
$ sudo cp config.yml /etc/node_exporter
$ sudo chown -R node_exporter:node_exporter /etc/node_exporter
4. Updating the Node Exporter Service
To use the new configuration file, update the Node Exporter systemd service:
Open and edit the service file:
$ vi /etc/systemd/system/node_exporter.service
Example of a systemd configuration for Node Exporter:
[Unit] Description=Node Exporter Wants=network-online.target After=network-online.target [Service] User=node_exporter Group=node_exporter Type=simple ExecStart=/usr/local/bin/node_exporter --web.config=/etc/node_exporter/config.yml [Install] WantedBy=multi-user.target
Reload the systemd daemon and restart Node Exporter:
$ systemctl daemon-reload $ systemctl restart node_exporter
When using self-signed certificates, testing with tools like curl will require an insecure flag, as seen below:
$ curl https://localhost:9100/metrics
curl: (60) SSL certificate problem: self-signed certificate
More details here: https://curl.se/docs/sslcerts.html
For testing, bypass verification using the -k
flag:
$ curl -k https://localhost:9100/metrics
# HELP promhttp_metric_handler_requests_total Total number of scrapes by HTTP status code.
# TYPE promhttp_metric_handler_requests_total counter
promhttp_metric_handler_requests_total{code="200"} 10217
promhttp_metric_handler_requests_total{code="500"} 0
promhttp_metric_handler_requests_total{code="503"} 0
5. Configuring TLS for Prometheus
With Node Exporter now requiring HTTPS, update the Prometheus configuration accordingly:
Copy the Node Exporter certificate to the Prometheus server using SCP:
$ scp username:password@node:/etc/node_exporter/node_exporter.crt /etc/prometheus $ sudo chown prometheus:prometheus /etc/prometheus/node_exporter.crt
Open the Prometheus configuration file for editing:
$ vi /etc/prometheus/prometheus.yml
Modify the configuration with these changes:
- Change the scheme to
https
. - Under
tls_config
, provide the CA file location. - Set
insecure_skip_verify
to true (since you are using self-signed certificates).
scrape_configs: - job_name: "node" scheme: https tls_config: ca_file: /etc/prometheus/node_exporter.crt insecure_skip_verify: true static_configs: - targets: ["192.168.1.168:9100"]
- Change the scheme to
Restart Prometheus:
$ sudo systemctl restart prometheus
6. Setting Up Basic Authentication
Adding basic authentication further secures your setup. Follow these steps:
Generate a hashed password using Apache's htpasswd tool. Install
apache2-utils
if needed:$ sudo apt install apache2-utils $ htpasswd -nBC 12 "" | tr -d ':\n' New password: Re-type new password: $2y$12$gfAopKV008KKO63rJe0Z9efGRx30qJEZ9vcC8IxBP9.cXkurguc6
This hashed password will be used in the Node Exporter configuration.
Update your Node Exporter configuration file (
/etc/node_exporter/config.yml
) with the basic authentication block. Replace the example hash with the one you generated:tls_server_config: cert_file: node_exporter.crt key_file: node_exporter.key basic_auth_users: prometheus: $2y$12$dCqkk9uah20wF
Restart Node Exporter:
$ sudo systemctl restart node_exporter
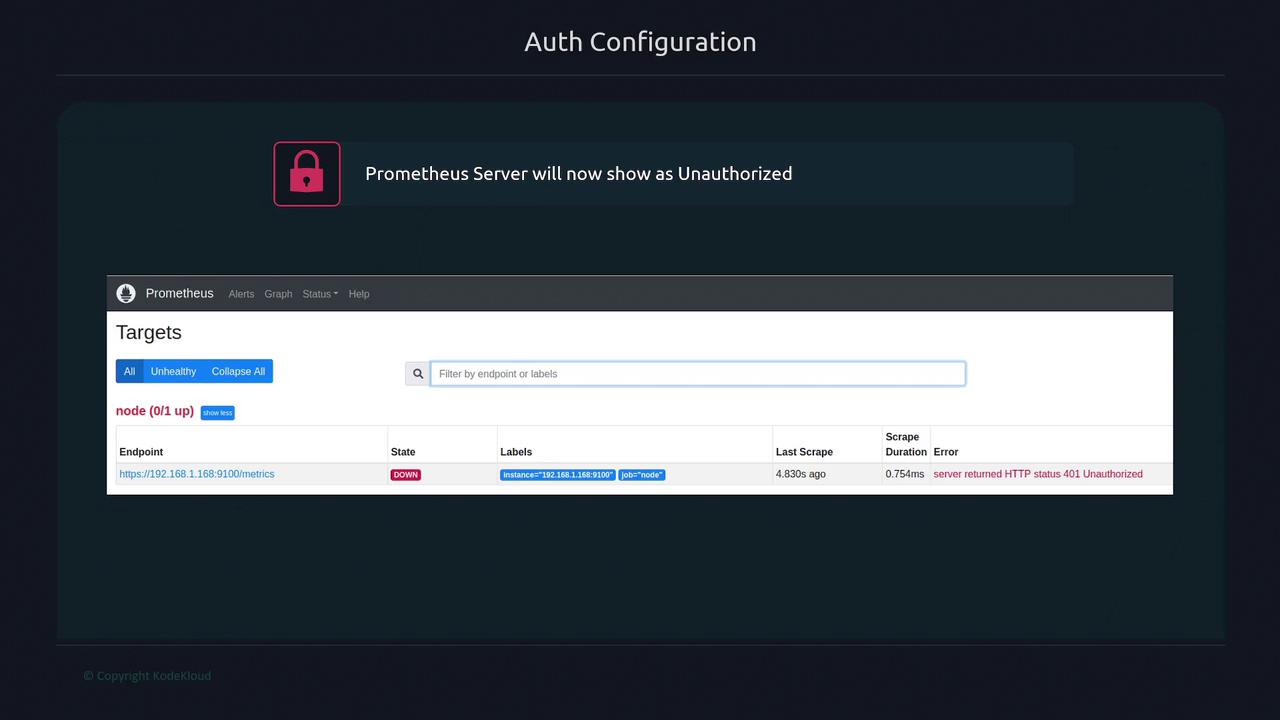
At this point, if you check the Prometheus targets page, you might see one target down because of an HTTP 401 Unauthorized error. This happens because Prometheus is not yet configured to authenticate with the target.
The diagram below shows a Prometheus server configuration screen indicating an unauthorized target:
To resolve this issue, update the Prometheus configuration to include basic authentication:
Edit the Prometheus configuration file:
$ vi /etc/prometheus/prometheus.yml
Add the
basic_auth
configuration with the username and plain text password (the same one used to generate the hash):scrape_configs: - job_name: "node" scheme: https basic_auth: username: prometheus password: password tls_config: ca_file: /etc/prometheus/node_exporter.crt insecure_skip_verify: true static_configs: - targets: ["192.168.1.168:9100"]
Restart Prometheus:
$ sudo systemctl restart prometheus
After these changes, the Prometheus targets page should show the target as active (up), confirming that both TLS and basic authentication are properly configured.
This lesson demonstrated how to enhance the security between Prometheus and Node Exporter by implementing TLS encryption and basic authentication. For further details, refer to related documents like Prometheus Documentation and Kubernetes Basics.
Watch Video
Watch video content
Practice Lab
Practice lab