This article explains the user authentication process during login, detailing credential verification and token generation.
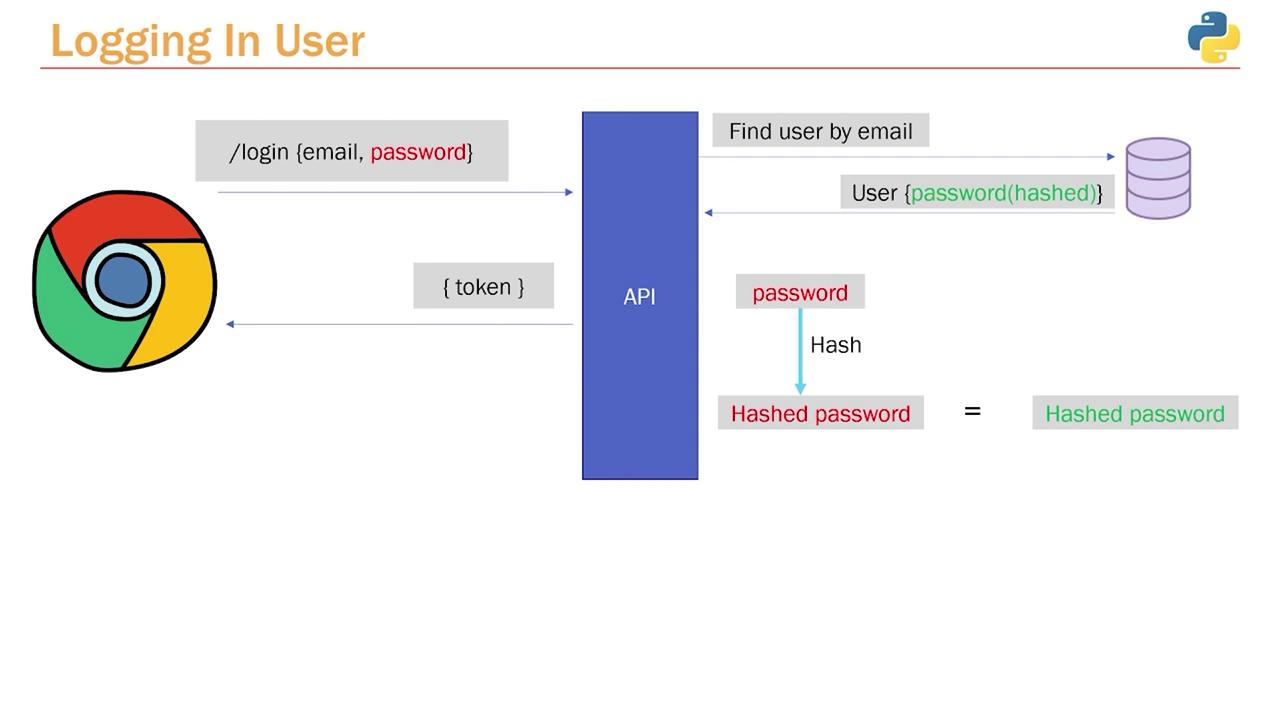
In this article, we explain the user authentication process during login. We’ll detail how submitted credentials are verified by comparing the plain text password against its hashed counterpart stored in the database, and how an authentication token is generated upon successful verification.When a user submits a login request, they provide an email and password (highlighted in red in our diagrams). Although the password is transmitted in plain text, only a hashed version is stored in the database for security. This raises the challenge of comparing a plain text password with a hashed version.The solution is to hash the submitted password using the same function that was used for hashing the original password during registration. If the hashed attempt matches the stored hash, the credentials are validated and an authentication token is generated and returned.
Instead of placing the login endpoint within the users.py router, it is best practice to create a dedicated authentication router. This separation keeps user routes distinct from authentication routes.Begin by creating a file (for this example, we’ll use app.py) and importing the necessary modules from FastAPI. The following code snippet sets up the new authentication router:
from fastapi import APIRouter, Depends, status, HTTPException, Responserouter = APIRouter(tags=['Authentication'])
Because the login involves handling user credentials, define the route as a POST request. While the endpoint can be named either /login or /authenticate, we’ll use /login in this example.Next, define the login function. This function retrieves the user from the database based on the provided email. For this reason, we import the database session along with our application’s models and schemas. Remember, in the database, the user passwords are stored as hashed values.Below is the code that sets up the login endpoint and fetches the user details:
from fastapi import APIRouter, Depends, status, HTTPException, Responsefrom sqlalchemy.orm import Sessionfrom .. import database, schemas, modelsrouter = APIRouter(tags=['Authentication'])@router.post('/login')def login(user_credentials: schemas.UserLogin, db: Session = Depends(database.get_db)): user = db.query(models.User).filter(models.User.email == user_credentials.email).first() if not user: raise HTTPException(status_code=status.HTTP_404_NOT_FOUND, detail="Invalid Credentials")
The next step is to validate the password provided by the user by comparing the plain text input with the hashed password stored in the database. This is achieved by re-hashing the incoming password using the same password hashing function, then comparing it with the stored hash.In a utility file (e.g., utils.py), implement the Bcrypt logic. This file contains functions to hash a password and to verify an attempted password against the hashed password.
Return to the login endpoint and incorporate the verify function from the utils module. This function checks if the provided password matches the hashed password in the database. If the credentials are invalid, an HTTP exception is raised without exposing whether the email or password is incorrect.
from fastapi import APIRouter, Depends, status, HTTPException, Responsefrom sqlalchemy.orm import Sessionfrom .. import database, schemas, models, utilsrouter = APIRouter(tags=['Authentication'])@router.post('/login')def login(user_credentials: schemas.UserLogin, db: Session = Depends(database.get_db)): user = db.query(models.User).filter(models.User.email == user_credentials.email).first() if not user: raise HTTPException(status_code=status.HTTP_404_NOT_FOUND, detail="Invalid Credentials") if not utils.verify(user_credentials.password, user.password): raise HTTPException(status_code=status.HTTP_404_NOT_FOUND, detail="Invalid Credentials") # Create a token (token creation logic to be implemented next) return {"token": "example token"}
Ensure that your utility functions and hashing mechanisms are consistent across your application to maintain security integrity.
Before testing the login process, verify that your database is in a clean state. If necessary, delete existing users who might have unhashed or inconsistent passwords. You can execute the following SQL commands:
SELECT * FROM users;DELETE FROM users;SELECT * FROM users;
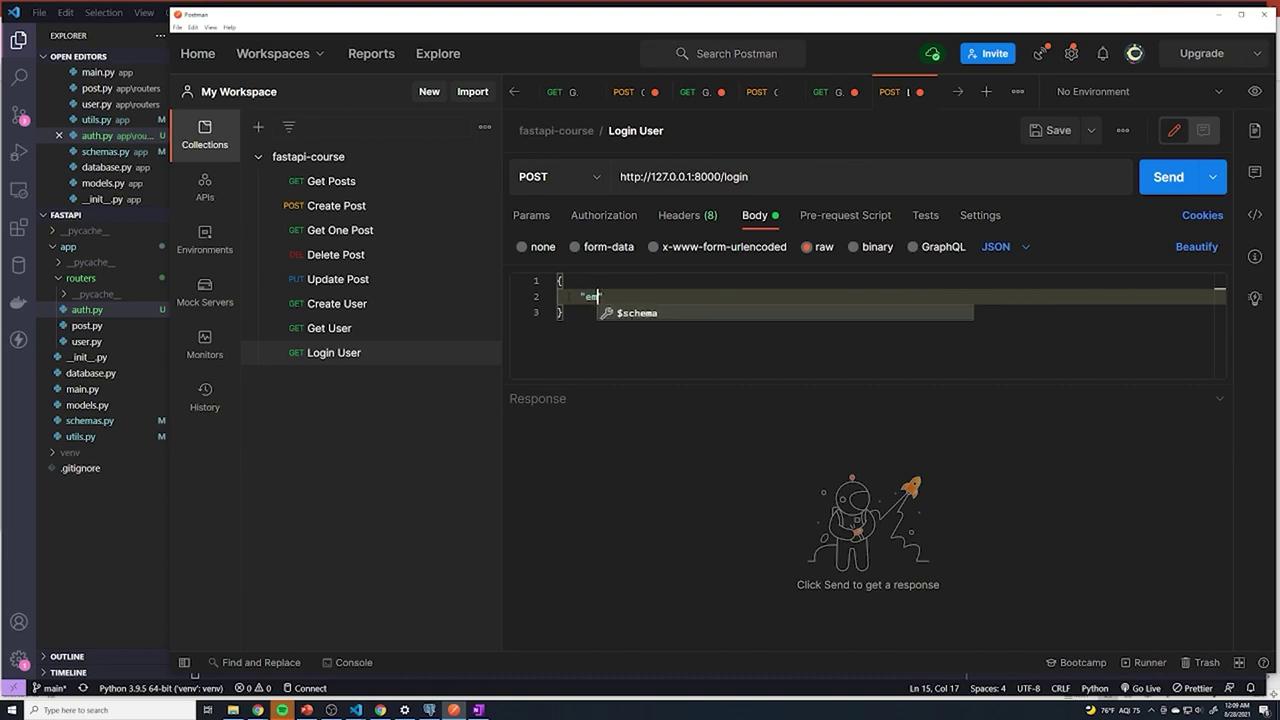
After cleaning the database, register a new user via the /users endpoint using a JSON payload like this:
If you receive a 404 error when accessing the /login endpoint, verify that the authentication router is included in your main application file (main.py). Your main file should include the necessary routers as demonstrated below:
from .routers import post, user, authapp.include_router(post.router)app.include_router(user.router)app.include_router(auth.router)@app.get("/")def root(): return {"message": "Welcome to the API!"}
After including the router, the login endpoint becomes accessible and will return the appropriate token when valid credentials are provided.
At this stage, the login mechanism is complete except for the token creation process. In the next installment of this series, we will explore how to generate and manage JWT tokens for securing application routes.For additional information, check out the following resources: