Red Hat Certified System Administrator(RHCSA)

Configure Local Storage

List create delete and modify physical storage partitions

Welcome to our comprehensive guide on managing physical storage partitions in Linux. This lesson covers essential commands and interactive utilities to list, create, delete, and modify disk partitions. Whether you’re setting up a dual-boot system or reorganizing storage, this guide will help you understand and implement proper partition management.

Understanding Disk Partitions

Disk partitions divide a physical storage device into discrete sections to isolate different file systems. For example, if you have a 2TB solid-state drive intended for both Windows and Linux, you cannot mix the NTFS file system (used by Windows) with Linux file systems like ext4 on a single continuous volume. Instead, you’d allocate separate partitions—for instance, 1TB for Windows and 1TB for Linux—so each operating system uses its dedicated partition.

Viewing Partitions with lsblk

The lsblk command lists block devices and their partitions. In the output, look for entries with "part" under the TYPE column to identify actual partitions. Consider the following example:

[aaron@LFCS-CentOS ~]$ lsblk
NAME   MAJ:MIN RM  SIZE RO TYPE MOUNTPOINT
sda    8:0    0   20G  0 disk
├─sda1 8:1    0    1G  0 part /boot
├─sda2 8:2    0   19G  0 part
├─cs-root 253:0 0   17G  0 lvm  /
└─cs-swap 253:1 0    2G  0 lvm  [SWAP]
sdb    8:16   0   10G  0 disk
sr0   11:0    1 1024M  0 rom
[aaron@LFCS-CentOS ~]$

Here, the primary disk sda includes partitions (sda1 and sda2) along with LVM volumes (cs-root and cs-swap). Disk names might vary in virtual environments (e.g., starting with "v"), so always refer to the TYPE column to distinguish between entire devices and their partitions.

Note

Remember: /dev/sda1 specifically accesses the first partition on /dev/sda, while /dev/sda refers to the whole disk.

You can verify device file usage with this repeated lsblk command:

[aaron@LFCS-CentOS ~]$ lsblk
NAME        MAJ:MIN RM  SIZE RO TYPE MOUNTPOINT
sda           8:0    0   20G  0 disk 
├─sda1        8:1    0    1G  0 part /boot
├─sda2        8:2    0   19G  0 part 
├─cs-root   253:0    0   17G  0 lvm  /
└─cs-swap   253:1    0    2G  0 lvm  [SWAP]
sdb           8:16   0   10G  0 disk 
sr0          11:0    1 1024M  0 rom  
[aaron@LFCS-CentOS ~]$

Examining Partitions with fdisk

The fdisk utility is a powerful tool for displaying and altering disk partition tables. To list the partitions on a specific device (for example /dev/sda), run:

sudo fdisk --list /dev/sda

The output includes detailed information such as sector size. If your output shows a 512-byte sector size and the first partition starts at sector 2048, the calculation (2048 × 512) confirms a 1,048,576-byte (1MB) offset reserved for a bootloader. For disks with a sector size of 4,096 bytes, the calculation adjusts accordingly.

Warning

Modifying partition tables requires elevated privileges. Double-check the device names and calculations to prevent data loss.

Interactive Partitioning using cfdisk

For a more intuitive management experience, cfdisk provides an interactive text-based interface. In this example, an additional storage device (/dev/sdb) is attached to a virtual machine. Start by running:

sudo cfdisk /dev/sdb

Depending on your setup, the additional disk might be represented as /dev/sdb or /dev/vdb. In our guide, we assume /dev/sdb.

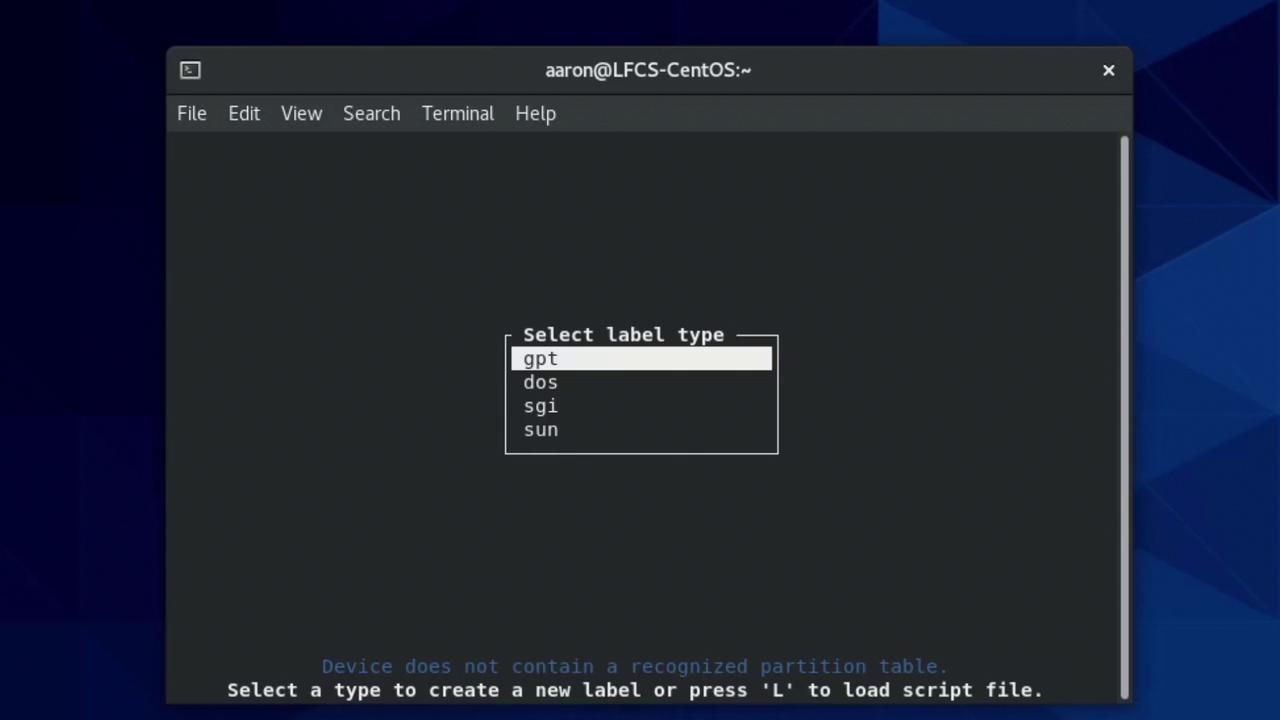
Choosing a Partition Table: MBR vs. GPT

When beginning with cfdisk, you are prompted to choose a partition table type. Historically, the Master Boot Record (MBR) was common, but modern setups typically favor the GUID Partition Table (GPT) due to its support for more partitions and larger drives.

The image shows a terminal window on a CentOS system prompting the user to select a partition label type, with options like GPT, DOS, SGI, and SUN.

Creating and Adjusting Partitions with cfdisk

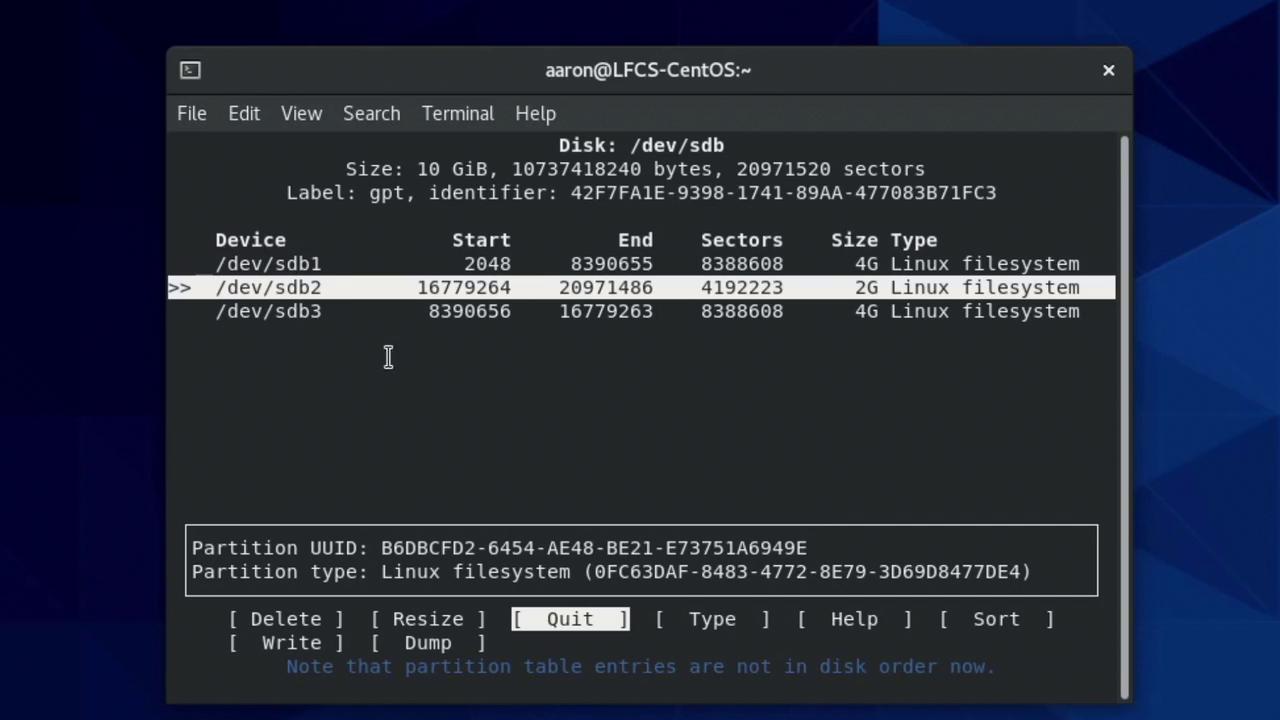
Imagine partitioning a 10GB drive into two sections:

  • 8GB for a new operating system.
  • 2GB dedicated to swap space.

Follow these steps in cfdisk:

  1. Navigate to the free space using the arrow keys and select “New.”
  2. Specify an 8G partition size (using a capital “G” to denote gigabytes) and press Enter.
  3. Navigate to the remaining free space to create a 2G partition.

At this point, you have established two partitions: SDB1 (8GB) and SDB2 (2GB). Later, if you decide to create a third partition, you can resize an existing partition. For example, reducing the 8GB partition to 4GB frees additional space, allowing the creation of three partitions:

  • SDB1 as 4GB
  • SDB2 as 2GB
  • SDB3 as 4GB

Note that partition numbers are assigned based on creation order rather than physical disk locations.

The image shows a terminal window displaying disk partition information for `/dev/sdb`, listing three partitions with their sizes and types. The interface includes options for managing the partitions, such as delete, resize, and quit.

To reorder partitions according to their physical position, select the “Sort” option. After sorting, SDB1 remains 4GB, SDB2 becomes 4GB, and SDB3 (now at the end of the disk) functions as a 2GB swap partition. You may also delete and recreate partitions at any time using the “Delete” and “New” options, noting that these changes remain tentative until committed.

Changing a Partition’s Type

Before committing the changes, you might need to adjust a partition’s type. For example, to designate SDB3 (the 2GB partition) as swap space, navigate to it and press the “Type” button. Then select “Linux swap” from the menu and confirm by pressing Enter.

The image shows a terminal window on a CentOS system with a menu for selecting a partition type, highlighting "Linux swap."

By default, partitions are created with a standard Linux file system type suitable for data storage. Changing the partition type is particularly useful when setting up swap areas or specific boot partitions (like EFI system partitions).

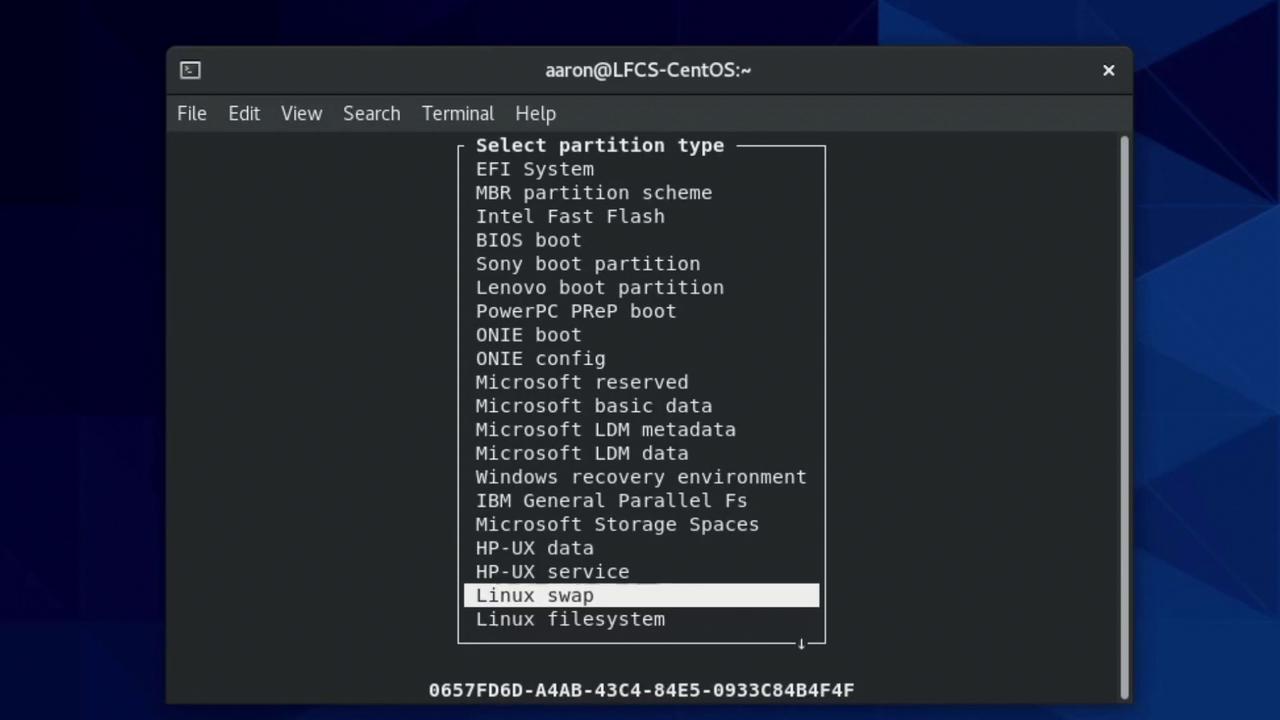
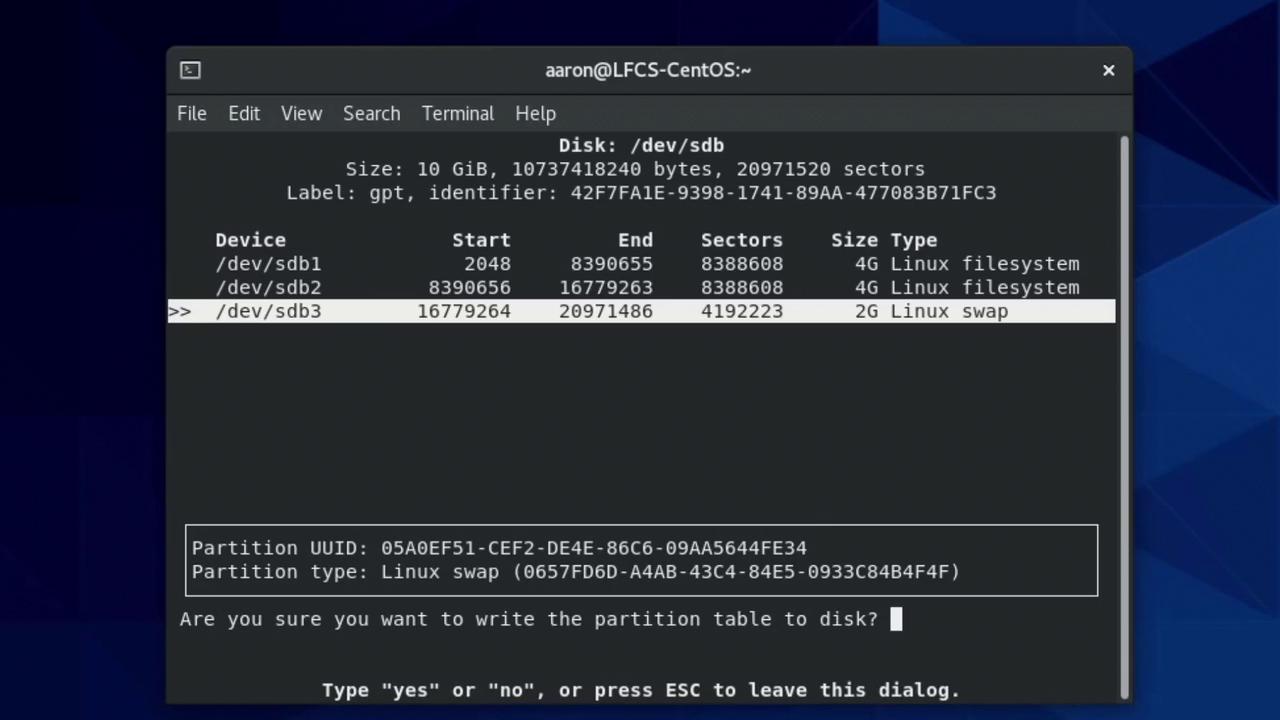
Committing Your Partition Changes

All modifications you make in cfdisk are provisional until you commit them. This feature allows you to review your changes and cancel if necessary. When ready, press the “Write” button (or similar) to apply the modifications. The tool will prompt for confirmation—type “Yes” and press Enter to proceed.

The image shows a terminal window displaying disk partition information for `/dev/sdb`, including details about three partitions with their sizes and types. It prompts the user to confirm writing the partition table to disk.

Once the partition table is committed, exit cfdisk by selecting “Quit.” Running the lsblk command again should display the updated partition layout similar to the following:

[aaron@LFCS-CentOS ~]$ lsblk
NAME   MAJ:MIN RM  SIZE RO TYPE MOUNTPOINT
sda      8:0    0   20G  0 disk 
├─sda1   8:1    0    1G  0 part /boot
├─sda2   8:2    0   19G  0 part 
├─cs-root 253:0  0   17G  0 lvm  /
└─cs-swap 253:1  0    2G  0 lvm  [SWAP]
sdb      8:16   0   10G  0 disk 
├─sdb1   8:17   0    4G  0 part 
├─sdb2   8:18   0    4G  0 part 
└─sdb3   8:19   0    2G  0 part 
sr0     11:0    1 1024M  0 rom  
[aaron@LFCS-CentOS ~]$

Summary

In this guide, you learned how to:

  • Use lsblk to view existing disk partitions and understand device naming.
  • Employ fdisk to examine detailed partition information and perform calculations related to sector sizes.
  • Utilize cfdisk for an interactive approach to creating, deleting, resizing, and modifying partitions.
  • Choose between MBR and GPT partition tables based on your system’s requirements.
  • Commit changes safely after reviewing your planned partition layout.

Note

Properly managing disk partitions is crucial for maintaining system stability and data integrity. Always back up any critical data before making significant changes to your disk structure.

Thank you for following this guide. Continue to explore additional lectures and labs to deepen your understanding of Linux storage management.

Watch Video

Watch video content

Previous
Manage tuning profiles