- Azure Firewall: Best for centralized rule and logging management, supporting layer-seven filtering (e.g., by application or Fully Qualified Domain Name).
- Network Security Groups (NSGs): Operate at layer four of the OSI model and govern inbound and outbound access to network resources such as network interfaces, subnets, and VMs. NSGs enforce rules based on IP protocol, port number, and address prefix.
For complex, large-scale environments requiring centralized management, use Azure Firewall. For simpler, resource-level access control, NSGs are ideal. Both services can complement each other to deliver multiple layers of filtering.
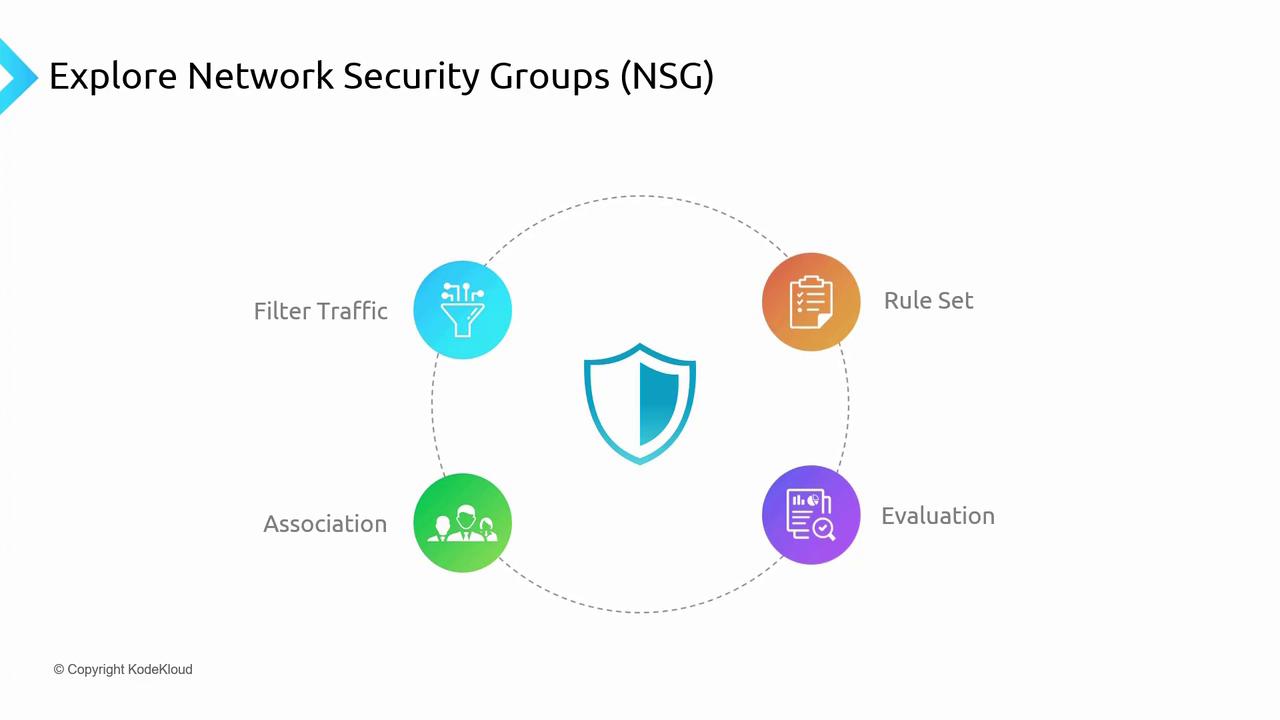
Core Functionalities of Network Security Groups
Filtering Traffic
NSGs monitor the source and destination IP addresses and ports for all inbound and outbound traffic. They then allow or deny traffic according to a set of predefined rules operating at layer four of the OSI model.Rule Set
- NSGs contain a prioritized list of rules where each rule specifies whether to allow or deny traffic.
- The priority is defined by a numerical value (lower numbers indicate higher priority).
- For example, a rule with priority 100 is processed before one with priority 400, while default rules typically have values in the 65,000 range.
Association
An NSG can be associated with both subnets and individual network interfaces. This association strategy allows uniform rule enforcement across a network, while providing the option to override subnet-level rules at the network interface level.Evaluation
- Rules applied at both the subnet and NIC levels are evaluated independently.
- Inbound or outbound traffic must be permitted at both levels to successfully reach a resource.
NSG Rule Attributes
When configuring NSG rules, you specify several attributes to control network traffic:- Service: Define either custom or predefined services (e.g., HTTP, HTTPS, RDP, SSH) for the corresponding open ports.
- Port Range: Specify a single port or a range of ports.
- Priority: A numerical value (commonly between 100 and 4,096 for custom rules; default rules use values around 65,000) that indicates rule precedence.
- Action: Determine whether traffic will be allowed or denied.
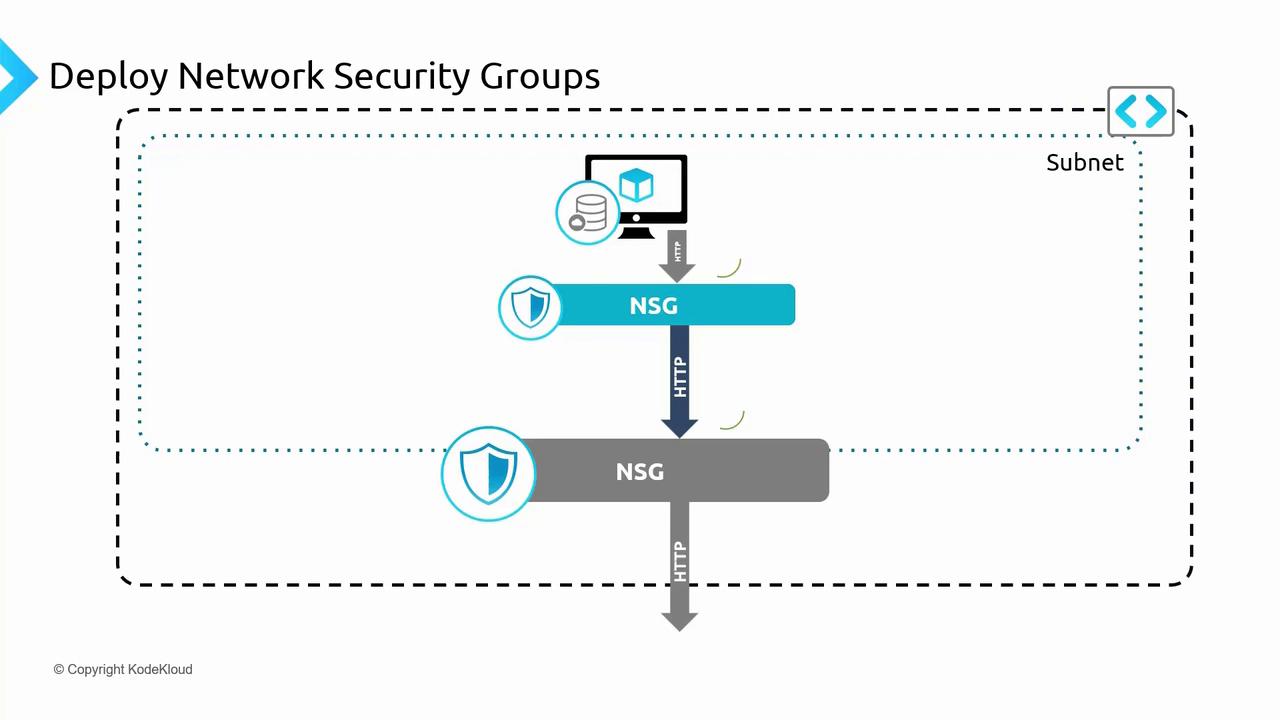
NSG Rule Evaluation Example
Consider a virtual network hosting a web server VM within a subnet. An NSG associated at the subnet level governs inbound traffic before it reaches the VM. For instance, to allow HTTP traffic (port 80) to the web server:- Create a rule on the subnet NSG permitting traffic on port 80.
- Optionally, apply an additional NSG rule at the NIC level for further filtering.
- Traffic is allowed only if both NSGs permit the connection.
- If either NSG denies the traffic, it is blocked.
- The NIC-level NSG evaluates the traffic first.
- Then, the subnet-level NSG evaluates it.
- The outgoing traffic is allowed only if both NSG levels approve it.
Configuring and Testing NSGs in Azure
Deploying the Test Environment
To test NSGs, deploy a set of virtual machines, a virtual network, and NSGs using the provided script. Locate thensg-prep-infra.ps1 script in the “050- Administer Virtual Networking” folder of your training materials.
Before running the script, ensure that you are in the correct subscription context. For example:
Get-AzContext, run the script:
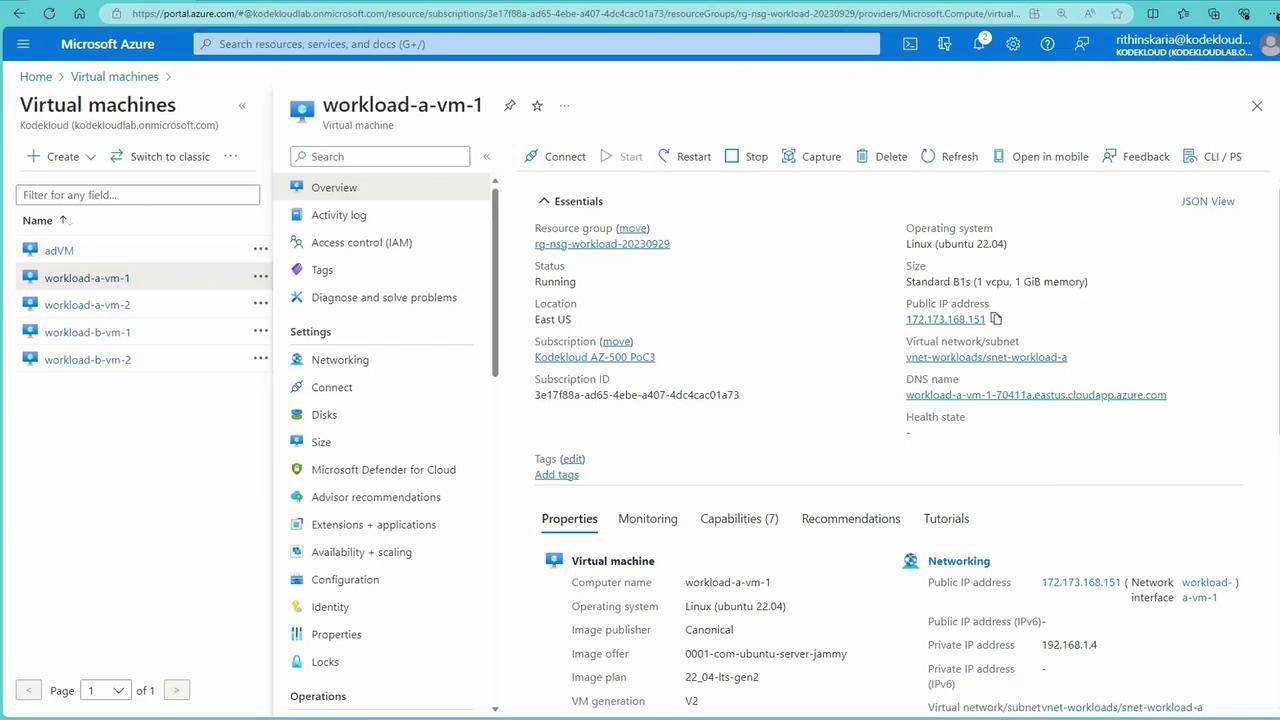
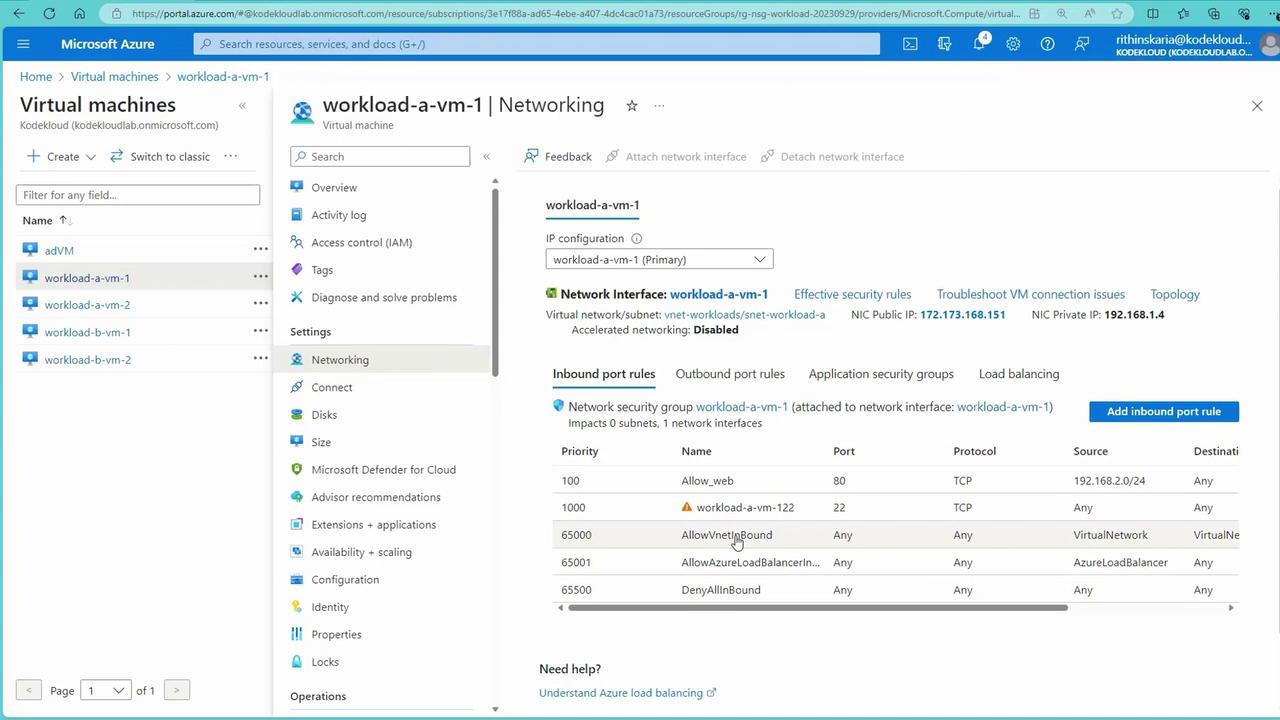
Verifying NSG Settings via the Azure Portal
- Open the Azure Portal and navigate to Virtual Machines to see the list of four VMs.
- Select a VM (e.g., workload-a-vm-1) and inspect its Networking settings.
- Notice that an NSG is applied to the network interface, with default rules like:
- Allow VNet inbound (priority around 65,000).
- Allow Azure Load Balancer for health probes.
- Deny all inbound traffic.
Establishing Connectivity via SSH
Use the public IP address of a VM (such as workload-a-vm-1) to test connectivity via SSH. Since SSH (port 22) is allowed by default, the connection should succeed. Below is an example SSH session:curl:
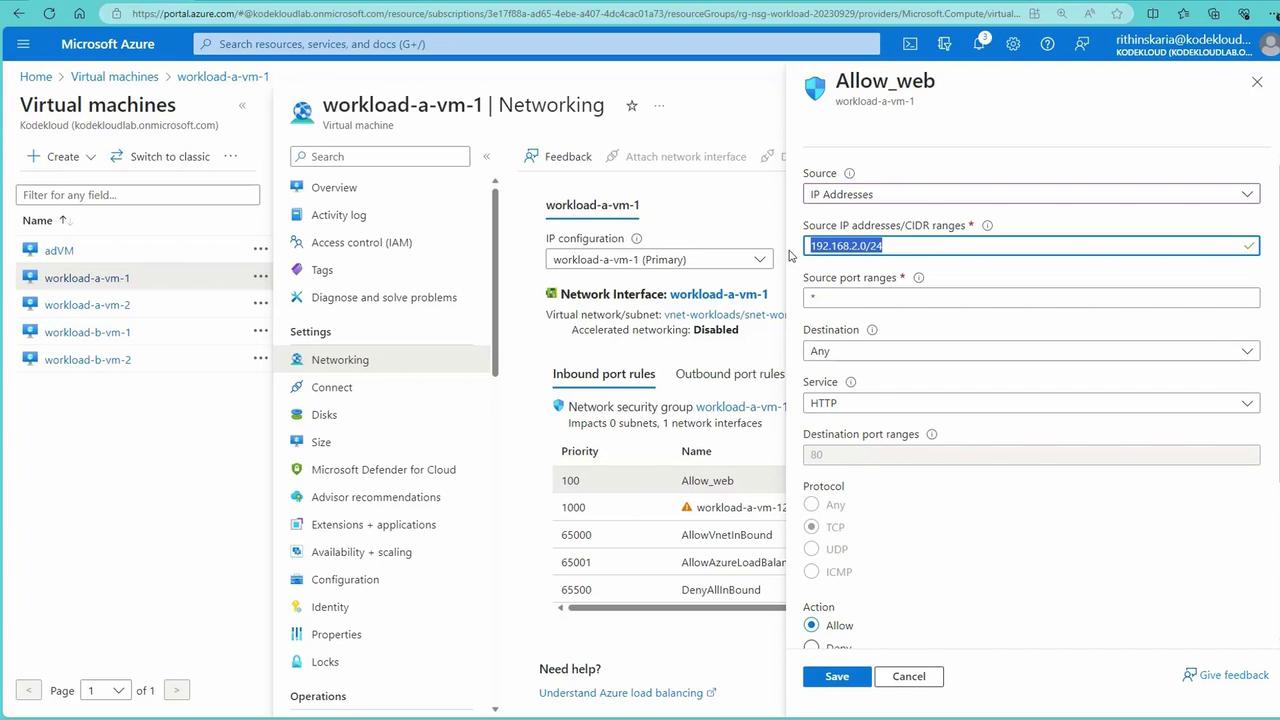
- Source: Any
- Source Port Range: *
- Destination: Any
- Service: HTTP
- Priority: 100 (for example)
- Action: Allow
Advanced NSG Scenario – Denying Specific Traffic
To further refine security, NSG rules can be modified to block specific traffic. For example, to block inbound traffic from a particular IP range (e.g., 192.168.2.0/24, typically corresponding to VMs in subnet B), create a rule with:- Action: Deny
- Priority: A value higher than default rules (e.g., 100)
- SSH into another VM (e.g., workload-b-vm-1) to simulate inter-VM communication.
- Use
curlto connect to the IP address of workload-a-vm-1. - If the deny rule is active, the connection will be blocked despite system routes allowing communication.
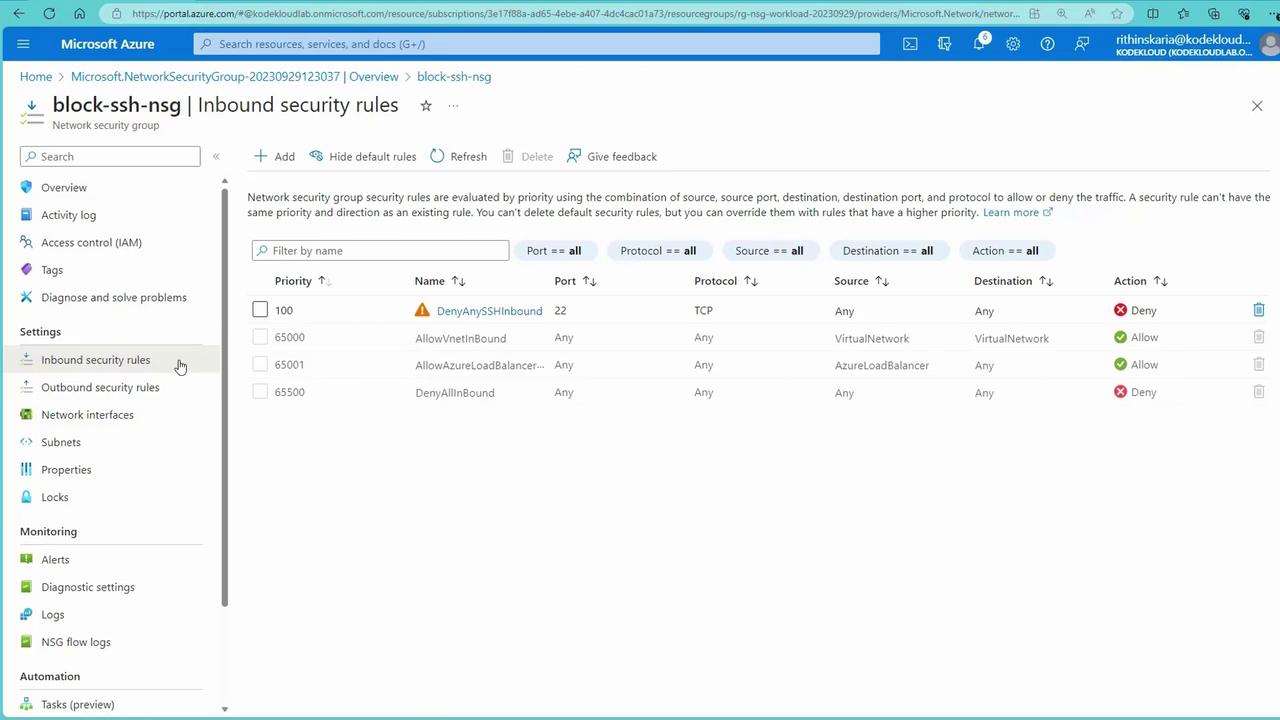
Creating a New NSG to Block SSH Traffic
Next, create a new NSG to block SSH traffic at the subnet level, effectively overriding the NIC-level rule that allows SSH by default:- In the Azure Portal, create a new NSG (e.g., “block SSH NSG”) within the appropriate resource group.
- Add an inbound rule with the following details to Deny SSH (port 22) from any source.
- Associate the NSG with the target subnet (e.g., subnet B).
Augmented Network Security Rules
Augmented NSG rules allow you to specify a range of ports or multiple IP addresses in a single rule. This reduces the complexity and number of individual rules needed.- Instead of creating separate rules for different ports, list them as comma-separated values or specify a range (e.g., 80-85).
- Similarly, define multiple source IP ranges in one rule (e.g., “192.168.1.0/24,192.168.3.0/24”).
With this comprehensive understanding of NSGs, their evaluation process, and configuration strategies, you are now equipped to manage network traffic and enforce security policies effectively in your Azure environments. Next, we will explore Application Security Groups and how they further extend these capabilities. For more detailed guidance on Azure networking and security, refer to the following links: