GKE - Google Kubernetes Engine

Networking for GKE clusters

Demo Configure container native load balancing using Ingress

In this tutorial, you’ll learn how to set up container-native load balancing for your GKE applications using Ingress and Network Endpoint Groups (NEGs). We’ll cover:

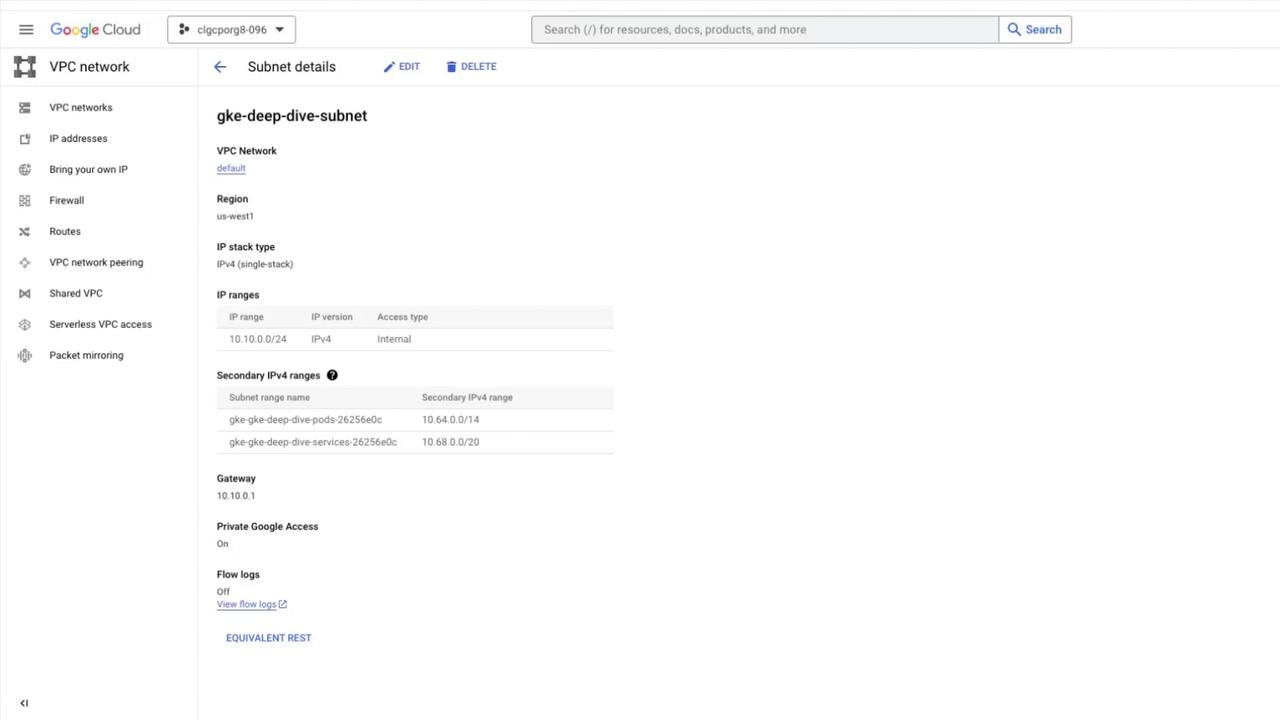
  1. Creating a custom subnet in your VPC
  2. Provisioning a VPC-native GKE cluster with IP aliasing
  3. Deploying a simple HTTP server
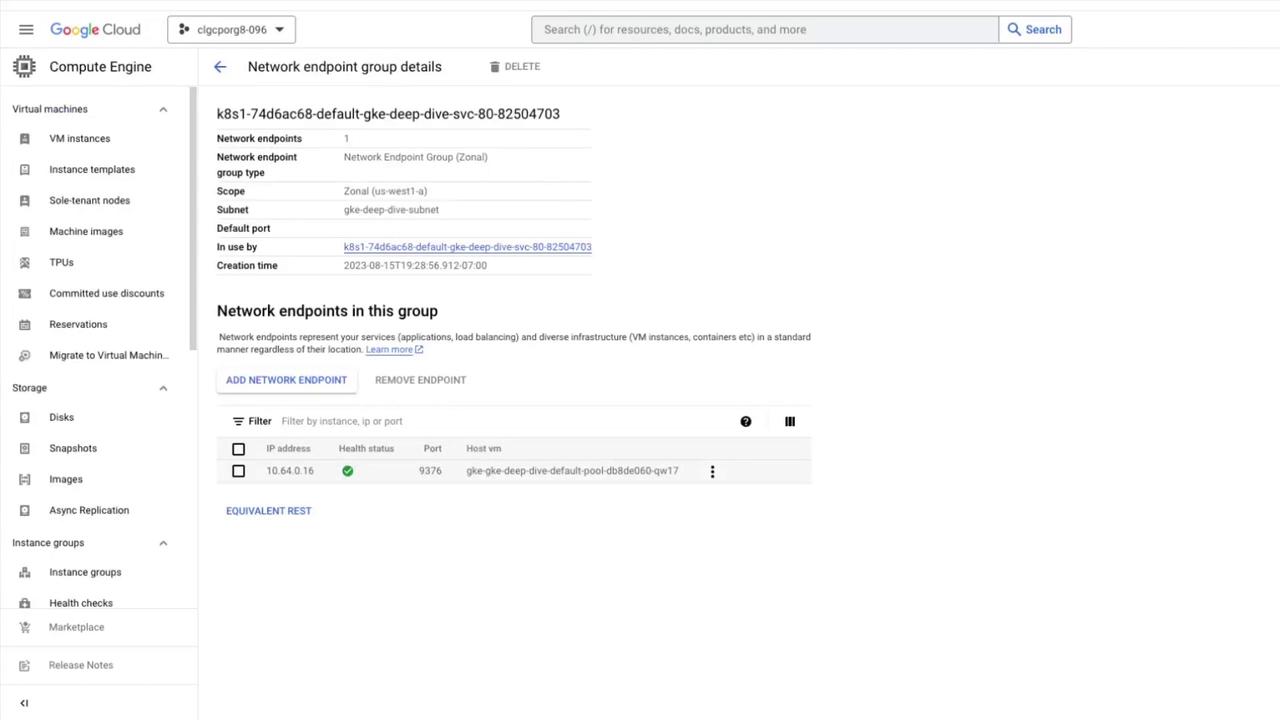
  4. Exposing it via Ingress backed by a NEG
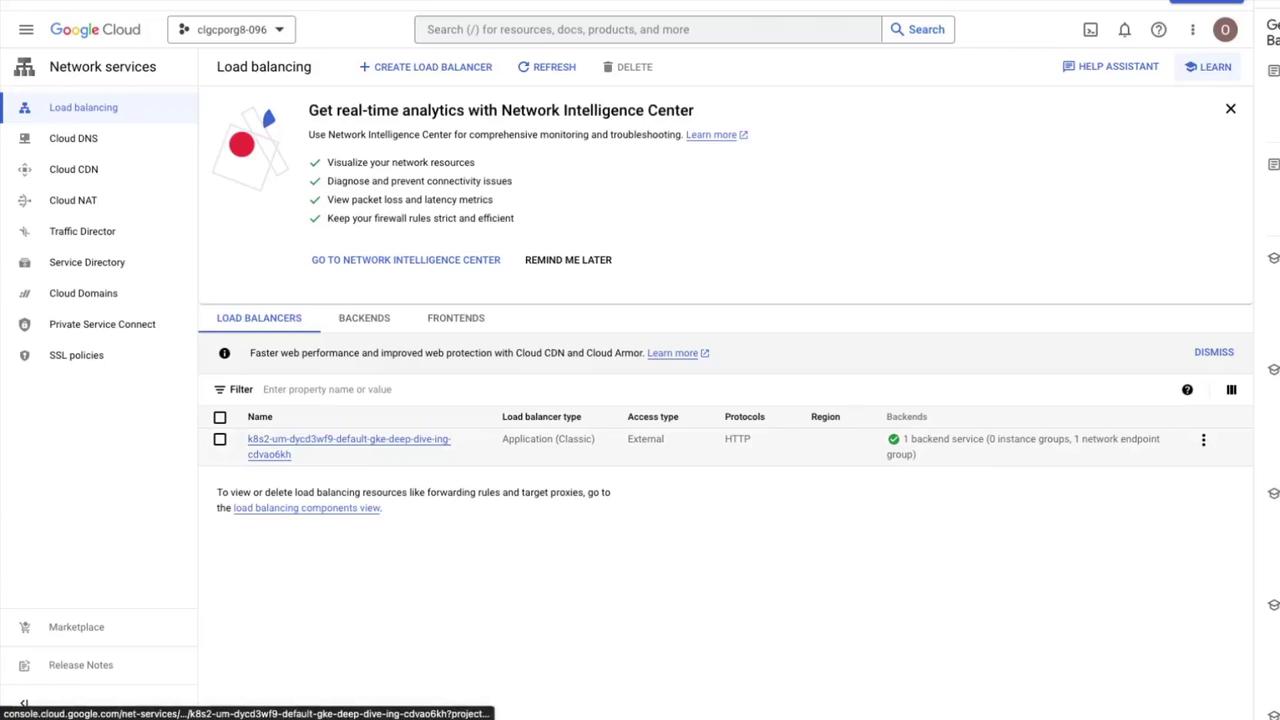
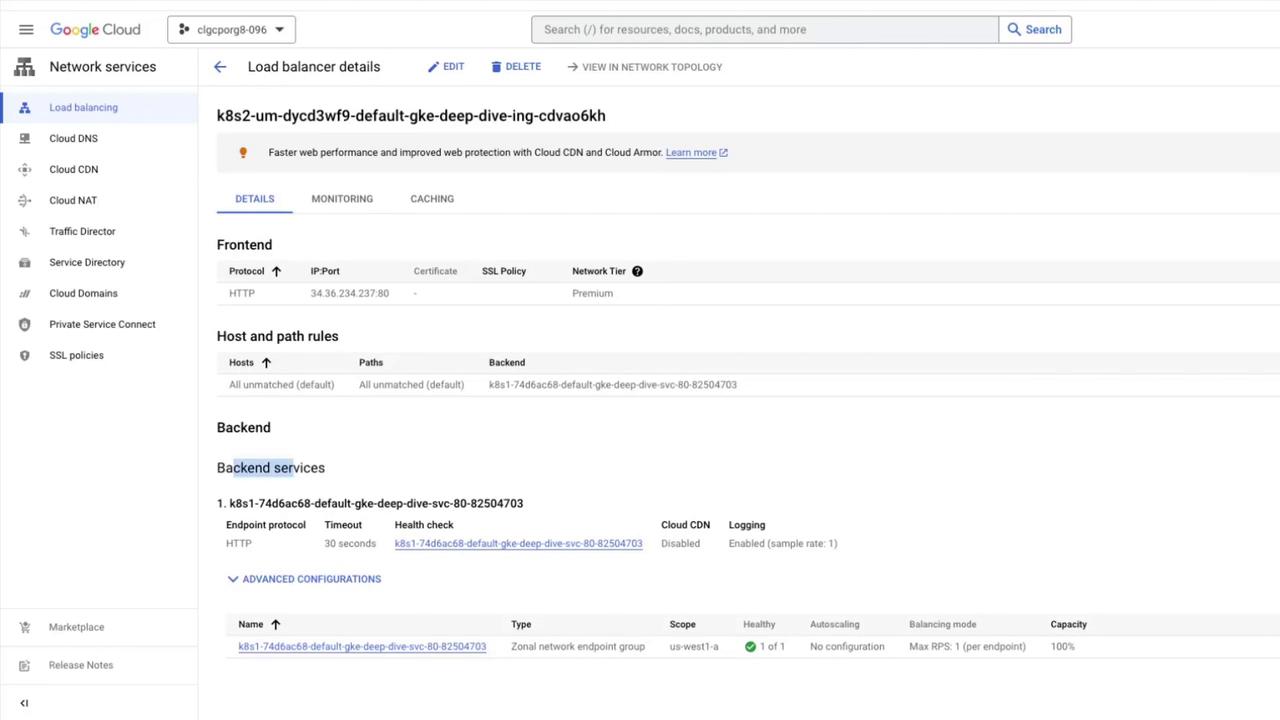
  5. Viewing the resulting Load Balancer and NEGs
  6. Scaling the deployment and validating load balancing

This end-to-end guide uses Google Cloud Platform commands, Kubernetes manifests, and Console walkthroughs.


1. Create a custom subnet

First, create a /24 subnet in the default VPC in us-west1:

gcloud compute networks subnets create gke-deep-dive-subnet \
  --network=default \
  --region=us-west1 \
  --range=10.10.0.0/24

You can verify the new subnet under VPC networks > default VPC in the Cloud Console.

Note

Choose a CIDR range that doesn’t overlap with your existing networks. This subnet will host both Pods and Services via secondary IP ranges.


2. Provision a VPC-native GKE cluster

Set your Compute region and zone, then create a GKE cluster with IP aliasing enabled on the custom subnet:

gcloud config set compute/region us-west1
gcloud config set compute/zone us-west1-a

gcloud container clusters create gke-deep-dive \
  --num-nodes=1 \
  --disk-type=pd-standard \
  --disk-size=10 \
  --enable-ip-alias \
  --subnetwork=gke-deep-dive-subnet

Note

Cluster provisioning typically takes 10–15 minutes. Verify that two secondary IP ranges (for Pods and Services) appear under your subnet.

The image shows a Google Cloud Platform interface displaying details of a VPC subnet named "gke-deep-dive-subnet," including its IP ranges, region, and other network settings.


3. Deploy the HTTP server application

We’ll deploy a basic HTTP server that responds with its Pod hostname.

3.1 Deployment manifest

Create a file named gke-deep-dive-app.yaml:

apiVersion: apps/v1
kind: Deployment
metadata:
  name: gke-deep-dive-app
  labels:
    app: gke-deep-dive-app
spec:
  replicas: 1
  selector:
    matchLabels:
      app: gke-deep-dive-app
  template:
    metadata:
      labels:
        app: gke-deep-dive-app
    spec:
      containers:
        - name: gke-deep-dive
          image: gcr.io/google-containers/serve_hostname
          ports:
            - containerPort: 80
              protocol: TCP

Apply and verify:

kubectl apply -f gke-deep-dive-app.yaml
kubectl get pods

3.2 Service manifest

Expose the Deployment as a ClusterIP Service annotated for NEGs. Save as gke-deep-dive-svc.yaml:

apiVersion: v1
kind: Service
metadata:
  name: gke-deep-dive-svc
  annotations:
    cloud.google.com/neg: '{"ingress": true}'
spec:
  type: ClusterIP
  selector:
    app: gke-deep-dive-app
  ports:
    - name: http
      port: 80
      protocol: TCP
      targetPort: 80

Apply and confirm:

kubectl apply -f gke-deep-dive-svc.yaml
kubectl get svc

3.3 Ingress manifest

Create gke-deep-dive-ing.yaml to route HTTP traffic via Ingress:

apiVersion: networking.k8s.io/v1
kind: Ingress
metadata:
  name: gke-deep-dive-ing
spec:
  defaultBackend:
    service:
      name: gke-deep-dive-svc
      port:
        number: 80

Apply the Ingress:

kubectl apply -f gke-deep-dive-ing.yaml
kubectl get ingress

Warning

An EXTERNAL-IP may take a few minutes to appear. Wait until it’s provisioned before testing.

Once you have the IP, browse to:

http://<EXTERNAL_IP>

You should see the hostname of the serving Pod.

3.4 Resource manifest overview

Resource TypeFilePurpose
Deploymentgke-deep-dive-app.yamlDeploy basic HTTP server
Servicegke-deep-dive-svc.yamlExpose Pods with NEG annotation
Ingressgke-deep-dive-ing.yamlRoute external HTTP traffic via Ingress

4. View Load Balancer and NEG

In the Cloud Console, go to Network services > Load balancing. You’ll see an HTTP(S) Load Balancer created for your Ingress:

The image shows a Google Cloud Platform interface for managing network services, specifically focusing on load balancing. It includes options for creating and managing load balancers, with details about backend services and protocols.

Click the Load Balancer name to view both frontend and backend configurations:

The image shows a Google Cloud Platform interface displaying load balancer details, including frontend and backend configurations, protocols, and network tiers. It provides information about host and path rules, backend services, and health checks.

Select the backend service to inspect the NEG:

The image shows a Google Cloud Platform interface displaying details of a network endpoint group, including network endpoints, scope, subnet, and a list of endpoints with their IP addresses and health status.


5. Scale and verify load balancing

Increase the Deployment to three replicas:

kubectl scale deployment gke-deep-dive-app --replicas=3
kubectl get deployment gke-deep-dive-app

Refresh your browser at the Ingress IP. You’ll see responses cycling through the three Pod hostnames, demonstrating container-native load balancing via Ingress + NEGs.


Watch Video

Watch video content

Previous
Load Balancing GKE Traffic Ingress