Jenkins Pipelines
AWS Lambda and Advanced Deployment Techniques
Lambda Deployment using Jenkinsfile
In this article, we detail the process of automating the deployment of an AWS Lambda function using a Jenkinsfile. We explain how to modify the Lambda function configuration using the AWS Lambda UI, prepare the deployment package, and update the function code via the AWS CLI. Follow the steps below for a comprehensive guide.
Step 1: Remove Environment Variables from AWS Lambda
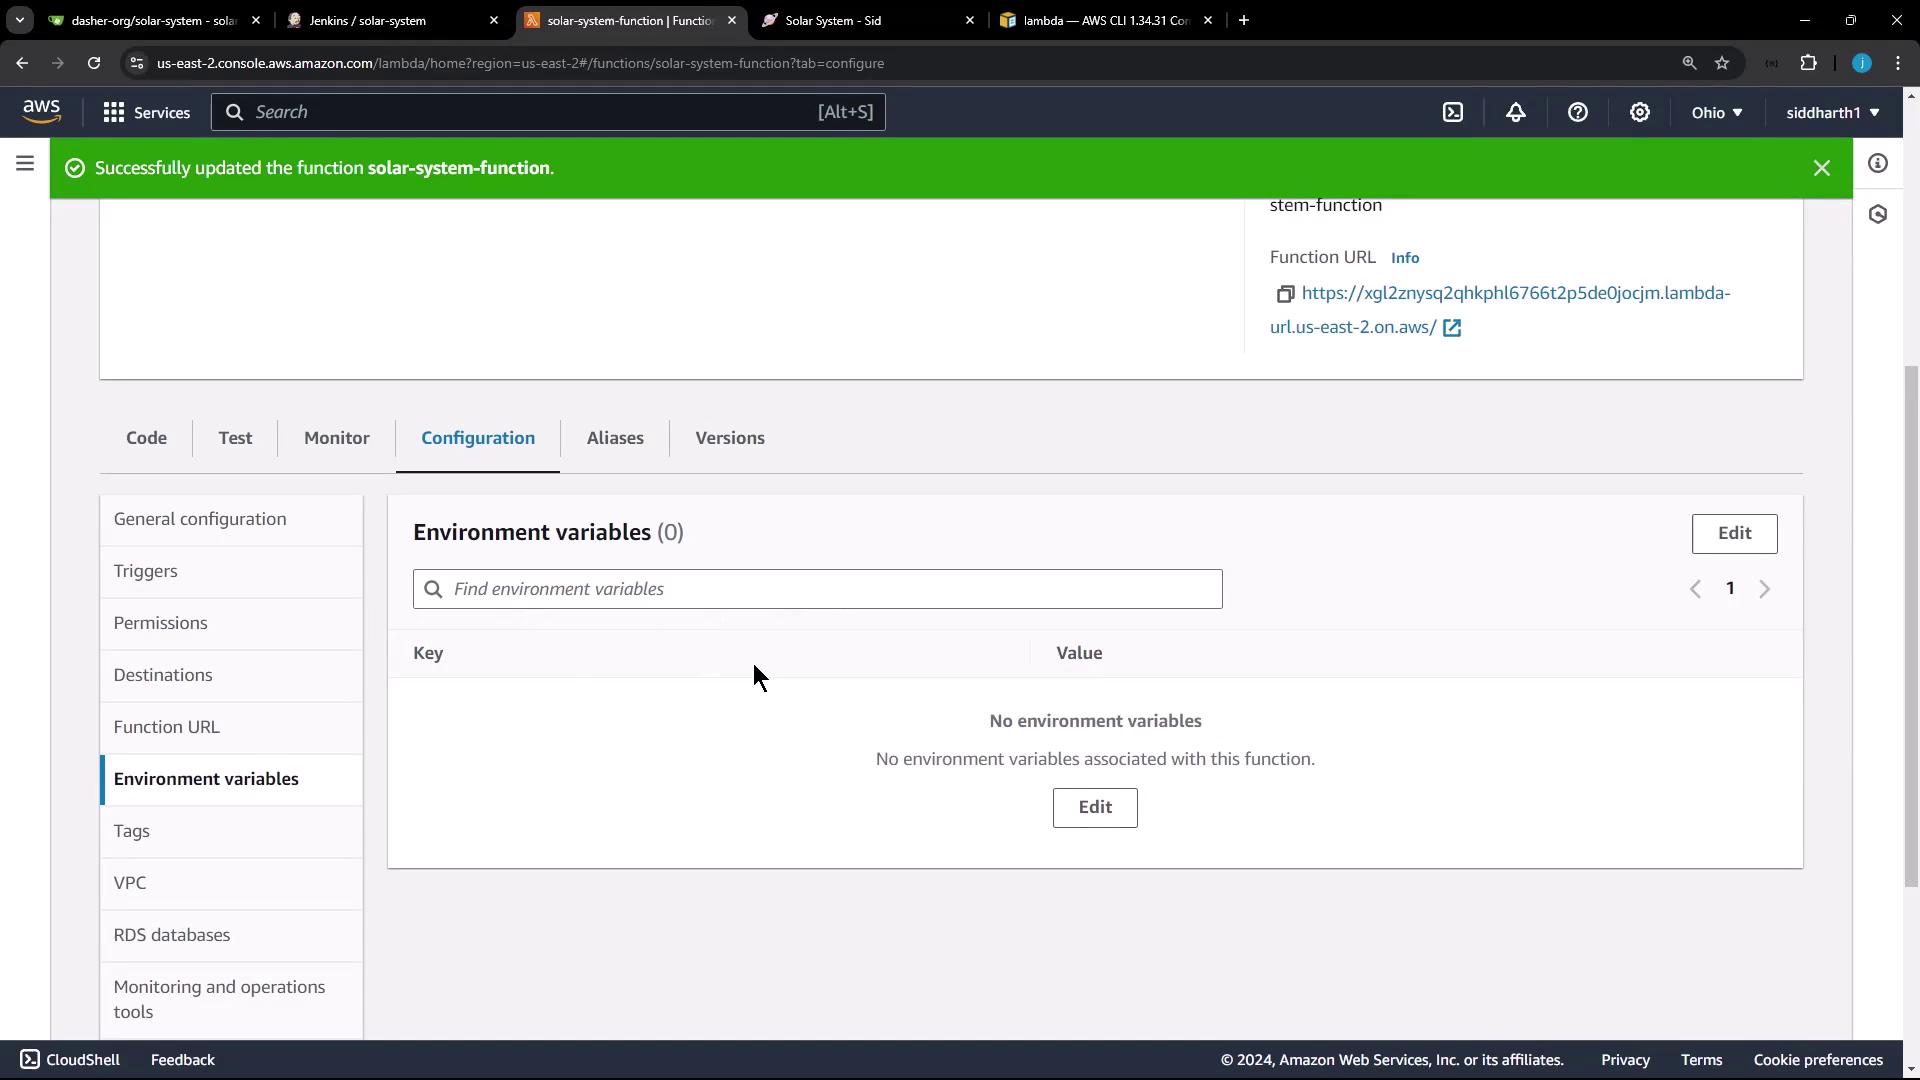
Before updating the Jenkinsfile, clear any static environment variables in the Lambda function. To do this, open the AWS Lambda configuration dashboard, navigate to the Configurations tab, and delete the environment variables. This ensures that the Jenkins pipeline will inject dynamic values during deployment.
The original environment variables might have looked like:
MONGO_PASSWORD: SuperPassword
MONGO_URI: mongodb+srv://supercluster.d83jjj.mongodb.net/superData
MONGO_USERNAME: superuser
After their removal, no environment variables should be displayed.

Step 2: Prepare the Local Environment
Switch to your VM, remove any previous sandbox directories, and set up your working area. For example, remove the "sandbox" directory as follows:
pwd
/root/sandbox/solar-system
cd ~
rm -rf san
Next, ensure that you are on the main branch of the "Solar System" repository. Execute a git fetch and git pull to merge changes from the feature branch that introduced the Jenkinsfile. This pull updates the repository with the latest Jenkinsfile and additional files.
git fetch
git pull
You should see output similar to:
Unpacking objects: 100% (1/1), 296 bytes | 296.00 KiB/s, done.
From http://64.227.187.25:5555/dasher-org/solar-system
 * b78611c..072147a   -> origin/main
Updating b78611c..072147a
Fast-forward
 Jenkinsfile                               | 328 +++++++++++++++++++++++++++++++++++++++++++++
 index.html                                 |   2 +
 integration-testing-ec2.sh                 |  30 +++++
 package-lock.json                          | 224 +++++++++++++++++++++++++++++++
 package.json                               |  10 +++
 zap_ignore_rules                           |   6 +
 6 files changed, 459 insertions(+), 127 deletions(-)
 create mode 100644 Jenkinsfile
 create mode 100644 integration-testing-ec2.sh
 create mode 100644 zap_ignore_rules
root@jenkins-controller-1 in solar-system on ⎇ main via 🐍 v20.16.0 on ☁️ (us-east-2)
Another sample output might be:
Unpacking objects: 100% (1/1), 296 bytes | 296.00 KiB/s, done.
From http://64.227.187.25:5555/dasher-org/solar-system
 * b78611c..072147a  main -> origin/main
Updating b78611c..072147a
Fast-forward
 Jenkinsfile                   | 328 +++++++++++++++++++++++++++++++-----------
 index.html                    |  2 +
 integration-testing-ec2.sh    |  2 +
 package-lock.json             | 224 +++++++++++++++++++++++++
 package.json                  |  6 +-
 zap_ignore_rules              |  6 -
 6 files changed, 459 insertions(+), 127 deletions(-)
 create mode 100644 Jenkinsfile
 create mode 100644 integration-testing-ec2.sh
 create mode 100644 zap_ignore_rules
Note
Ensure that you are working on the main branch before triggering the build to avoid merging conflicts.
Step 3: Lambda S3 Upload and Deploy Stage in Jenkinsfile
A new stage named Lambda S3 Upload & Deploy has been added to the Jenkinsfile. This stage is executed exclusively on the main branch and proceeds through several steps:
- AWS CLI Authentication: Uses AWS credentials (securely stored in Jenkins) with permissions for Lambda and S3 services.
- Modify
app.js: Executes shell commands to comment or uncomment certain lines in theapp.jsfile. - Zip the Deployment Package: Compresses the application files into a zip file that includes the Jenkins build ID.
- Upload to S3: Sends the zip file to a designated S3 bucket.
- Update Lambda Function Code: Uses the AWS CLI to update the Lambda function with the new code from the uploaded zip file.
Modifying app.js
This snippet demonstrates the use of sed commands to modify app.js:
tail -5 app.js
echo "************************************************************"
sed -i "/^app.listen(3000/ s/^/\\/\\/g" app.js
sed -i "s/module.exports = app;/\\/\\/module.exports = app;/g" app.js
echo "************************************************************"
tail -5 app.js
Zipping and Uploading the Package
The following block creates the zip file and then uploads it to S3 using the s3Upload step:
tail -5 app.js
echo "************************************************************"
sed -i "s|App\.listen(3000/|//|g" app.js
sed -i "s|module.exports = app;|module.exports.handler| app.js
echo "************************************************************"
tail -5 app.js
zip -qr solar-system-lambda-$BUILD_ID.zip app* package* index.html node*
ls -ltr solar-system-lambda-$BUILD_ID.zip
s3Upload(
    file: "solar-system-lambda-${BUILD_ID}.zip",
    bucket: 'solar-system-lambda-bucket'
)
Complete Jenkinsfile Stage
Below is the consolidated Groovy stage that incorporates the AWS CLI call to update the Lambda function after the zip file has been uploaded:
stage('Lambda - S3 Upload & Deploy') {
    when {
        branch 'main'
    }
    steps {
        withAWS(credentials: 'aws-s3-ec2-lambda-creds', region: 'us-east-2') {
            sh '''
                tail -5 app.js
                echo "*************************************************************************"
                sed -i "s|/app\\.listen(3000|/\\/|g" app.js
                sed -i "s|/module.exports = app;|/|g" app.js
                sed -i "s|^|/module.exports.handler| app.js"
                echo "*************************************************************************"
                tail -5 app.js
            '''
            sh '''
                zip -qr solar-system-lambda-$BUILD_ID.zip app* package* index.html node*
                ls -ltr solar-system-lambda-$BUILD_ID.zip
            '''
            s3Upload(
                file: "solar-system-lambda-${BUILD_ID}.zip",
                bucket: 'solar-system-lambda-bucket'
            )
        }
        sh '''
            aws lambda update-function-code \
                --function-name solar-system-function \
                --s3-bucket solar-system-lambda-bucket \
                --s3-key solar-system-lambda-$BUILD_ID.zip
        '''
    }
}
A similar iteration of the stage appears as follows:
stage('Lambda -- S3 Upload & Deploy') {
  when {
    branch 'main'
  }
  steps {
    withAWS(credentials: 'aws-s3-ec2-lambda-creds', region: 'us-east-2') {
      sh '''
        tail -5 app.js
        echo "**********************************************************"
        sed -i "s|/app\\.listen(3000|/||" app.js
        sed -i "s|/module.exports = app;|/|g" app.js
        sed -i "s|^|/module.exports.handler|module.exports.handler|" app.js
        echo "**********************************************************"
        tail -5 app.js
      '''
      sh '''
        zip -qr solar-system-lambda-$BUILD_ID.zip app* package* index.html node*
        ls -ltr solar-system-lambda-$BUILD_ID.zip
      '''
      s3Upload {
        file: "solar-system-lambda-${BUILD_ID}.zip",
        bucket: "solar-system-lambda-bucket"
      }
    }

    sh '''
      aws lambda update-function-code \
      --function-name solar-system-function \
      --s3-bucket solar-system-lambda-bucket
    '''
  }
}
Step 4: Update index.html for Versioning
Before committing the Jenkinsfile changes, update the index.html file to reflect the new version of your application. In this example, the version is updated to 5.0. Locate line 66 in the file and replace the button text as shown below:
<button
    style="font-size: 40px;
           background: rgb(50,43,167);
           background: linear-gradient(90deg, rgba(50,43,167,1) 0%, rgba(82,41,124,1) 0%, rgba(137, 0,0,1) 0%);
           color: white;
           font-family: 'Orbitron', sans-serif;
           border-radius: 25px;
           border: 2px solid rgb(35, 34, 36);
           width: 600px;
           height: 70px;
           text-align: center;
           line-height: initial;
           border-width: 1px 1px 3px">
   SOLAR <i class="fa fa-rocket"></i> SYSTEM 5.0
</button>
Save and commit these changes. Pushing this update to the main branch will trigger a new build in Jenkins.
Step 5: Build and Deployment Verification
Once the Jenkins job is triggered on the main branch, the Lambda S3 Upload & Deploy stage will execute the following process:
Modification of app.js:
The stage usestailcommands to inspect the file before and after modifying it. The modifications include commenting out the local server startup command and ensuring that the correct export is active.Sample log output:
tail -5 app.js
app.listen(3000, () => { console.log("Server successfully running on port - " + 3000); })
//module.exports = app;
module.exports.handler = serverless(app)
echo "****************************************"
sed -i "s/\/app\.listen(3000/\/V\/module.exports = app;/g" app.js
sed -i "s//module.exports.handler|/ app.js
echo "****************************************"
tail -5 app.js
//app.listen(3000, () => { console.log("Server successfully running on port - " + 3000); })
//module.exports = app;
module.exports.handler = serverless(app)
S3 Upload:
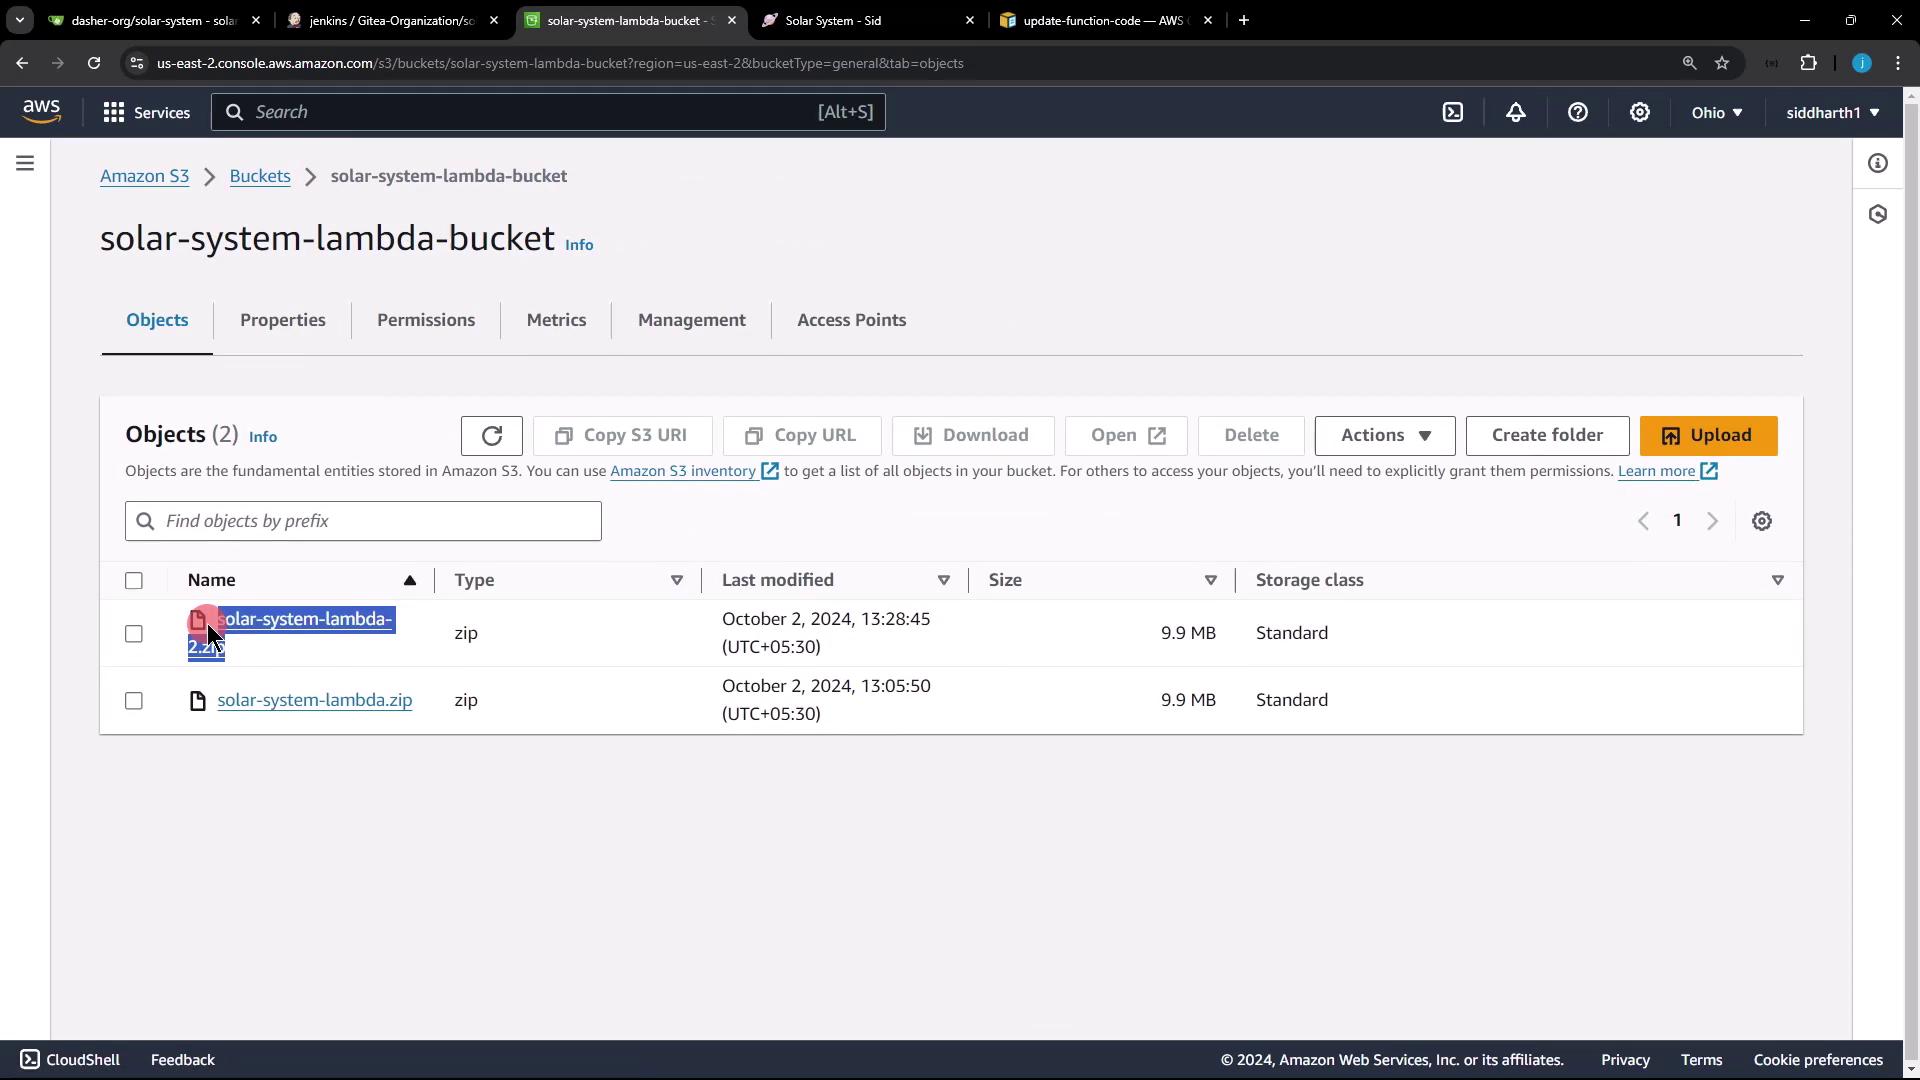
The generated zip file (for example, "solar-system-lambda-2.zip") is uploaded to the S3 bucket. Confirm the new object in the AWS S3 console.
AWS Lambda Update:
The AWS CLI command updates the function code. A successful update will return a JSON message similar to the following:{ "FunctionArn": "arn:aws:lambda:us-east-2:604513242291:function:solar-system=function", "Runtime": "nodejs20.x", "Role": "arn:aws:iam::604513242291:role/service-role/solar-system-function-role-gs891r3l", "Handler": "app.handler", "Description": "", "MemorySize": 128, "LastModified": "2024-10-12T07:58:50.000Z", "CodeSha256": "2bdrPuHIIs0yf5y5bU1ILKYwl6YFZ3hes=", "Version": "$LATEST", "TracingConfig": { "Mode": "PassThrough" }, "RevisionId": "35b10668-0f91-46de-ae42-f412b229b30c", "State": "Active", "LastUpdateStatus": "InProgress", "LastUpdateStatusReason": "The function is being created.", "LastUpdateStatusReasonCode": "Creating", "PackageType": "Zip", "Architectures": [ "x86_64" ], "EphemeralStorage": { "Size": 512 }, "SnapStart": { "ApplyOn": "None", "OptimizationStatus": "Off" }, "RuntimeVersionConfig": { "RuntimeVersionArn": "arn:aws:lambda:us-east-2::runtime:ad9b28ae231dfc4c3235e183024ccb4d9de1saa1479d98295f898140041247f7" }, "LoggingConfig": { "LogFormat": "Text", "LogGroup": "/aws/lambda/solar-system-function" } }Verification of Deployment:
Access the Lambda function through the AWS Lambda console. Since the environment variables have been removed, the function will emit an internal server error. CloudWatch logs will detail an error caused by the missing MongoDB URI, username, and password.An example CloudWatch error might be:
{
  "errorType": "MongooseError",
  "errorMessage": "The 'uri' parameter to 'openUri()' must be a string, got 'undefined'. Make sure the first parameter to 'mongoose.connect()' or 'mongoose.createConnection()' is a string.",
  "stack": [
    "MongooseError: The 'uri' parameter ...",
    "... more logging details ..."
  ]
}
Warning
Make sure to review your AWS CloudWatch logs for any errors after deployment to ensure that all necessary configurations are applied correctly.
Step 6: Update Environment Variables in app.js
For MongoDB connectivity, the application relies on the following environment variables:
const mongoose = require('mongoose');

mongoose.connect(process.env.MONGO_URI, {
    user: process.env.MONGO_USERNAME,
    pass: process.env.MONGO_PASSWORD,
    useNewUrlParser: true,
    useUnifiedTopology: true
}, function(err) {
    if (err) {
        console.log("Error!!" + err)
    } else {
        // console.log("MongoDB Connection Successful")
    }
});
In the Jenkinsfile, the AWS Lambda update step must inject these environment variables. In a subsequent session, update the Lambda configuration to include the secure MongoDB credentials stored in Jenkins.
A sample snippet from the Jenkinsfile environment configuration might look like this:
pipeline {
    agent any
    environment {
        MONGO_URI = "mongodb+srv://supercluster.d83jj.mongodb.net/superData"
        MONGO_DB_CREDS = credentials('mongo-db-credentials')
        MONGO_USERNAME = credentials('mongo-db-username')
        MONGO_PASSWORD = credentials('mongo-db-password')
        SONAR_SCANNER_HOME = tool 'sonarqube-scanner-610'
        GITEA_TOKEN = credentials('gitea-api-token')
    }
    stages {
        stage('Installing Dependencies') {
            // Steps to install dependencies
        }
        stage('Dependency Scanning') {
            // Steps to run dependency scans
        }
        stage('Unit Testing') {
            // Steps to run unit tests
        }
        stage('Code Coverage') {
            // Steps for code coverage analysis
        }
    }
}
Following this configuration update, the Lambda function will be able to establish a connection to MongoDB with the correct credentials.
Thank you for following along in this guide. With these steps, your AWS Lambda deployment is automated using Jenkins, ensuring a smoother release cycle and reducing manual configuration errors. Happy deploying!
Watch Video
Watch video content