Kubernetes and Cloud Native Associate - KCNA

Container Orchestration Security

Authentication

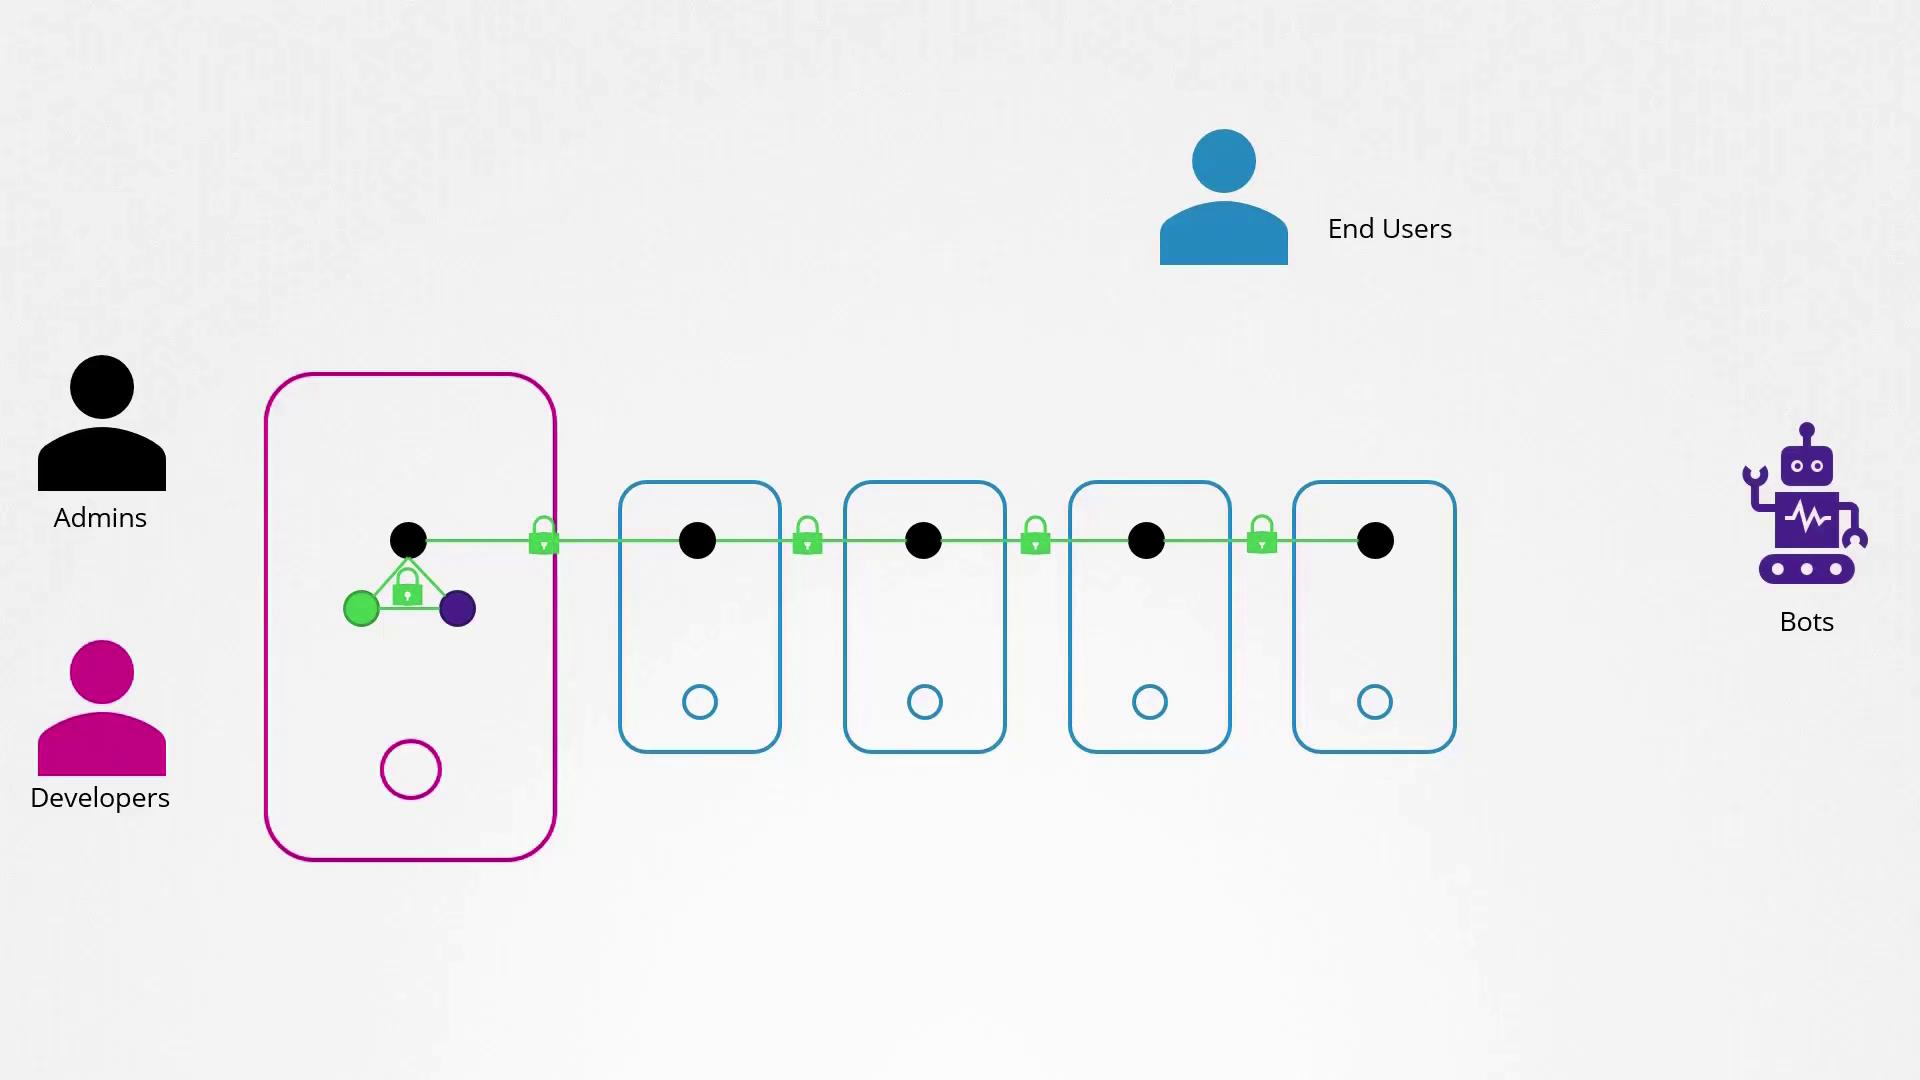
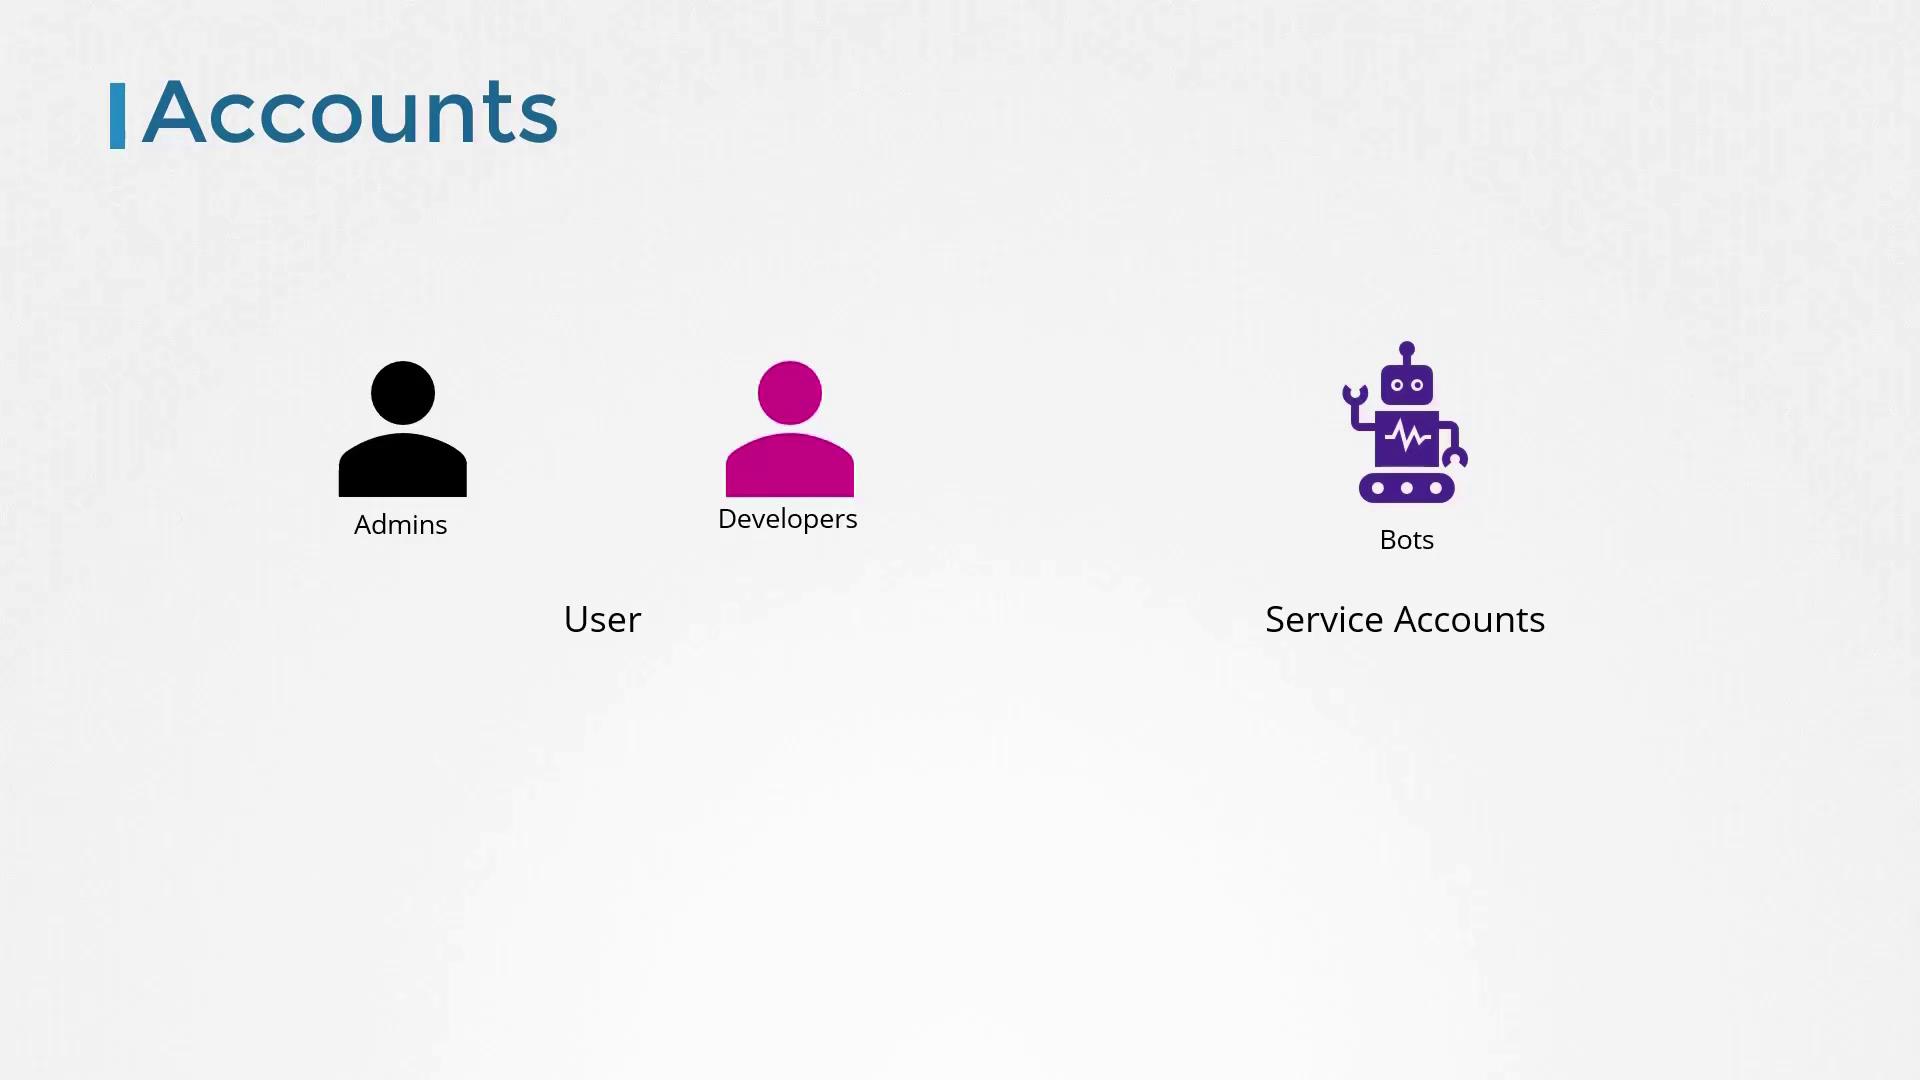
Welcome to this lesson on authentication within a Kubernetes cluster. In a typical Kubernetes environment, the cluster is composed of multiple nodes—physical or virtual—and various components that work together seamlessly. Users who access the cluster include administrators performing system tasks, developers deploying and testing applications, end users interacting with applications, and third-party processes integrating with the cluster. In this lesson, we focus specifically on securing management access using robust authentication and authorization mechanisms.

The image illustrates a network flow involving admins, developers, end users, and bots, with interconnected nodes and security locks, indicating a secure communication system.

Kubernetes handles authentication for users (administrators and developers) and automated processes directly through the kube-apiserver. Although application-level user security is managed within the application itself, Kubernetes relies on external solutions—such as static files containing user details, certificate authorities, or third-party identity services like LDAP—for authenticating human users. Importantly, Kubernetes does not manage human user accounts natively but does manage service accounts via its API. (A detailed explanation of service accounts is provided elsewhere in this course.)

All user requests—whether initiated via the kubectl command-line tool or through direct API calls—are processed by the kube-apiserver, which authenticates the requests before any further handling.

The following command examples demonstrate basic interactions with the API server:

kubectl
curl https://kube-server-ip:6443/

The kube-apiserver supports multiple authentication methods, including:

  • Static password files (usernames and passwords)
  • Static token files (usernames and tokens)
  • Certificate-based authentication
  • Integration with third-party authentication protocols (e.g., LDAP, Kerberos)

In this lesson, we begin with the simplest forms: static password and token files.

The image categorizes accounts into "Admins," "Developers," and "Bots," under "User" and "Service Accounts" sections, using icons for each type.

Static Password File Authentication

To use static password authentication, you can create a CSV file that lists users and their passwords. This CSV file typically includes three columns: password, username, and user ID. When starting the kube-apiserver, reference this file using the --basic-auth-file option. Be sure to restart the kube-apiserver to apply these changes.

Below is an example of a static password file named user-details.csv:

password123,user1,u0001
password123,user2,u0002
password123,user3,u0003
password123,user4,u0004
password123,user5,u0005

An example snippet from the kube-apiserver startup configuration is as follows:

--basic-auth-file=user-details.csv
ExecStart=/usr/local/bin/kube-apiserver \
  --advertise-address=${INTERNAL_IP} \
  --allow-privileged=true \
  --apiserver-count=3 \
  --authorization-mode=Node,RBAC \
  --bind-address=0.0.0.0 \
  --enable-swagger-ui=true \
  --etcd-servers=https://127.0.0.1:2379 \
  --event-ttl=1h \
  --runtime-config=api/all \
  --service-cluster-ip-range=10.32.0.0/24 \
  --service-node-port-range=30000-32767 \
  --v=2

If your cluster is set up using kubeadm, modify the kube-apiserver configuration in the pod definition file as shown below. The kubeadm tool will automatically restart the kube-apiserver after you update this file:

ExecStart=/usr/local/bin/kube-apiserver \
  --advertise-address=${INTERNAL_IP} \
  --allow-privileged=true \
  --apiserver-count=3 \
  --authorization-mode=Node,RBAC \
  --bind-address=0.0.0.0 \
  --enable-swagger-ui=true \
  --etcd-servers=https://127.0.0.1:2379 \
  --event-ttl=1h \
  --runtime-config=api/all \
  --service-cluster-ip-range=10.32.0.0/24 \
  --service-node-port-range=30000-32767 \
  --v=2 \
  --basic-auth-file=user-details.csv

apiVersion: v1
kind: Pod
metadata:
  creationTimestamp: null
  name: kube-apiserver
  namespace: kube-system
spec:
  containers:
  - command:
    - kube-apiserver
    - --authorization-mode=Node,RBAC
    - --advertise-address=172.17.0.107
    - --allow-privileged=true
    - --enable-admission-plugins=NodeRestriction
    - --enable-bootstrap-token-auth=true
  image: k8s.gcr.io/kube-apiserver-amd64:v1.11.3
  name: kube-apiserver

After configuring basic authentication, users can access the API server by providing their credentials. For example, the following curl command uses a username and password from the CSV file:

curl -v -k https://master-node-ip:6443/api/v1/pods -u "user1:password123"

The API server will respond with an output similar to the following JSON:

{
  "kind": "PodList",
  "apiVersion": "v1",
  "metadata": {
    "selfLink": "/api/v1/pods",
    "resourceVersion": "3594"
  },
  "items": [
    {
      "metadata": {
        "name": "nginx-64f497f8fd-krkg6",
        "generateName": "nginx-64f497f8-",
        "namespace": "default",
        "selfLink": "/api/v1/namespaces/default/pods/nginx-64f497f8fd-krkg6",
        "uid": "77dd7dfb-2914-11e9-b468-0242ac11006b",
        "resourceVersion": "3569",
        "creationTimestamp": "2019-02-05T07:05:49Z",
        "labels": {
          "pod-template-hash": "2090539498",
          "run": "nginx"
        }
      }
    }
  ]
}

Optionally, you can add a fourth column to the CSV file for group assignments:

password123,user1,u0001,group1
password123,user2,u0002,group2
password123,user3,u0003,group2
password123,user4,u0004,group2
password123,user5,u0005,group2

Static Token File Authentication

Alternatively, you can use a static token file. This file is similar to the password CSV file, but the token value replaces the password field. Reference this file using the --token-auth-file option when starting the kube-apiserver.

Here is an example of a static token file:

password123,user1,u0001,group1
password123,user2,u0002,group1
password123,user3,u0003,group2
password123,user4,u0004,group2
password123,user5,u0005,group2

KpjCvBI7rCFAHYPKByTlzRb7gulcUc4B,user10,u0010,group1
rJjncHmvtXHc6M1WQddhtvNyhgTdxSC,user11,u0011,group1
mjpOFEiFokLgtoikaRNTt59ePtczZSq,user12,u0012,group2
PG411Xhs7qjwWkmBkvG7g9lOyUqZj,user13,u0013,group2

Start the kube-apiserver with the token file by including:

--token-auth-file=user-details.csv

When making API requests using token authentication, specify the token as a bearer token in your request headers. For example:

curl -v -k https://master-node-ip:6443/api/v1/pods --header "Authorization: Bearer KpjCvBI7rCFAHYPKByTlzRb7gulcUc4B"

The image contains a note advising against a certain authentication mechanism, suggesting volume mount consideration in kubeadm setup, and setting up role-based authorization for new users.

Security Note

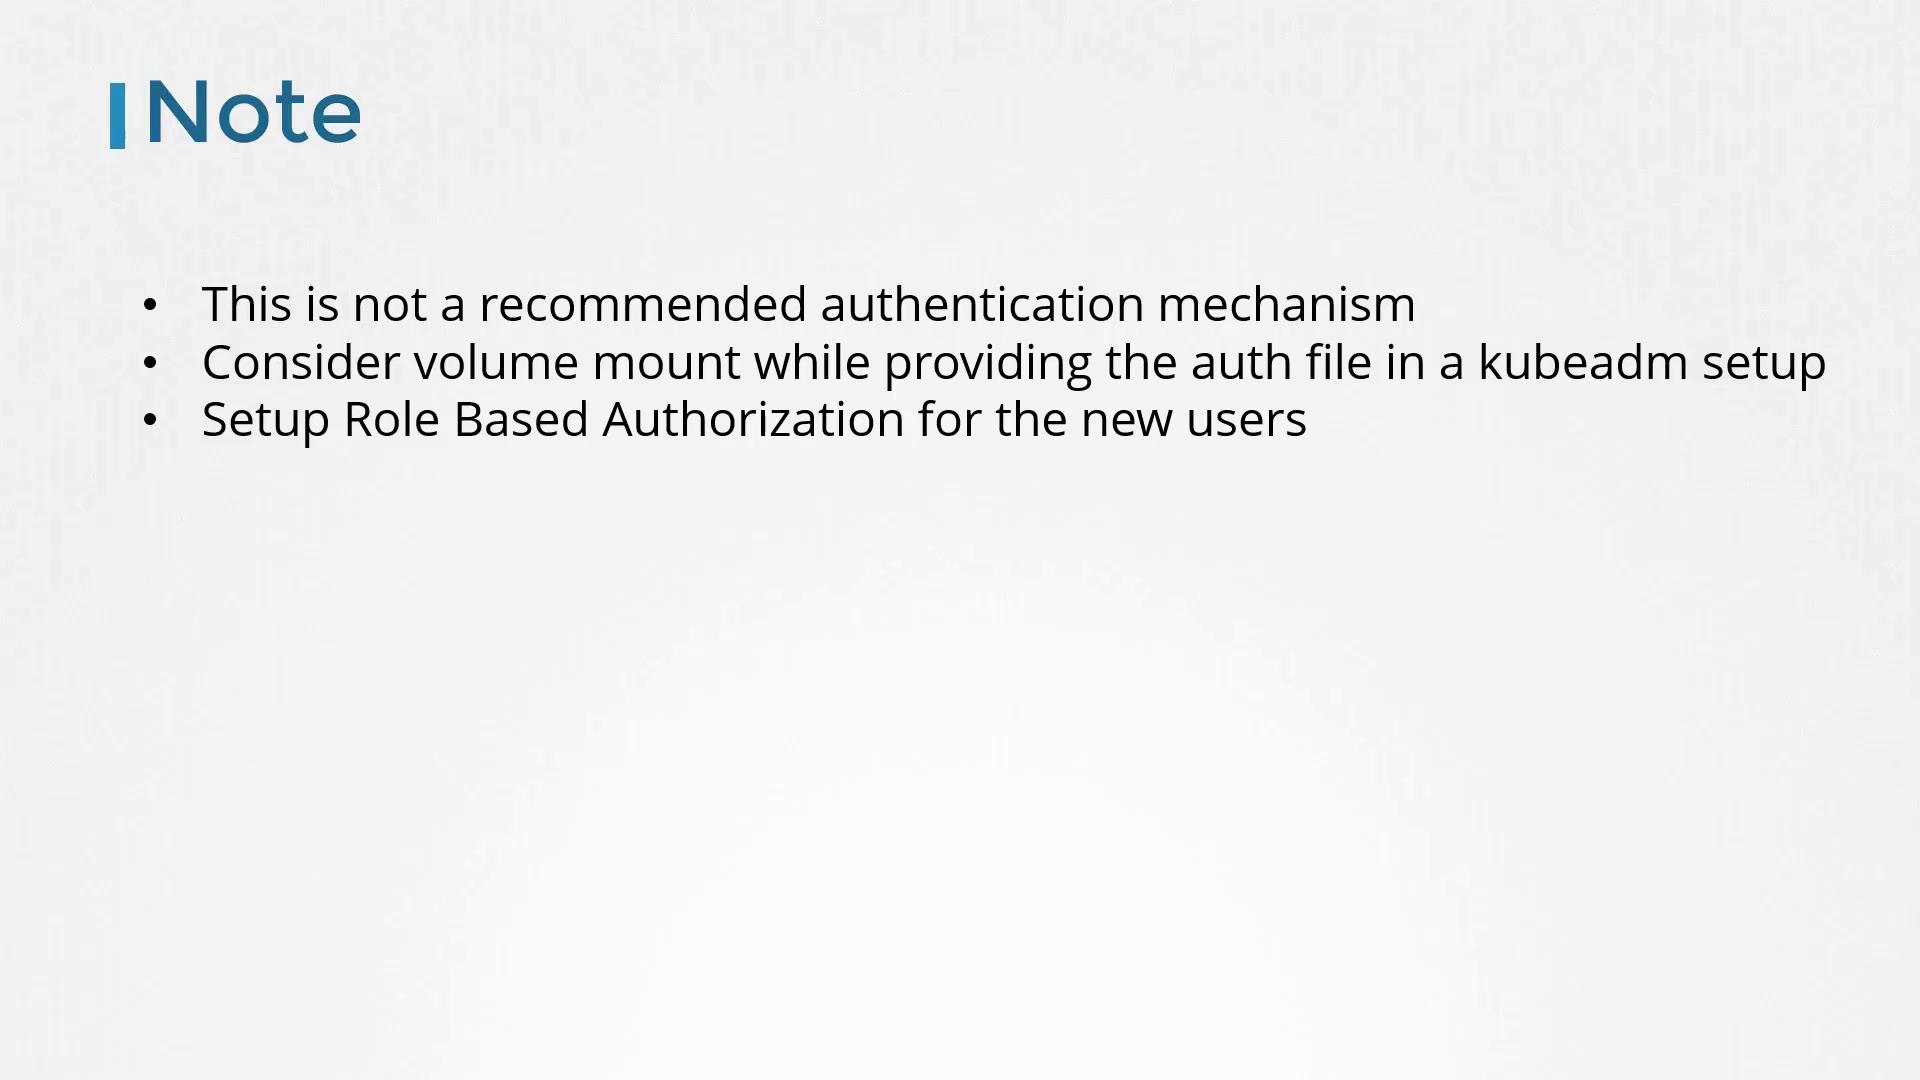
Using static files to store usernames, passwords, and tokens in clear text is acceptable for learning environments but is generally not recommended for production due to security risks. Consider using certificate-based authentication or integrating with external identity providers in production.

Final Considerations

When using kubeadm, ensure that the authentication file is correctly provided to the kube-apiserver via proper volume mounts in your pod configuration. This step is critical for the authentication mechanism to function as expected.

This concludes our lesson on authentication in Kubernetes. For further reading on Kubernetes authentication strategies and best practices, consider exploring the Kubernetes Documentation and related resources.

Watch Video

Watch video content

Previous
Security Kubernetes Security Primitives