Telepresence For Kubernetes
Telepresence For Kubernetes
Demo Telepresence Basics
In this guide, you’ll learn how to use Telepresence for seamless local development against a Kubernetes cluster by walking through a simple three-service demo application.
Application Architecture
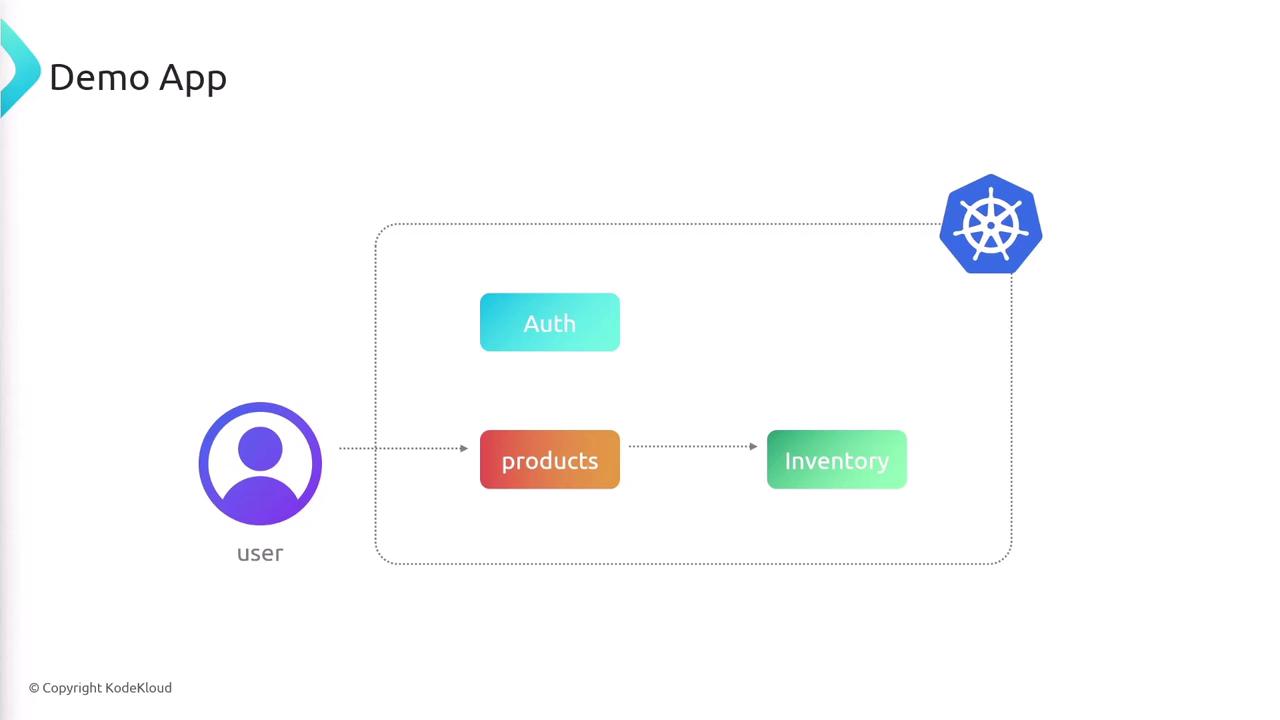
Our sample app comprises three microservices:
| Service | Description | Port |
|---|---|---|
| auth | Handles user authentication | 3000 |
| products | Returns product details; user entry point | 3000 |
| inventory | Tracks stock levels per product | 3000 |
When a client requests product data, products calls inventory to fetch stock counts and then merges the results. auth runs independently.
What We’ll Cover
- Inspect application code and Kubernetes manifests
- Install the Telepresence client locally
- Deploy the Telepresence traffic manager in the cluster
- Establish a connection and verify setup
- Test DNS, service endpoints, and pod IPs from your laptop
- Cleanly disconnect when finished

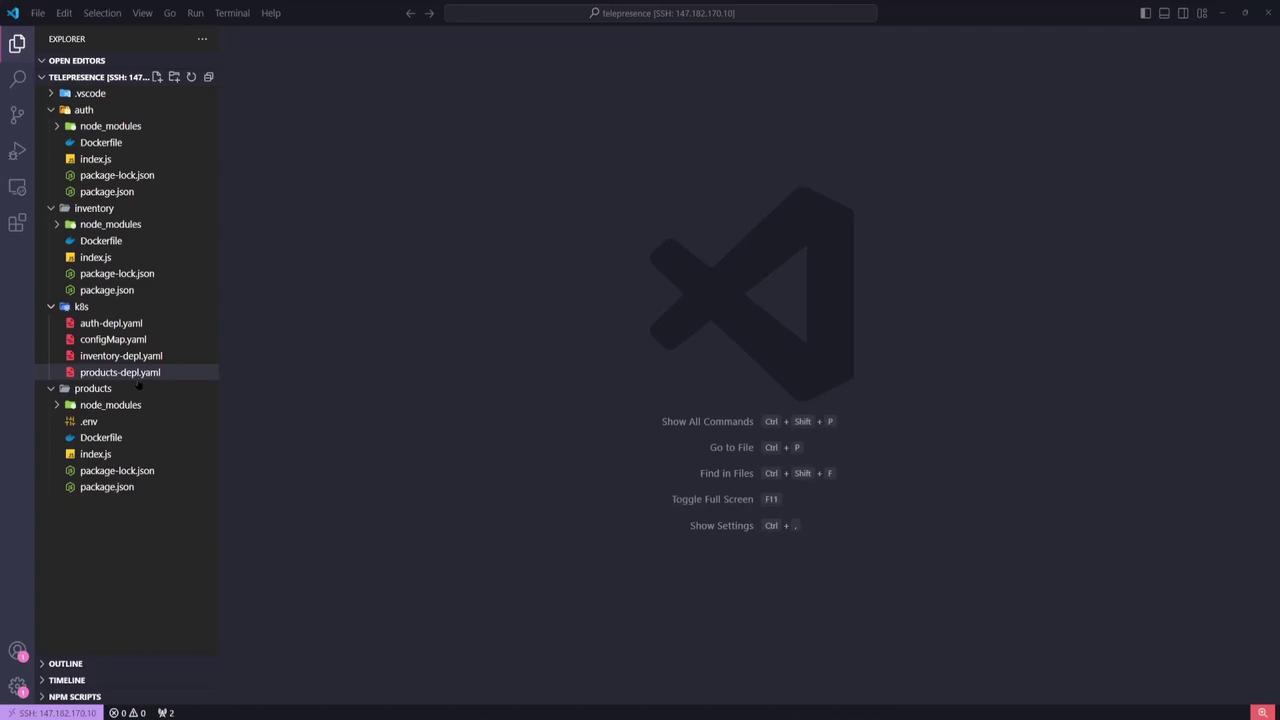
1. Inspecting the Code
Open the project in VS Code or your preferred IDE. You’ll see three top-level folders—auth, inventory, and products—each containing:
index.js: Node.js entrypointpackage.jsonDockerfile
Under the k8s/ directory are the Kubernetes YAML manifests for each service.
2. Kubernetes Manifests
Auth Deployment & Service
apiVersion: apps/v1
kind: Deployment
metadata:
  name: auth-depl
spec:
  selector:
    matchLabels:
      app: auth
  template:
    metadata:
      labels:
        app: auth
    spec:
      containers:
      - name: auth
        image: sanjeevkt720/telepresence-auth
        ports:
        - containerPort: 3000
          name: web
---
apiVersion: v1
kind: Service
metadata:
  name: auth-service
spec:
  selector:
    app: auth
  ports:
    - port: 3000
      targetPort: web
  type: ClusterIP
Inventory Deployment & Service
apiVersion: apps/v1
kind: Deployment
metadata:
  name: inventory-depl
spec:
  selector:
    matchLabels:
      app: inventory
  template:
    metadata:
      labels:
        app: inventory
    spec:
      containers:
      - name: inventory
        image: sanjeevkt720/telepresence-inventory
        ports:
        - containerPort: 3000
          name: web
---
apiVersion: v1
kind: Service
metadata:
  name: inventory-service
spec:
  selector:
    app: inventory
  ports:
    - port: 3000
      targetPort: web
  type: ClusterIP
Products Deployment & Service
The products service is exposed via a LoadBalancer:
apiVersion: apps/v1
kind: Deployment
metadata:
  name: products-depl
spec:
  selector:
    matchLabels:
      app: products
  template:
    metadata:
      labels:
        app: products
    spec:
      containers:
      - name: products
        image: sanjeevkt720/telepresence-products
        ports:
        - containerPort: 3000
          name: web
        env:
        - name: API_URL
          value: http://inventory-service:3000/
---
apiVersion: v1
kind: Service
metadata:
  name: products-service
spec:
  type: LoadBalancer
  selector:
    app: products
  ports:
    - port: 3000
      targetPort: web
3. Verifying the Kubernetes Cluster
Before proceeding, ensure your cluster is running and your kubectl context is set correctly.
kubectl get nodes
You should see multiple nodes in the Ready state.
Kubernetes Cluster Ready
Make sure your kubeconfig points to the correct context. On managed services like AWS EKS, verify your cluster endpoint and authentication.
4. Installing the Telepresence Client
On Windows, open PowerShell as an Administrator:
# 1. Download Telepresence (~50 MB)
Invoke-WebRequest `
  https://app.getambassador.io/download/telzoss/releases/download/v2.20.0/telepresence-windows-amd64.zip `
  -OutFile telepresence.zip

# 2. Extract and remove archive
Expand-Archive -Path telepresence.zip -DestinationPath telepresenceInstaller/telepresence
Remove-Item telepresence.zip
cd telepresenceInstaller/telepresence

# 3. Run installer script
powershell.exe -ExecutionPolicy Bypass -File .\install-telepresence.ps1

# 4. Cleanup
cd ../..
Remove-Item telepresenceInstaller -Recurse -Force

# 5. Verify installation
telepresence --help
5. Deploying the Telepresence Traffic Manager
Telepresence uses Helm to install its Traffic Manager. Simply run:
telepresence helm install
This creates the ambassador namespace and deploys the traffic manager pods.
kubectl get ns
# ...
kubectl get pods -n ambassador
# traffic-manager-xxxxx  1/1  Running
6. Connecting to the Cluster
Establish a VPN-like tunnel between your laptop and the Kubernetes cluster:
telepresence connect
Check connection status:
telepresence status
You’ll see details on:
- Connection status
- Active Kubernetes context & namespace
- Routes for service and pod CIDRs
- DNS proxy configuration
- Traffic Manager health
Helm & Permissions
Ensure you have cluster-wide permissions to deploy the Traffic Manager via Helm. You may need a cluster-admin role.
7. Reviewing Cluster Services Locally
With Telepresence active, your laptop now behaves like a pod:
kubectl get svc
Example output:
NAME                TYPE           CLUSTER-IP      EXTERNAL-IP                                           PORT(S)
auth-service        ClusterIP      10.100.10.52    <none>                                                3000/TCP
inventory-service   ClusterIP      10.100.246.69   <none>                                                3000/TCP
products-service    LoadBalancer   10.100.169.75   a4519082e1ab846e38b3d9760c9e3b9-515600148.us-east-1.elb.amazonaws.com   3000:30782/TCP
kubernetes          ClusterIP      10.100.0.1      <none>                                                443/TCP
8. Testing DNS Resolution
Verify Kubernetes DNS from your laptop:
nslookup auth-service
Server:         127.0.0.53
Address:        127.0.0.53#53

Non-authoritative answer:
Name:   auth-service.default.svc.cluster.local
Address: 10.100.10.52
9. Curling Services Locally
Auth Service
curl http://auth-service:3000
{"message":"this is the auth service"}
Products Service
curl "http://products-service:3000?product_ids=1,2,3"
{
  "data": [
    {"id":1,"name":"iPhone 14","price":900,"category":"electronics","onSale":false,"inventoryCount":893},
    {"id":2,"name":"Samsung 40in TV","price":500,"category":"electronics","onSale":true,"inventoryCount":902},
    {"id":3,"name":"Apple MacbookPro","price":2500,"category":"electronics","onSale":false,"inventoryCount":444}
  ]
}
10. Accessing a Pod by IP
List pods with IPs:
kubectl get pod -o wideCurl the pod directly:
curl http://192.168.32.69:3000{"message":"this is the auth service"}
11. Disconnecting Telepresence
When you’ve finished testing, terminate the connection:
telepresence quit
Confirm disconnection:
telepresence status
# Status: Disconnected
Links and References
- Telepresence: https://www.telepresence.io/
- Kubernetes Basics: https://kubernetes.io/docs/concepts/overview/what-is-kubernetes/
- Helm: https://helm.sh/
- AWS EKS: https://aws.amazon.com/eks/
Watch Video
Watch video content