[Updated] AZ-104: Microsoft Azure Administrator

Administer PaaS Compute Options

Securing App Service

Securing your App Service is essential for protecting your applications from unauthorized access and potential threats. In this guide, we cover several security topics including App Service Authentication, SSL certificates, diagnostic settings, network ACLs, and Key Vault integration. These measures combine to create a robust security framework for your web applications.

App Service Authentication

App Service Authentication adds a layer of protection by intercepting incoming requests and requiring valid credentials before allowing access. This built-in feature supports multiple identity providers such as Microsoft, Apple, Facebook, GitHub, Google, and Twitter. For providers that use OpenID Connect, Azure App Service leverages OAuth 2.0 protocols to ensure secure integration.

By default, anonymous access is permitted. For example, navigating directly to your app’s URL will load the landing page without any authentication prompts. To secure your app, switch the default setting and enforce the authentication mechanism of your choice.

Tip

Ensure that you select a provider that complements your application's user base and security requirements.

Securing Data with SSL Certificates

Implementing SSL certificates is vital for encrypting the data exchanged between your application and its users. This encryption safeguards sensitive information during transit and builds trust with your end-users.

Diagnostic Settings

Diagnostic settings are a key part of maintaining and troubleshooting your Azure App Service. By enabling detailed logging and monitoring, you can quickly identify and resolve potential performance issues or security vulnerabilities.

Network Access Control Lists (ACLs)

Network ACLs further secure your App Service by specifying which IP addresses or networks are permitted to access your application. Configuring these rules minimizes the exposure of your web app to unauthorized traffic.

Security Note

Always evaluate your network access rules to ensure that only trusted sources can communicate with your App Service.

Key Vault Integration

Managing sensitive data such as API keys, connection strings, and other secrets is streamlined with Azure Key Vault. By integrating your App Service with Key Vault, you eliminate the risk of exposing secrets in your code or configuration files, ensuring that sensitive information remains secure.

The image is a presentation slide about securing an app service, highlighting authentication and security features, and showing a dropdown menu for selecting an identity provider.

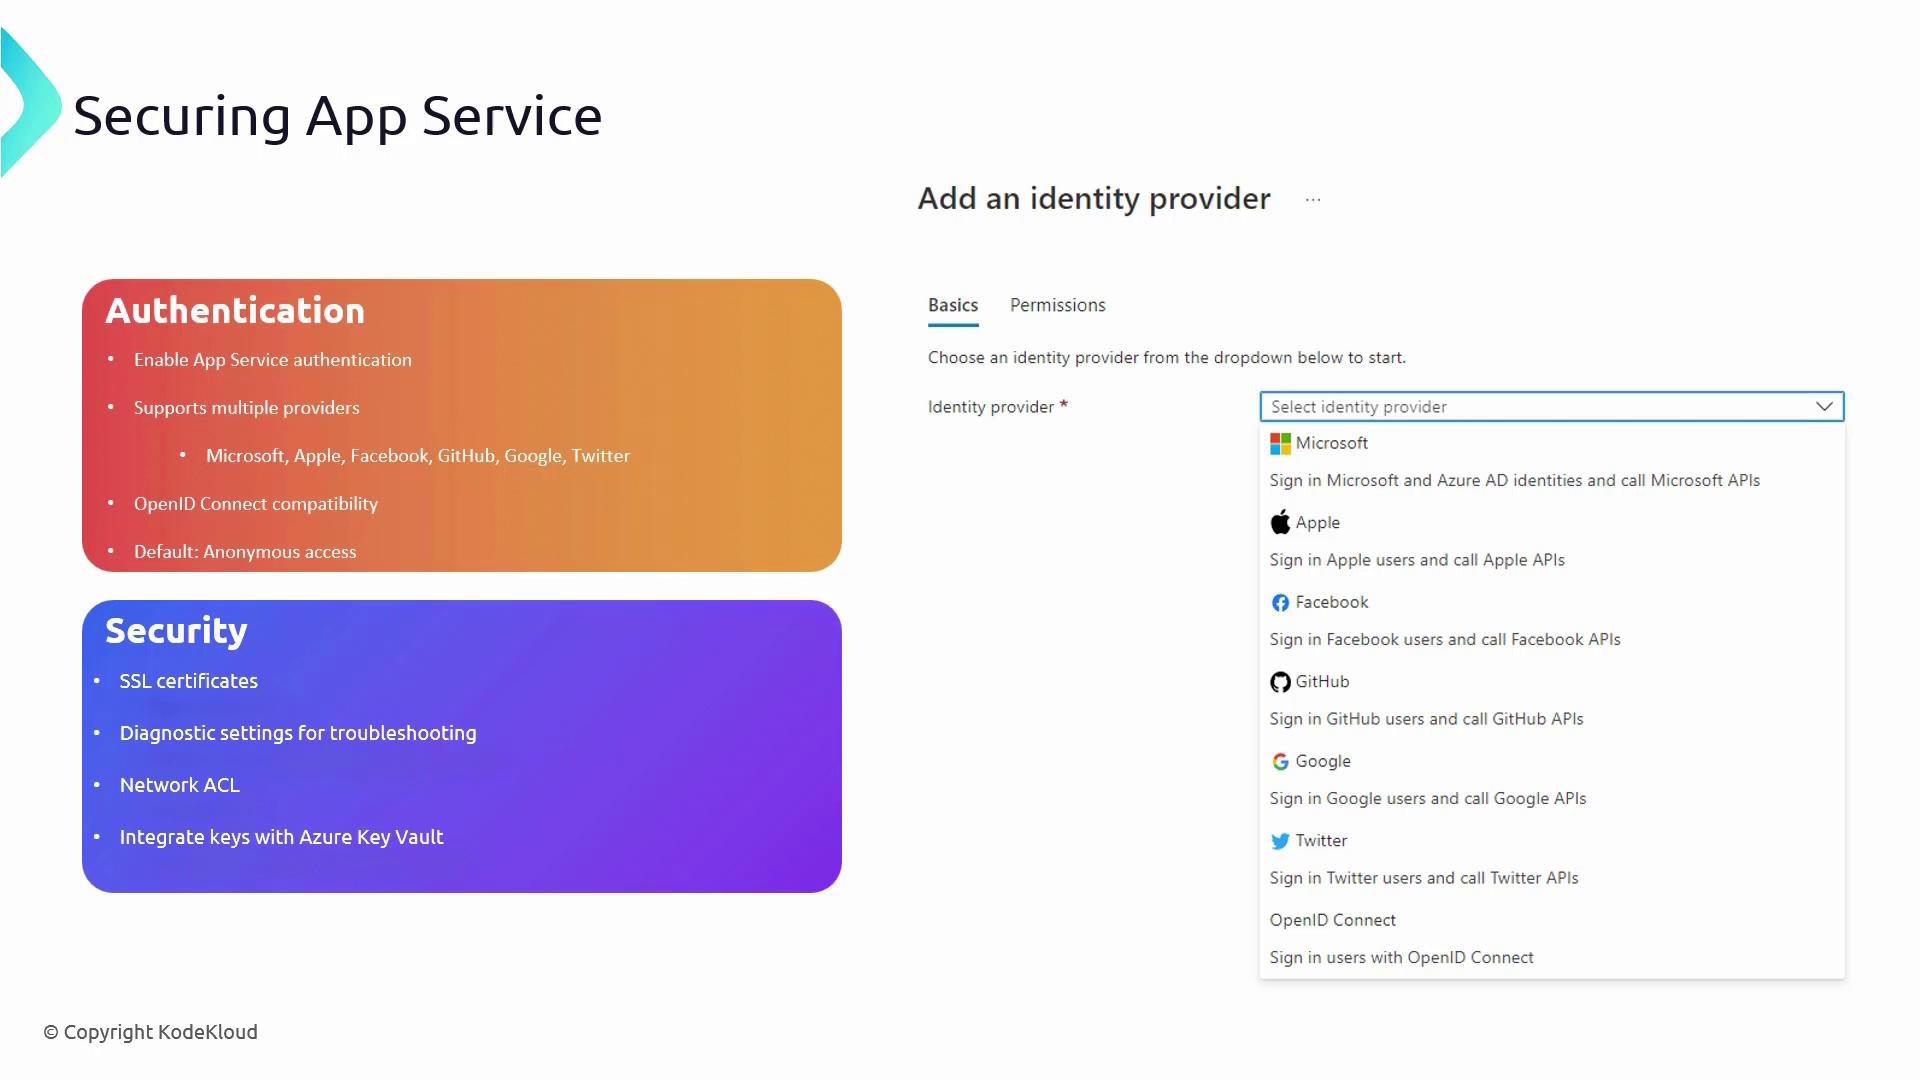
Deploying Code to Your App Service

After securing your service, the next step is deploying your application code. While there are multiple deployment methods available, this guide focuses on using Visual Studio Code. However, Visual Studio, FTP, and other techniques are equally effective.

Deploying with Visual Studio Code

To deploy with Visual Studio Code, press Control+Shift+P and select "Deploy to Web App." You will be prompted to choose your project folder and target web app. If you haven’t authenticated with your Azure account yet, follow the on-screen instructions. Once connected, the deployment process automatically begins.

Below is an example of an HTML file deployed to the App Service:

<!DOCTYPE html>
<html lang="en">
<head>
    <meta charset="UTF-8">
    <meta name="viewport" content="width=device-width, initial-scale=1.0">
    <title>NiceAdmin</title>
    <!-- Template Azure App Service: Deploy to Web App... -->
    <link rel="stylesheet" href="style.css">
</head>
<body>
    <!-- ====== Header ====== -->
    <header id="header" class="header fixed-top d-flex align-items-center">
        <div class="d-flex align-items-center justify-content-between">
            <a href="index.html" class="logo d-flex align-items-center">
                <img src="assets/img/logo.png" alt="">
                <span class="d-none d-lg-block">NiceAdmin</span>
            </a>
            <i class="bi bi-list toggle-sidebar-btn"></i>
        </div><!-- End Logo -->
        
        <div class="search-bar">
            <form class="search-form d-flex align-items-center" method="POST" action="#">
                <input type="text" name="query" placeholder="Search keyword" title="Enter search keyword">
                <button type="submit"><i class="bi bi-search"></i></button>
            </form>
        </div><!-- End Search Bar -->
    </header><!-- End Header -->
</body>
</html>

After selecting your folder and target app, Visual Studio Code deploys your code to Azure. The following snippet demonstrates how vendor CSS and associated resources are included during deployment:

<!-- Vendor CSS -->
<link href="assets/vendor/bootstrap-icons/bootstrap-icons.css" rel="stylesheet">
<link href="assets/vendor/bootstrap/css/bootstrap.min.css" rel="stylesheet">
<link href="assets/vendor/boxicons/css/boxicons.min.css" rel="stylesheet">
<link href="assets/vendor/quill/quill.bubble.css" rel="stylesheet">
<link href="assets/vendor/quill/quill.snow.css" rel="stylesheet">
<link href="assets/vendor/remixicon/remixicon.css" rel="stylesheet">
<link href="assets/vendor/simple-datatables/style.css" rel="stylesheet">

<!-- Template Main CSS File -->
<link href="assets/css/style.css" rel="stylesheet">

<!-- Template Name: NiceAdmin -->
<!-- Updated: Nov 17 2023 with Bootstrap v5.3.2 -->
<!-- Template URL: https://bootstrapmade.com/nice-admin-bootstrap-admin-html-template/ -->
<!-- License: BootstrapMade.com/license/ -->

<body>
<!-- ======= Header ======= -->
<header id="header" class="header fixed-top d-flex align-items-center">
  <div class="d-flex align-items-center justify-content-between">
    <a href="index.html" class="logo d-flex align-items-center">
      <img src="assets/img/logo.png" alt="">
      <span class="d-none d-lg-block">NiceAdmin</span>
    </a>
    <i class="bi bi-list toggle-sidebar-btn"></i>
  </div><!-- End Logo -->

  <!-- End Search Bar -->
</header>

During deployment, a zip package of your application is created and pushed to your App Service. You can review the deployment log to ensure everything processed smoothly:

<!-- Deployment Log Output -->
10:07:29 PM kodekloudemoapp: Copying file: 'assets\img\messages-3.JPG'
10:07:29 PM kodekloudemoapp: Copying file: 'assets\img\news-1.jpg'
10:07:30 PM kodekloudemoapp: Copying file: 'assets\img\news-3.jpg'
10:07:30 PM kodekloudemoapp: Copying file: 'assets\img\news-4.jpg'
10:07:30 PM kodekloudemoapp: Omitting next output lines...
10:07:30 PM kodekloudemoapp: Finished successfully.
10:07:30 PM kodekloudemoapp: Running post deployment command(s)...
10:07:30 PM kodekloudemoapp: Triggering recycle (preview mode disabled).
10:07:30 PM kodekloudemoapp: Deployment successful.

After a successful deployment, navigate to your website. A refresh will display the deployed Bootstrap template and confirm that your application is live.

Securing Your Application with Authentication

By default, App Service does not enforce authentication. To enhance security, go to the Authentication section of your web app in the Azure Portal and add an identity provider. In this example, Microsoft Entra ID is used.

After creating an app registration within Microsoft Entra ID, use the default configuration settings and click "Add." With the identity provider active, open an incognito window and navigate to your app’s URL. A sign-in prompt confirms that authentication is now required to access your application.

The image shows a Microsoft Azure portal page for adding an identity provider, with options for app registration and authentication settings.

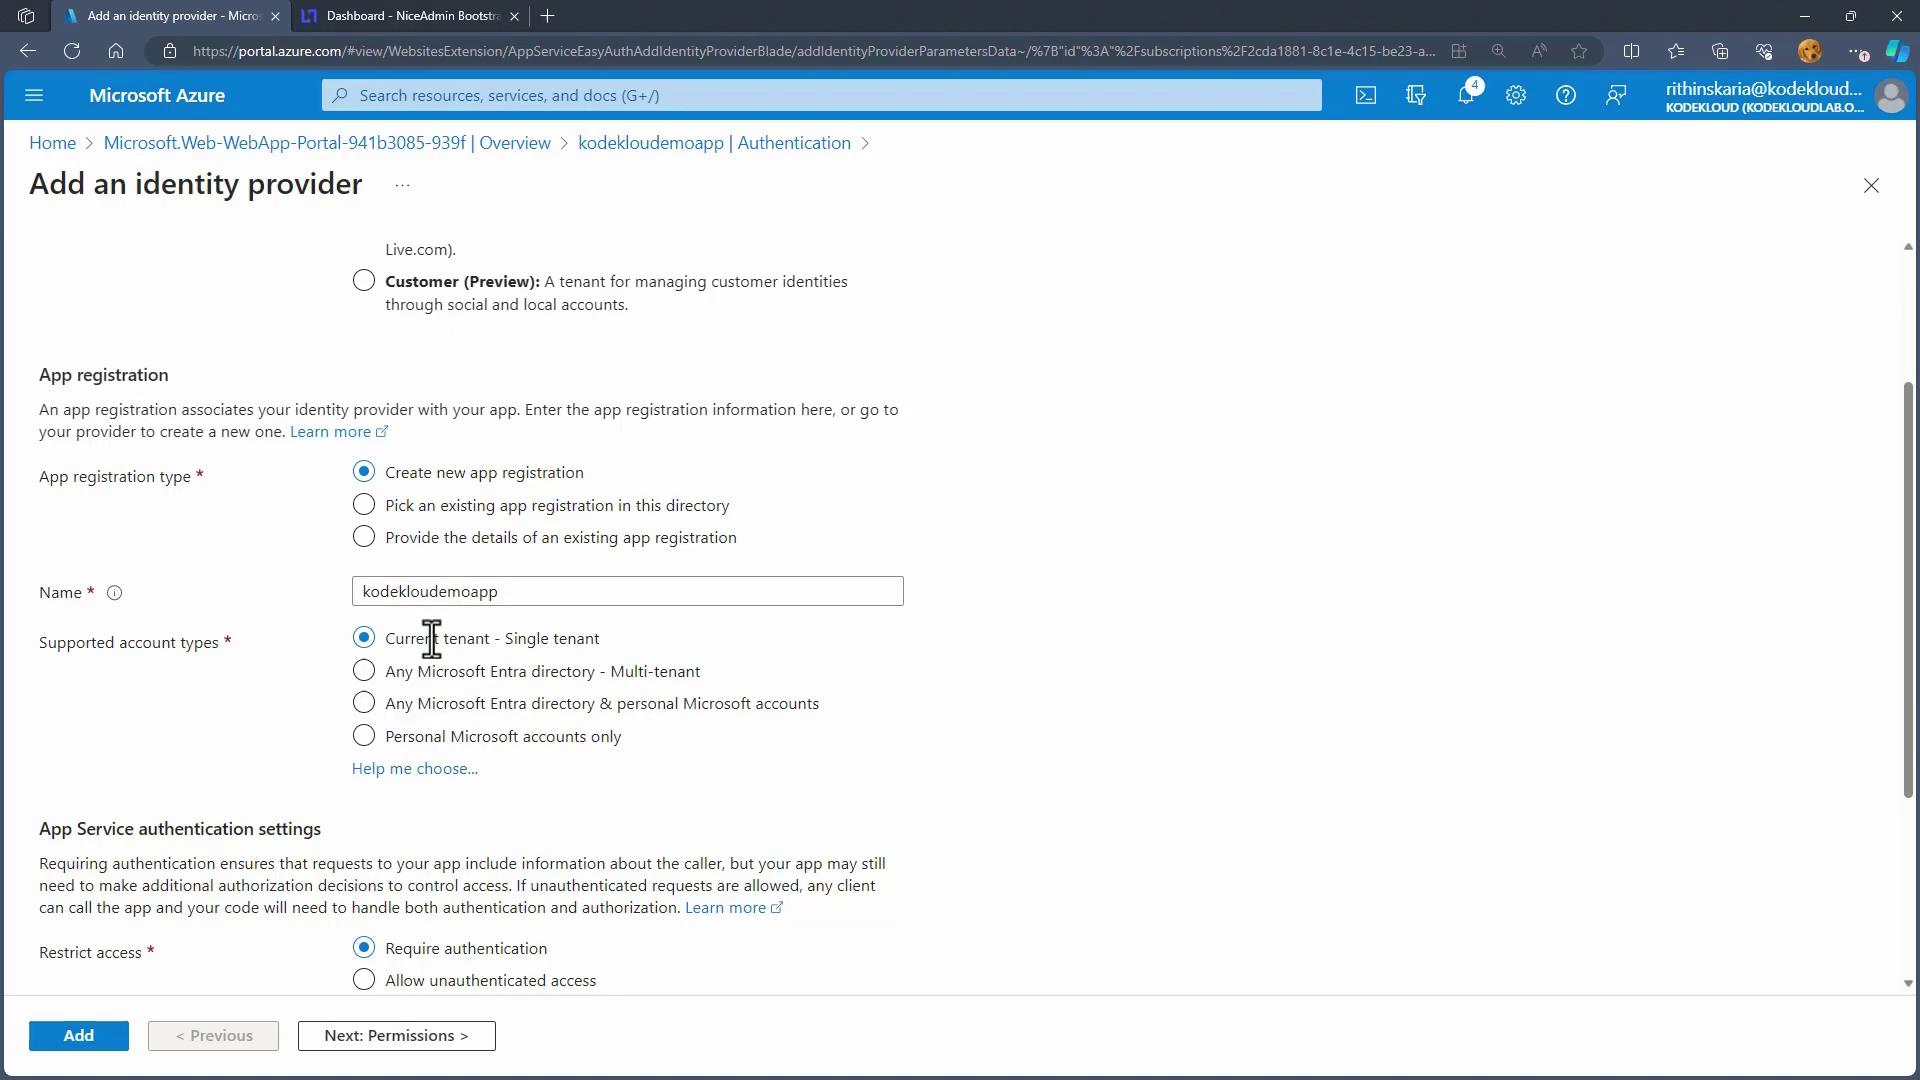
Additional Deployment Options

If Visual Studio Code is not your preferred deployment tool, consider these alternatives:

  • Deployment Center: A centralized hub to explore various deployment methods.
  • FTPS Credentials: Retrieve your FTPS endpoint, username, and password to deploy files using any FTP client.

The image shows the FTPS credentials section of the Deployment Center in Microsoft Azure for a web app named "kodekloudemoapp." It includes fields for FTPS endpoint, username, and password management.

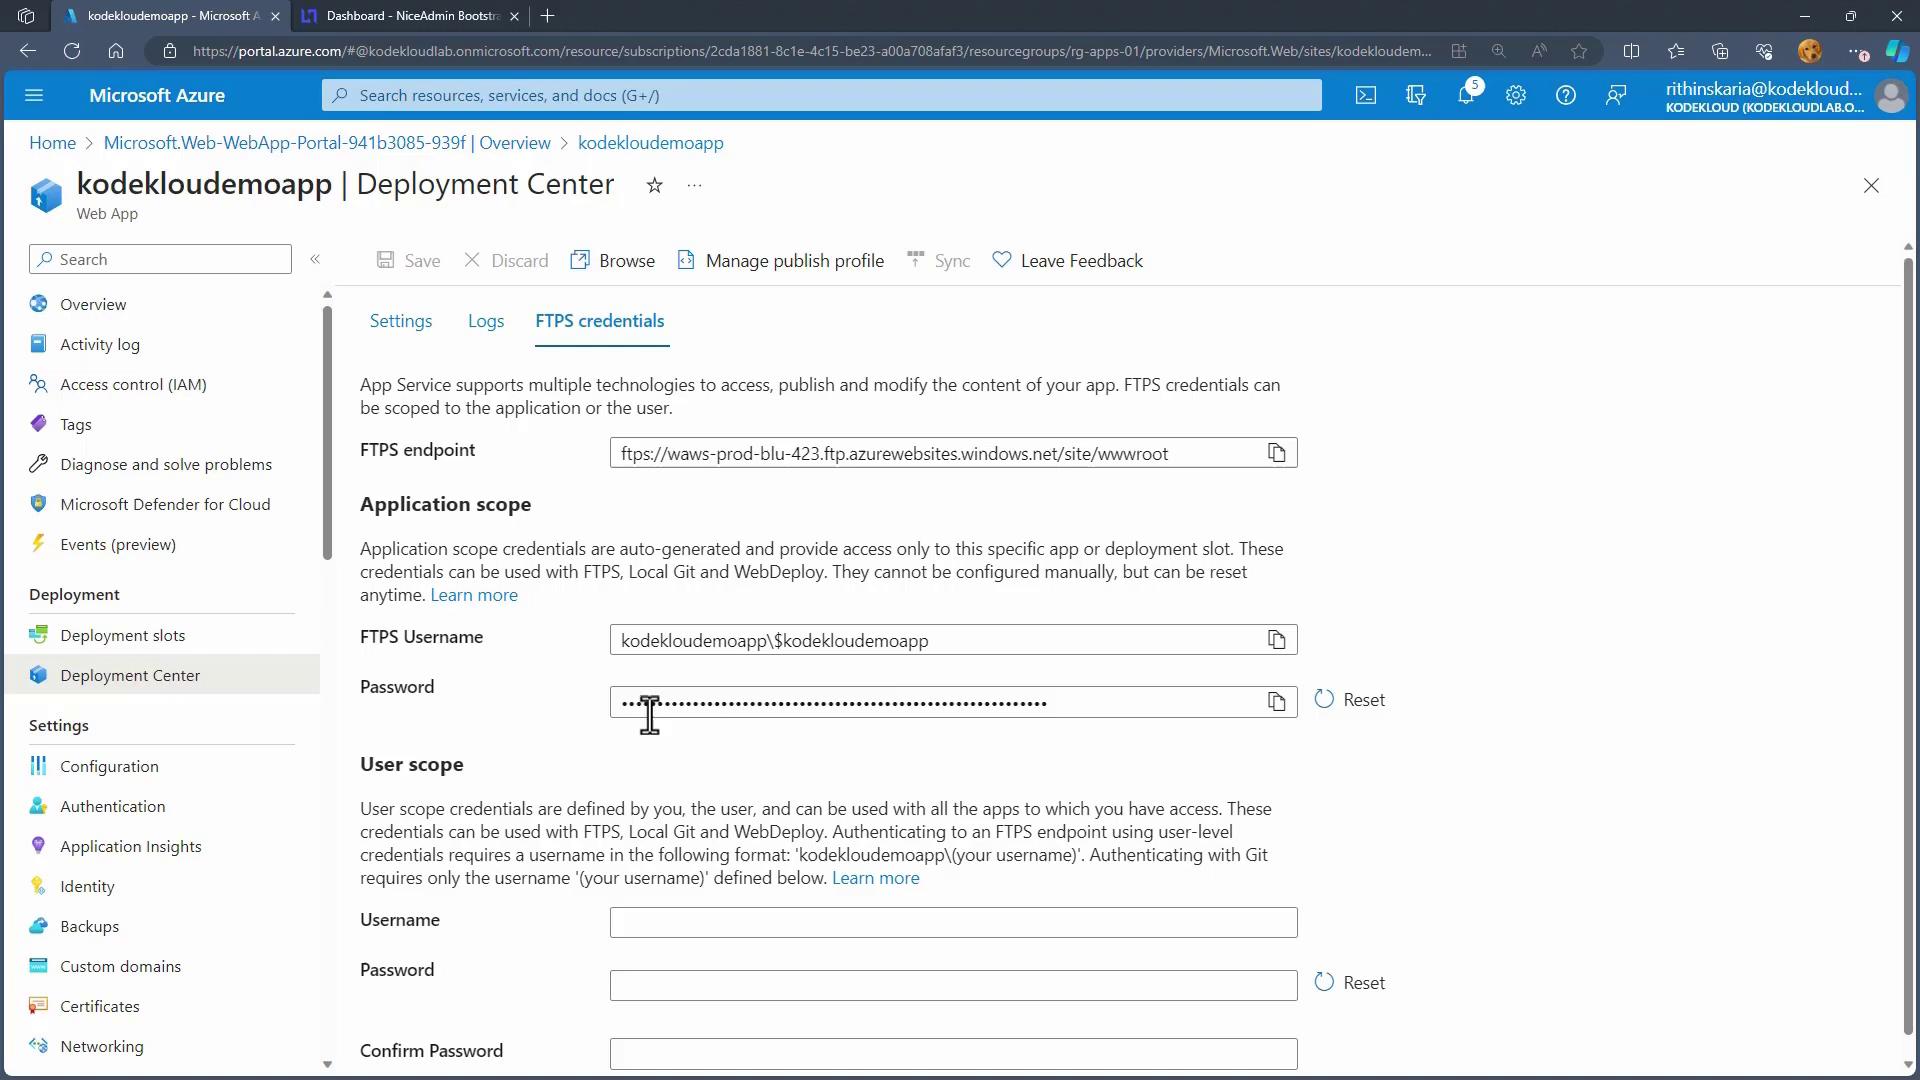
  • Kudu Portal: A web-based interface for file management and uploads.

Implementing SSL Certificates

Azure provides various options for securing your web app with SSL certificates. You can either purchase a Managed Certificate directly from Azure or bring your own public key certificates, ensuring that all communication to and from your application is encrypted.

Configuring Network Access Restrictions

Control public access to your App Service via the Networking blade in the Azure Portal. Here, you can configure rules to restrict traffic to specific IP addresses. The process involves creating "Allow" rules for trusted sources and adding a "Deny All" rule to block unauthorized access.

For instance, to allow a specific IPv4 address, set up a rule with:

  • Action: Allow
  • Priority: 100
  • Type: IPv4 (or IPv6/Virtual Network Service Tag)
  • Source IP: [Your desired IP]

Then, create an additional rule to deny all other traffic:

  • Rule Name: Deny All
  • Action: Deny
  • Priority: 101
  • Type: IPv4

The image shows the Microsoft Azure portal with the "Access Restrictions" settings for a web app. It includes options for configuring site access rules and adding a new rule with specific settings like action, priority, and source IP address.

With these rules configured, any access attempt from an unauthorized IP address will result in a "Forbidden" error message.

Custom Domains

By default, your App Service is hosted under the azurewebsites.net domain. For branding or SEO purposes, you may configure a custom domain (e.g., kodecloud.com) in the Azure Portal to better align with your business identity.


This guide has reviewed the key strategies for securing your App Service, deploying your application code, and enforcing robust authentication and network restrictions. Implement these best practices to safeguard your web applications and improve overall performance and security.

Watch Video

Watch video content

Previous
Deploying App Service