This article explores how taints and tolerations in Kubernetes control pod placement on nodes.
Hello and welcome to this lesson on taints and tolerations in Kubernetes. I’m Mumshad Manambeth, and in this article, we’ll explore how pods are scheduled on nodes while using taints and tolerations to control pod placement.
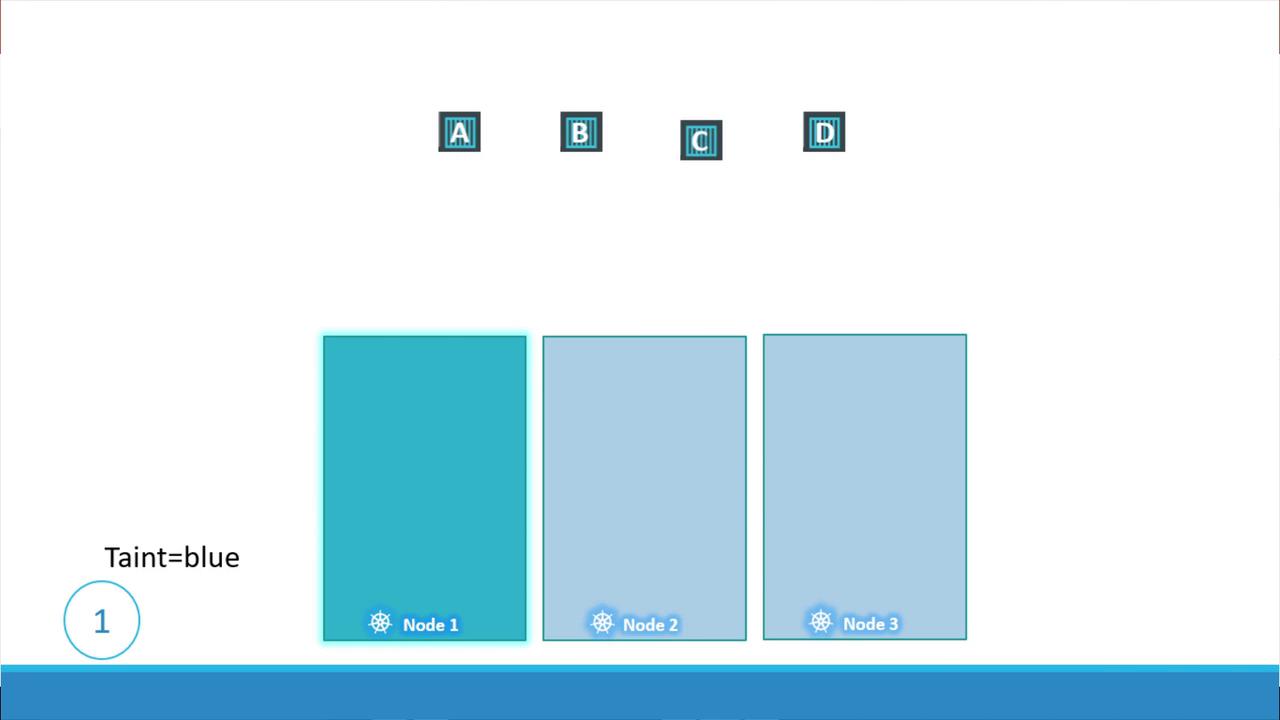
In this lesson, our focus is on the pod-to-node relationship and how to restrict pod placement on specific nodes. While taints and tolerations may initially seem complex, an everyday analogy can help clarify the concept:Imagine a bug approaching a person. To deter the bug, you spray the person with a repellent. Here, the repellent represents a taint applied on a node. Most bugs (pods) are repelled and cannot land on the person (node). However, some bugs might be resistant to the repellent; these represent pods that can tolerate the taint. The ability of a pod to tolerate a taint decides whether it can be scheduled on a node that has been “tainted.”In Kubernetes, the node is analogous to the person while the pods are like bugs. Taints are applied to nodes solely to restrict which pods can be scheduled on them; they do not serve as a security measure.Consider a simple cluster with three worker nodes—named one, two, and three—and four pods labeled A, B, C, and D. Without any restrictions, the Kubernetes scheduler evenly distributes these pods among the nodes. Now, assume you want to dedicate node one for a specific application and have only the related pods scheduled there. You first prevent all pods from landing on node one by applying a taint (for example, with the key “app” and value “blue”). Since pods do not come with tolerations by default, they will be excluded from node one.
To schedule only certain pods on node one, add a toleration to the pod’s definition. For instance, if you want only pod D to be scheduled on node one, you would add a toleration corresponding to the taint (blue) into its specification. With taints and tolerations configured appropriately, the scheduler will avoid node one for pods A, B, and C while allowing pod D to run on it.You can apply a taint to a node using the following command:
For example, to taint node1 with the key-value pair “app=blue” and an effect of NoSchedule, run:
kubectl taint nodes node1 app=blue:NoSchedule
The taint effect determines the behavior for pods that do not tolerate the taint. There are three available effects:
NoSchedule: Pods without the required toleration are not scheduled on the node.
PreferNoSchedule: The scheduler avoids placing a pod on the node if possible, but it is not strictly enforced.
NoExecute: New pods that do not tolerate the taint are not scheduled, and existing pods without the toleration are evicted.
To add a toleration to a pod, update its pod definition file by including a tolerations section under spec. For example, to allow a pod to tolerate the taint with key “app” and value “blue” with a NoSchedule effect, include the following in the pod’s YAML file:
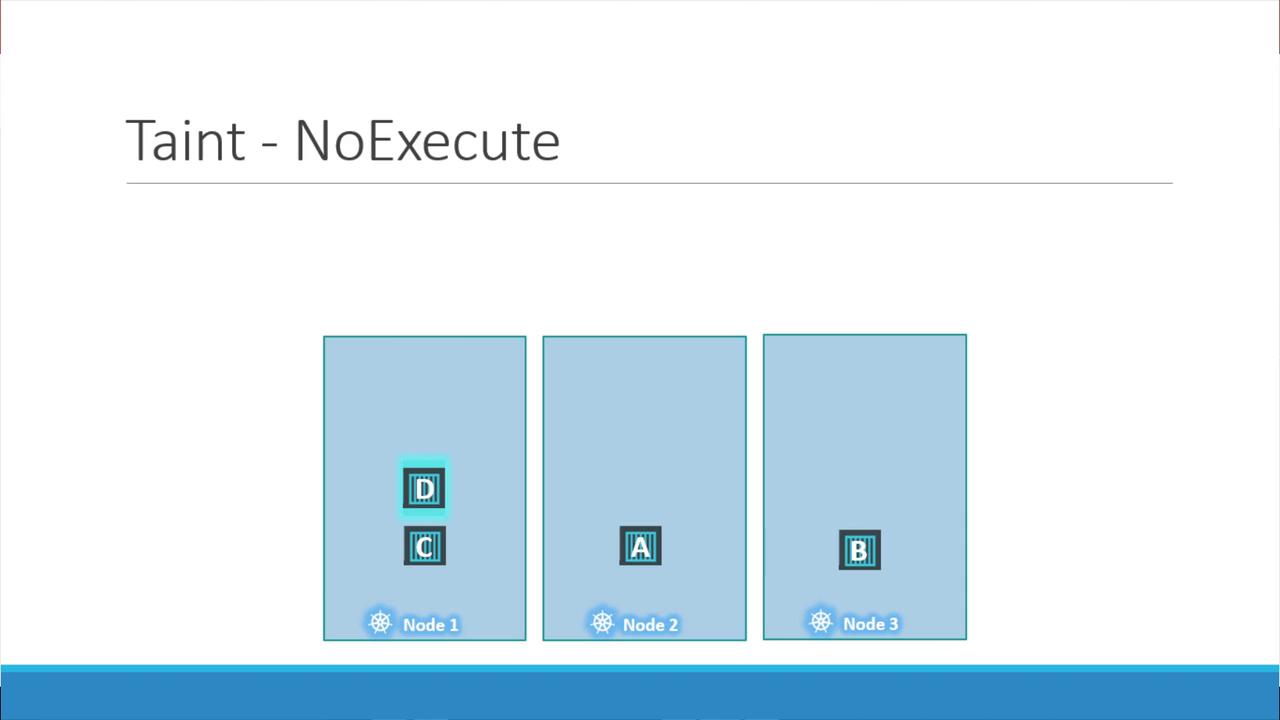
Ensure that each value is correctly enclosed in double quotes as shown. Once pods are created or updated with the necessary tolerations, they will be scheduled or evicted based on the taint’s effect and the pod’s toleration settings.Let’s examine the NoExecute effect in more detail. Imagine a cluster with three nodes running workloads without any taints. Later, when node one is dedicated to a special application, you taint node one using the NoExecute effect and add a toleration only to the designated pod (pod D).
In this scenario, the NoExecute taint ensures that any pod on node one that does not tolerate the taint (for example, pod C) is evicted, while pod D remains since it has the necessary toleration.
Taints and tolerations control which pods a node accepts. They do not force pods to be scheduled on a particular node. Even if a pod tolerates a node’s taint, without additional constraints such as node affinity, it may still be scheduled on another available node.
An interesting aspect of taints and tolerations concerns master nodes. Although master nodes are technically capable of hosting pods, the Kubernetes scheduler does not place regular application pods on them by default. When you set up a Kubernetes cluster, a taint is automatically applied to the master node to prevent scheduling application workloads. You can verify this taint by running:
kubectl describe node kube-master
Examine the taint section to see that the master node is configured to not accept pods. While this behavior can be modified, it is best practice to keep application workloads separate from master nodes.That concludes this lesson on taints and tolerations. Now, you can reinforce your understanding by practicing these concepts through hands-on coding exercises.For further reading, check out the following resources: