Nginx For Beginners

Intermediate Config

Load Balancer

In this lesson, we’ll dive into what a load balancer does and how Nginx handles load balancing out of the box. You’ll learn how to configure upstream pools, choose the right algorithm, and ensure high availability for your web applications.

What Is a Load Balancer?

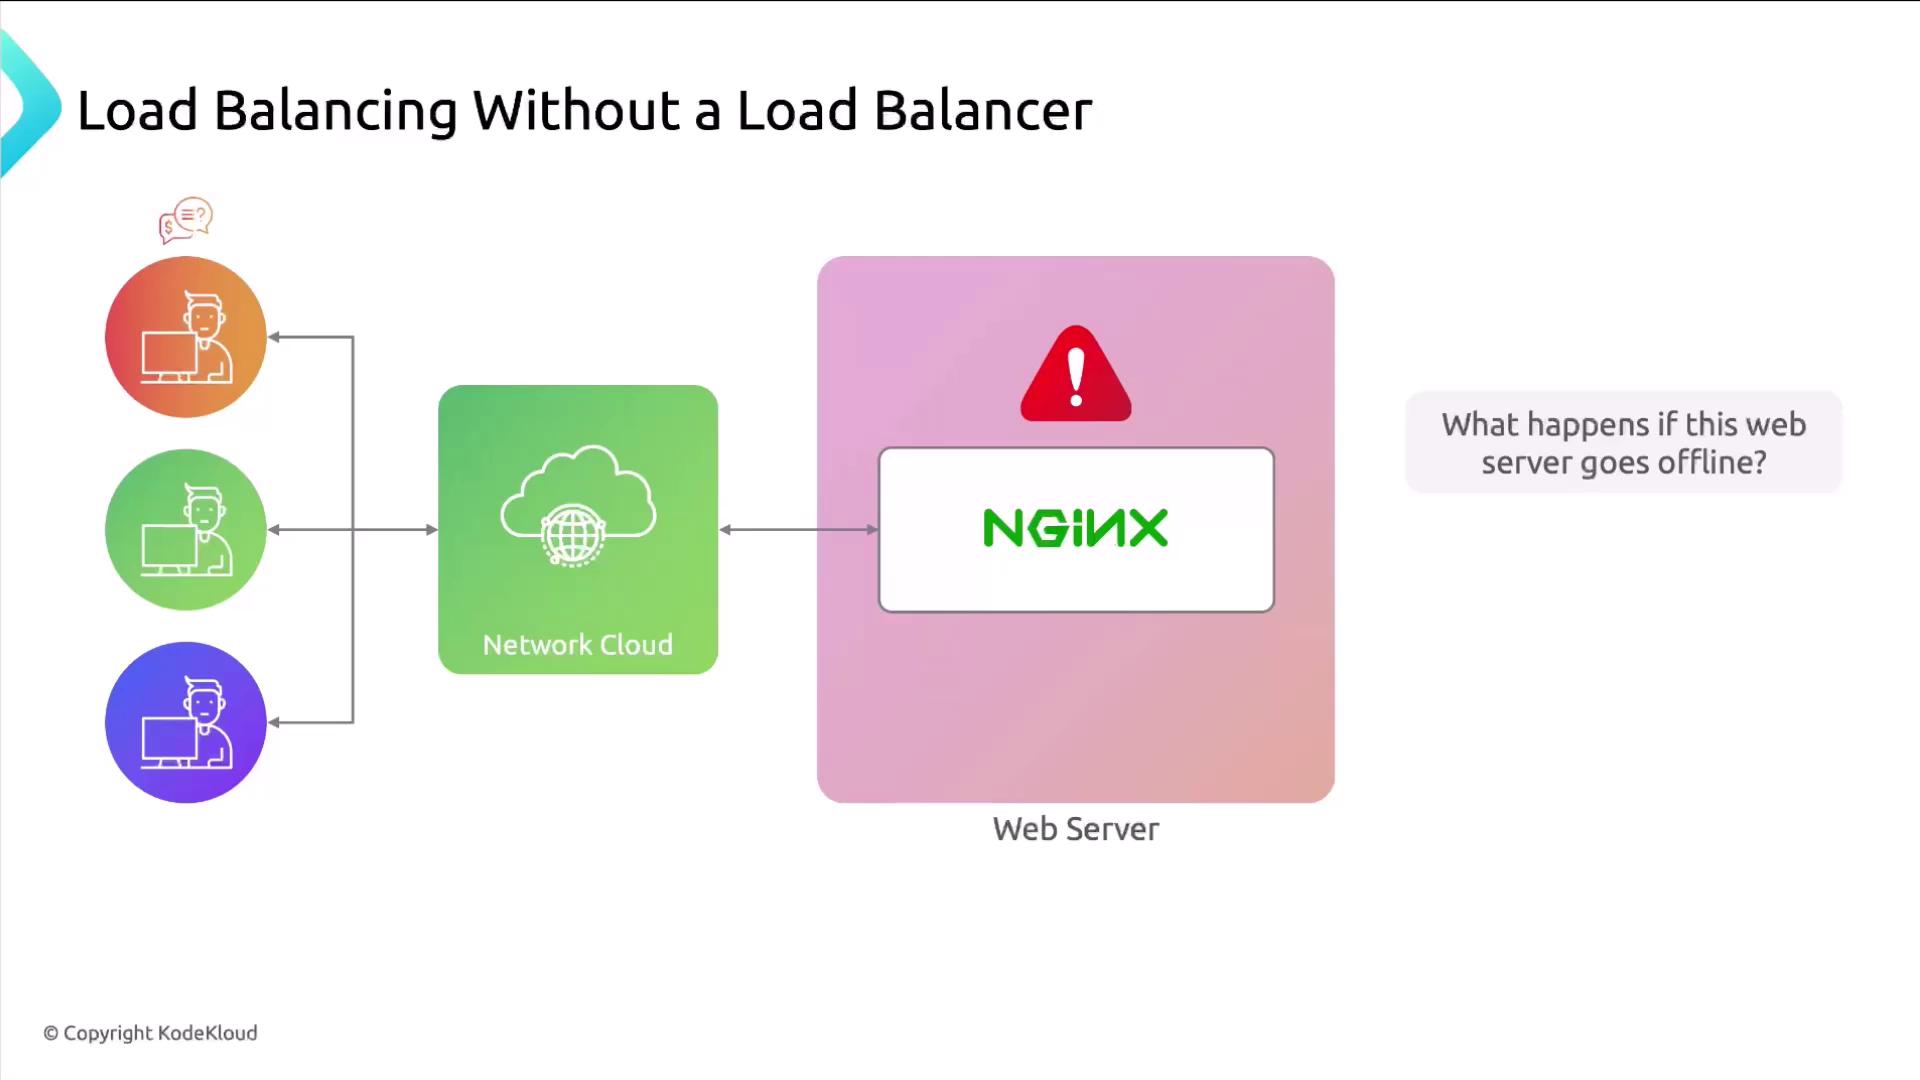
A load balancer is a network device—software or hardware—that distributes incoming traffic across multiple backend servers. It prevents any single server from becoming a performance bottleneck or single point of failure.

The image illustrates a load balancing setup using Nginx, showing the flow from users through a network cloud to a load balancer, which distributes traffic to multiple web servers.

Without a load balancer, every request hits one server:

The image illustrates a network setup without a load balancer, showing users connecting through a network cloud to a web server running NGINX, with a question about handling growing traffic.

The image illustrates a network setup without a load balancer, showing users connecting through a network cloud to a single NGINX web server, with a warning about potential issues if the server goes offline.

If that lone server crashes, your entire site goes down—and you lose traffic, revenue, and user trust.

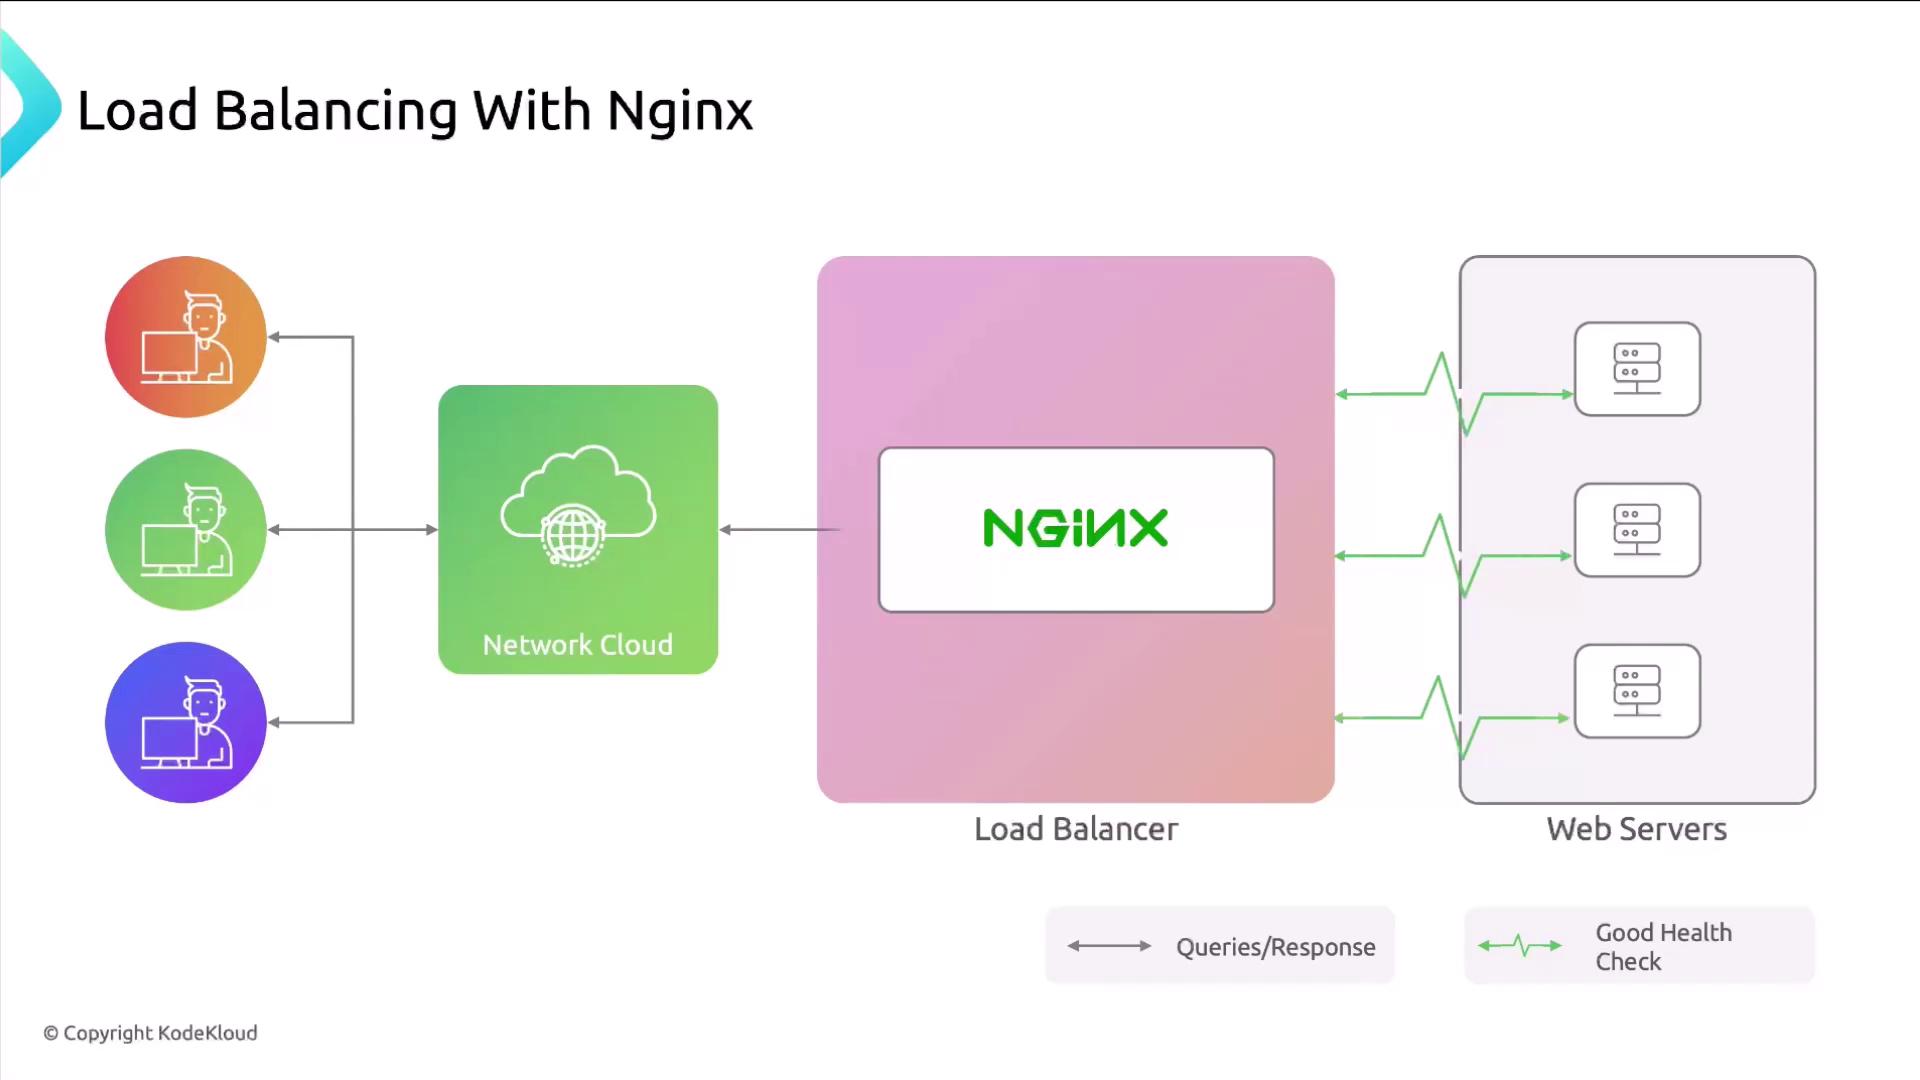
Why Use Nginx as a Load Balancer?

Nginx not only distributes traffic but also performs health checks on backend servers. When a node fails, Nginx automatically marks it unhealthy and stops sending traffic its way, keeping your site available on remaining nodes.

The image is a diagram illustrating load balancing with Nginx, showing the flow from users through a network cloud to a load balancer, and then to web servers with health checks.

Note

By default, Nginx excludes failed servers from the pool. You can tune probe intervals, timeouts, and retry counts for advanced health checks.


Configuring Upstream Pools

Upstream blocks group your backend servers into a single logical name. Later, you reference that name with proxy_pass in a server block.

upstream backend {
    server 10.10.0.101:80;
    server 10.10.0.102:80;
    server 10.10.0.103:80;
}

server {
    listen 80;
    server_name example.com www.example.com;

    location / {
        proxy_pass http://backend;
    }
}

Load Balancing Methods

Nginx supports multiple algorithms to suit different workloads. Here’s a quick summary:

AlgorithmUse CaseDirective
Round RobinEven distribution (default)
Weighted Round RobinPrioritize higher-capacity serversweight=
IP HashSticky sessions based on client IPip_hash
Least ConnectionsSend to server with fewest active connsleast_conn
Least Time*Fastest response (NGINX Plus only)least_time last_byte/header

* Requires NGINX Plus subscription

1. Round-Robin (Default)

Distributes requests evenly in a circular order.

The image illustrates a Round Robin load balancing algorithm using NGINX, distributing requests across three web servers.

upstream backend {
    server 10.10.0.101:80;
    server 10.10.0.102:80;
    server 10.10.0.103:80;
}

server {
    listen 80;
    server_name example.com www.example.com;

    location / {
        proxy_pass http://backend;
    }
}

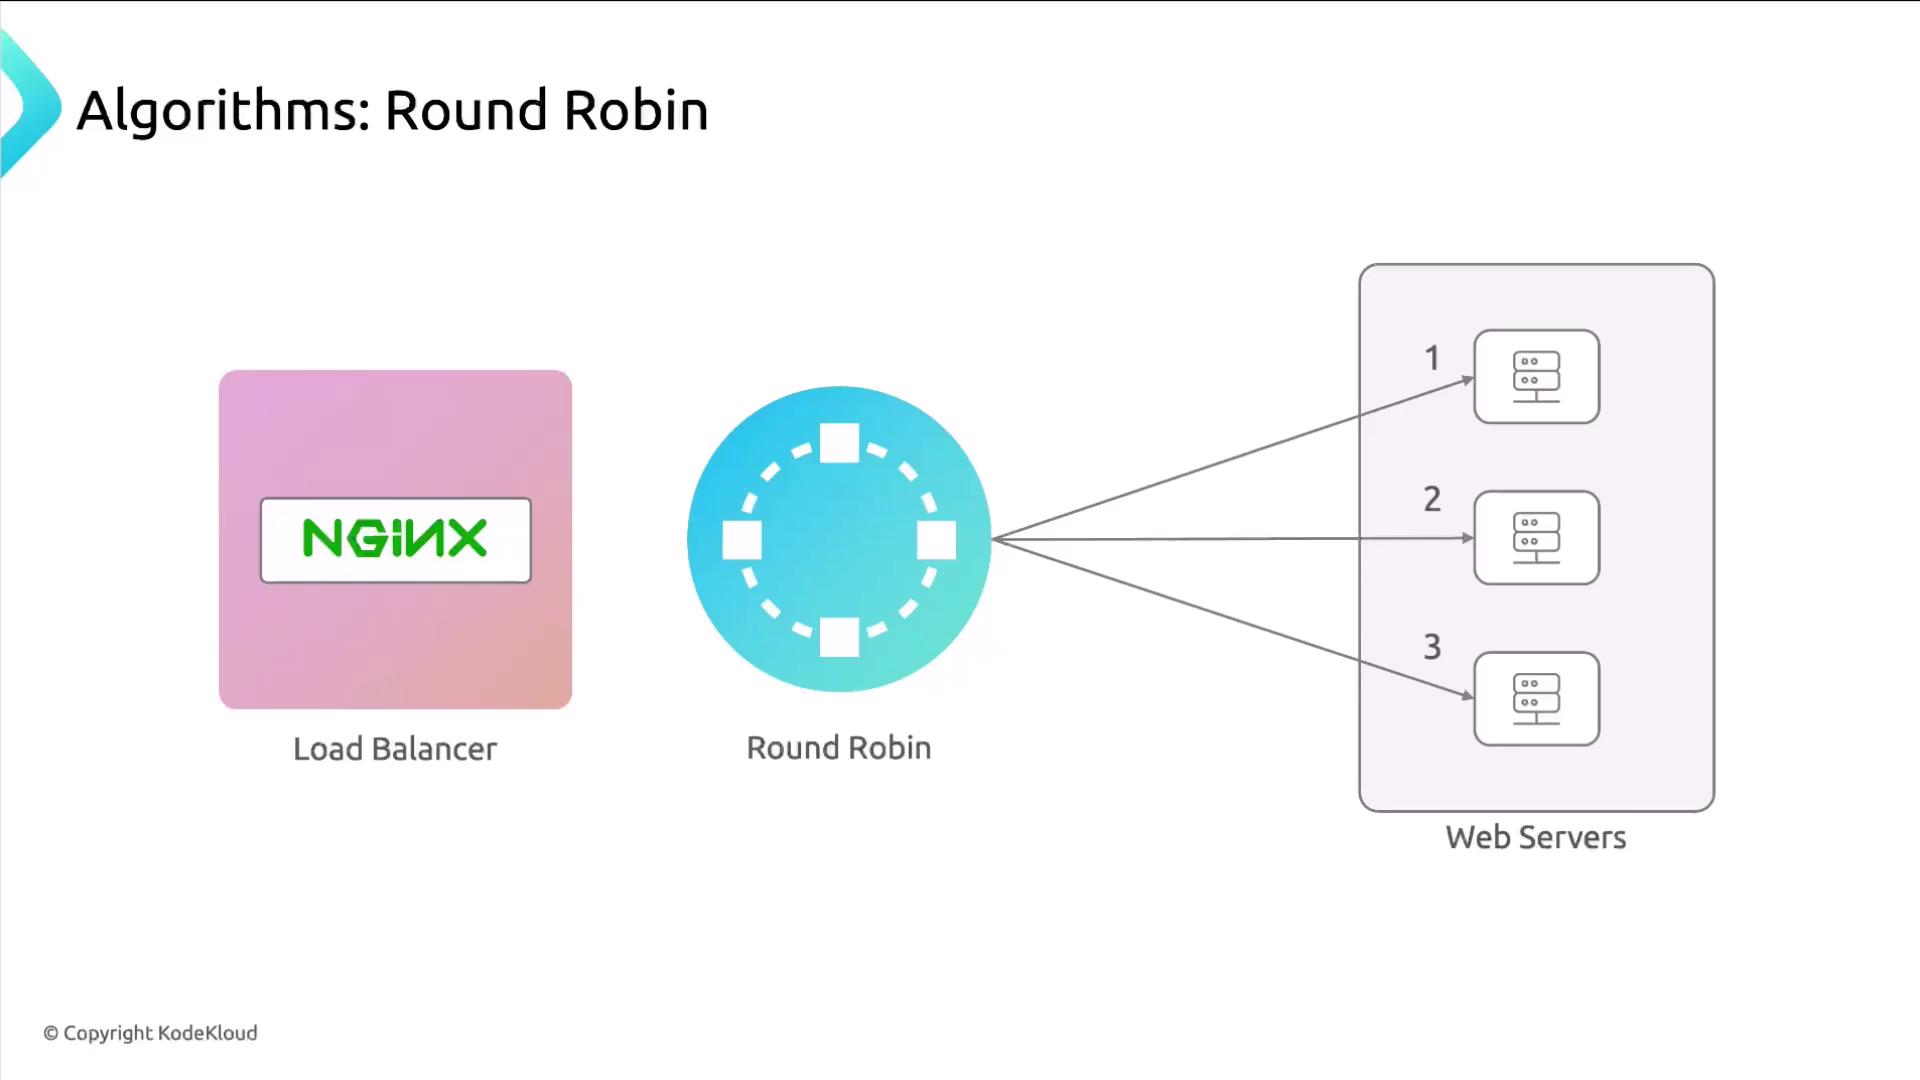
2. Weighted Round-Robin

Assign heavier weights to more powerful servers so they receive a larger share of traffic.

The image illustrates a load balancing algorithm using NGINX, specifically the Weighted Round Robin method, distributing requests to web servers with different weights.

upstream backend {
    server 10.10.0.101:80 weight=4;
    server 10.10.0.102:80 weight=2;
    server 10.10.0.103:80 weight=1;
}

server {
    listen 80;
    server_name example.com www.example.com;

    location / {
        proxy_pass http://backend;
    }
}

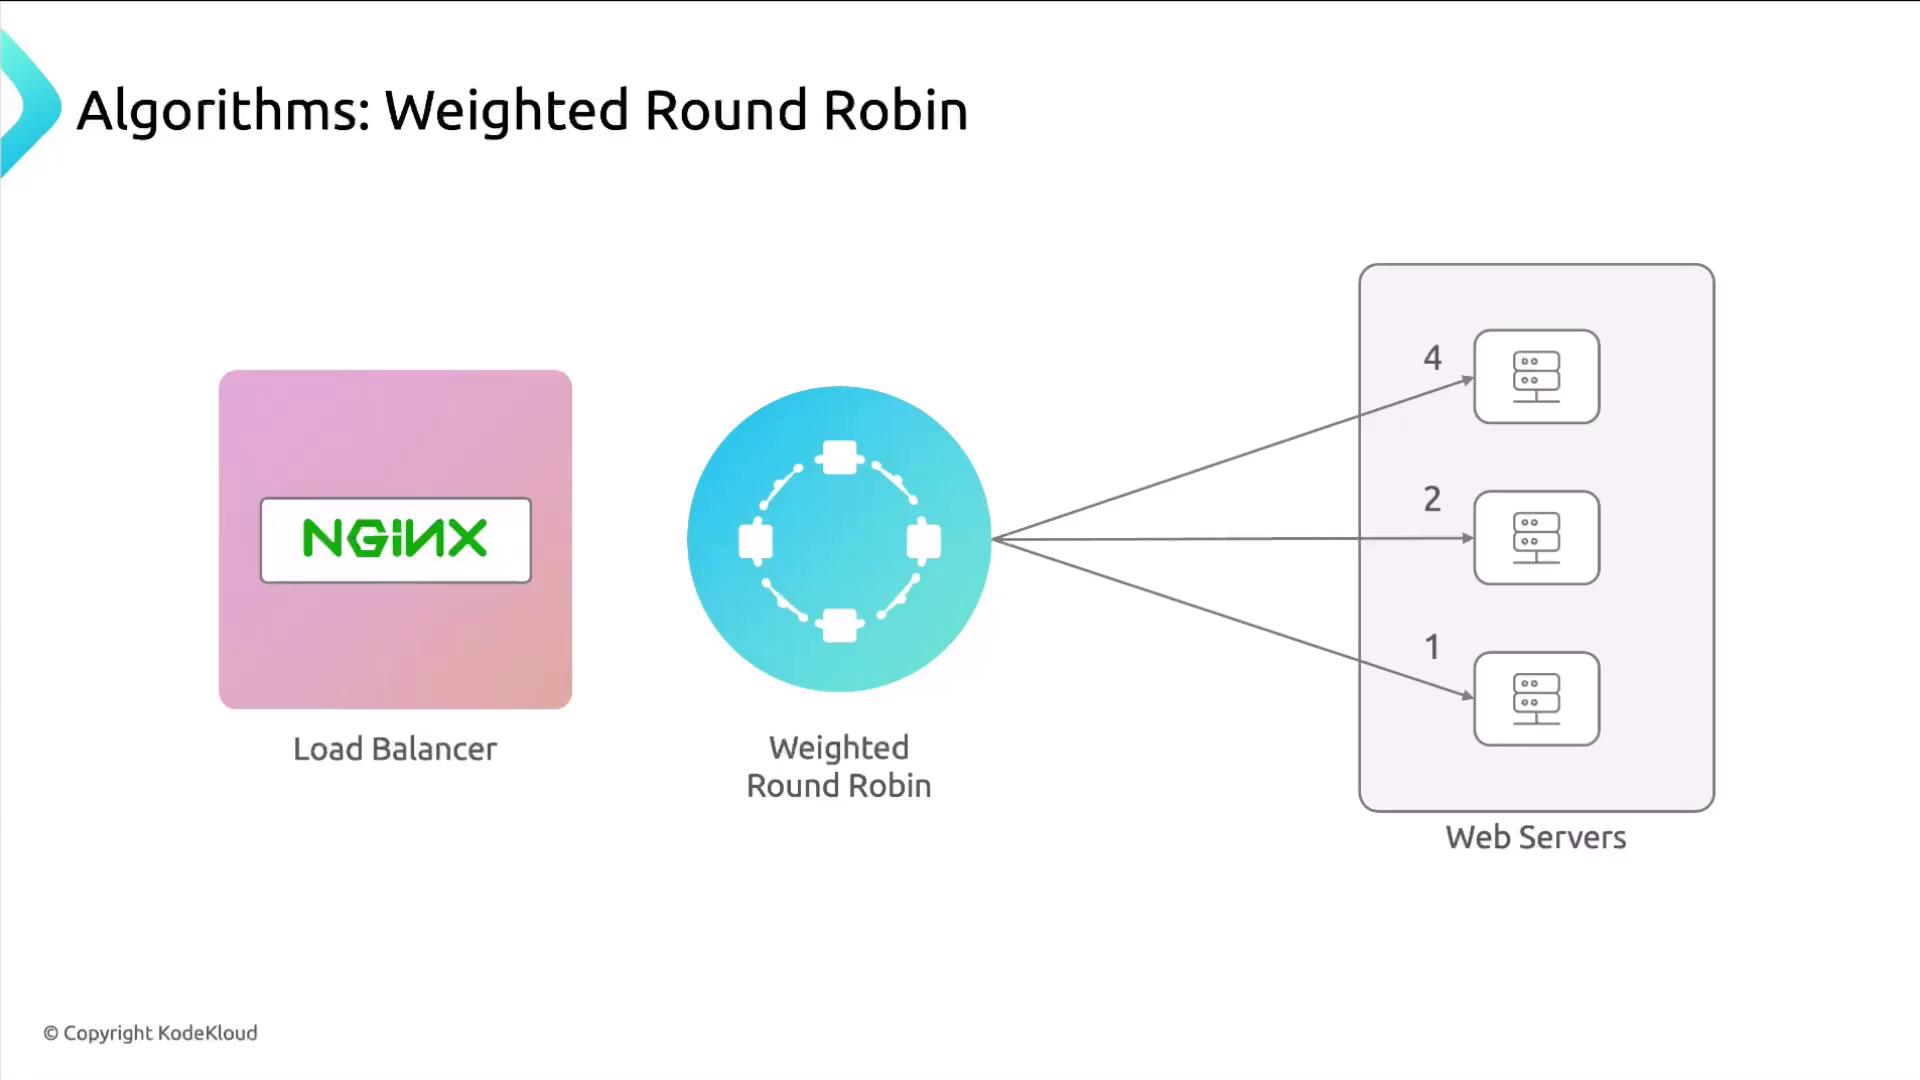
3. IP Hash (Sticky Sessions)

Ensures the same client IP always hits the same server—ideal for session persistence when data is stored in memory on each backend.

The image illustrates an IP Hash algorithm used in load balancing, showing a load balancer directing traffic to multiple web servers based on IP addresses.

upstream backend {
    ip_hash;
    server 10.10.0.101:80;
    server 10.10.0.102:80;
    server 10.10.0.103:80;
}

server {
    listen 80;
    server_name example.com www.example.com;

    location / {
        proxy_pass http://backend;
    }
}

Warning

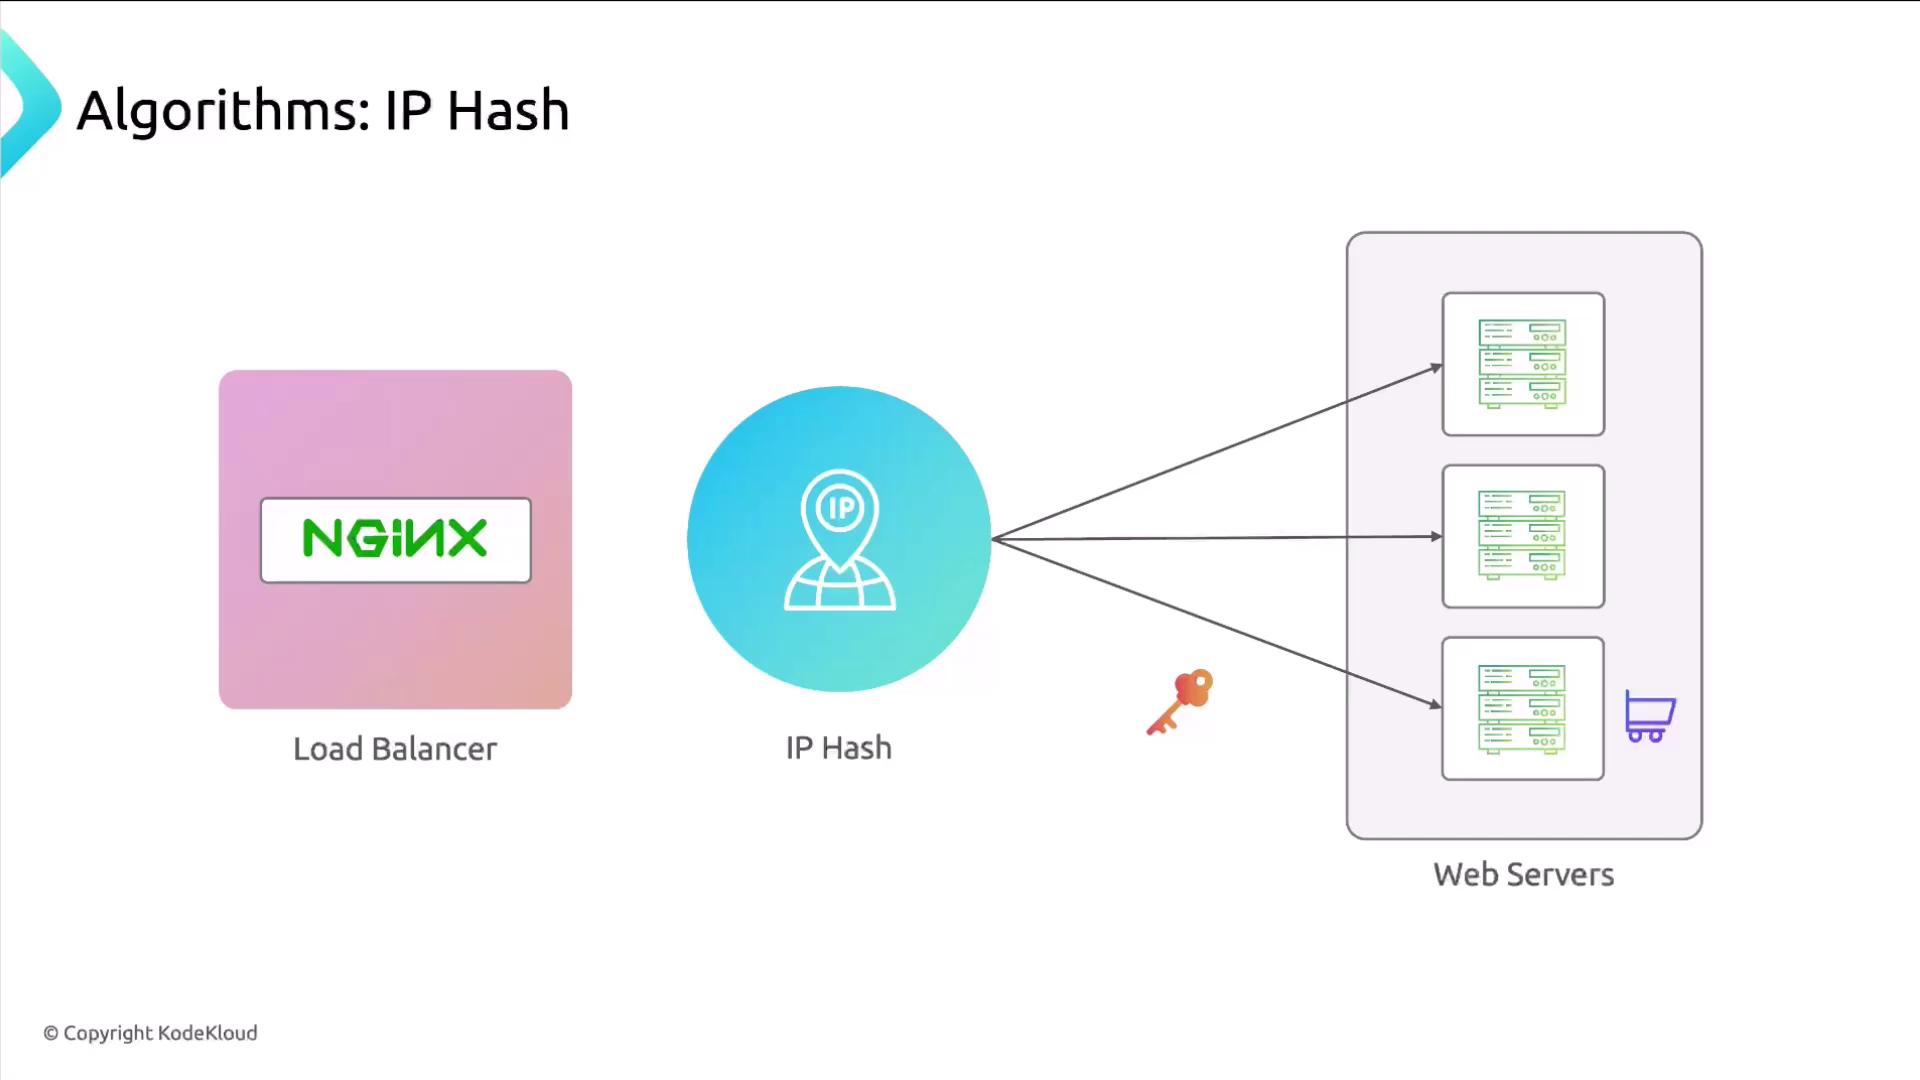
Sticky sessions can lead to uneven load if some clients generate more traffic. Use only when backend-level session sharing isn’t an option.

4. Least Connections

Routes each new request to the server with the fewest active connections—ideal for dynamic workloads.

The image illustrates a load balancing algorithm called "Least Connection" using NGINX, showing how connections are distributed to web servers based on the number of active connections.

upstream backend {
    least_conn;
    server 10.10.0.101:80;
    server 10.10.0.102:80;
    server 10.10.0.103:80;
}

server {
    listen 80;
    server_name example.com www.example.com;

    location / {
        proxy_pass http://backend;
    }
}

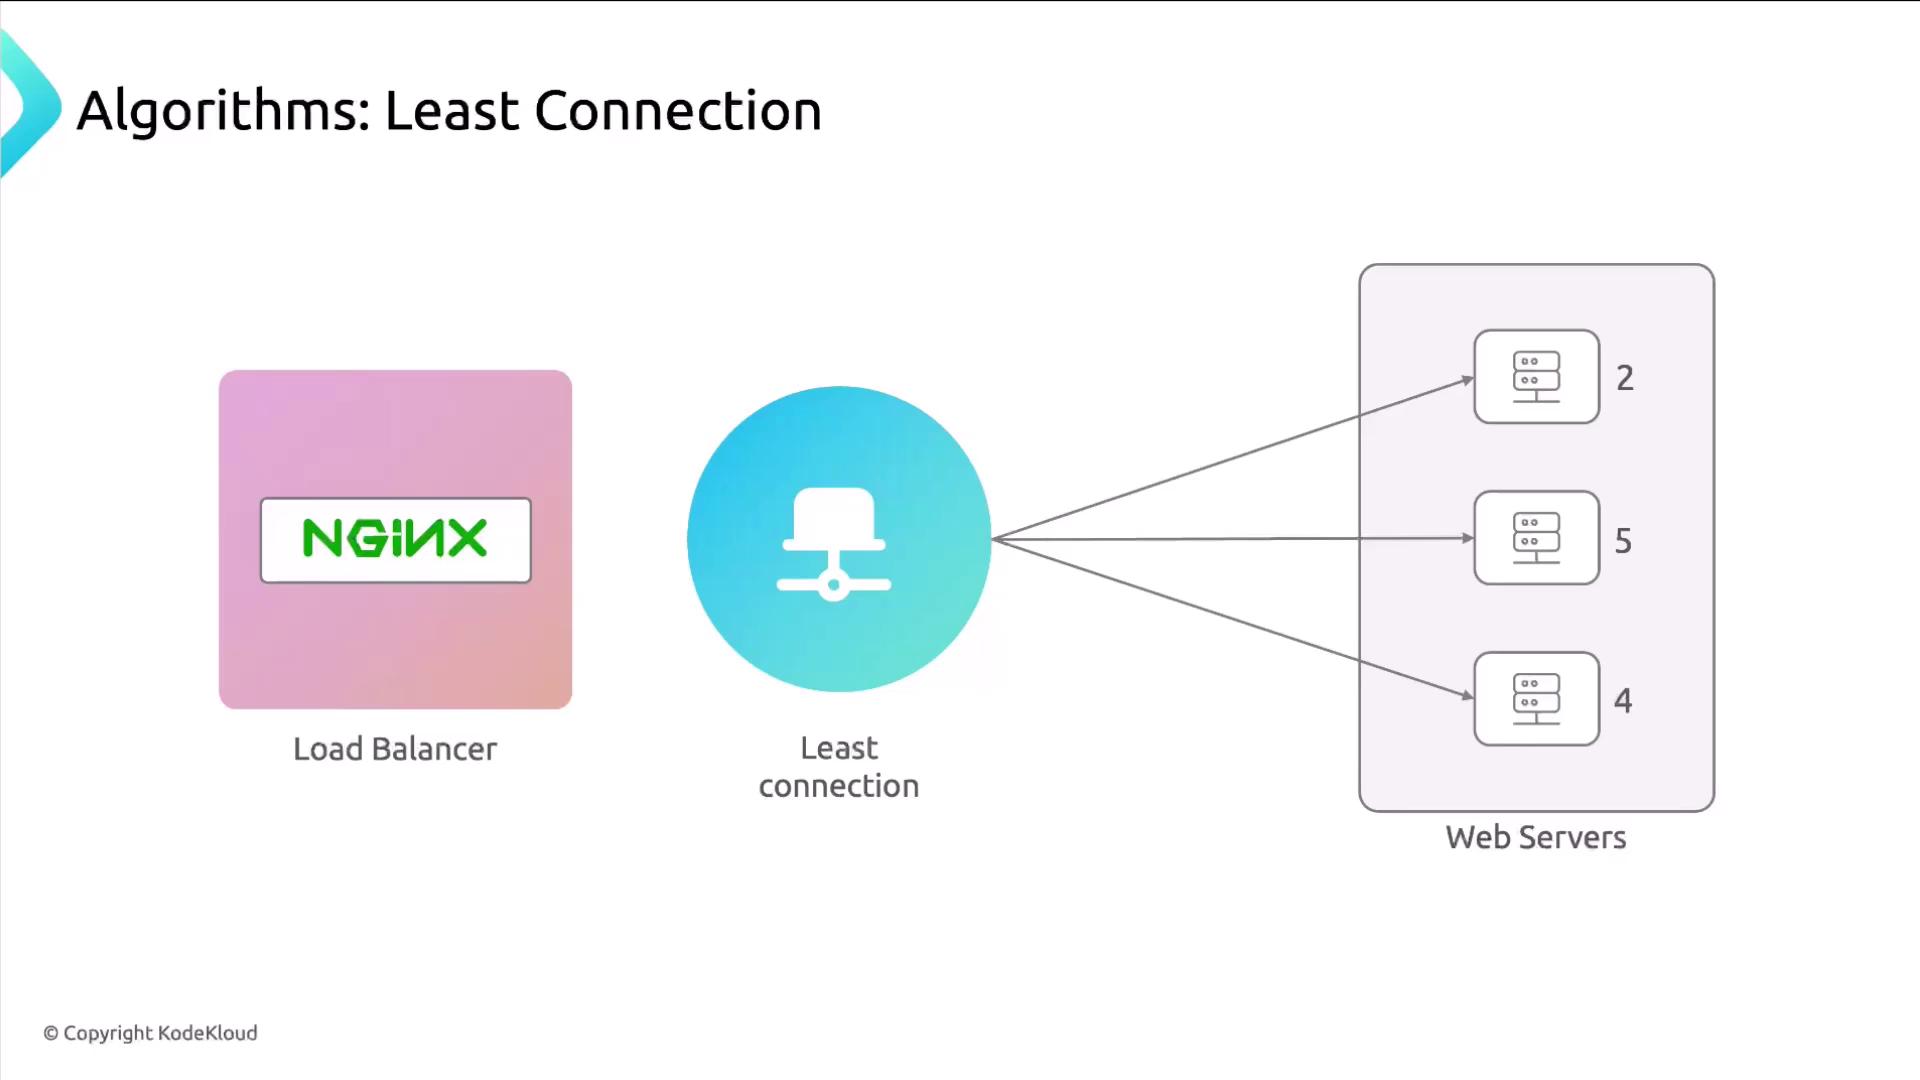
5. Least Time (NGINX Plus)

Selects the backend with the fastest response time—either time to first byte or last byte. This requires NGINX Plus.

upstream backend {
    least_time last_byte/header;
    server 10.10.0.101:80;
    server 10.10.0.102:80;
    server 10.10.0.103:80;
}

server {
    listen 80;
    server_name example.com www.example.com;

    location / {
        proxy_pass http://backend;
    }
}

References

Watch Video

Watch video content

Previous
Demo Configure URL Rewrite