GitHub Actions

Self Hosted Runner

Installing a Self Hosted Runner

This guide walks you through attaching a self-hosted runner directly to your GitHub repository. While organization- and enterprise-level runners are possible, this tutorial focuses on repository-level setup for Linux.

Refer to the official GitHub docs for detailed requirements, auto-scaling, limits, and best practices: Hosting your own runners.

The image shows a GitHub Docs page about self-hosted runners, explaining their use in GitHub Actions workflows. It includes navigation links and a detailed description of self-hosted runners.

1. Add a New Self-Hosted Runner in GitHub

  1. In your repository, go to SettingsActionsRunners.
  2. Click New self-hosted runner.
  3. Select Linux as the OS and x64 as the architecture. GitHub then displays the setup commands.

The image shows a GitHub repository page with details about branches, files, and a README section discussing GitHub Actions. The interface includes options for code management and repository settings.

Available Runner Platforms

Operating SystemArchitecture
Linuxx64
macOSx64, ARM
Windowsx64, ARM

2. Install the Runner on Your Linux VM

Open a terminal and execute:

# 1. Create and enter a directory for the runner
mkdir actions-runner && cd actions-runner

# 2. Download the latest runner package
curl -o actions-runner-linux-x64-2.310.2.tar.gz -L \
  https://github.com/actions/runner/releases/download/v2.310.2/actions-runner-linux-x64-2.310.2.tar.gz

# 3. (Optional) Verify checksum
echo "fb23a1c715ea0c501fa60beefcf295e26cfbbf849f3  actions-runner-linux-x64-2.310.2.tar.gz" \
  | sha256sum --check

# 4. Unpack the archive
tar xzf ./actions-runner-linux-x64-2.310.2.tar.gz

Note

Ensure your VM meets the runner requirements: at least 2 CPU cores, 8 GB RAM, and Docker if you plan on containerized jobs.

After extraction, verify the scripts:

ls
# bin  config.sh  env.sh  externals  run-helper.cmd.template \
# run-helper.sh.template  run.sh  safe_sleep.sh

3. Configure the Runner

Use the registration token provided in the GitHub UI:

./config.sh --url https://github.com/your-username/your-repo \
  --token YOUR_TOKEN_HERE

Warning

By default, running the runner as root is disabled for security. To override (at your own risk), export:

export RUNNER_ALLOW_RUNASROOT=1

Follow the interactive prompts:

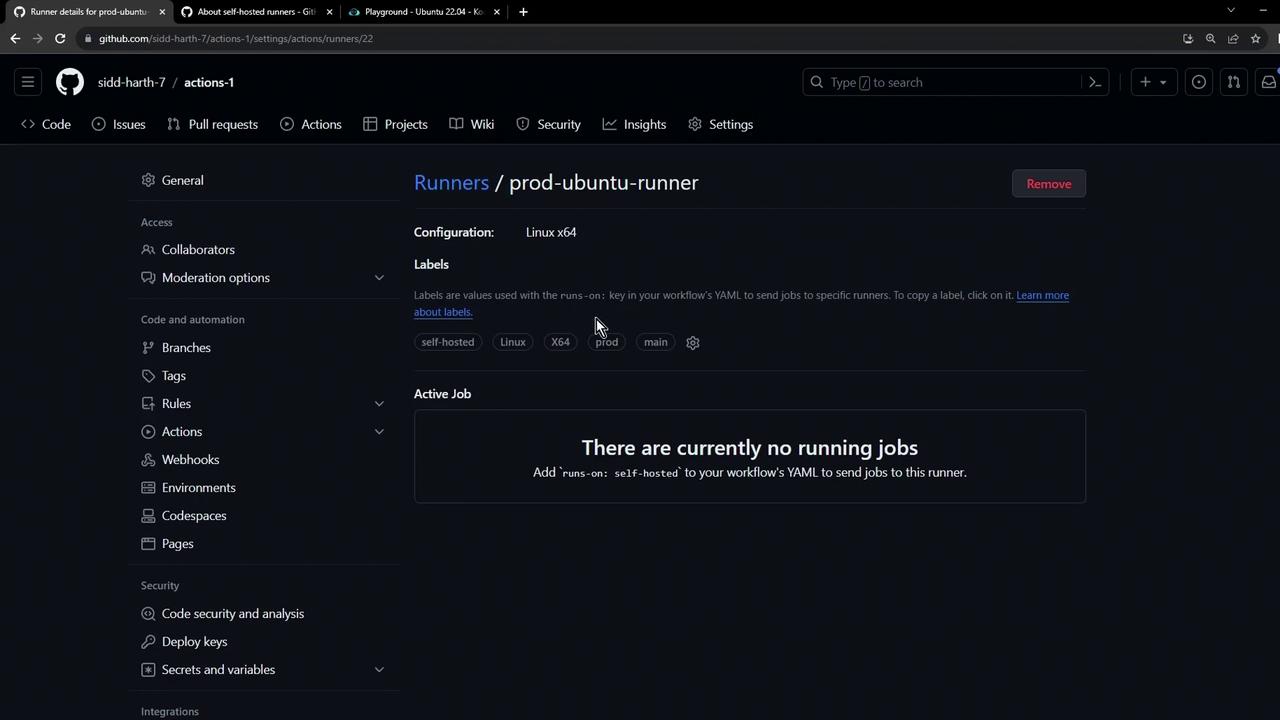
GitHub Actions self-hosted runner registration
✓ Connected to GitHub
Enter the name of runner group: [Default]
Enter name of runner: [press Enter for ubuntu-host] prod-ubuntu-runner
Labels: self-hosted, Linux, X64
Enter additional labels (comma-separated): [skip]
✓ Runner successfully added
✓ Runner connection is good
Enter work folder name: [press Enter for _work]

4. Verify the Runner in GitHub

Return to SettingsActionsRunners and refresh. You should see prod-ubuntu-runner listed (initially offline):

The image shows a GitHub Actions runner configuration page for a "prod-ubuntu-runner" with no active jobs running. It displays labels such as "self-hosted," "Linux," and "X64."

5. Start the Runner

Launch the runner process:

./run.sh

Sample output:

Current runner version: '2.310.2'
2023-10-24 14:51:44Z: Listening for Jobs

After a moment, refresh the GitHub Runners page—it should display online and idle, ready to accept jobs.


Watch Video

Watch video content

Previous
Types of Runners