AWS Solutions Architect Associate Certification

Services Security

Demo Setting up CloudTrail for the first time

In this lesson, we demonstrate how to work with AWS CloudTrail effectively. You will learn how to view the past 90 days of events, create a CloudTrail trail to store and forward logs, and review detailed log records in both Amazon S3 and CloudWatch.

Viewing CloudTrail Events

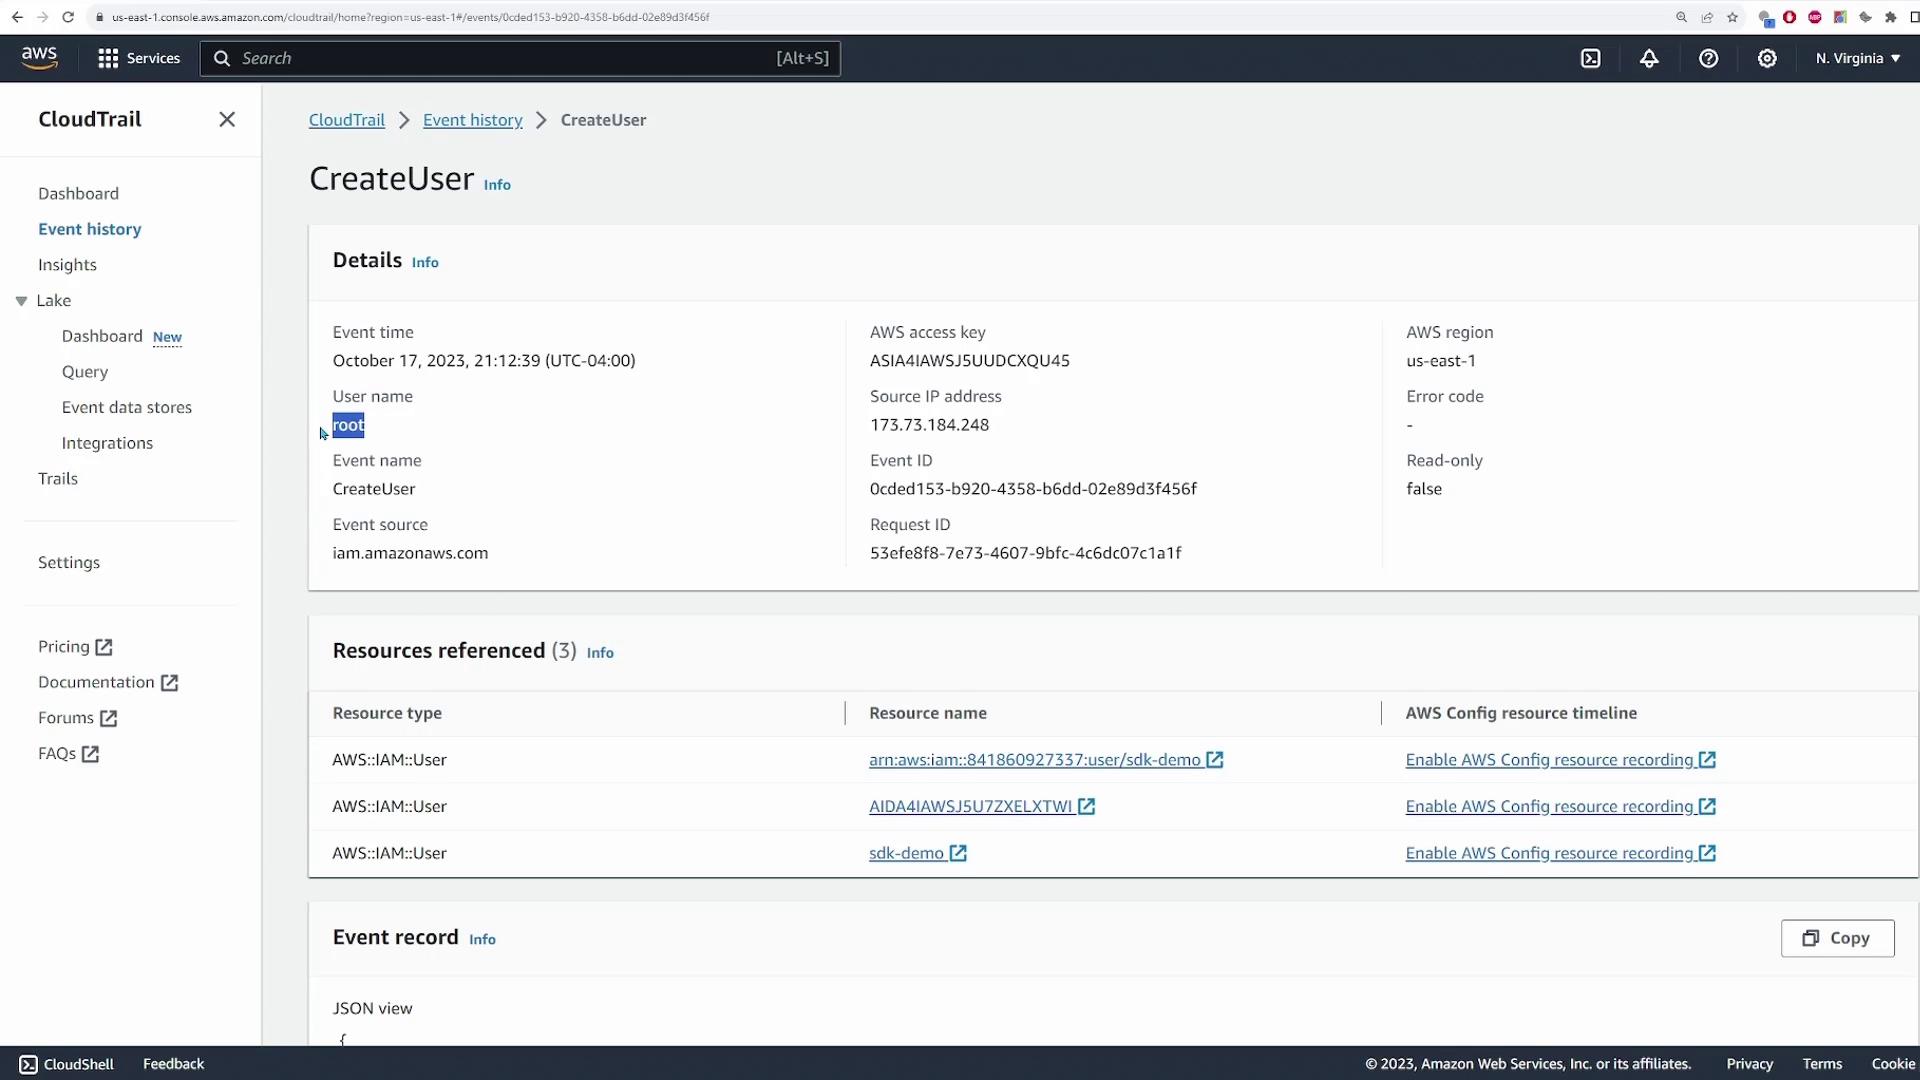
To begin, search for the CloudTrail service in the AWS Console. Once in the CloudTrail dashboard, click on Event History to view recent events. For example, selecting a "CreateUser" event lets you examine critical details such as the event time, the user who initiated the action, the event type, the source IP address, and the access key used.
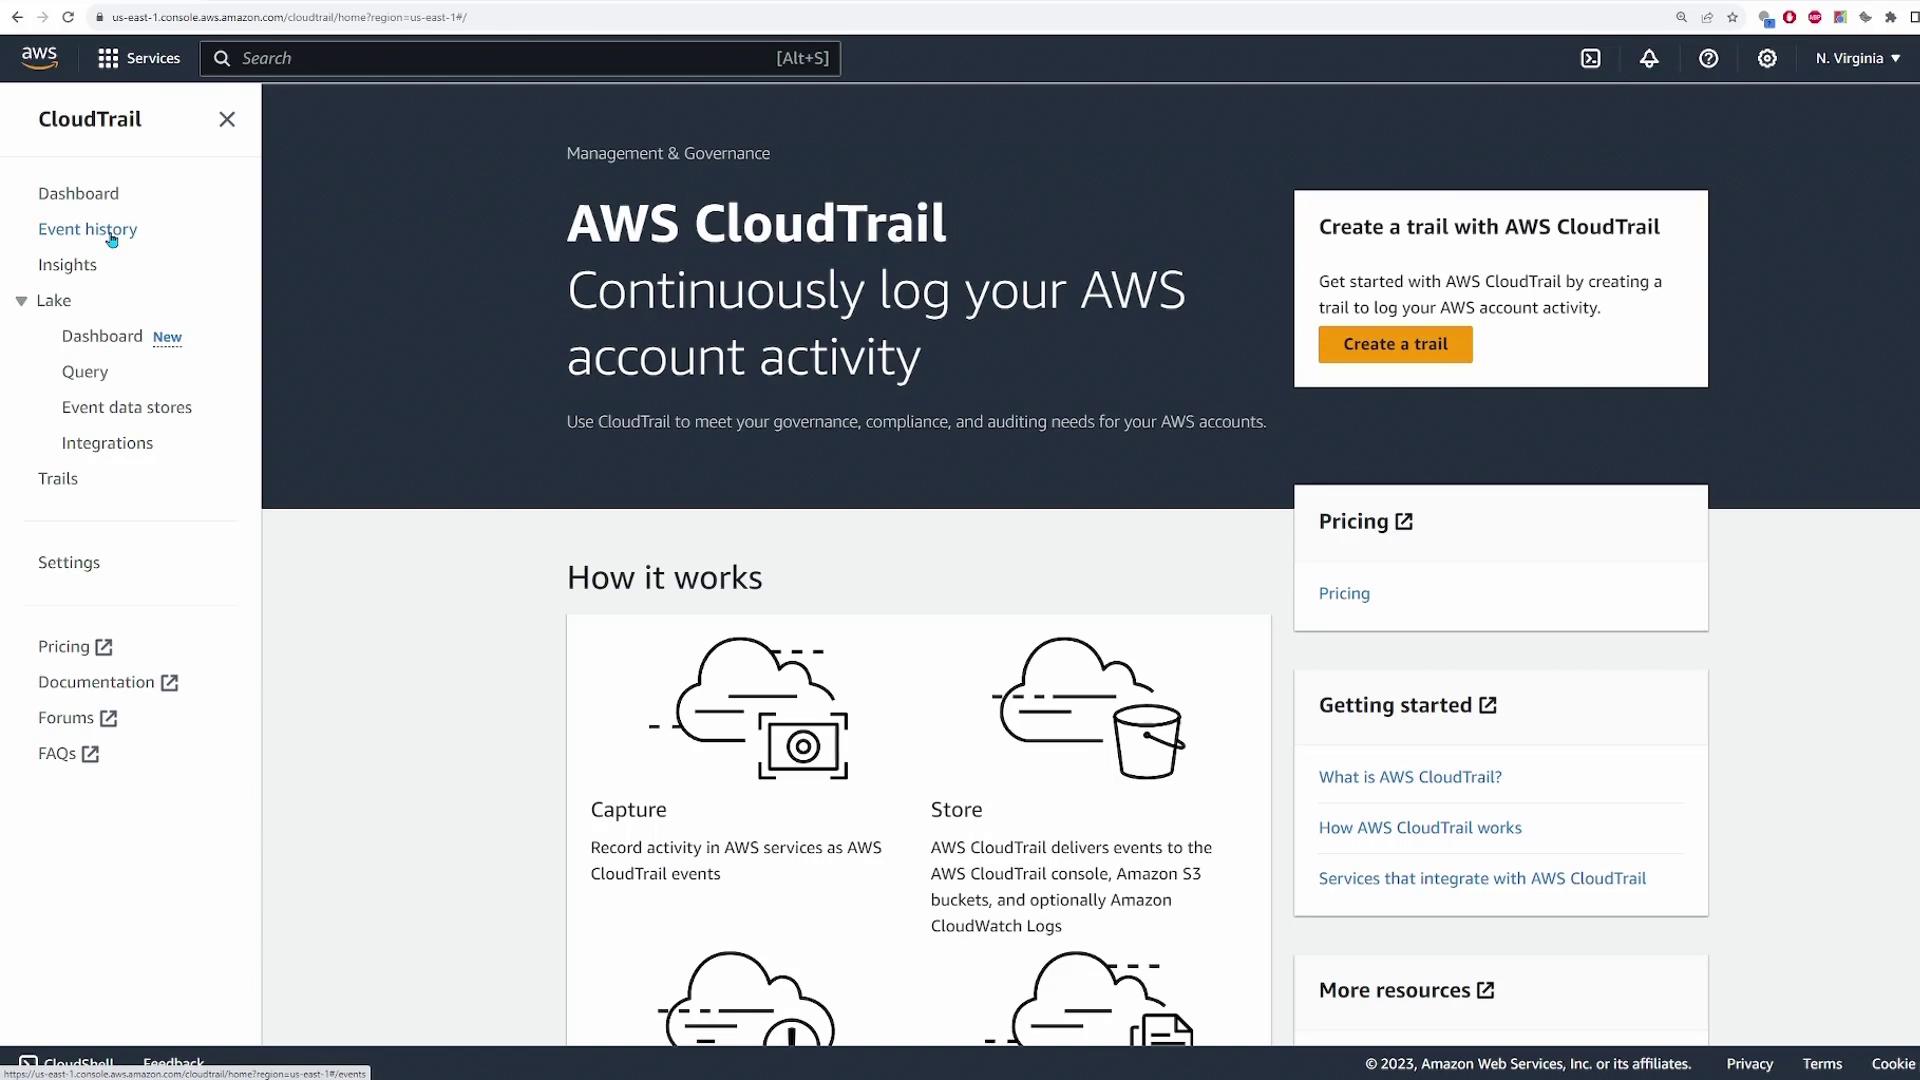
The image shows the AWS CloudTrail dashboard, highlighting features for logging AWS account activity and providing options to create a trail, view pricing, and access resources.

Expanding a specific event (like the "CreateUser" event) provides a detailed view that includes:

  • User identity
  • Event time
  • Action details
  • Event metadata

The image shows an AWS CloudTrail event details page for a "CreateUser" action, displaying information such as event time, user name, AWS region, and resources referenced.

You also have the option to view the event record in JSON format. Consider the following example of a CloudTrail event for a user creation action:

{
  "eventVersion": "1.08",
  "userIdentity": {
    "type": "Root",
    "principalId": "841860927337",
    "arn": "arn:aws:iam::841860927337:root",
    "accountId": "841860927337",
    "accessKeyId": "ASIAIAAWSJ5UUDCXQU45",
    "sessionContext": {
      "sessionIssuer": {},
      "webIdFederationData": {},
      "attributes": {
        "creationDate": "2023-10-18T00:46:36Z",
        "mfaAuthenticated": "true"
      }
    }
  },
  "eventTime": "2023-10-18T01:12:39Z",
  "eventSource": "iam.amazonaws.com",
  "eventName": "CreateUser",
  "awsRegion": "us-east-1",
  "sourceIPAddress": "173.73.184.248",
  "userAgent": "AWS Internal",
  "requestParameters": {
    "userName": "sdk-demo"
  }
}

Note

CloudTrail by default displays events for the past 90 days. For long-term log storage or integration with services like Amazon S3 and CloudWatch, you must create and configure a CloudTrail trail.

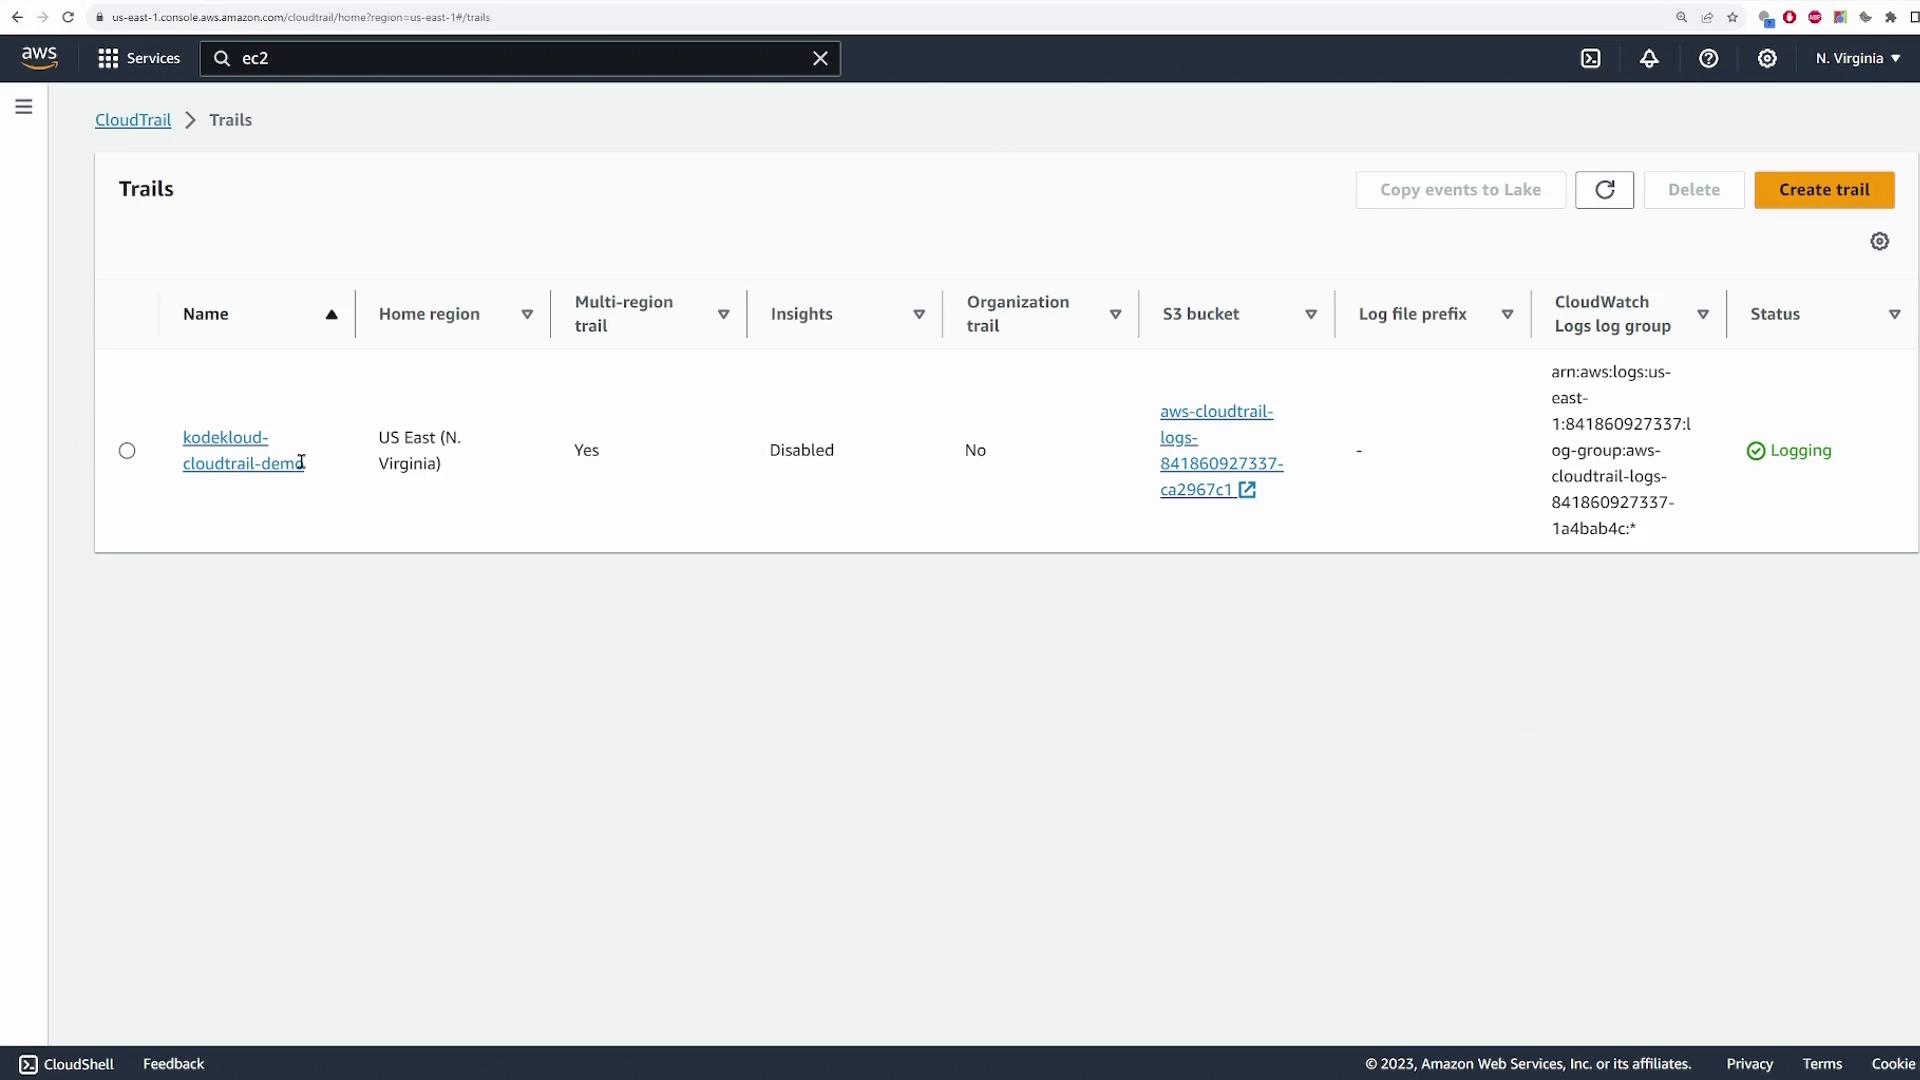
Setting Up a CloudTrail Trail

To extend the log retention period and enable additional integrations, follow these steps to set up a CloudTrail trail:

  1. Create a New Trail:
    Click on Create trail in the CloudTrail dashboard.

  2. Name Your Trail:
    Enter a trail name (for example, "KodeKloud CloudTrail demo").

  3. Select Event Sources:
    By default, the trail captures events from all regions in your account.
    (If you wish to capture events from all accounts or your organization, select the appropriate option. In this demo, the organization option is not configured.)

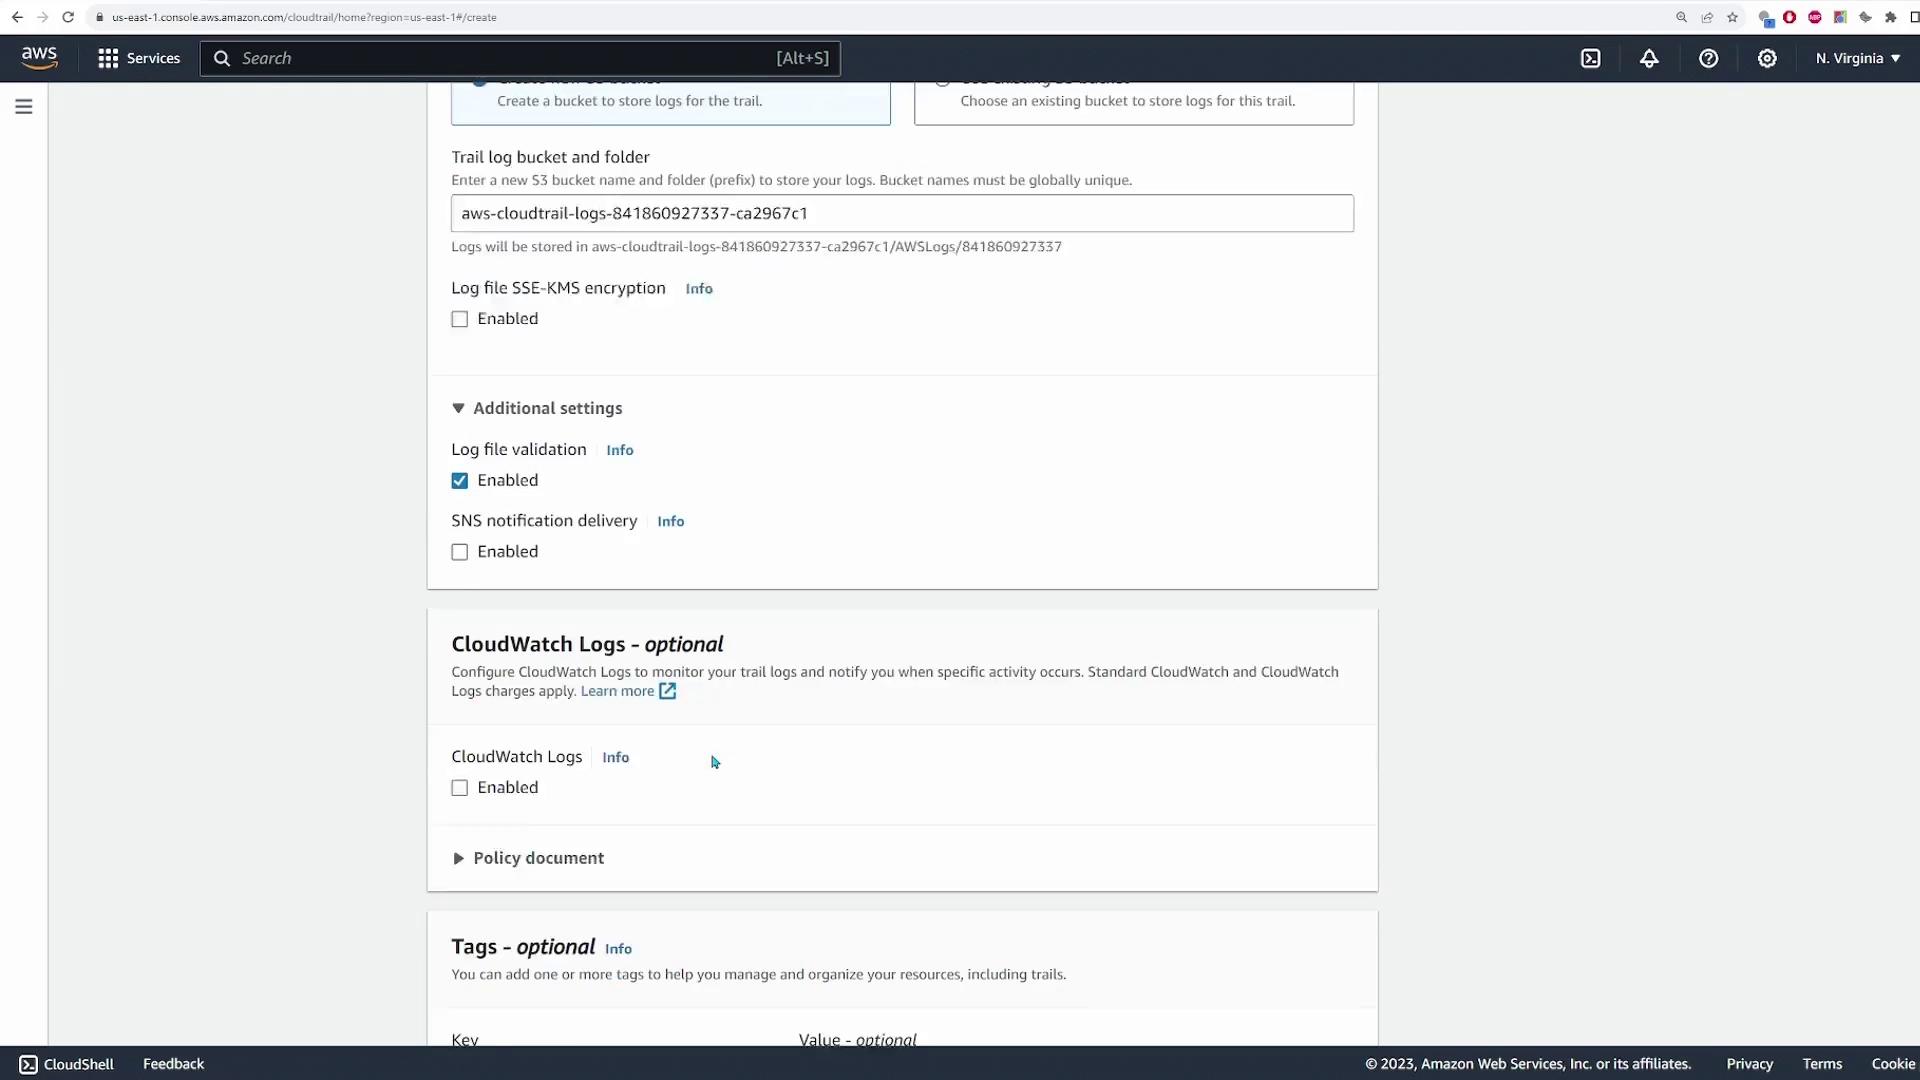
  4. Configure Storage Settings:
    Choose a storage location by either creating a new S3 bucket or selecting an existing one. A new bucket will be created with the suggested name unless renamed.

  5. Optional Encryption:
    Enable encryption for your log files if required. In this demo, encryption remains disabled.

  6. Enable Log File Validation:
    Decide whether to enable this feature to detect any modifications or deletions of log files.

  7. SNS Notifications (Optional):
    Optionally, set up SNS notifications for new CloudTrail events or log file deliveries. This is disabled in the demo.

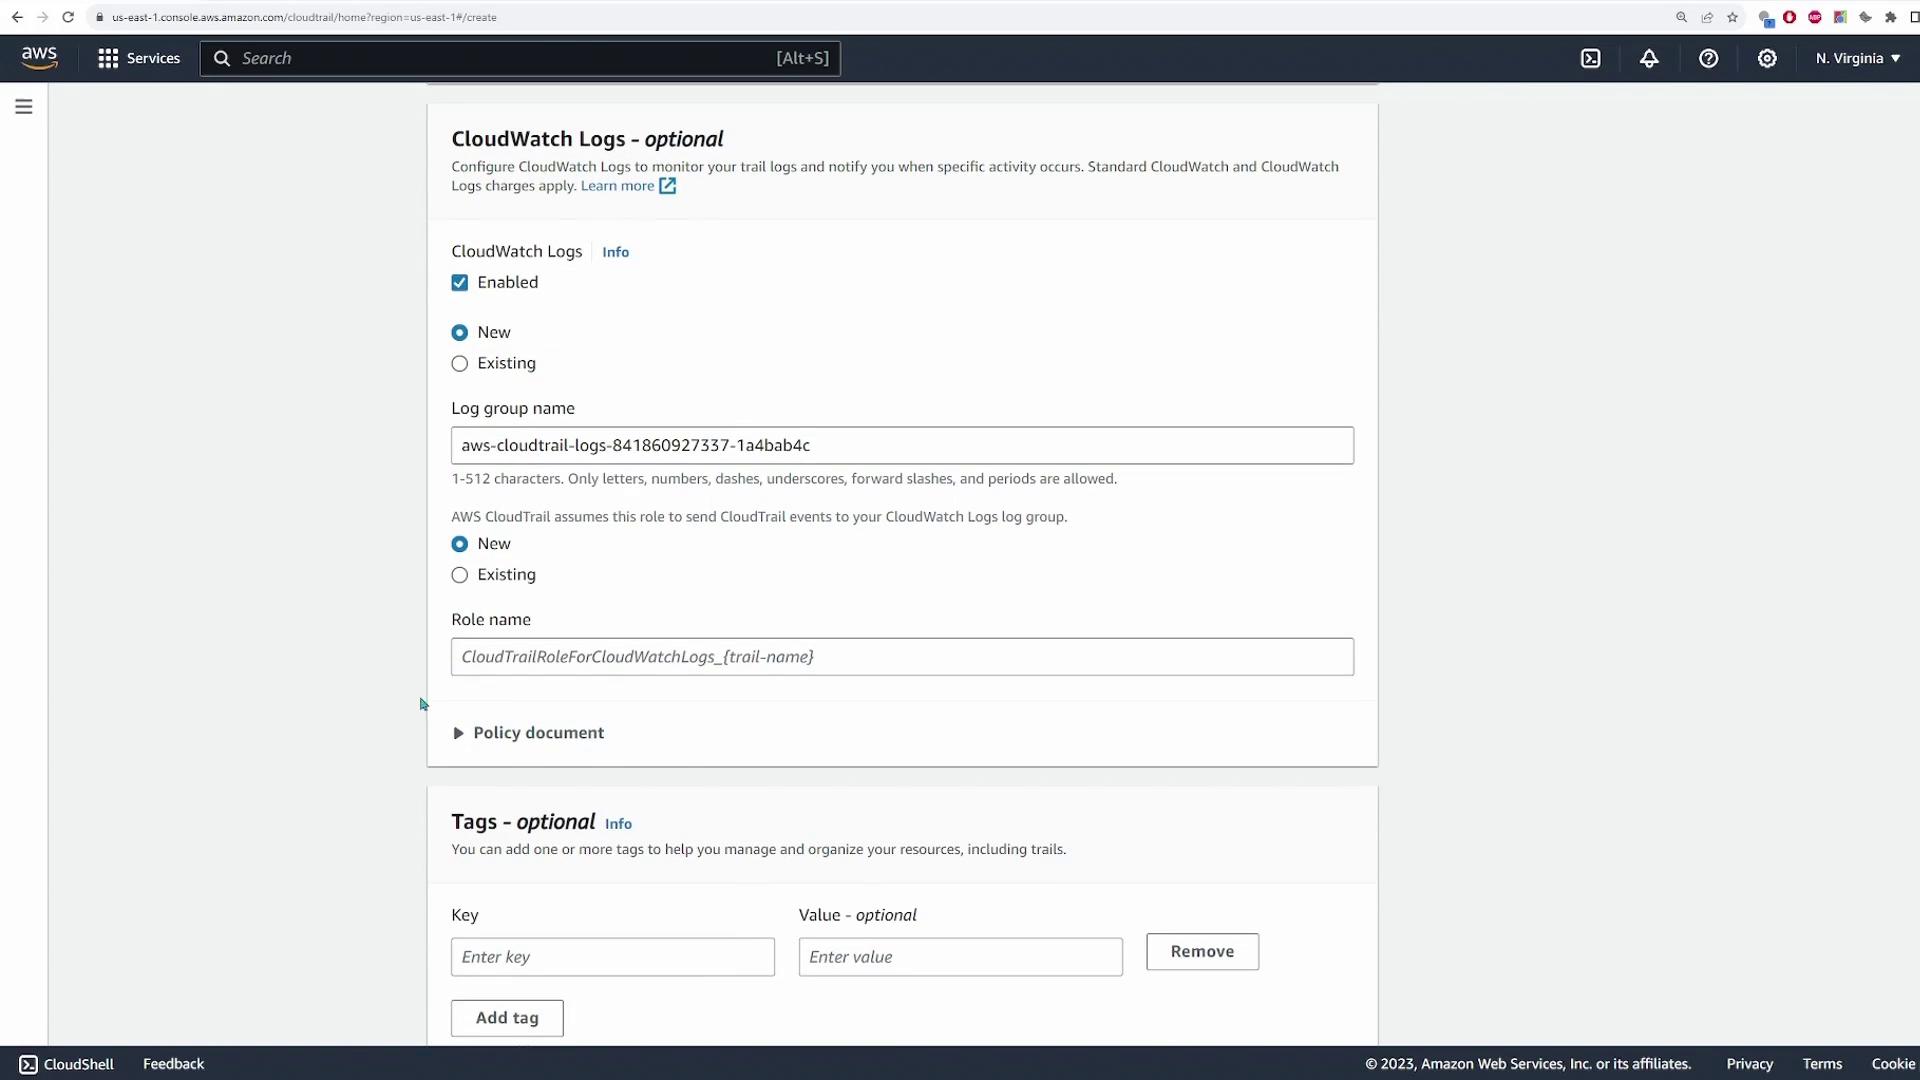
  8. Forward Logs to CloudWatch:
    Enable the CloudWatch logs option. You can create a new log group or select an existing one. In this demonstration, the option "Create new log group" is selected with default configurations.

  9. Configure IAM Role for CloudWatch:
    Set up a role to grant CloudTrail permissions to forward logs to CloudWatch. Choose New and leave the default configuration. When prompted, assign a role name (e.g., "CloudTrail CloudWatch role").

  10. Specify Event Types:
    By default, management events are selected. Although you have the option to log data and insight events, these are left unchecked in this demo.

The image shows an AWS CloudTrail setup screen where users can choose trail attributes, including naming the trail, enabling it for all accounts, and selecting an S3 bucket for log storage. Options for encryption and KMS alias are also visible.

The image shows a section of the AWS CloudTrail setup interface, where log settings and options like log file validation and CloudWatch Logs are configured.

The image shows an AWS CloudTrail configuration screen for setting up CloudWatch Logs, with options to enable logs, specify a log group name, and add tags.

After reviewing your configuration, create the trail. Once the trail is active, navigate to your selected S3 bucket to view the stored log files.

The image shows an AWS CloudTrail console with a trail named "kodekloud-cloudtrail-demo" in the US East (N. Virginia) region, indicating that logging is enabled.

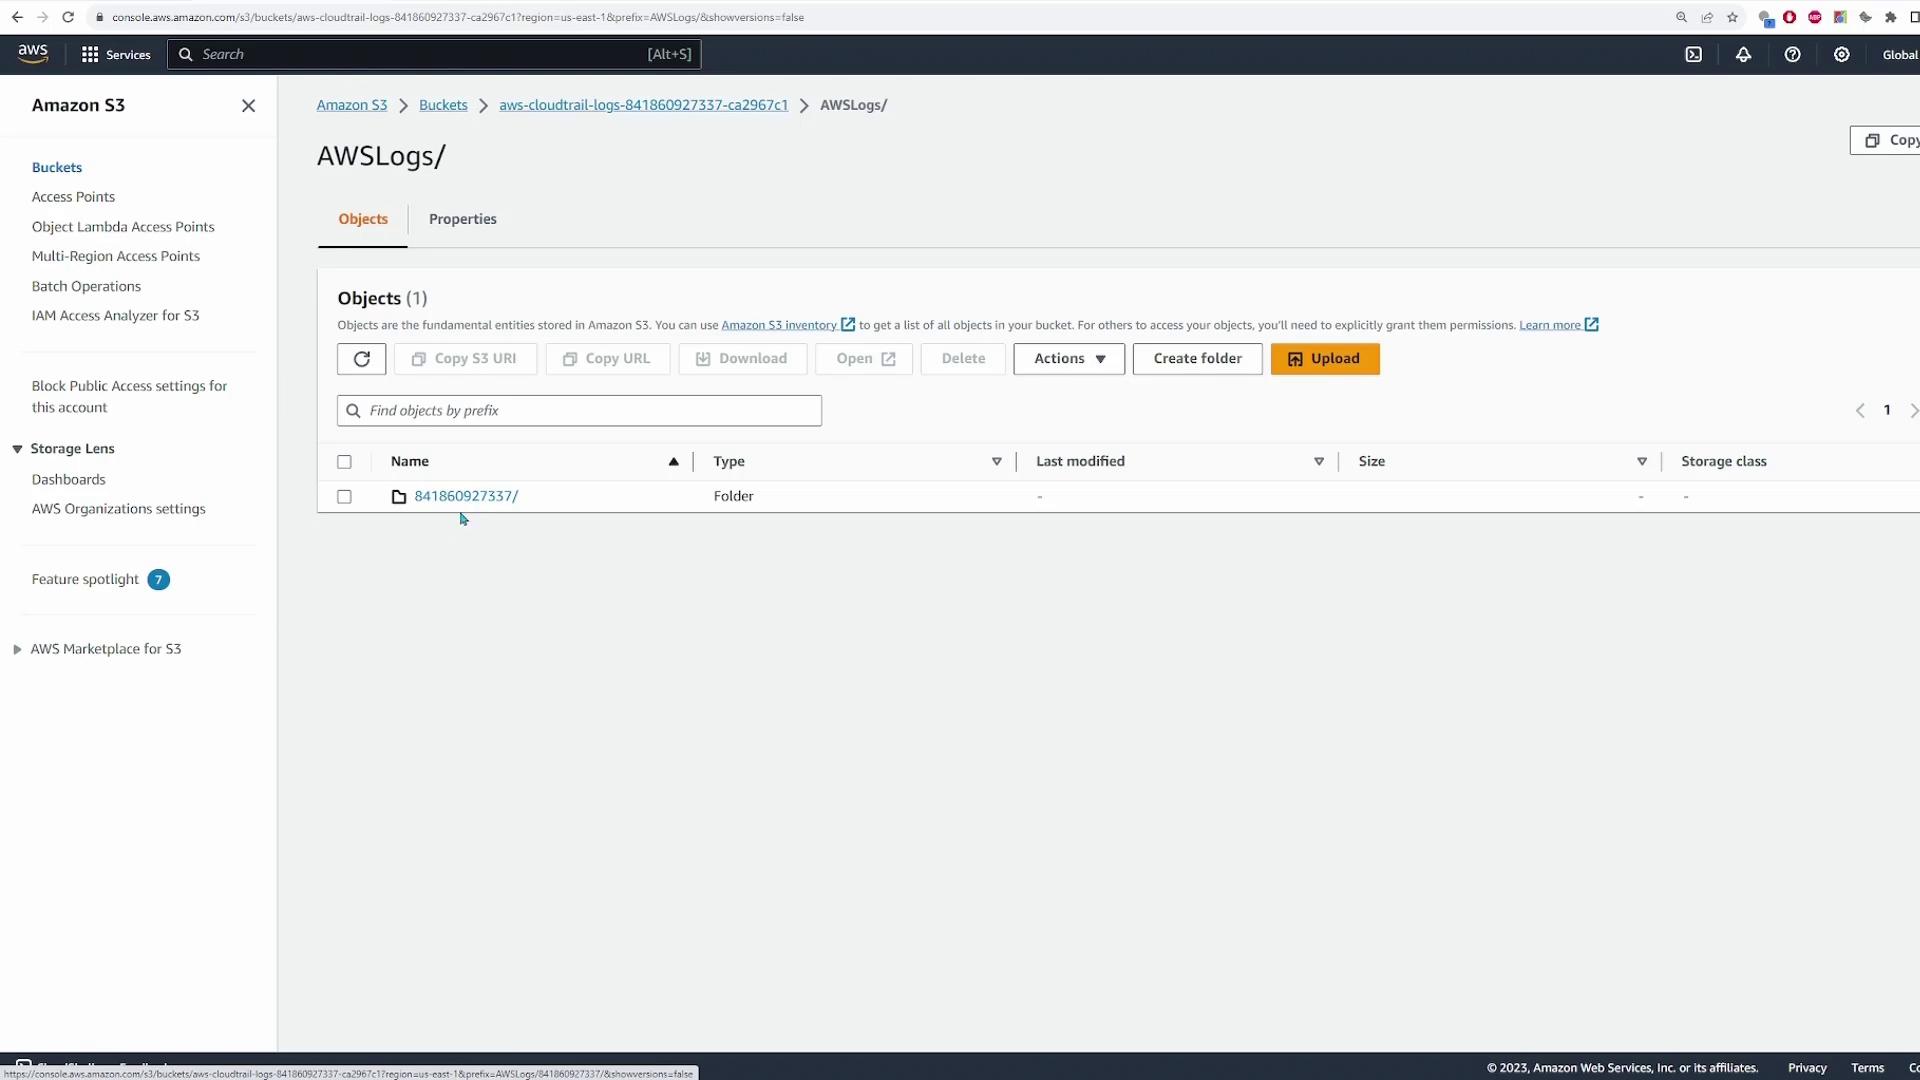
Exploring Logs in Amazon S3

When you follow the link provided in the CloudTrail console, you will be directed to the corresponding path within your S3 bucket. Inside the bucket:

  • You will see an "AWSLogs" folder.
  • Inside "AWSLogs", there is a folder corresponding to your account ID (for example, "841860927337").
  • Within your account ID folder, open the "CloudTrail" folder.
  • Logs are organized into sub-folders by region (in this demo, only "us-east-1" is present), then by year, month, and date.

The image shows an Amazon S3 console with a bucket named "AWSLogs" containing a folder labeled "841860927337/". The interface displays options for managing objects, such as creating folders and uploading files.

Inside the appropriate date folder, you will find JSON log files. Opening a JSON file in a new browser tab displays the raw log data. Since JSON may appear unformatted, you can copy and paste the data into a JSON viewer tool (e.g., JSON Viewer) to enhance readability.

The image shows an Amazon S3 console with a list of objects in a bucket, displaying one JSON file with details like name, type, last modified date, and size.

For instance, the following JSON snippet is an event record for a "CreateRole" action stored in the S3 bucket:

{
  "eventVersion": "1.08",
  "userIdentity": {
    "type": "Root",
    "principalId": "841860927337",
    "arn": "arn:aws:iam::841860927337:root",
    "accountId": "841860927337",
    "accessKeyId": "ASIAIAJW5J5USLDMR7RZ",
    "sessionContext": {},
    "sessionIssuer": {},
    "webIdFederationData": {},
    "attributes": {
      "creationDate": "2023-10-21T17:04:29Z",
      "mfaAuthenticated": "true"
    }
  },
  "eventTime": "2023-10-21T17:13:23Z",
  "eventSource": "iam.amazonaws.com",
  "eventName": "CreateRole",
  "awsRegion": "us-east-1",
  "sourceIPAddress": "173.73.184.248",
  "userAgent": "Coral/Jakarta",
  "requestParameters": {
    "path": "/service-role/",
    "roleName": "Cloudtrail-cloudwatch-role",
    "assumeRolePolicyDocument": "{\n  \"Version\": \"2012-10-17\",\n  \"Statement\": [\n    {\n      \"Effect\": \"Allow\",\n      \"Principal\": {\n        \"Service\": \"cloudtrail.amazonaws.com\"\n      },\n      \"Action\": \"sts:AssumeRole\"\n    }\n  ]\n}"
  }
}

Storing logs in an S3 bucket guarantees that your logs are retained beyond the default 90-day retention period.

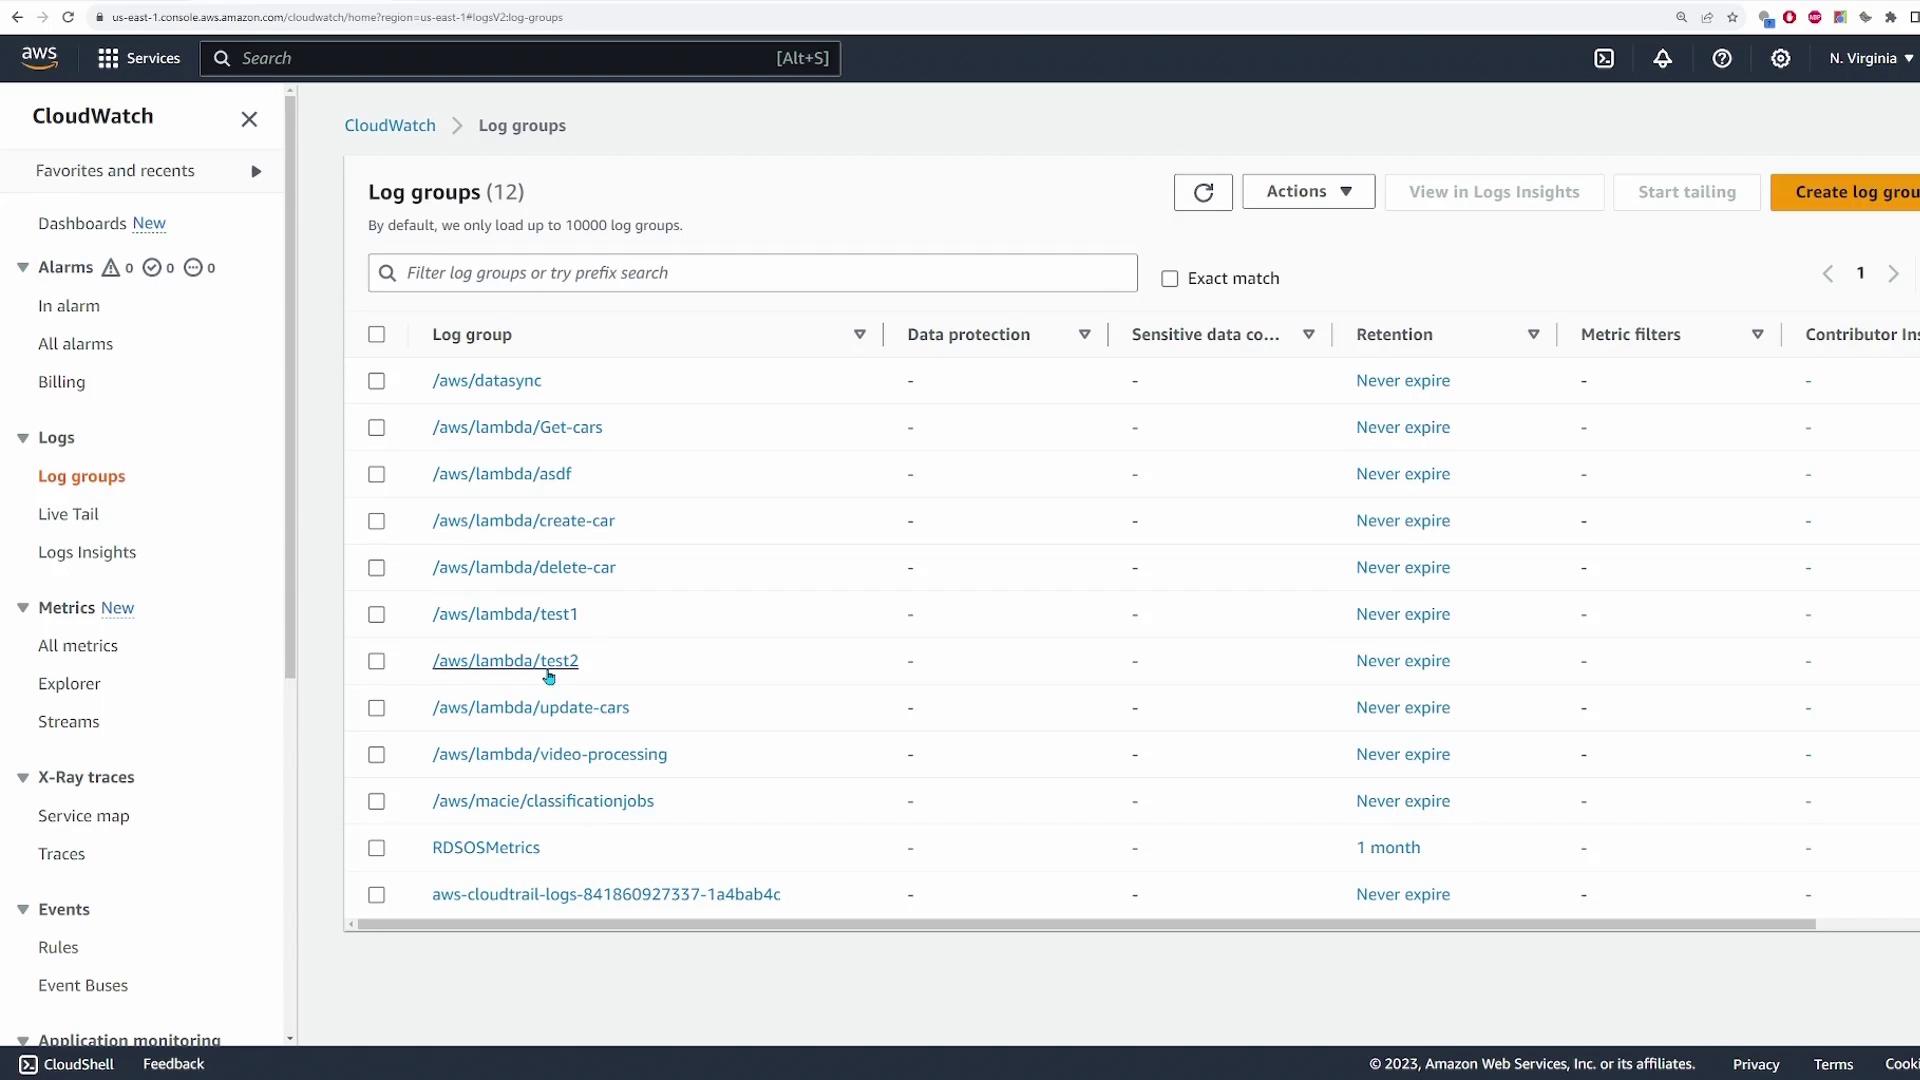
Monitoring with CloudWatch

Next, let’s review how CloudTrail logs are forwarded to CloudWatch for real-time monitoring. To access CloudWatch logs:

  1. Search for the CloudWatch service in the AWS Console.
  2. Navigate to Log Groups.
    Here, you will find a log group that contains all the forwarded CloudTrail logs.
  3. Click on a log stream within the group to see the events in a structured JSON format.

The image shows the AWS CloudWatch console displaying a list of log groups, each with details like retention settings.

Below is an example of a CloudTrail event forwarded to CloudWatch:

{
  "eventVersion": "1.08",
  "userIdentity": {
    "type": "Root",
    "principalId": "841869297337",
    "arn": "arn:aws:iam::841869297337:root",
    "accountId": "841869297337",
    "accessKeyId": "ASIA...",
    "sessionContext": {
      "sessionIssuer": {},
      "webIdFederationData": {},
      "attributes": {
        "creationDate": "2023-10-21T17:04:29Z",
        "mfaAuthenticated": "true"
      }
    }
  },
  "eventTime": "2023-10-21T17:19:44Z",
  "eventSource": "notifications.amazonaws.com",
  "eventName": "ListNotificationHubs",
  "awsRegion": "us-east-1",
  "sourceIPAddress": "173.73.184.248",
  "userAgent": "Mozilla/5.0 (Windows NT 10.0; Win64; x64) AppleWebKit/537.36 (KHTML, like Gecko) Chrome/118.0.0.0 Safari/537.36",
  "requestParameters": null,
  "responseElements": null,
  "eventID": "7dcad2c4-c99a-42c2-3c2e3c1f81a",
  "readOnly": true,
  "eventType": "AwsApiCall",
  "managementEvent": true,
  "recipientAccountId": "841869297337",
  "eventCategory": "Management"
}

With CloudTrail integrated to store logs in Amazon S3 and forward them to CloudWatch, you gain both the long-term data retention you need and the ability to monitor changes in real time.

Conclusion

In this demonstration, you learned how to:

  • View recent CloudTrail events in the AWS Console,
  • Set up a CloudTrail trail to extend log retention and enable integration with S3 and CloudWatch,
  • Navigate the S3 bucket structure to locate JSON log files,
  • Use CloudWatch to monitor real-time events.

Pro Tip:

For further reading on AWS CloudTrail and its integration with other AWS services, visit the AWS CloudTrail Documentation and explore related tutorials on AWS Blogs.

Enjoy exploring AWS CloudTrail to enhance the security and monitoring of your AWS account!

Watch Video

Watch video content

Previous
CloudTrail
Next
Config