This guide demonstrates how to deploy a managed PostgreSQL instance on Amazon RDS so AWS handles database infrastructure (patching, backups, and underlying compute). Follow the console workflow below to create, connect to, and manage an RDS instance. Recommendations and best practices are included throughout.

Overview

Amazon RDS provides managed relational databases (PostgreSQL, MySQL, MariaDB, Oracle, SQL Server, and Aurora). Using RDS lets you focus on your application while AWS manages backups, software patching, automatic failure detection, and recovery.

Create a database (AWS Console)

  1. Open the AWS Management Console, search for “RDS”, and choose Create database.
  2. Choose a creation method:
    • Standard create — configure all options manually (recommended for learning and production).
    • Easy create — uses defaults for a quick start.
For this walkthrough we use Standard create so you can see the available options.
A screenshot of the AWS Management Console showing the RDS "Create database" page with options to choose a creation method (Standard or Easy) and engine type. The lower section displays selectable database engines (Aurora, MySQL, MariaDB, PostgreSQL, Oracle, etc.) with icons and radio buttons.

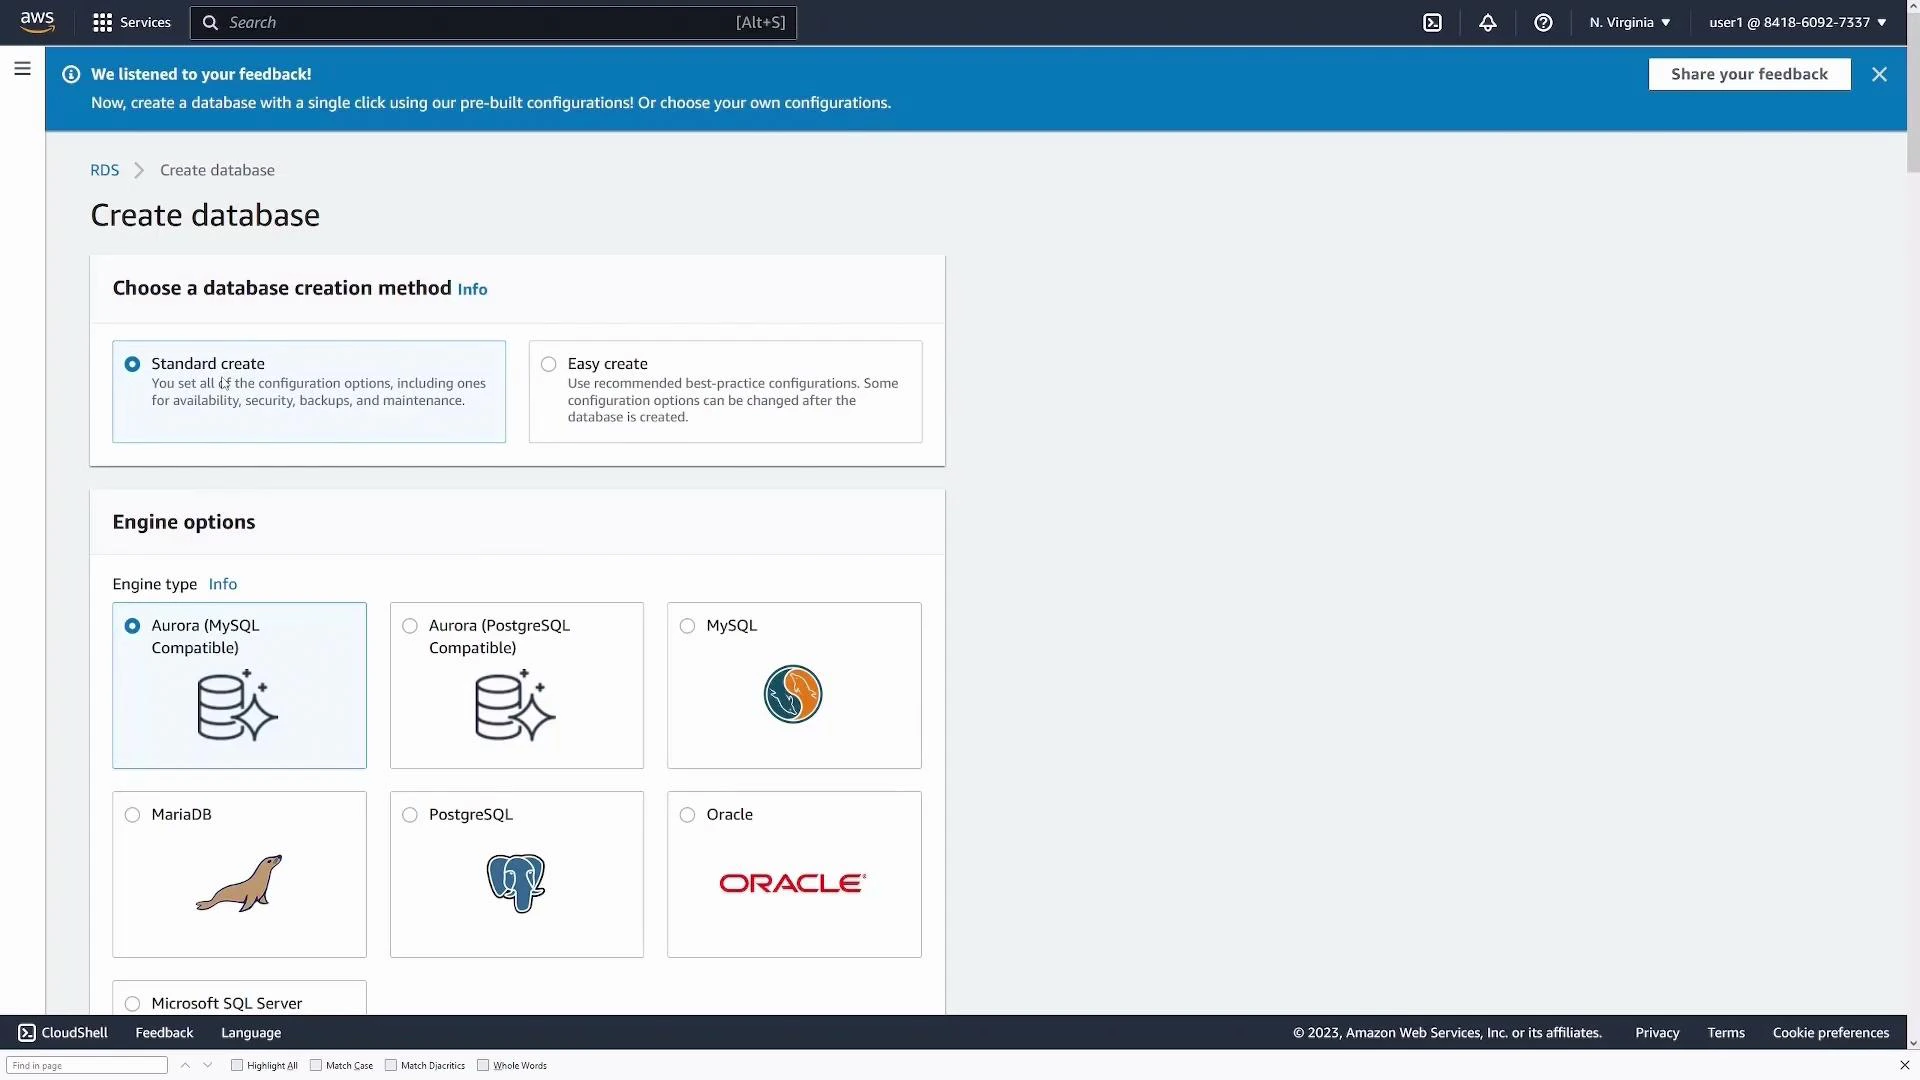
Select engine and version

Under Engine type, pick the database engine you want (this guide uses PostgreSQL). The console shows recommended versions by default — choose one that matches your compatibility and features requirements.

Choose a template

Templates preconfigure sensible defaults for cost, availability, and resilience. Common template choices:
TemplateUse caseNotes
ProductionHigh availabilityEnables settings like Multi‑AZ, stronger defaults for backups and monitoring
Dev/TestDevelopment and testingLower cost, single instance often sufficient
Free tier (if available)Trial or learningLimited resources for eligible accounts
For this demo choose Dev/Test.
A screenshot of the AWS RDS setup page showing the "Templates" section with "Dev/Test" selected and the "Availability and durability" options where "Single DB instance" is chosen. The page also shows a DB instance identifier set to "database-1" and a right-hand panel describing Aurora MySQL.
Decide on availability and durability: a single DB instance is fine for development; use Multi‑AZ for production to improve fault tolerance.

Instance identifier, credentials, and sizing

  • Set the DB instance identifier (example: my-first-db).
  • Provide a master username (Postgres default: postgres) and secure password, or let AWS generate one.
  • Choose the instance class (EC2 instance type that hosts the DB engine) suitable for your workload.
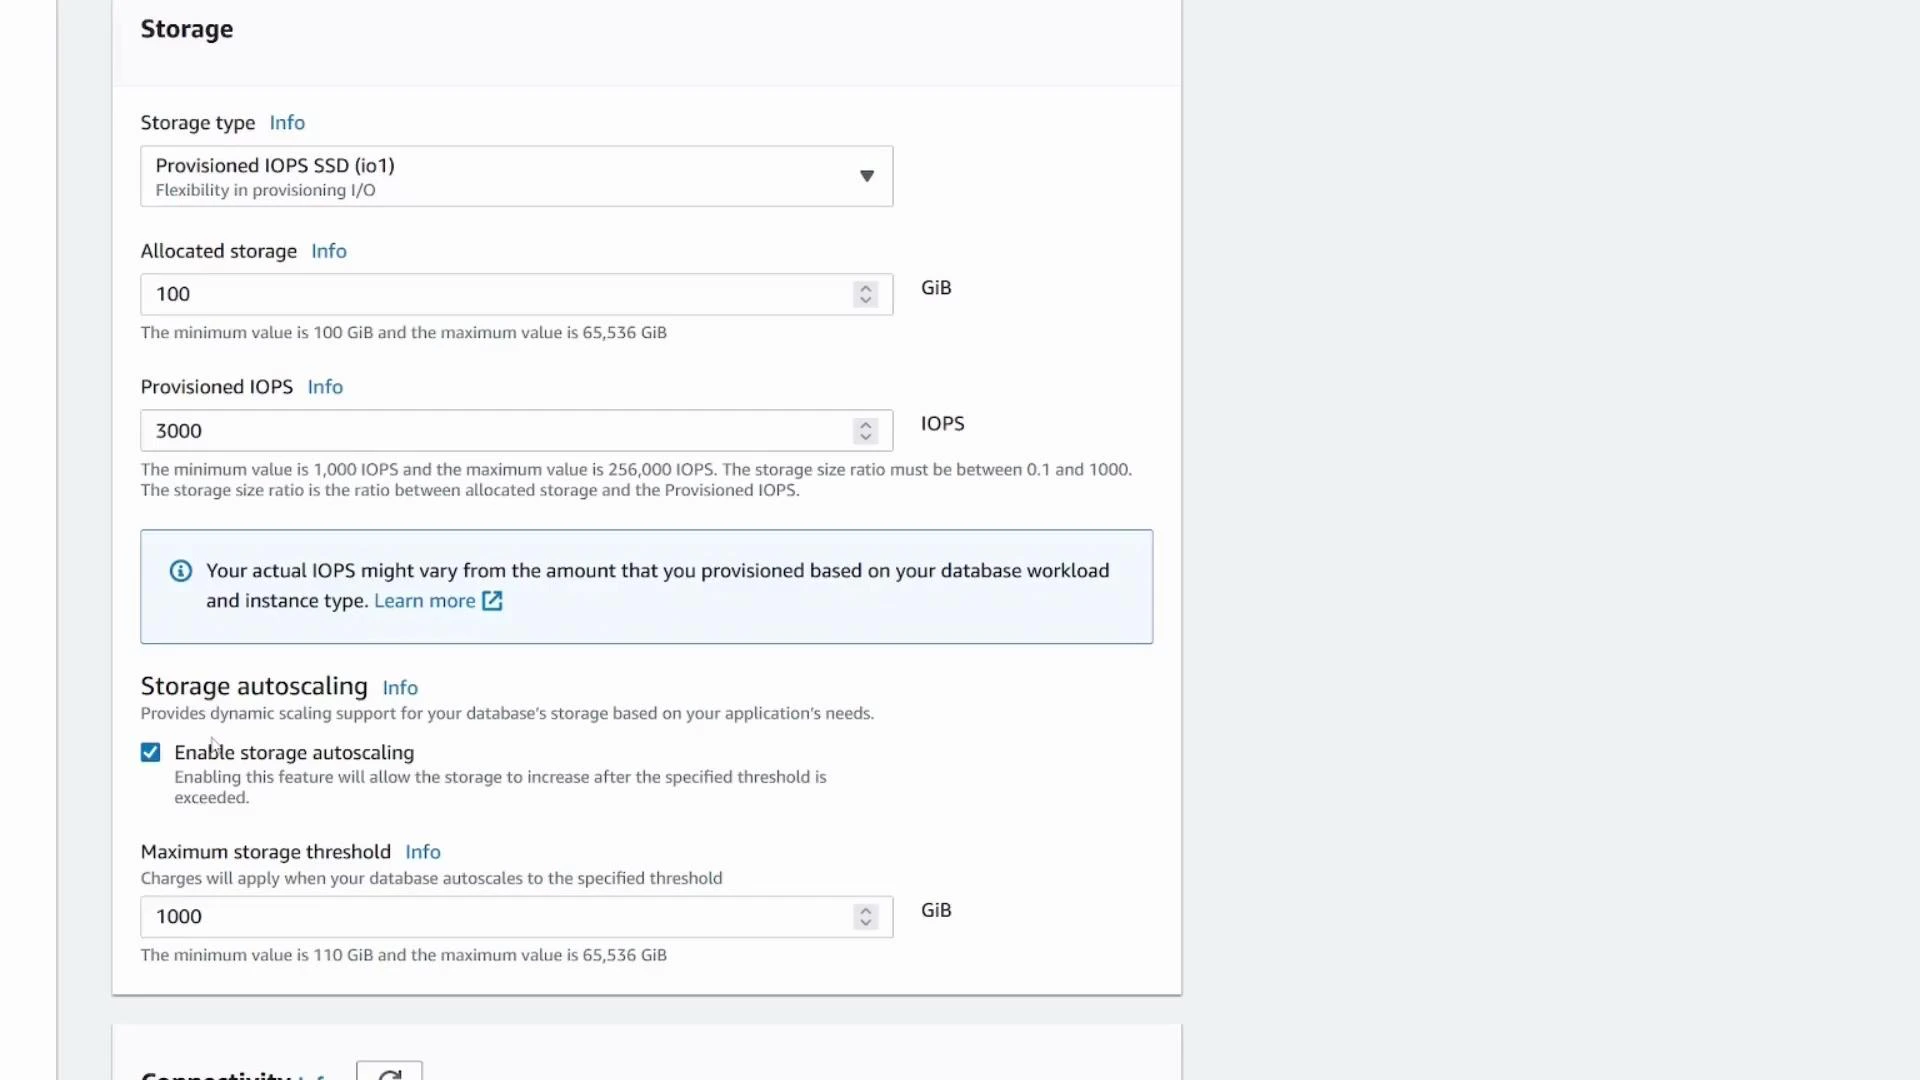
  • Configure storage type and size; enable storage autoscaling if you expect growth. Note free-tier and minimum storage limits vary by account and engine.
A cloud database storage settings screen showing "Provisioned IOPS SSD (io1)" with Allocated storage set to 100 GiB and Provisioned IOPS set to 3000. Storage autoscaling is enabled with a maximum threshold of 1000 GiB and a note about actual IOPS potentially varying.

Connectivity & security

  • Choose or create a VPC and subnet group.
  • Public access: for demos you may enable Public access to connect directly from your laptop. For production, select No and access via application servers or bastion hosts.
  • Select or create security groups to allow only required IPs and ports (Postgres default port: 5432).
  • Choose availability zone (or leave as no preference).
Do not enable Public access for production databases. Exposing a database endpoint publicly increases attack surface — prefer private subnets and restrict access via security groups and application layers.

Authentication, monitoring, and additional config

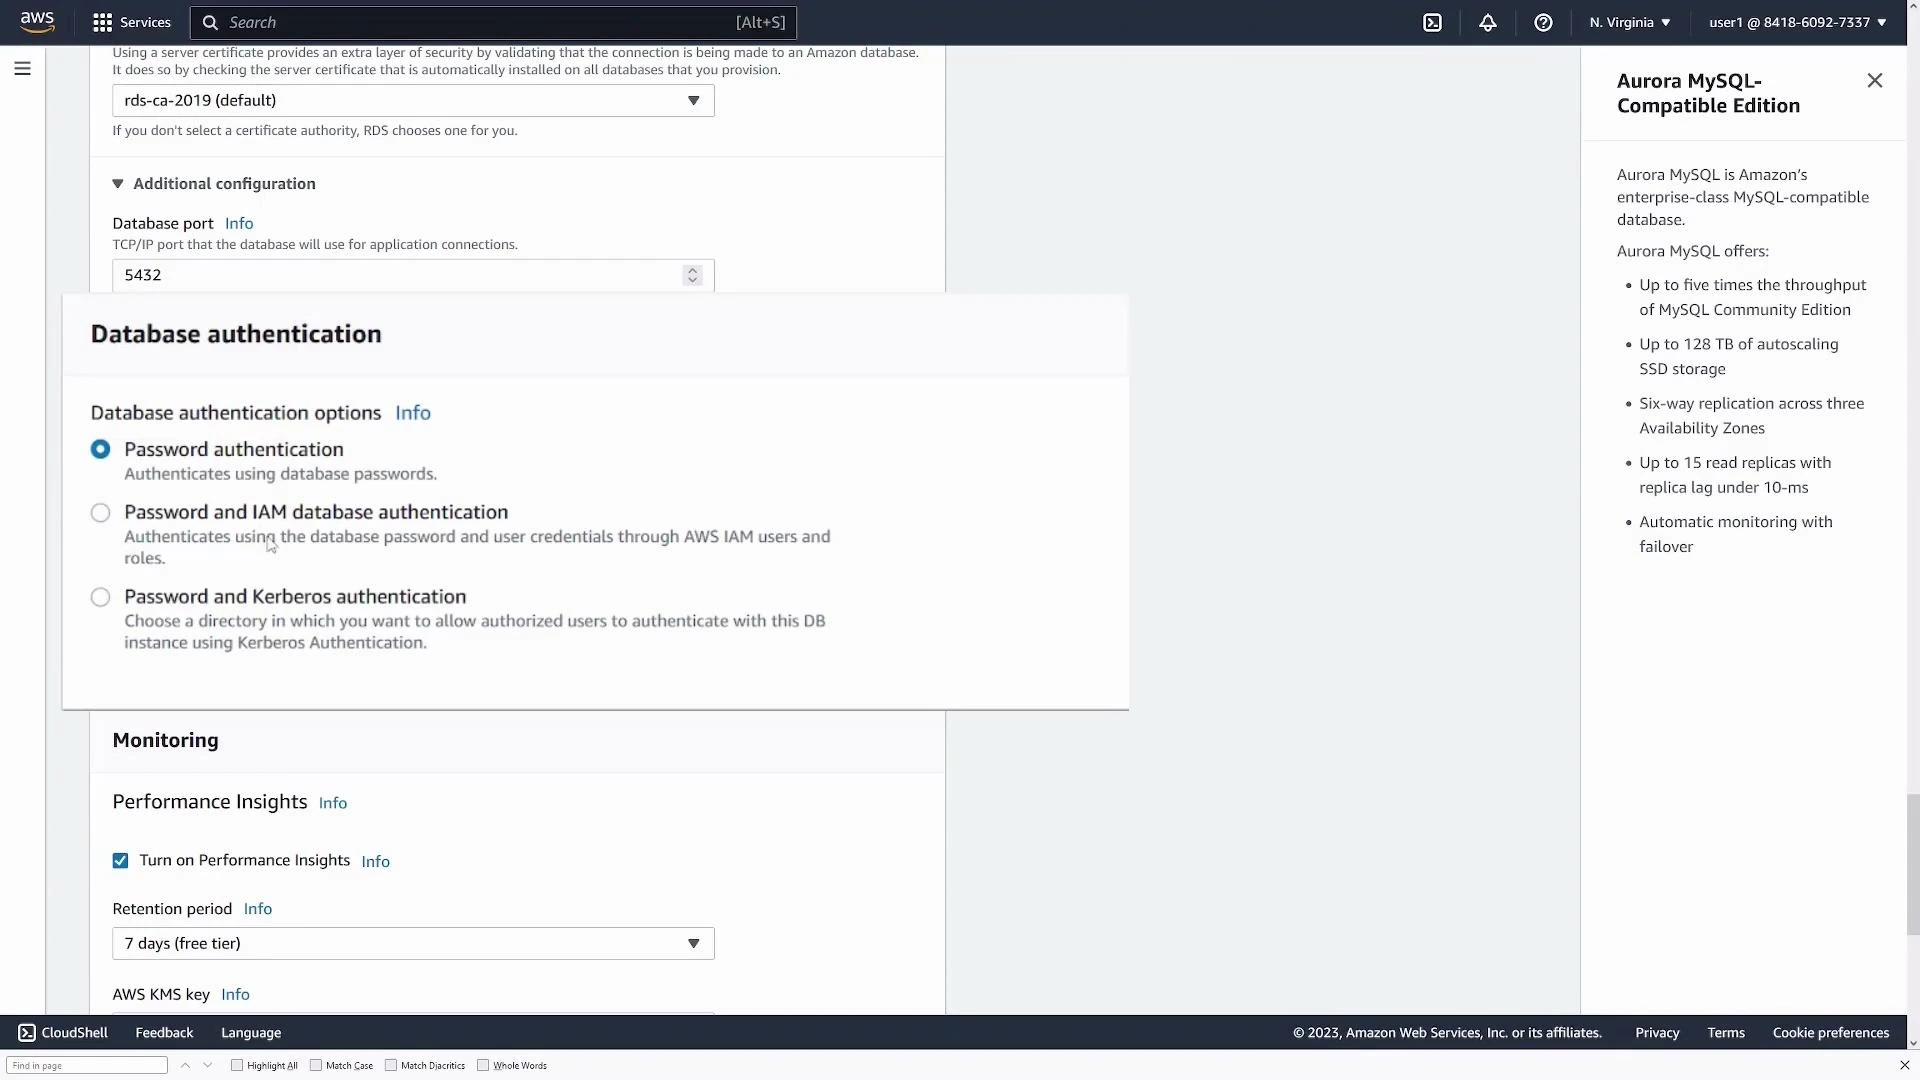
  • Authentication: select password authentication or integrate with IAM (or other supported mechanisms).
  • Monitoring/Performance Insights: enable as needed to track CPU, I/O, queries, and other metrics.
  • Additional configuration: confirm the port, initial database name, parameter groups, and option groups.
A screenshot of the AWS RDS console showing a "Database authentication" dialog with options for Password authentication, Password and IAM database authentication, and Password and Kerberos authentication, with Monitoring/Performance Insights settings visible below. The right sidebar lists features of the Aurora MySQL–Compatible Edition.

Backups, encryption, and final review

Configure automated backups and retention window, enable encryption if required, and review snapshot and backup options. When satisfied, click Create database. Initialization can take several minutes; the instance status transitions to Available when ready.
A screenshot of the AWS RDS console showing database configuration and backup settings (DB parameter group default.postgres14, automated backups enabled with a 7-day retention, backup window set to “No preference”, and encryption enabled). The right sidebar shows info about the Aurora MySQL-compatible edition.

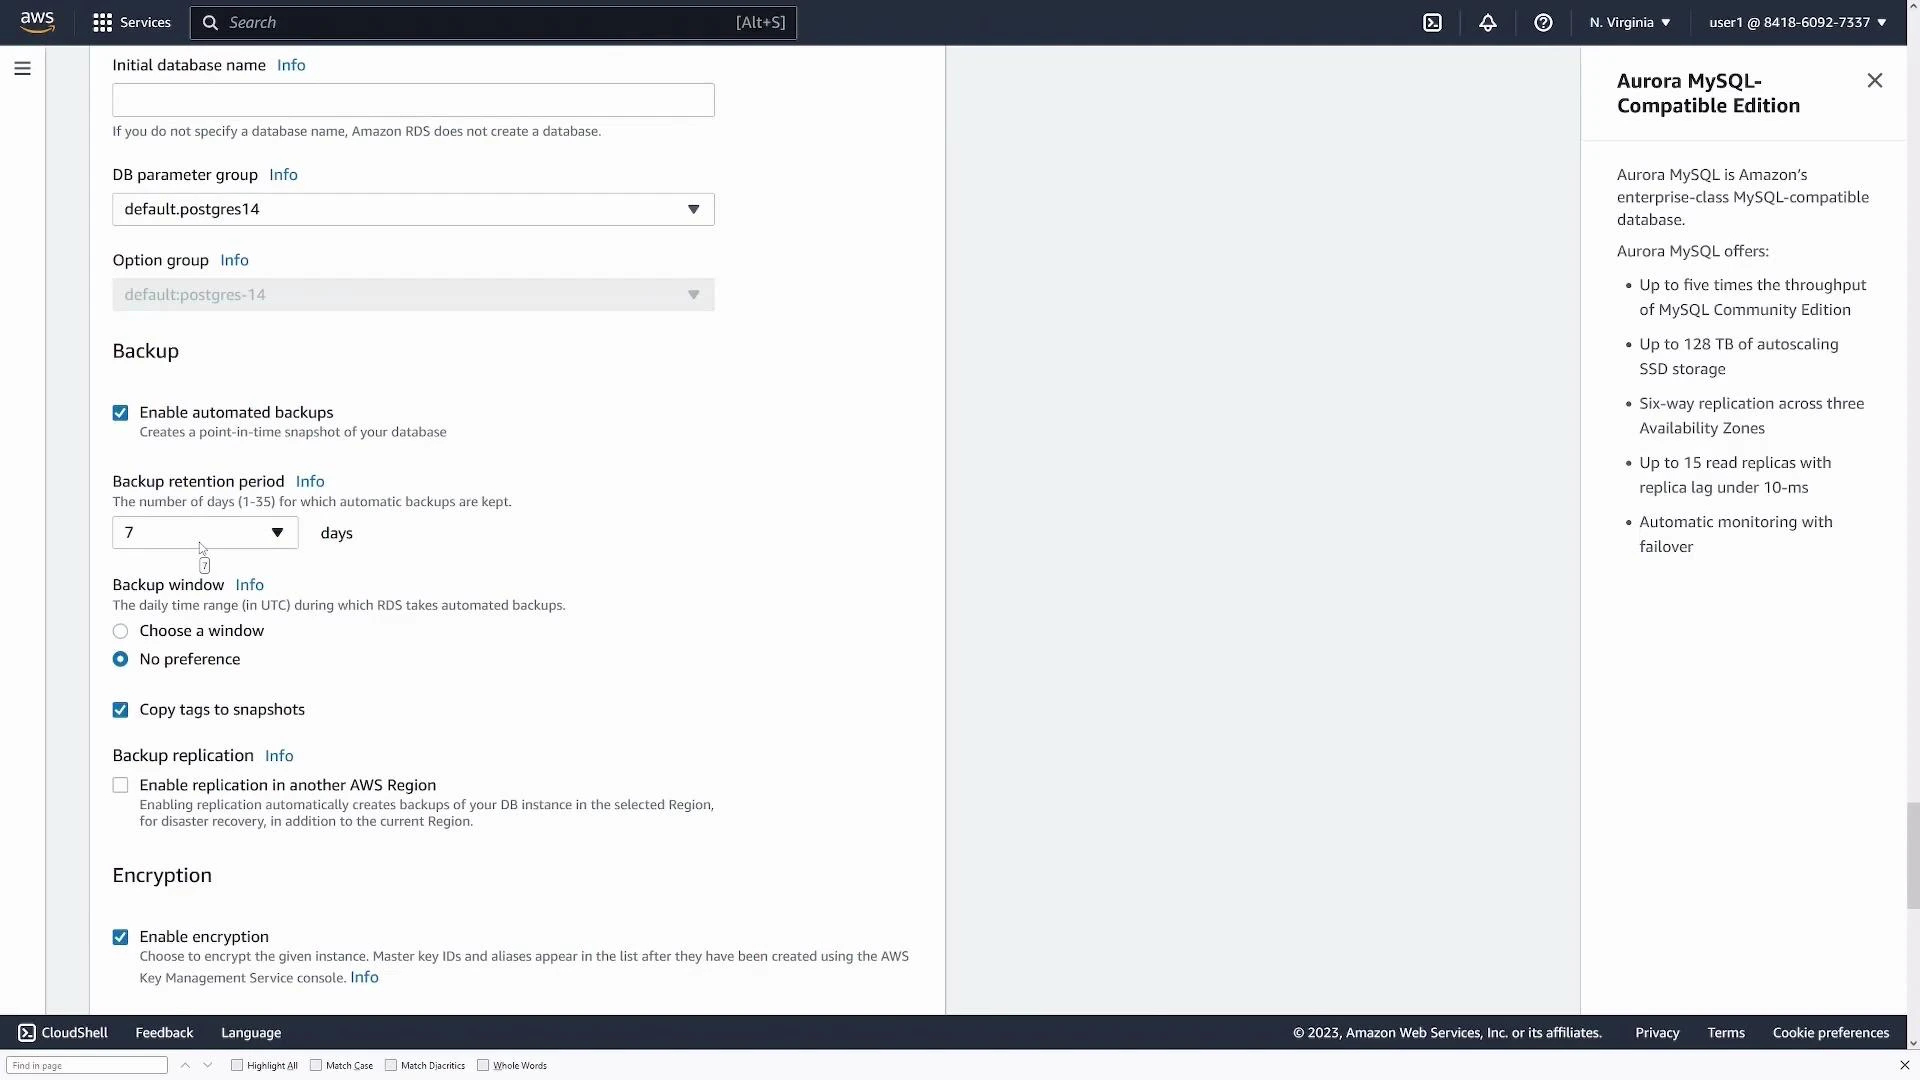
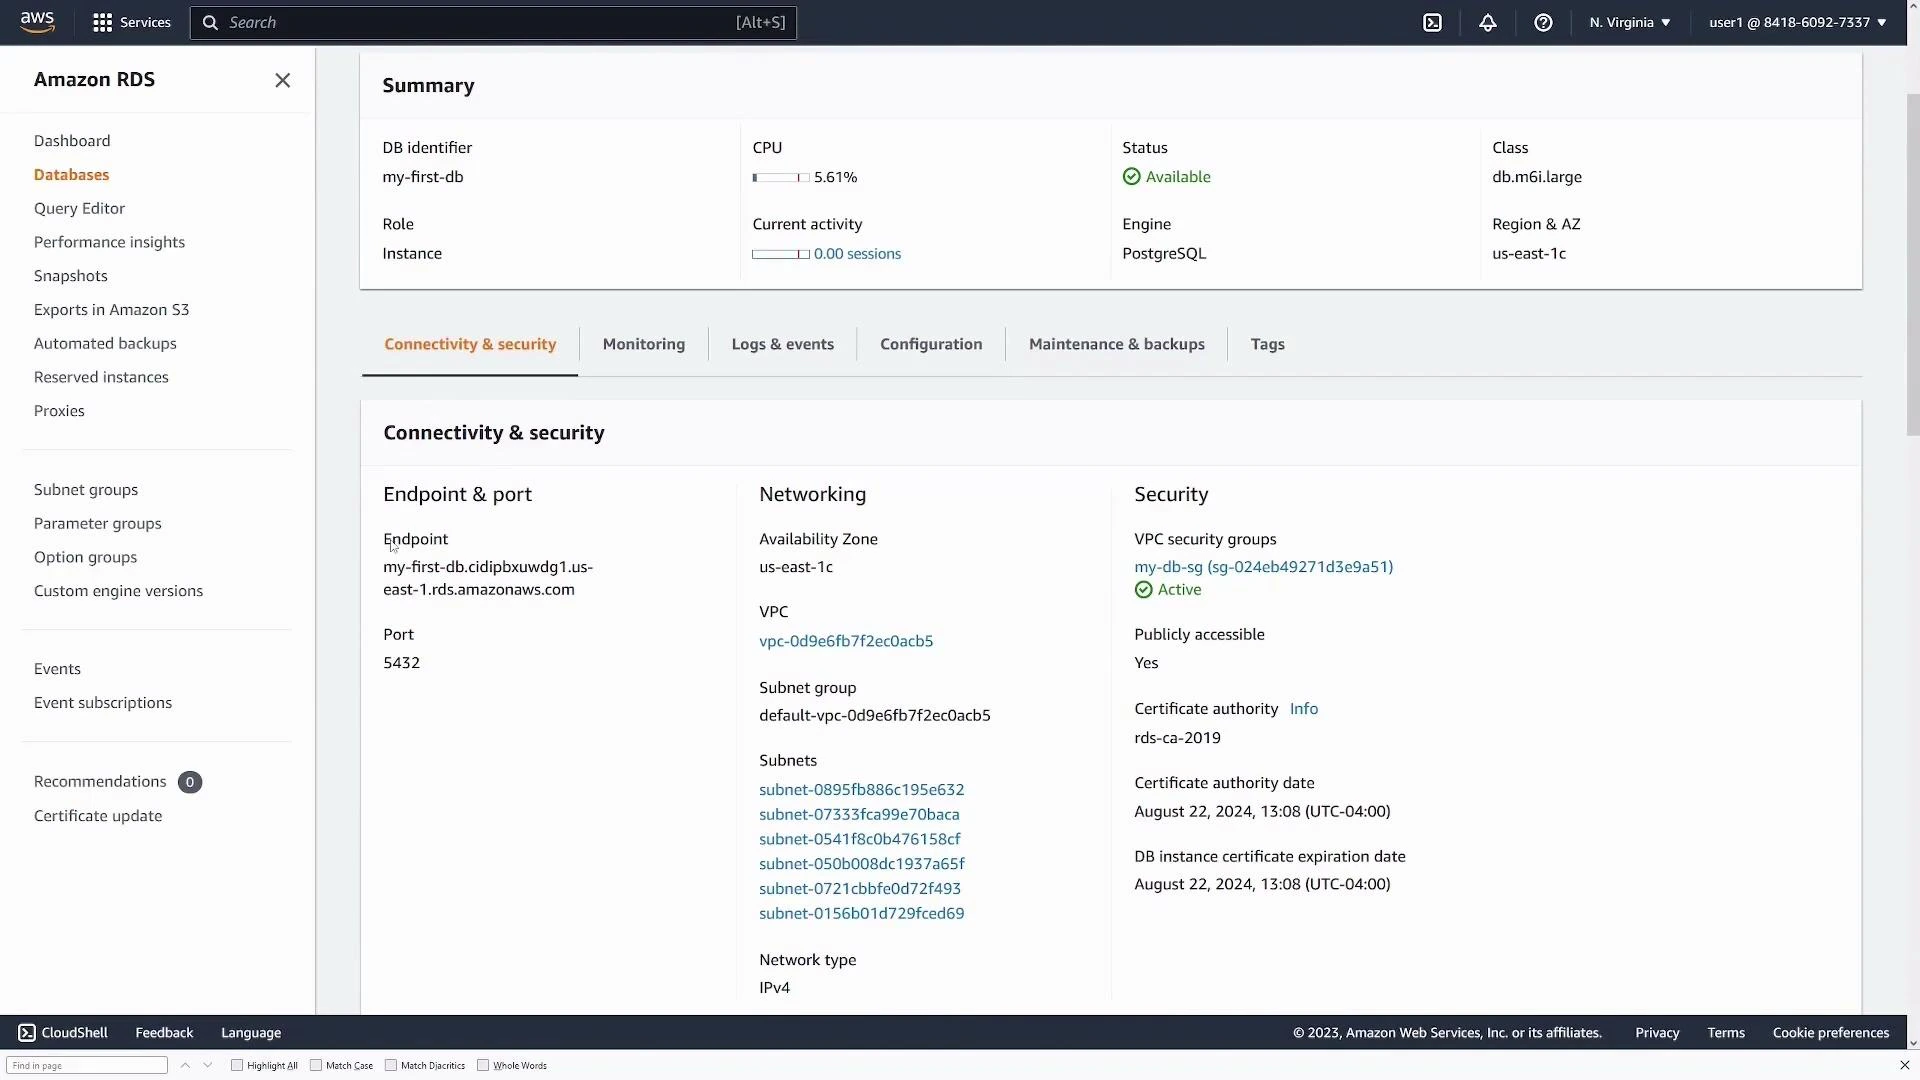
Connect to the database

Once Available, open the DB details and find the Connectivity & security section. Important values:
  • Endpoint (hostname)
  • Port (default 5432 for PostgreSQL)
Use these, along with the master username and password, to build your connection string. For production, create dedicated non-master users with limited privileges and store credentials in a secrets manager (AWS Secrets Manager, Parameter Store, or environment-based secret injection).
A screenshot of the Amazon RDS console showing details for a PostgreSQL DB instance (DB identifier "my-first-db"), including status, class, and CPU activity. The Connectivity & security pane lists the instance endpoint and port, VPC/subnet information, and VPC security group and certificate details.
Example: Node.js using knex (do not hardcode secrets in production — use a secrets manager):
const knex = require("knex")({
  client: "pg",
  connection: {
    host: "my-first-db.cidipbxuwdg1.us-east-1.rds.amazonaws.com",
    port: 5432,
    user: "postgres",
    password: "your_master_password_here",
    database: "postgres",
  },
});

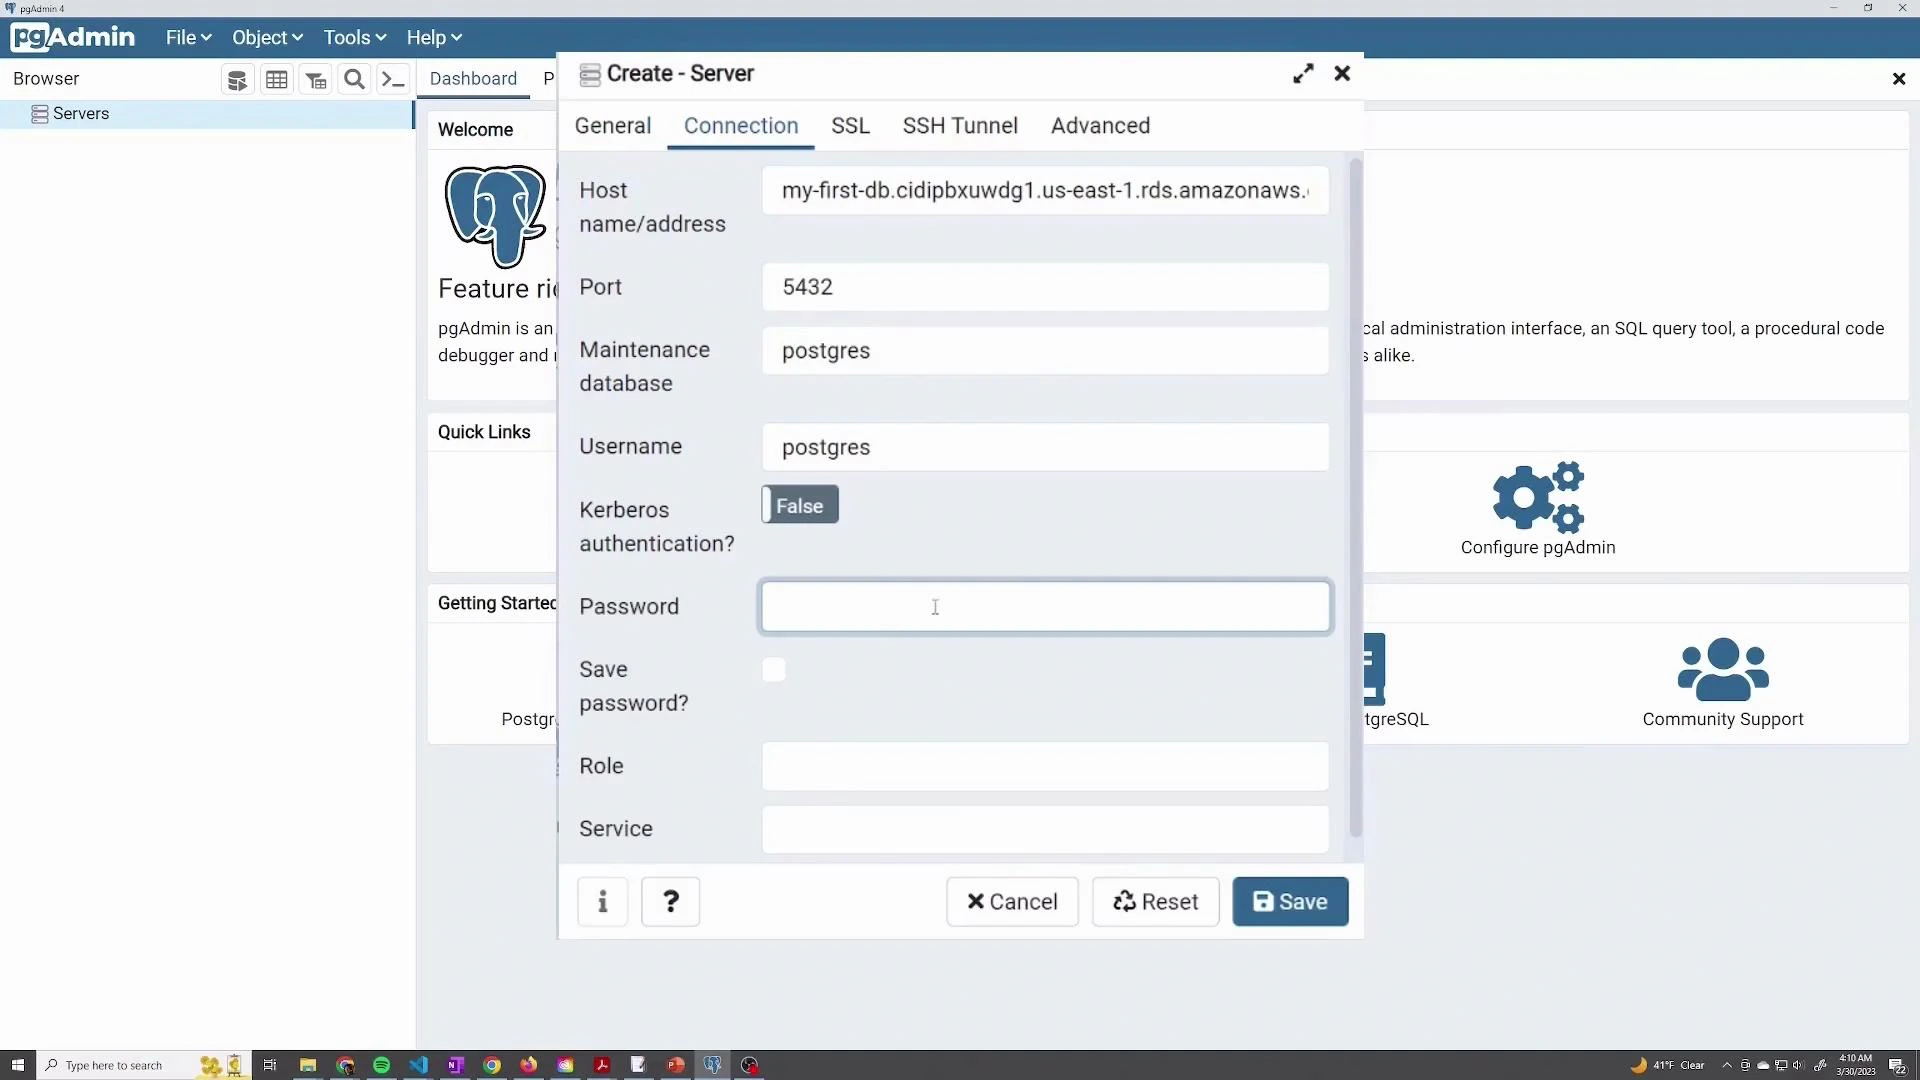
Using pgAdmin (or other clients)

To connect with pgAdmin:
  1. Create a new server connection.
  2. Provide the endpoint as Host name/address, port 5432, maintenance DB (postgres), username, and password.
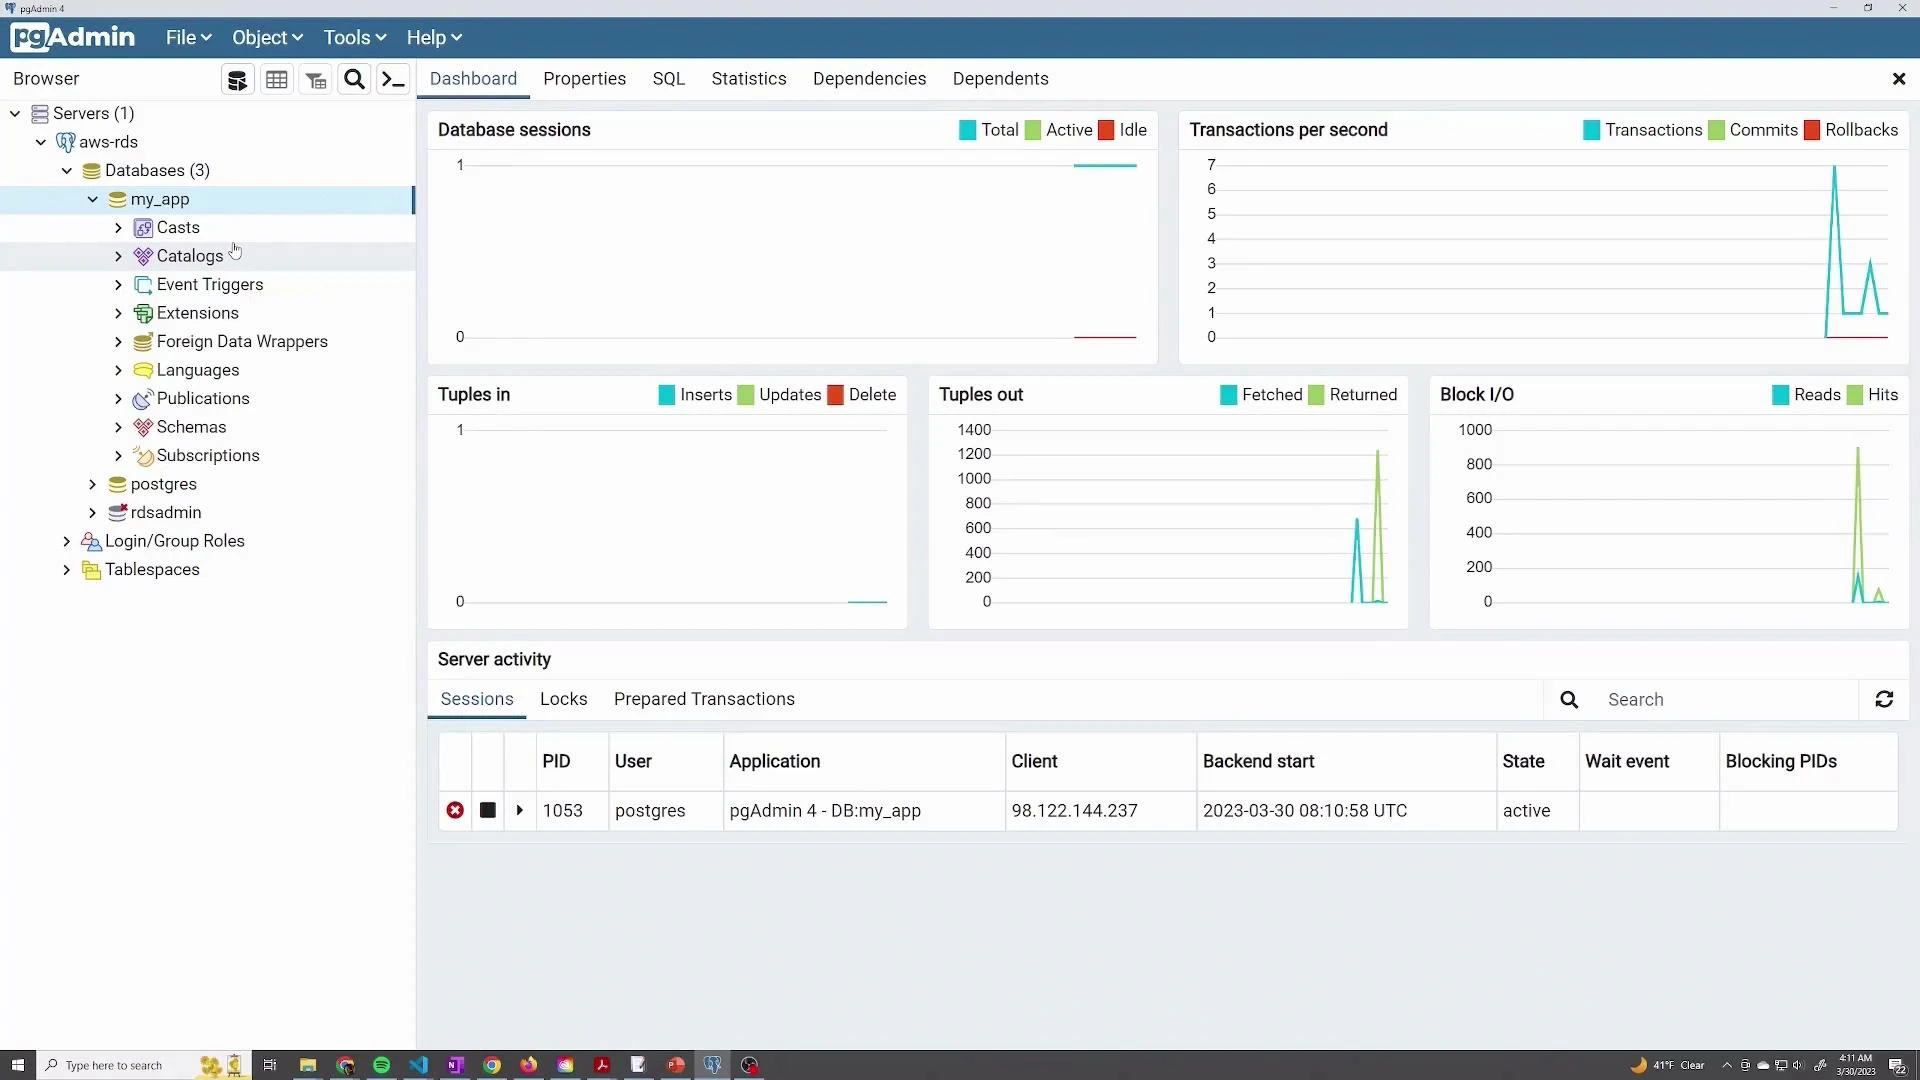
  3. Save and browse databases, create users, or run queries.
A screenshot of the pgAdmin application showing the "Create - Server" dialog on the Connection tab. It displays fields for host name/address, port (5432), maintenance database, username (postgres) and a password entry for connecting to a PostgreSQL server.
If pgAdmin fails to save local metadata, you may encounter a sqlite3 IntegrityError like this example:
Error saving properties

(sqlite3.IntegrityError) UNIQUE constraint failed: database.id, database.server
[SQL: INSERT INTO "database" (id, schema_res, server) VALUES (?, ?, ?)]
[parameters: (16402, '', 1)]
(Background on this error at: http://sqlalche.me/e/13/gkpj)
After successful connection you can create application databases (for example, my_app) and monitor server activity.
A screenshot of the pgAdmin database management interface showing an "aws-rds" server with the "my_app" database selected in the left tree. The right pane displays performance graphs (transactions, tuples, I/O) and a server activity table with an active postgres session.

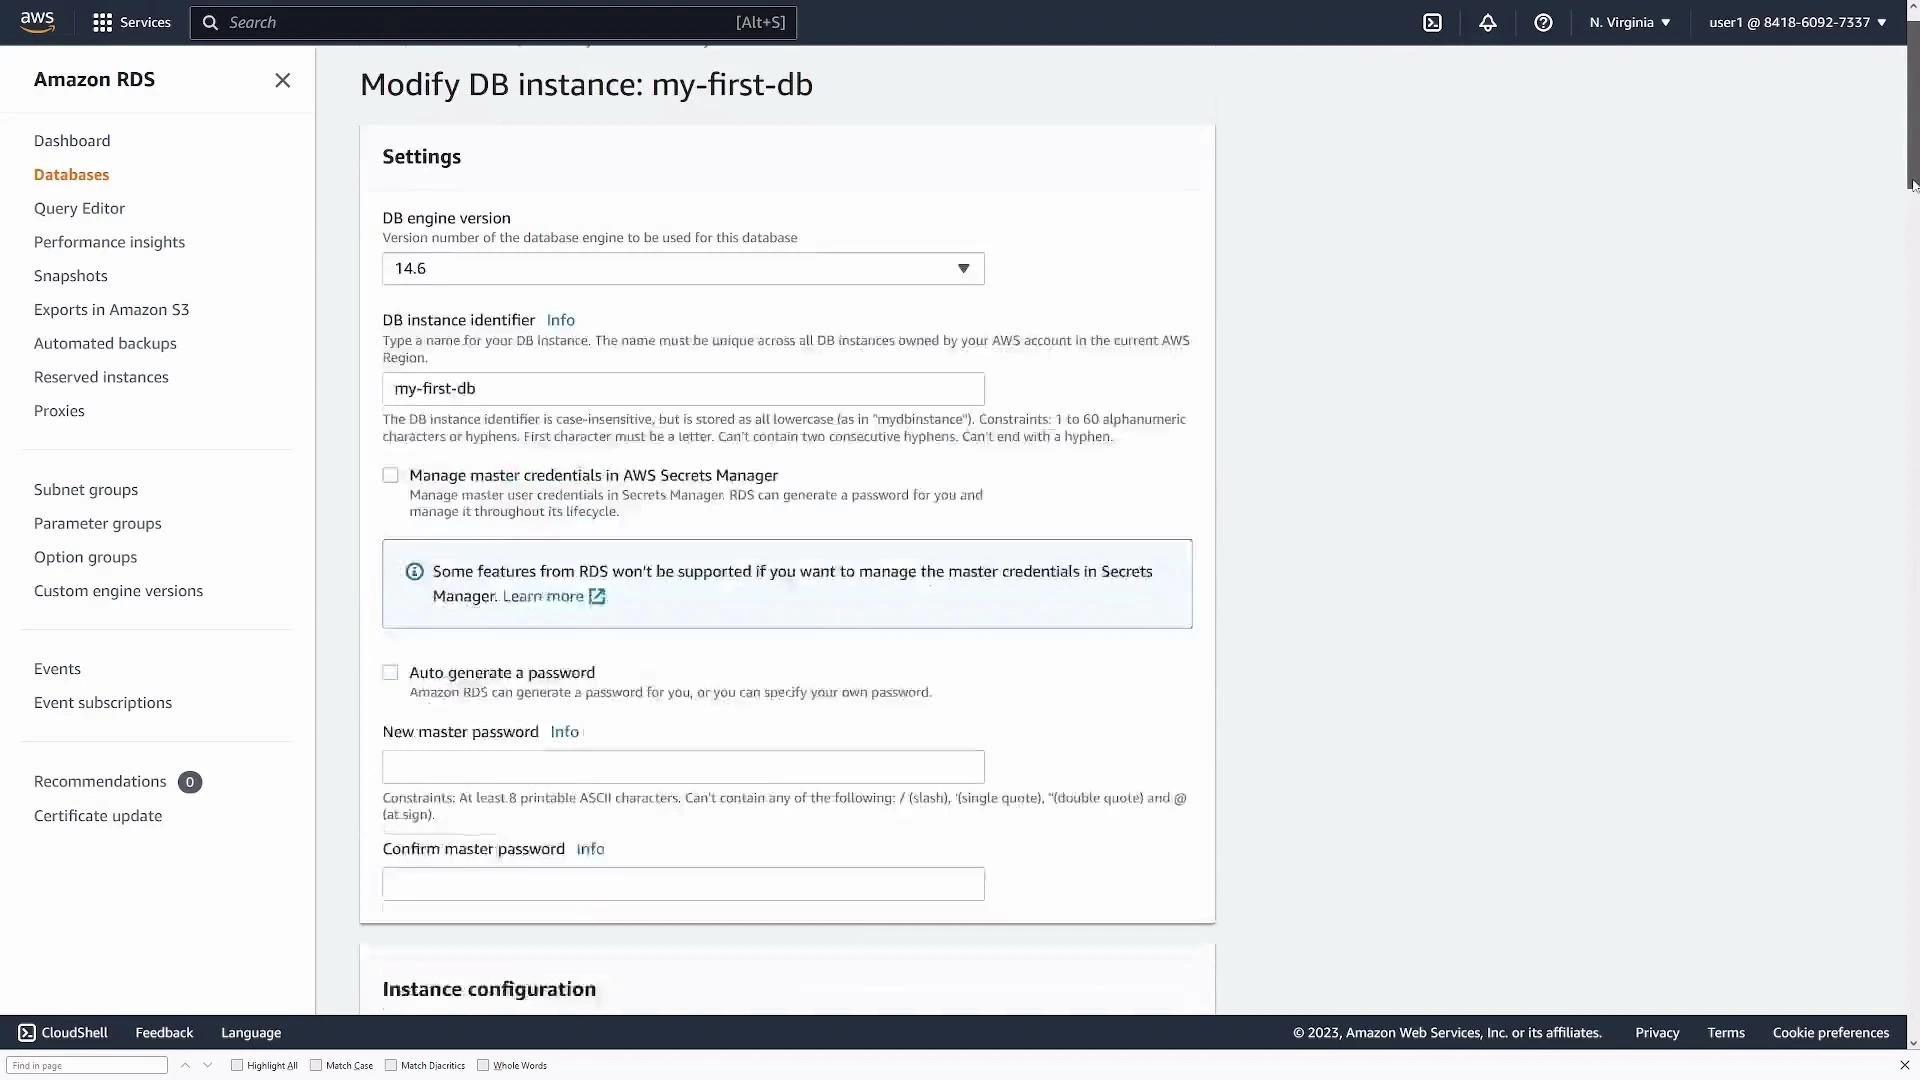
Management: modify, snapshot, delete

  • To change instance class, storage, or other settings, choose Modify on the DB instance page. Many changes can be applied immediately or during the next maintenance window.
Screenshot of the AWS Amazon RDS console on the "Modify DB instance: my-first-db" page, showing settings like DB engine version, instance identifier, and master password options. The left sidebar displays RDS navigation items (Databases, Snapshots, Automated backups, etc.).
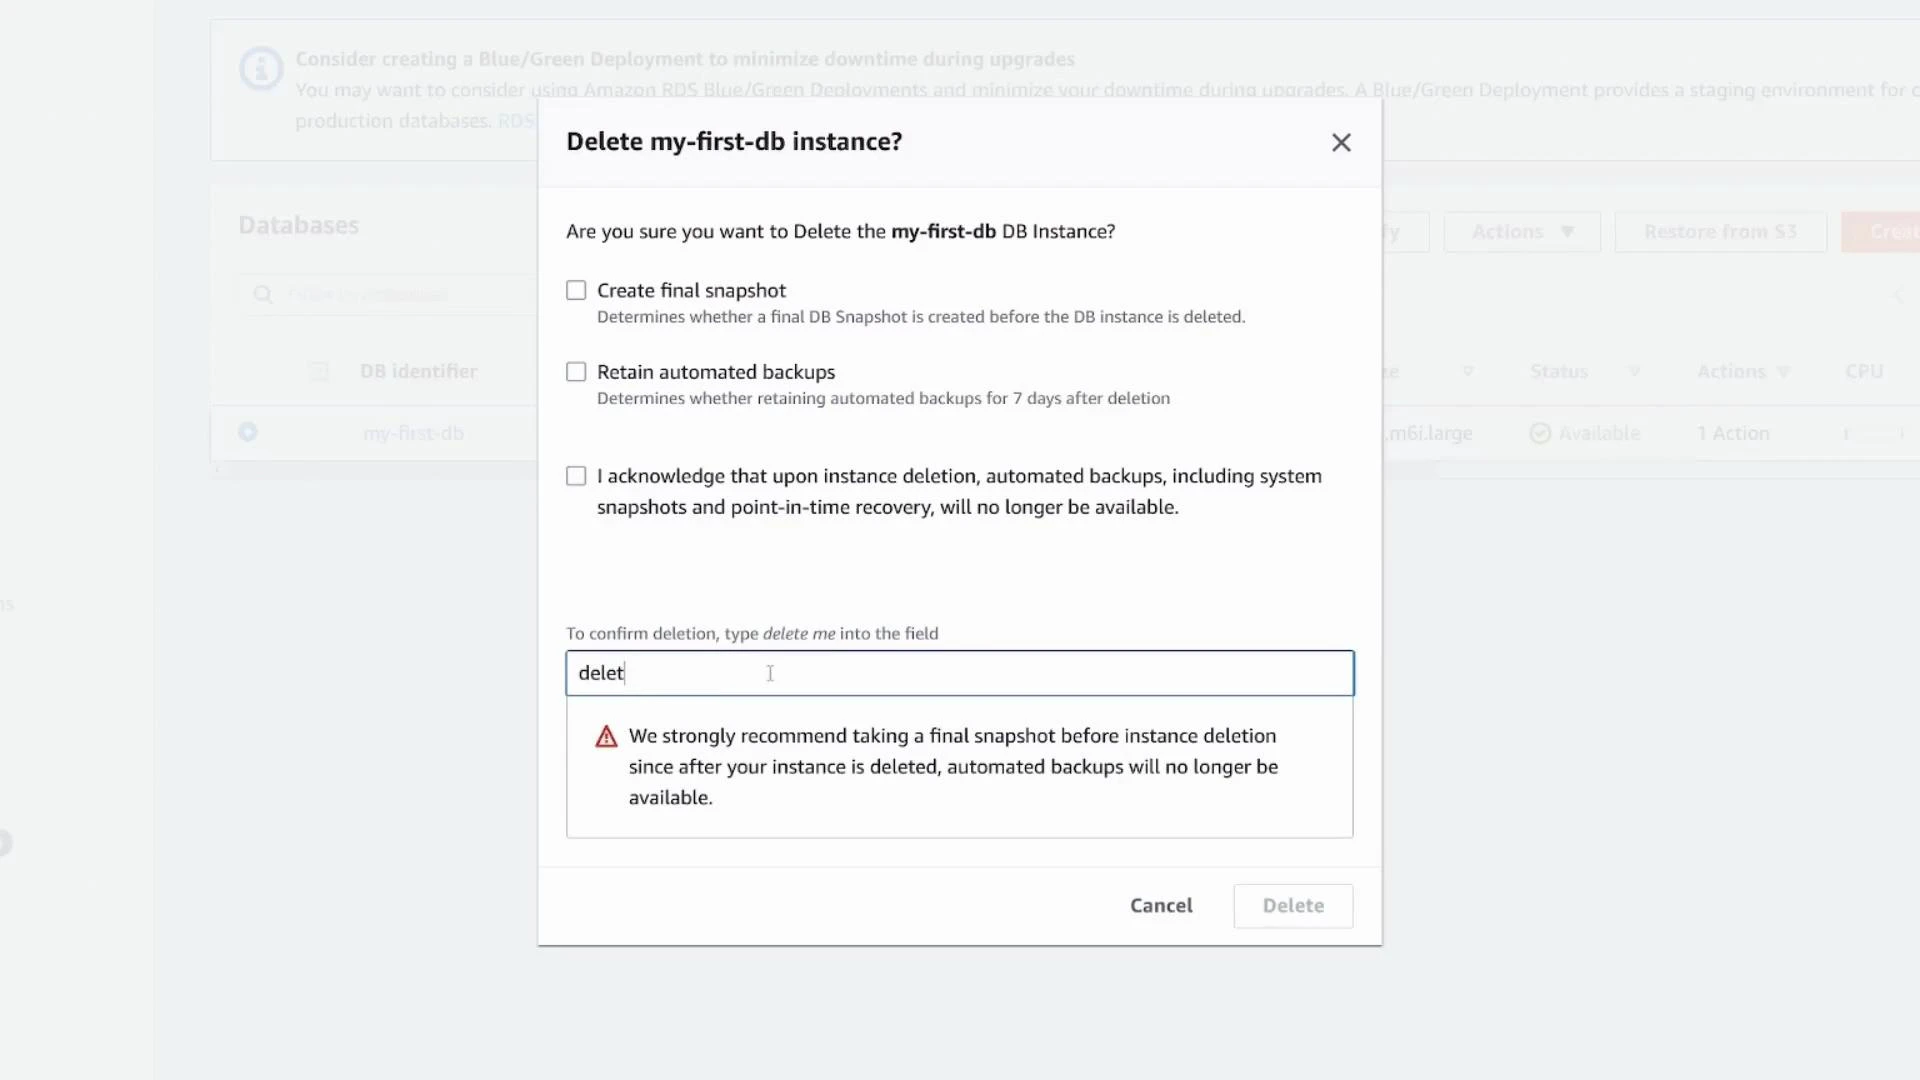
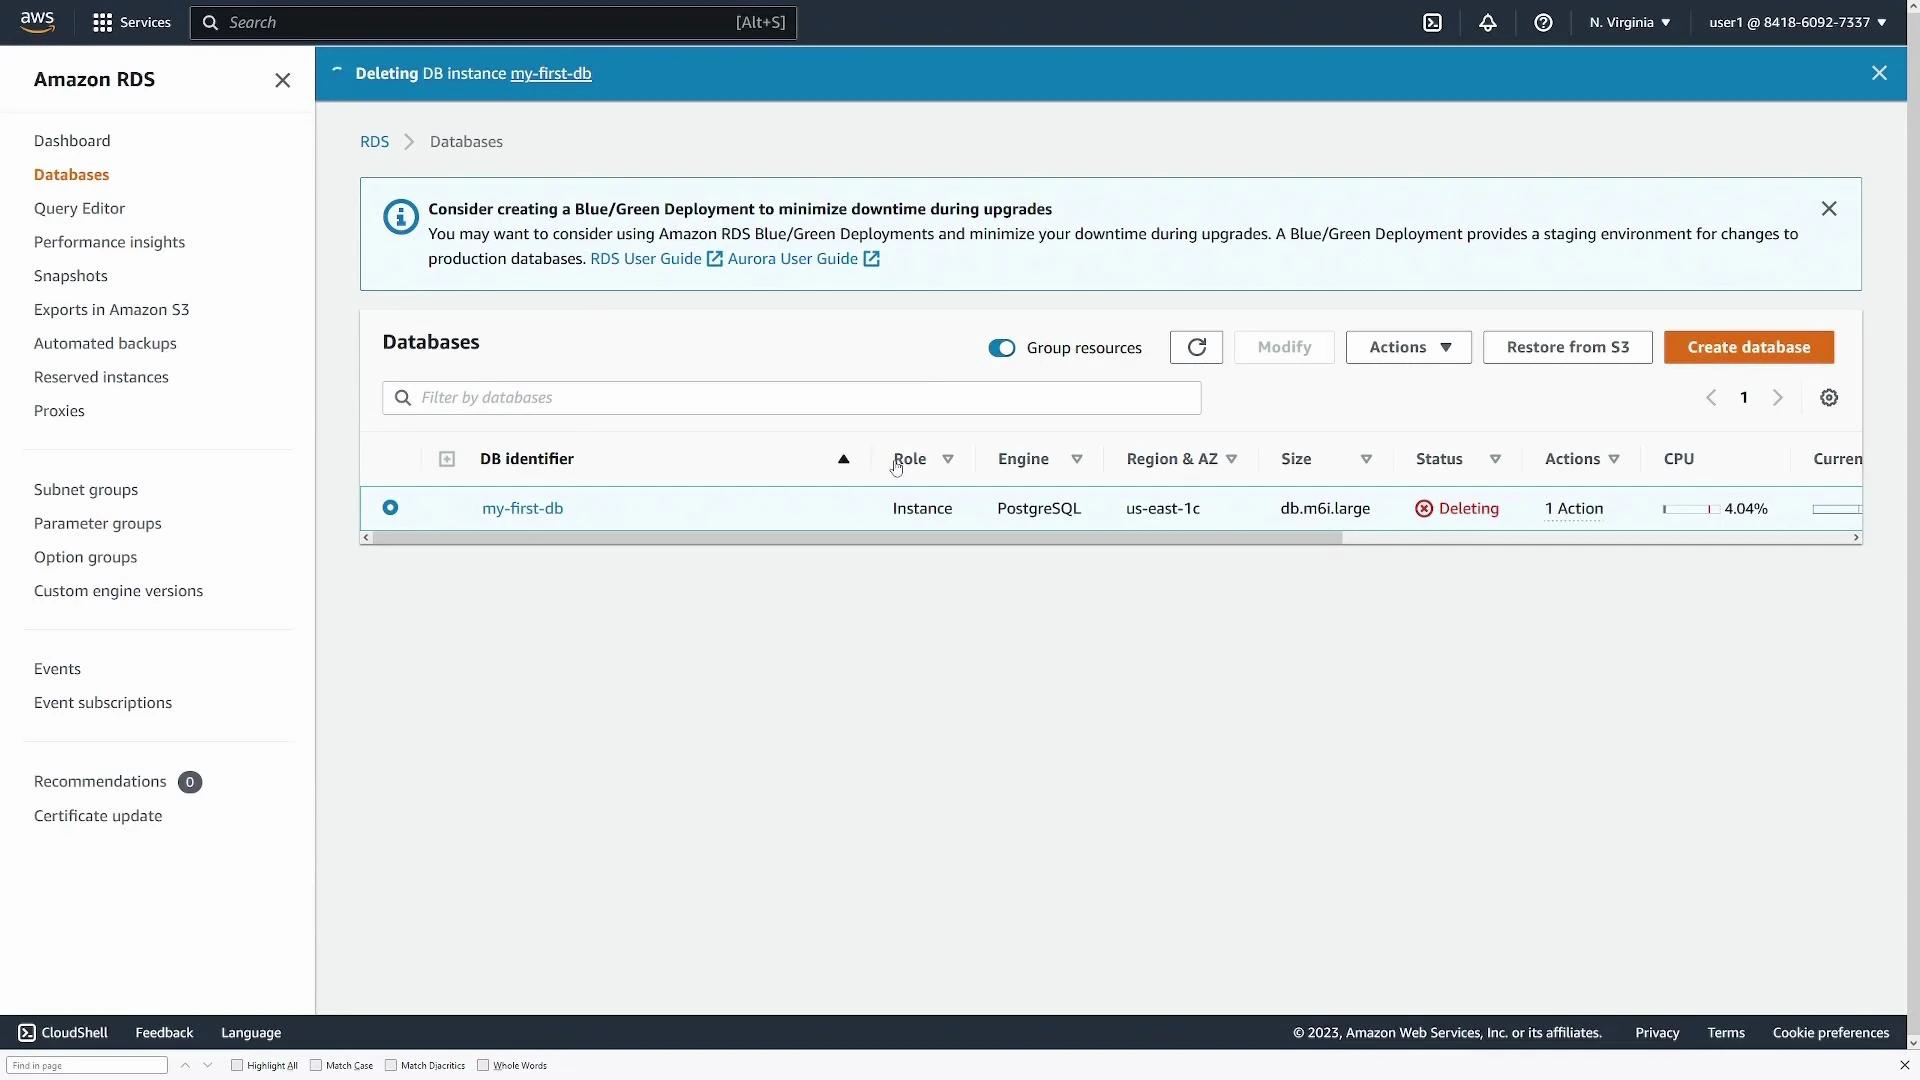
  • To remove a demo instance, use Delete. The console prompts to create a final snapshot and retain automated backups. For production systems, always create a final snapshot unless you explicitly want to discard data.
A confirmation dialog for deleting the "my-first-db" database instance, showing checkboxes to create a final snapshot, retain automated backups, and acknowledge data-loss consequences. It also has a text field to type a confirmation and a warning recommending taking a final snapshot before deletion.
After confirming deletion the DB enters Deleting state until it is removed.
A screenshot of the Amazon RDS console showing the Databases page. It lists a PostgreSQL instance named "my-first-db" with the status "Deleting."

Wrap-up and best practices

Your RDS PostgreSQL instance should now be operational and ready to serve application connections.
A screenshot of the Amazon RDS console showing details for a database named "my-first-db," including a summary (CPU, status, engine) and the Connectivity & security, Monitoring, and Configuration tabs. The Connectivity & security panel lists the DB endpoint, port (5432), VPC/subnet info, and security group settings.
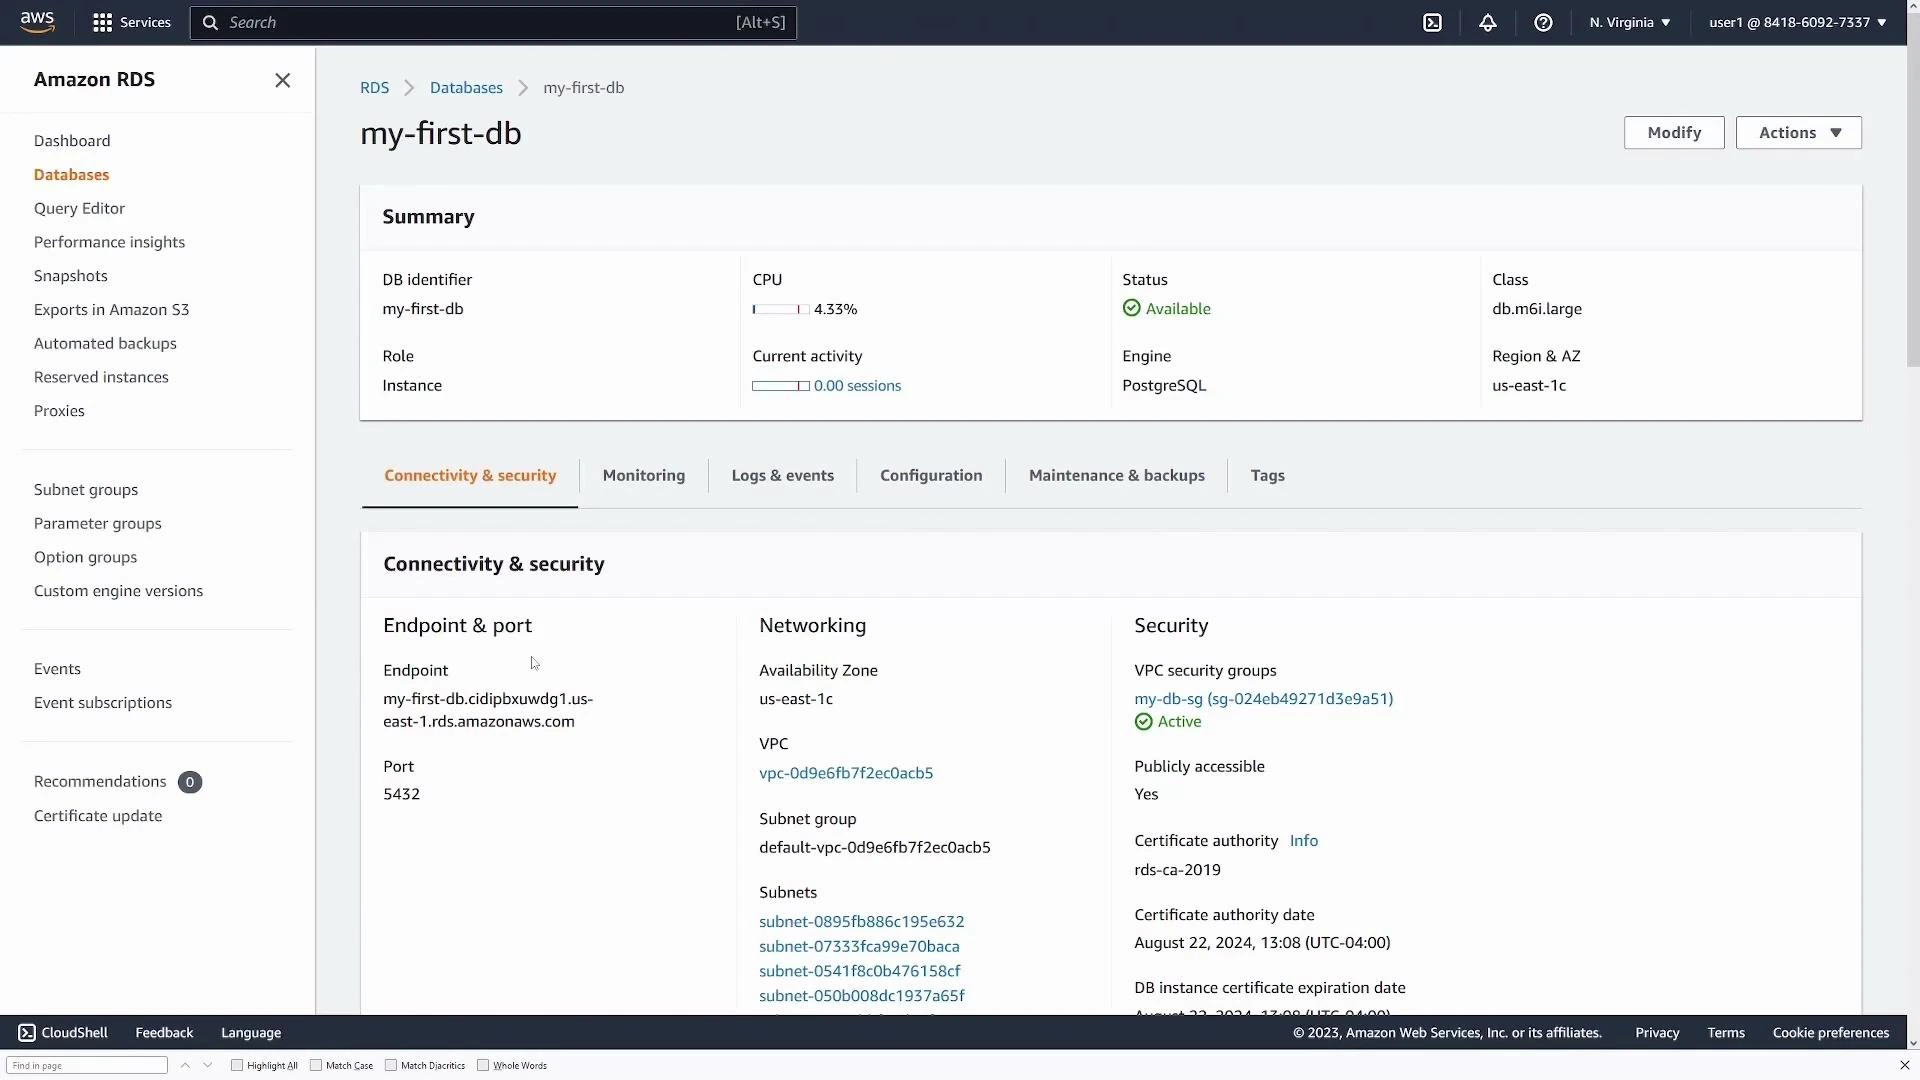
Best practices summary: prefer private DB endpoints (no public access) for production; avoid using the master account in applications; store credentials in AWS Secrets Manager or IAM-based authentication; enable automated backups and Performance Insights; and choose Multi‑AZ for high availability.

Watch Video

Practice Lab