Introduction
Istio sidecar injection embeds an Envoy proxy alongside your application container to enable advanced traffic management, mutual TLS, and telemetry within Kubernetes. In this guide, you’ll learn how to:- Inject an Envoy sidecar into a pod automatically
- Deploy a Node.js microservice in a dedicated namespace
- Verify the injected sidecar and inspect traffic flows
Sidecar Injection Methods
Istio offers two approaches to inject the Envoy proxy into your workloads:| Method | Description | Commands |
|---|---|---|
| Automatic Injection | Labels a namespace so that any new pod includes the sidecar via a mutating webhook. | bash<br>kubectl label namespace <name> istio-injection=enabled<br>kubectl apply -f movies.yaml |
| Manual Injection | Injects proxy settings directly into your YAML before applying with istioctl. | bash<br>kubectl apply -f <(istioctl kube-inject -f movies.yaml) |
We’ll use Automatic Injection for this demo, since it requires no modifications to your application manifests.
Istio Demo Architecture
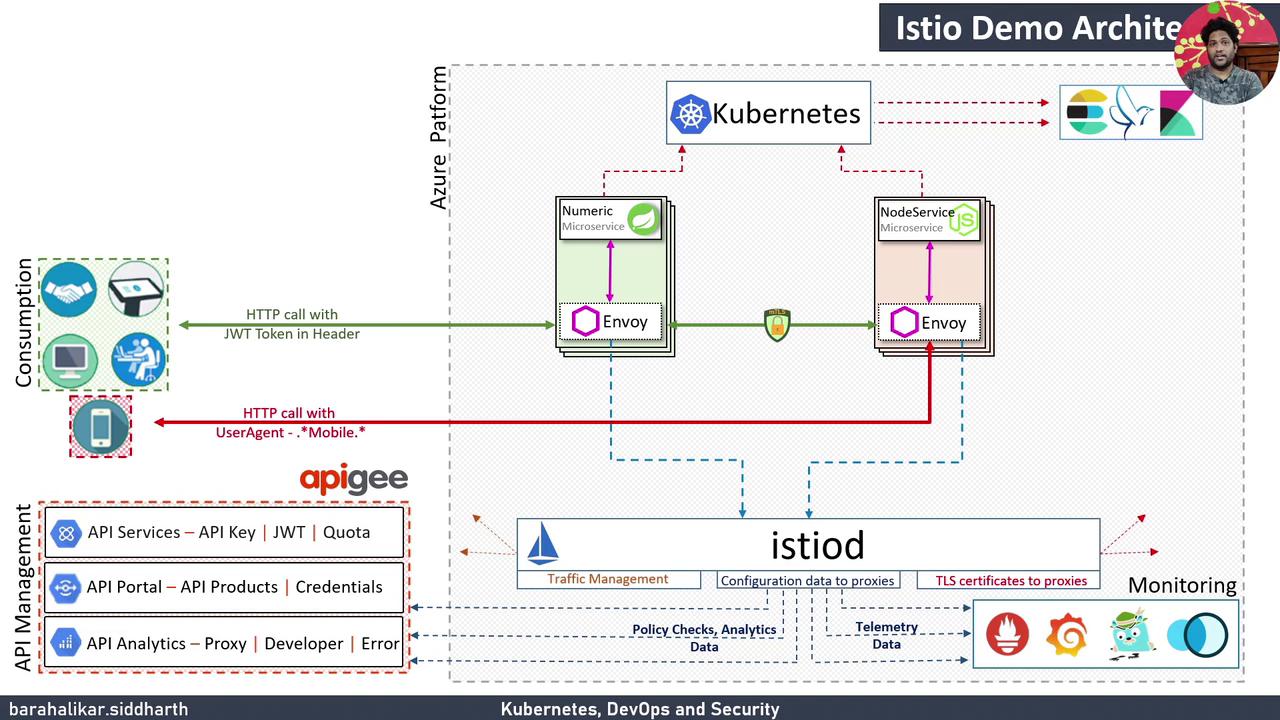
| Component | Role |
|---|---|
| Azure VM Kubernetes Cluster | Hosts Istio control plane (Pilot, Citadel, Galley) and workloads |
| Istio Sidecar (Envoy) | Intercepts pod traffic for routing, mTLS, and telemetry |
| Telemetry & Visualization | Grafana, Prometheus, Kiali, Jaeger capture metrics and traces |
| API Management (Optional) | Apigee integration for API security, developer portals, and analytics |
Prerequisites
- A Kubernetes cluster with Istio installed
kubectlandistioctlCLI tools available- Docker image
siddharth67/node-service:v1pushed to a registry
1. Create and Label the prod Namespace
First, set a shorthand for kubectl:
prod and confirm:
2. Deploy the Node.js Service
Deploy the Node.js microservice with a single container initially:3. Enable Automatic Sidecar Injection
Inspect existing namespace labels:prod for Istio:
The
istio-system namespace is generally labeled istio-injection=disabled to prevent sidecar injection into control plane components.4. Restart the Deployment
Trigger pod recreation so the Envoy sidecar is injected:2/2 READY:
5. Verify the Sidecar Injection
Inspect one of the pods in detail:node-service(your application)istio-proxy(Envoy sidecar, e.g.,docker.io/istio/proxyv2:1.9.0)