This lesson explores fundamental networking concepts including switching, routing, gateways, and DNS configurations on Linux for device communication.
In this lesson, we explore the fundamental concepts of networking, including switching, routing, gateways, and DNS configurations on Linux. These core topics form the building blocks for understanding how devices communicate over a network.
Imagine you have two computers (or VMs) that need to communicate. Both systems are connected to a switch, and each host requires an interface—either physical or virtual—to establish that connection. To view the available interfaces on a Linux host, run:
ip link# Example output:# eth0: <BROADCAST,MULTICAST,UP,LOWER_UP> mtu 1500 qdisc fq_codel state UP mode DEFAULT group default qlen 1000
Assuming the network subnet is 192.168.1.0, assign an IP address from this range to each system. For example, on one host, use:
# On system Aip addr add 192.168.1.10/24 dev eth0
And on another:
# On system Bip addr add 192.168.1.11/24 dev eth0
Once the IP addresses are configured, the systems can communicate via the switch. Test connectivity with a ping:
ping 192.168.1.11# Expected output:# Reply from 192.168.1.11: bytes=32 time=4ms TTL=117
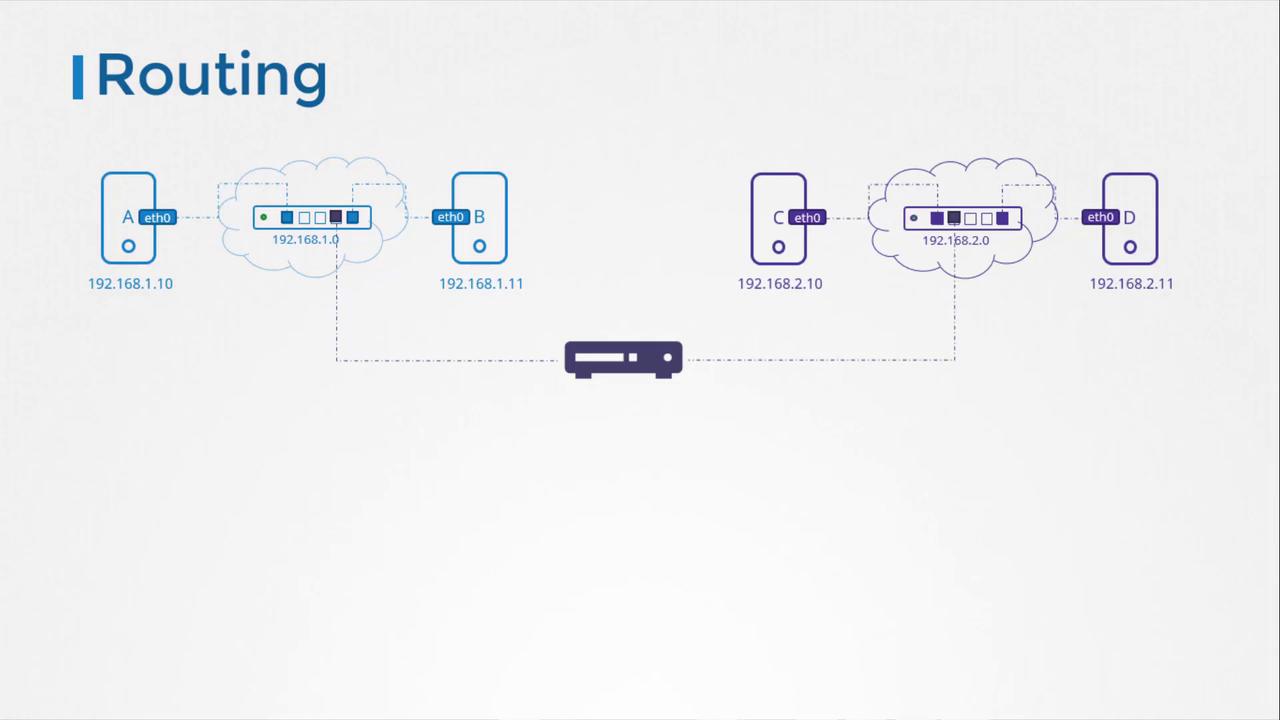
A switch, however, only facilitates communication within the same network. Consider introducing a second network with the CIDR 192.168.2.0, where host IPs might be 192.168.2.10 and 192.168.2.11. To enable communication between systems on the 192.168.1.0 network and those on the 192.168.2.0 network, a router becomes essential.A router connects separate networks by using multiple network interfaces. Typically, you assign it IP addresses such as 192.168.1.1 on the first network and 192.168.2.1 on the second. This configuration lets the router forward traffic between the networks.
When system B (192.168.1.11) needs to reach system C (192.168.2.10), it must use the router as its gateway. To check the current routing table on a Linux system, run:
route# Example output:# Kernel IP routing table# Destination Gateway Genmask Flags Metric Ref Use Iface
Without additional configuration, system B can only communicate within its own network. To route traffic destined for the 192.168.2.0 network, add an entry on system B:
ip route add 192.168.2.0/24 via 192.168.1.1
After adding this route, system B’s routing table will reflect that traffic to 192.168.2.0 is forwarded through the router. Any system that communicates across networks (for example, system C talking to system B) must have a similar route set up.
Using the default gateway simplifies routing for internet access. Rather than adding separate routes for every external network, you set the router as the default route.
When systems need Internet access—such as reaching Google within the 172.217.104.0 network—the router connected to the Internet must be designated as the default gateway. To set up a default route, use:
ip route add default via 192.168.2.1
This default route catches any packet destined for an unspecified network. Running the routing command might now yield:
route# Kernel IP routing table# Destination Gateway Genmask Flags Metric Ref Use Iface# 192.168.1.0 192.168.2.1 255.255.255.0 UG 0 0 0 eth0# 172.217.194.0 192.168.2.1 255.255.255.0 UG 0 0 0 eth0# default 192.168.2.1 0.0.0.0 UG 0 0 0 eth0
Both the “default” keyword and the “0.0.0.0” entry function as catch-all destinations for packets that do not match more specific routes.In environments with multiple routers, such as one handling Internet traffic and another for internal networks, you must create separate routing entries. For example, if traffic destined for network 192.168.1.0 should use a router at 192.168.2.2 while all other traffic uses 192.168.2.1 as the default gateway, set the route as follows:
ip route add 192.168.1.0/24 via 192.168.2.2
The routing table would then resemble:
route# Kernel IP routing table# Destination Gateway Genmask Flags Metric Ref Use Iface# default 192.168.2.1 0.0.0.0 UG 0 0 0 eth0# 192.168.1.0 192.168.2.2 255.255.255.0 UG 0 0 0 eth0
If you experience issues reaching the Internet, reviewing the routing table and checking the default gateway configuration is an excellent troubleshooting step.
Now, consider configuring a Linux host as a router. Picture three hosts: A, B, and C. Hosts A and B belong to the 192.168.1.0 network, while hosts B and C are part of the 192.168.2.0 network. Host B connects to both networks via two interfaces—eth0 and eth1—with IP addresses 192.168.1.6 and 192.168.2.6 respectively. Host A has IP 192.168.1.5, and host C uses IP 192.168.2.5.Initially, if host A pings host C:
ping 192.168.2.5# Expected output:# Connect: Network is unreachable
This error occurs because host A does not know to use host B as the gateway to reach the 192.168.2.0 network. To resolve this, add a route on host A:
ip route add 192.168.2.0/24 via 192.168.1.6
Similarly, inform host C to use host B as its gateway for the 192.168.1.0 network:
ip route add 192.168.1.0/24 via 192.168.2.6
Once these routes are added, host A can reach host C. However, you might still not receive any ping responses. This is because Linux, by default, does not forward packets between interfaces—a security measure to prevent unintended bridging of networks.
To check if IP forwarding is enabled, inspect the file /proc/sys/net/ipv4/ip_forward.
Since the output is 0, packet forwarding is disabled. To enable it temporarily, execute:
echo 1 > /proc/sys/net/ipv4/ip_forward
After enabling IP forwarding, a subsequent ping from host A should yield replies from host C:
ping 192.168.2.5# Expected output:# Reply from 192.168.2.5: bytes=32 time=4ms TTL=117# Reply from 192.168.2.5: bytes=32 time=4ms TTL=117
Keep in mind that this change does not persist after a reboot. To enable permanent IP forwarding, modify the configuration in the /etc/sysctl.conf file.
Below is a summary of essential commands covered in this lesson:
Command
Description
ip link
List and modify network interfaces on the host
ip addr
Display the IP addresses assigned to interfaces
ip addr add
Assign an IP address to an interface (temporary unless added to configuration)
ip route or route
View the current routing table
ip route add
Add entries to the routing table
cat /proc/sys/net/ipv4/ip_forward
Check if IP forwarding is enabled
echo 1 > /proc/sys/net/ipv4/ip_forward
Temporarily enable IP packet forwarding (adjust /etc/sysctl.conf for permanence)
With these fundamentals, you now have a solid understanding of basic networking, IP addressing, and routing. In the next lesson, we will delve into DNS configurations and further network management techniques.