This guide demonstrates connecting to a Linux VM on Mac using VirtualBox with different network configurations.
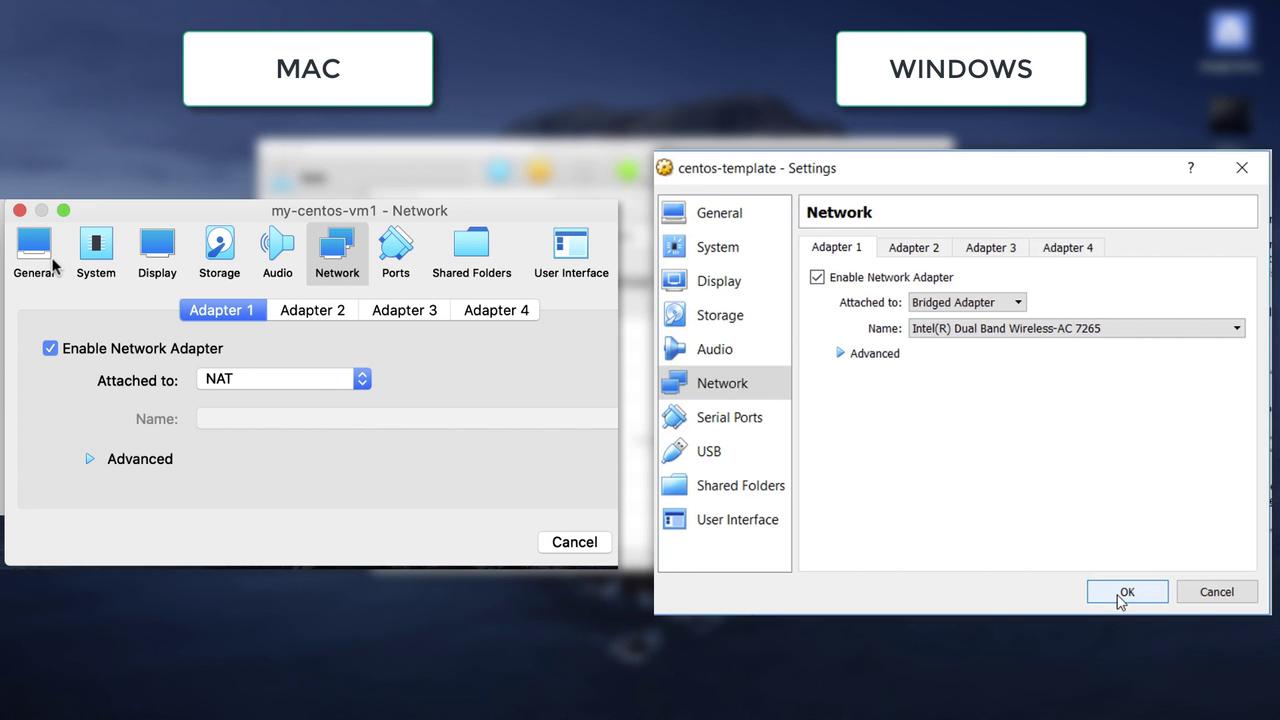
In this guide, we demonstrate how to connect to a Linux VM running on VirtualBox using different network configurations. While the demo covers both Windows and Mac environments, the fundamental concepts remain the same. The key difference lies in the network configuration: Windows uses a bridged adapter that assigns an external IP address, whereas Mac uses the default NAT configuration.On the left, you can see the Mac configuration, and on the right, the Windows configuration. In the Windows deployment, a bridged adapter allows the VM to join the external network, obtaining an IP address from it. This enables SSH connectivity as if the VM were another physical host on your network.
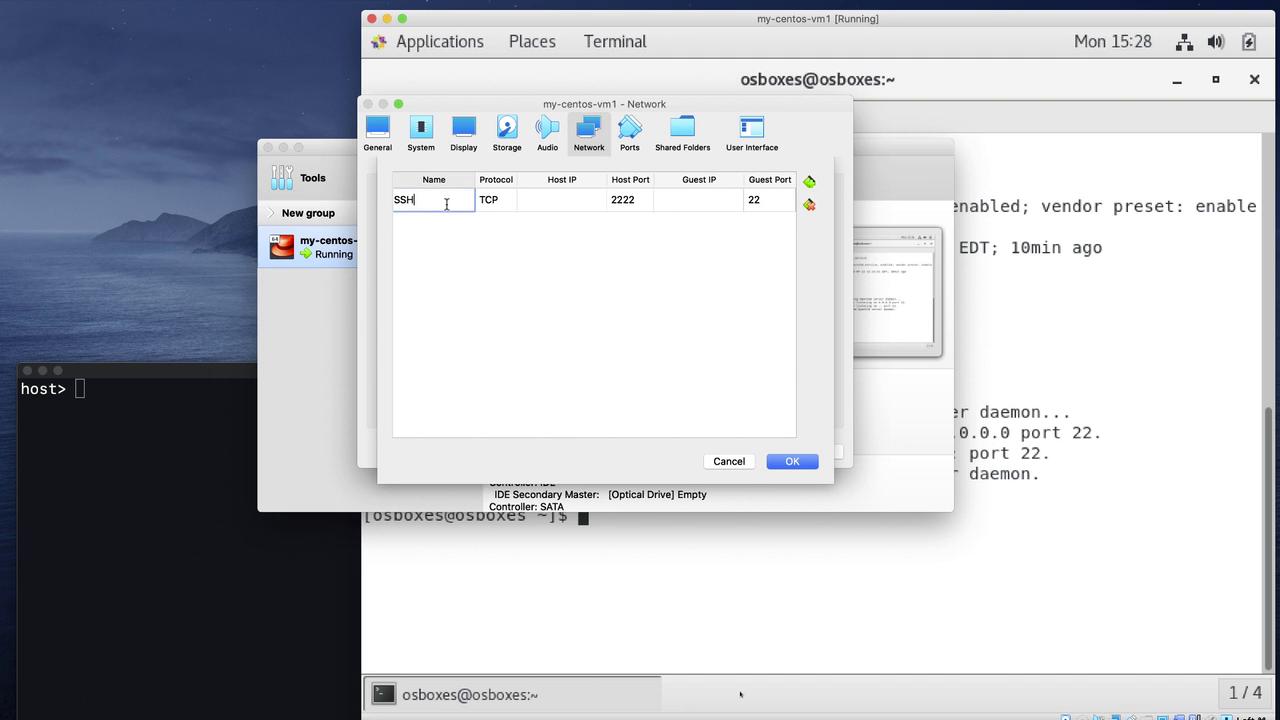
When using NAT, as on Mac, the VM does not receive an IP address on the external network. Instead, SSH access requires you to configure port forwarding. Both network configurations—bridged and NAT—are available on Windows and Mac, offering different connectivity options depending on your needs.
When you power on the system, if the console appears too small, adjust the scale from the View menu to 300%. A welcome screen and wizard may appear; simply complete them and close the wizard.
Open the terminal from the applications menu and check the VM’s IP address:
[osboxes@osboxes ~]$ ip
The VM will display an IP address of 10.0.2.15. This is a private internal IP assigned by the NAT router, meaning it is not accessible externally from the host. Do not attempt to ping or SSH into this IP directly from the host. Even if multiple VMs use NAT (resulting in the same IP), they remain isolated from one another. However, with a functioning internet connection, all VMs can access external sites. Verify connectivity by pinging an external website:
[osboxes@osboxes ~]$ ping www.google.comPING www.google.com (142.250.4.99) 56(84) bytes of data.64 bytes from 142.250.4.99: icmp_seq=1 ttl=63 time=3.30 ms64 bytes from 142.250.4.99: icmp_seq=2 ttl=63 time=3.34 ms64 bytes from 142.250.4.99: icmp_seq=3 ttl=63 time=3.52 ms--- www.google.com ping statistics ---3 packets transmitted, 3 received, 0% packet loss, time 2004msrtt min/avg/max/mdev = 3.300/3.390/3.522/0.106 ms[osboxes@osboxes ~]$
The VM’s IP (10.0.2.15) is assigned for internal communication by the NAT router and is not reachable from your host directly.
Before attempting to SSH, ensure that the SSH service is running on the VM:
[osboxes@osboxes ~]$ service sshd statusRedirecting to /bin/systemctl status sshd.service● sshd.service - OpenSSH server daemon Loaded: loaded (/usr/lib/systemd/system/sshd.service; enabled; vendor preset: enabled) Active: active (running) since Mon 2020-04-13 15:15:51 EDT; 10min ago Docs: man:sshd(8) man:sshd_config(5) Main PID: 1026 (sshd) Tasks: 1 CGroup: /system.slice/sshd.service └─1026 /usr/sbin/sshd -DApr 13 15:15:51 osboxes systemd[1]: Starting OpenSSH server daemon...Apr 13 15:15:51 osboxes sshd[1026]: Server listening on 0.0.0.0 port 22.Apr 13 15:15:51 osboxes sshd[1026]: Server listening on :: port 22.Apr 13 15:15:51 osboxes systemd[1]: Started OpenSSH server daemon.[osboxes@osboxes ~]$
Since the NAT configuration does not provide an externally reachable IP, port forwarding is required to enable SSH access.