In this guide, we will walk through how to complete your database schema using Alembic. We add user functionality by creating a users table, link posts to users using a foreign key, and then add additional columns along with a votes table via Alembic’s auto-generation feature.

Creating the Users Table

After successfully creating the posts table, the next step is implementing user functionality by creating a users table. This table will allow users to register and log in.
Before proceeding, ensure that your existing posts table is functioning correctly.
First, we add a new column to the posts table by executing the following migration:
The corresponding console output for upgrading and downgrading is:
Next, generate a new migration for the users table. Instead of typing everything from scratch, copy the following code from your notes:
Alembic will generate a migration file automatically, as seen below:

Key Points in the Users Table Migration

  • The id column is defined as an integer and set as non-nullable. A primary key is established using either primary_key=True or a separate sa.PrimaryKeyConstraint('id').
  • The email column has a unique constraint to prevent duplicate entries.
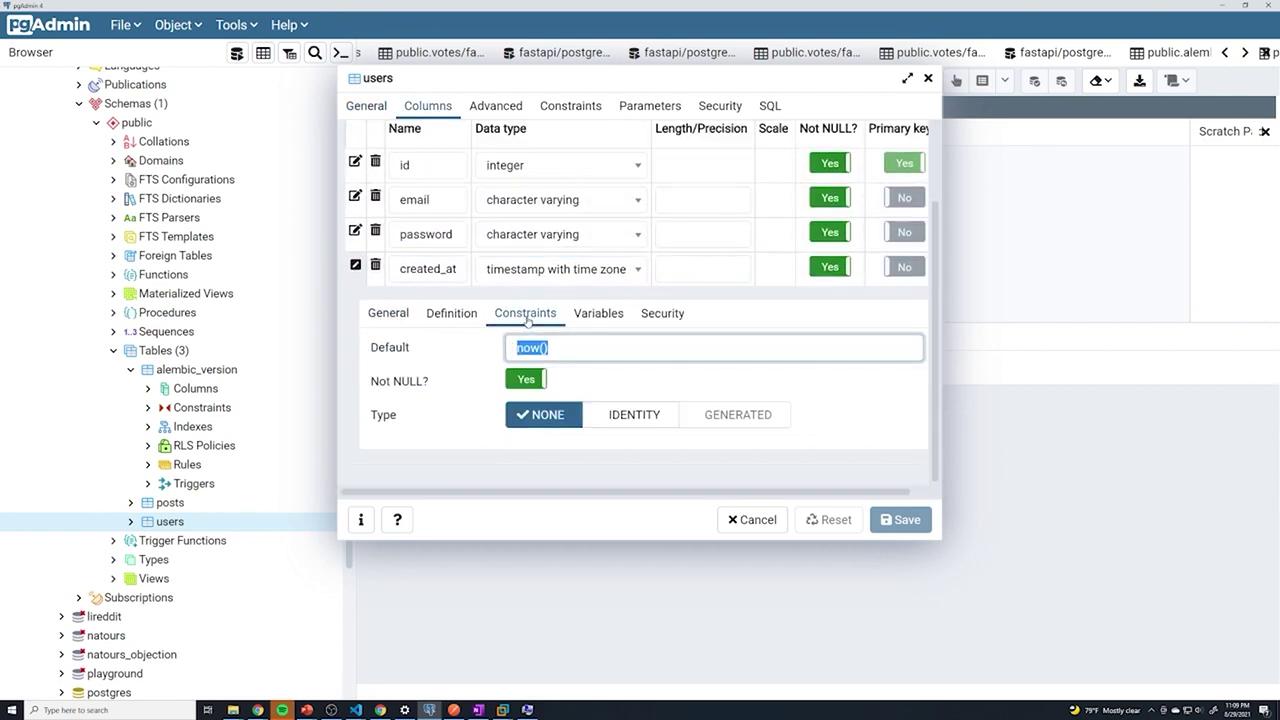
  • The created_at column is defined with TIMESTAMP and timezone support. Its default value is set to now() using server_default=sa.text('now()').
This configuration is reflected in your SQLAlchemy models:
The same SQL migration for creating the users table is captured here:
After running this migration, verify via your database interface that the users table contains the correct columns and constraints.
The image shows a pgAdmin interface with a table schema for "users," displaying columns like id, email, password, and created_at, along with their data types and constraints. The "Constraints" tab is open, showing a default value being set to "now()" for a timestamp column.

Adding a Foreign Key to the Posts Table

Next, establish a relationship between the posts and users tables by adding a foreign key to the posts table. To link the two tables, add a new column owner_id to the posts table. Start by introducing the column without the constraint:
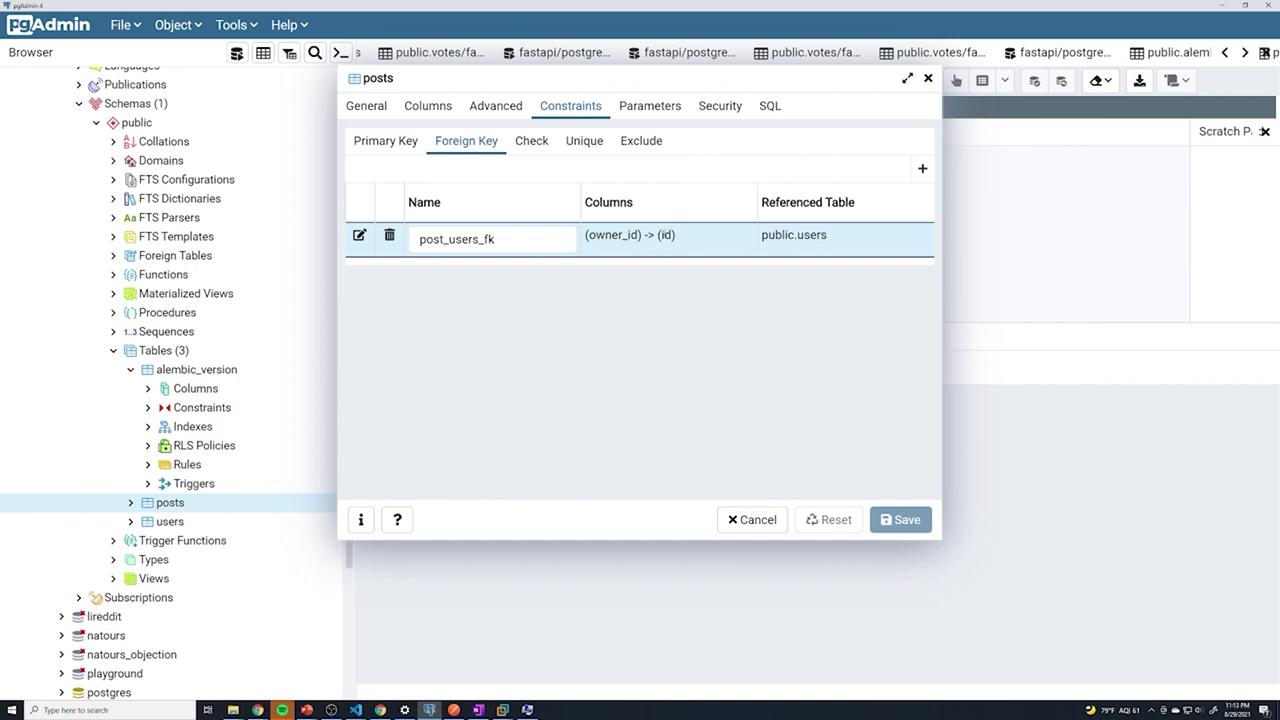
Then, update the migration to set up the foreign key that connects posts.owner_id to users.id with cascading delete behavior:
Ensure that your downgrade function reverses these changes properly:
After running the migration, use the following command to apply it:
After the upgrade, verify in pgAdmin that the foreign key constraint is correctly set up:
The image shows a pgAdmin interface with a foreign key constraint setup for a table named "posts," linking the "owner_id" column to the "id" column in the "public.users" table. The interface includes options to save or cancel the changes.

Adding Additional Columns to the Posts Table

Your application may require extra functionality that necessitates new columns. In this case, we add a boolean published column and a created_at timestamp column to the posts table. The following migration achieves this:
Run this migration and check the updated table structure via PostgreSQL. The image below shows the updated posts table schema:
The image shows a pgAdmin interface displaying the structure of a "posts" table with columns like "id," "title," "content," and "published," along with their data types and constraints. The left panel lists various database schemas and tables.

Downgrading and Re-Upgrading Revisions

Alembic provides the flexibility to rollback and upgrade revisions as needed. For instance, to roll back to the revision corresponding to the user table, use the following migration:
Then run:
Alternatively, upgrade a single revision:
Or upgrade directly to the latest revision using:
This approach ensures efficient management of your database schema throughout your development lifecycle.

Auto-Generating the Votes Table

With the posts and users tables in place, the next step is creating a votes table. Instead of writing the migration manually, leverage Alembic’s auto-generation feature. Alembic compares your SQLAlchemy models with the existing schema and creates the necessary migration. Below is the SQLAlchemy model for the Post, which includes all required columns:
After ensuring your models are imported in Alembic’s configuration, run the following command:
The auto-generated migration for the votes table will resemble this:
After upgrading with alembic upgrade head, verify that the votes table is created with the appropriate foreign key constraints.

Updating the User Model with a New Phone Number Column

If you wish to extend your User model with an optional phone_number column, update your SQLAlchemy model as shown below:
Then, create an auto-migration to reflect this change:
The generated migration file should include:
Upon running the upgrade, verify through pgAdmin that a new phone_number column is present in the users table:
The image shows a pgAdmin interface displaying the structure of a "users" table with columns for ID, email, password, created_at, and phone_number. The data types and NULL constraints for each column are also visible.

Removing models.Base.metadata.create_all from main.py

As Alembic now manages your database schema, you can remove the direct table creation command from your main application file. Although keeping it might be useful during early development, it is redundant once migrations are in place. Below is a sample main.py file with the table creation commented out:
When you start the application, the console will display standard startup messages:

By following these steps, you can efficiently manage your evolving database schema with Alembic. This process minimizes manual migration work and ensures that your database stays in sync with your SQLAlchemy models as your application grows. For further reading on Alembic and database migrations, consider exploring Alembic’s official documentation.

Watch Video