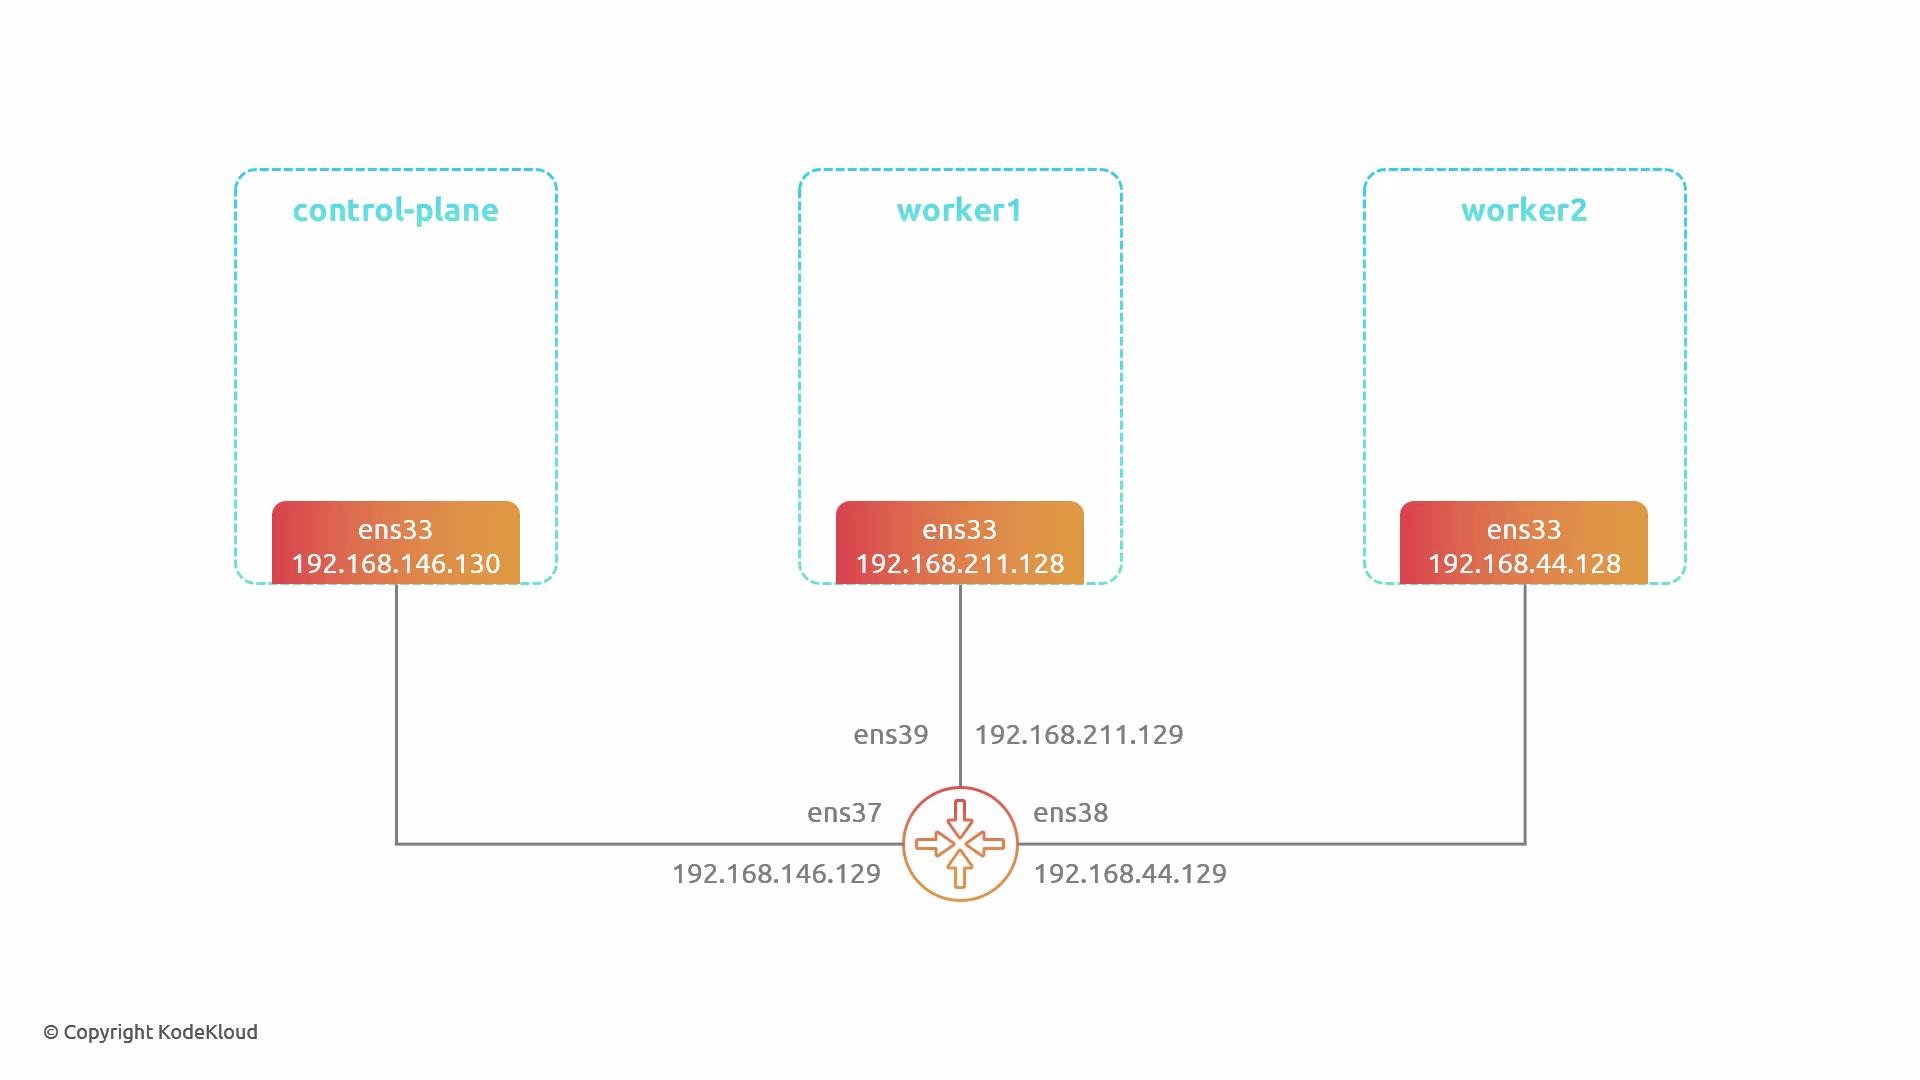
This guide demonstrates how to enable and verify IPsec encryption between pods using Cilium. We’ll use a simple three-node cluster (control-plane, worker1, worker2) connected via a single router. The workflow:
  • Deploy pods on worker1 and worker2.
  • Generate pod-to-pod traffic (ICMP/HTTP).
  • Capture traffic on the router before enabling encryption (unencrypted).
  • Enable Cilium encryption (IPsec).
  • Capture traffic again (encrypted) and verify in Wireshark.
  • Inspect node host interfaces to understand encapsulation addresses.
Topology (logical):
A simple network diagram showing three machines (control-plane, worker1, worker2), each with an ens33 interface and IPs 192.168.146.130, 192.168.211.128, and 192.168.44.128 respectively. They are linked to a central router/switch with interfaces ens37, ens39, ens38 (IPs .129 on each corresponding subnet).
Overview of steps
  • Verify pods are scheduled and reachable across nodes.
  • Capture unencrypted traffic on the router (validate visibility).
  • Add IPsec keys as a Kubernetes secret.
  • Enable encryption in the Cilium Helm values and upgrade.
  • Restart Cilium components, validate encryption status.
  • Capture encrypted traffic and inspect with Wireshark.
  • Inspect cilium_host addresses on nodes to understand outer IPs.
Quick reference — tools used
Resource / ToolPurposeExample / Link
tcpdumpCapture packets on the routerhttps://www.tcpdump.org
WiresharkInspect PCAPs and identify ESP/VXLANhttps://www.wireshark.org
kubectlKubernetes control plane operationshttps://kubernetes.io
helmInstall / upgrade Cilium charthttps://helm.sh
Cilium encryption (IPsec/WireGuard)Encrypt node-to-node pod traffichttps://cilium.io
Initial verification — pods and basic pod-to-pod traffic
  1. Confirm pods are running and which nodes they are on:
user1@control-plane:~$ kubectl get pod -o wide
NAME                                READY   STATUS    RESTARTS   AGE   IP           NODE
app1-75c78488c4-79vmb               1/1     Running   0          53s   10.0.2.200   worker2
app1-75c78488c4-7mslf               1/1     Running   0          53s   10.0.2.137   worker2
app1-75c78488c4-7wsn8               1/1     Running   0          53s   10.0.1.145   worker1
app1-75c78488c4-fqg5s               1/1     Running   0          53s   10.0.2.66    worker2
app1-75c78488c4-h9mjp               1/1     Running   0          53s   10.0.1.47    worker1
app1-75c78488c4-hvh9f               1/1     Running   0          53s   10.0.1.59    worker1
  1. Generate basic traffic from a pod on worker1 to a pod on worker2 (ICMP example):
user1@control-plane:~$ kubectl exec -it app1-75c78488c4-hvh9f -- bash
app1-75c78488c4-hvh9f:~# ping 10.0.2.200
PING 10.0.2.200 (10.0.2.200) 56(84) bytes of data.
64 bytes from 10.0.2.200: icmp_seq=1 ttl=63 time=13.2 ms
64 bytes from 10.0.2.200: icmp_seq=2 ttl=63 time=0.661 ms
64 bytes from 10.0.2.200: icmp_seq=3 ttl=63 time=1.46 ms
^C
--- 10.0.2.200 ping statistics ---
3 packets transmitted, 3 received, 0% packet loss
app1-75c78488c4-hvh9f:~# exit
Capturing unencrypted traffic on the router 
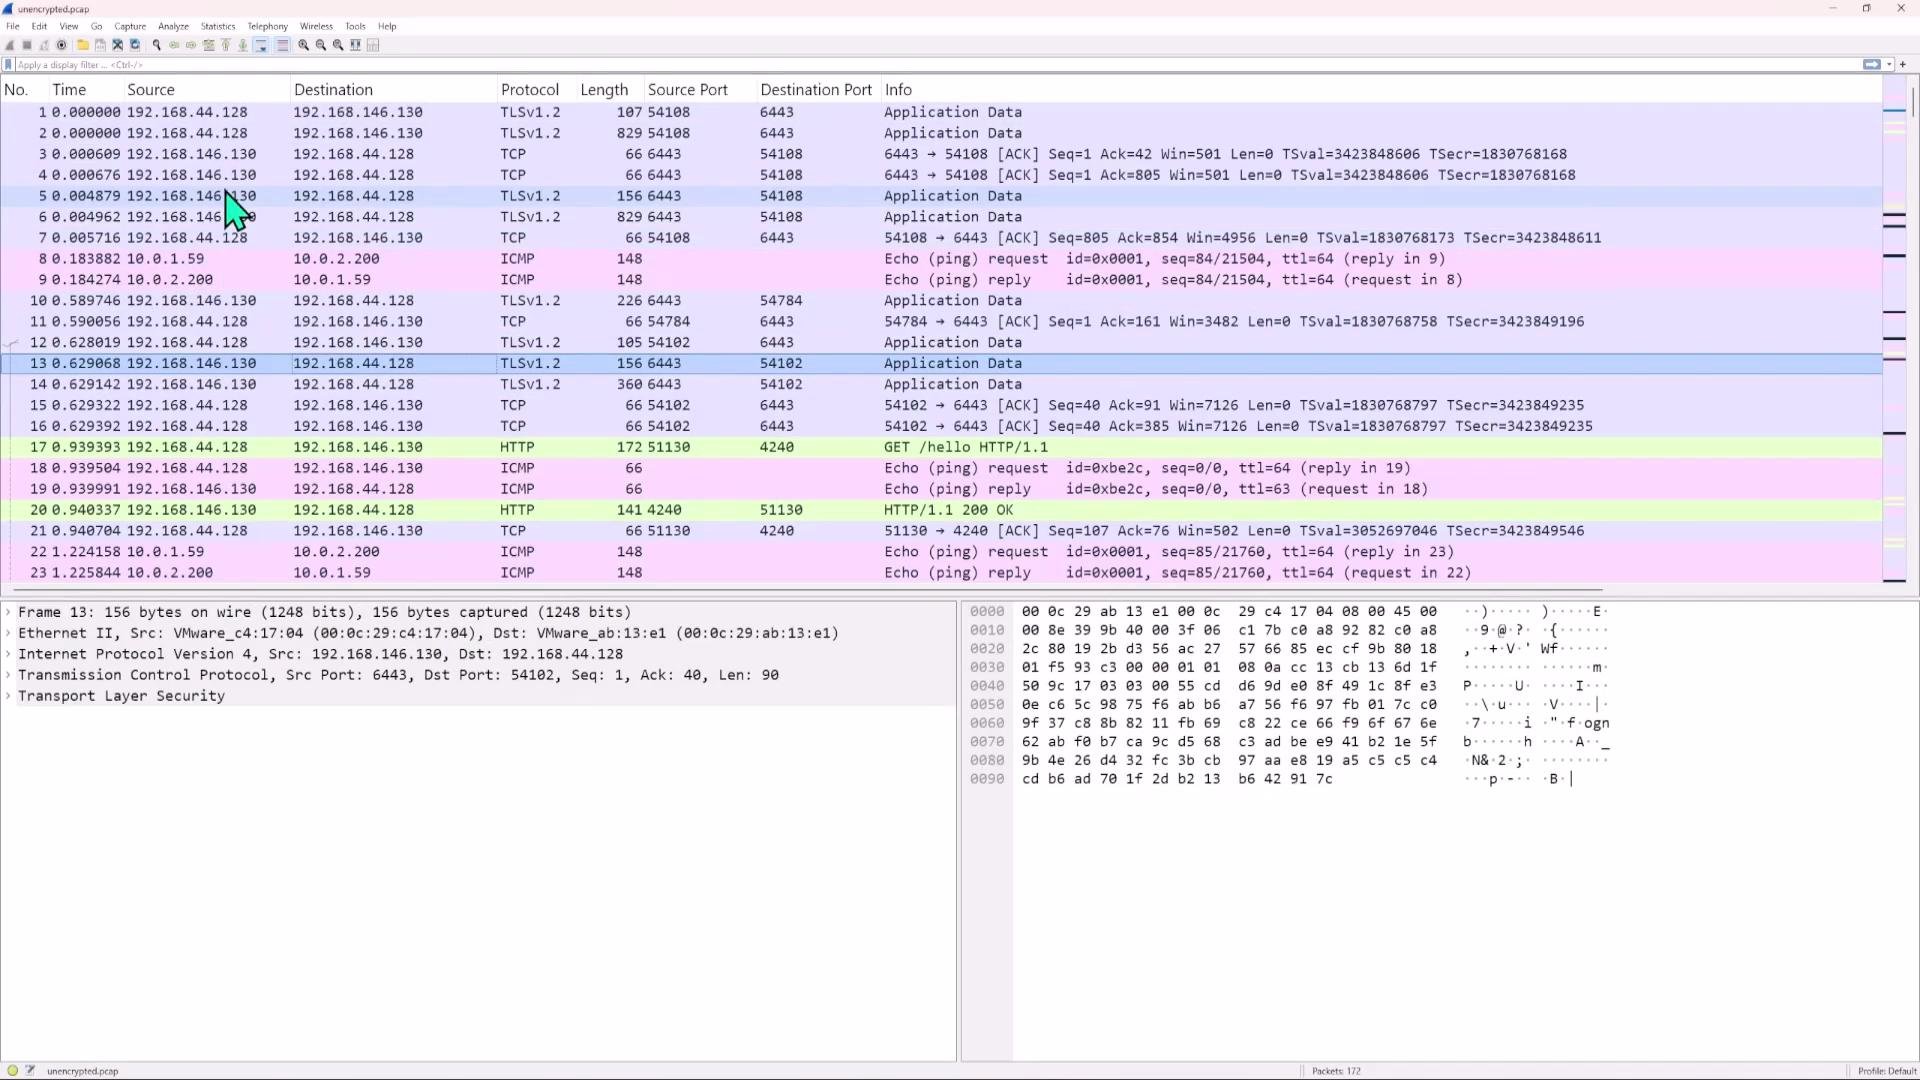
Run tcpdump on the router interface connected to the cluster (ens38 in this demo). Save to unencrypted.pcap. Packet capture requires elevated privileges.
Run tcpdump with sudo if you get “Operation not permitted” — packet capture needs root privileges.
user1@router:~$ sudo tcpdump -nnvv -i ens38 -w unencrypted.pcap
[sudo] password for user1:
tcpdump: listening on ens38, link-type EN10MB (Ethernet), snapshot length 262144 bytes
^C
172 packets captured
172 packets received by filter
0 packets dropped by kernel
Open unencrypted.pcap in Wireshark. With encryption disabled you will observe pod-to-pod traffic in cleartext for non-encrypted protocols (ICMP, HTTP). Note that application protocols using their own encryption (TLS) remain encrypted at the application layer — you will see TLS records but not the decrypted payload.
Screenshot of a Wireshark packet-capture window showing a list of network packets (TCP/TLS/HTTP/ICMP) with packet details and a hex/ASCII payload pane. A highlighted HTTP GET /hello request and various TLS and ICMP entries are visible.
Example Wireshark lines (cleartext example):
No.  Time        Source        Destination   Protocol Length Info
8    0.183882    10.0.1.59     10.0.2.200    ICMP     148    Echo (ping) request
9    0.184274    10.0.2.200    10.0.1.59     ICMP     148    Echo (ping) reply
17   0.939393    192.168.44.128 192.168.146.130 HTTP   172    GET /hello HTTP/1.1
You can expand a frame to view ICMP or HTTP payload in hex/ASCII to confirm visibility when encryption is not enabled. Enable IPsec encryption in Cilium Cilium supports IPsec or WireGuard for node-to-node encryption. The following demonstrates enabling IPsec.
  1. Create the Kubernetes secret containing IPsec keys in kube-system. The key entry format:
key-id rfc4106(gcm(aes)) <PSK-in-hex> <key-size-in-bits> Generate a 16-byte (128-bit) key as an example and create the secret:
user1@control-plane:~$ kubectl create -n kube-system secret generic cilium-ipsec-keys \
  --from-literal=keys="3 rfc4106(gcm(aes)) $(dd if=/dev/urandom bs=1 count=16 2>/dev/null | xxd -p -c 16) 128"
secret/cilium-ipsec-keys created
Verify the secret exists:
user1@control-plane:~$ kubectl get secret -n kube-system
NAME                           TYPE                  DATA   AGE
cilium-ca                      Opaque                2      21m
cilium-ipsec-keys              Opaque                1      7s
hubble-server-certs            kubernetes.io/tls     3      21m
sh.helm.release.v1.cilium.v1   helm.sh/release.v1    1      21m
Keep IPsec keys secret and manage them securely. Use appropriate key lengths for your security requirements (e.g., 256-bit where needed).
  1. Edit the Cilium Helm values (values.yaml) to enable encryption. Set the encryption block like:
encryption:
  enabled: true
  type: ipsec
(If you prefer WireGuard, set type: wireguard and provide keys in the expected format.)
  1. Upgrade the Cilium chart and restart Cilium components:
user1@control-plane:~$ helm upgrade cilium cilium/cilium -n kube-system -f values.yaml
Release "cilium" has been upgraded. Happy Helming!

user1@control-plane:~$ kubectl -n kube-system rollout restart deployment/cilium-operator
deployment.apps/cilium-operator restarted

user1@control-plane:~$ kubectl -n kube-system rollout restart ds/cilium
daemonset.apps/cilium restarted
Wait for pods to restart and become Ready. Verify the kube-system Cilium pods are running:
user1@control-plane:~$ kubectl get pod -n kube-system
NAME                                               READY   STATUS    RESTARTS   AGE
cilium-7f68t                                       1/1     Running   0          2m13s
cilium-operator-c8c8fcf7-6mpcq                     1/1     Running   0          2m27s
...
  1. Confirm Cilium reports encryption is active from a Cilium agent pod:
user1@control-plane:~$ kubectl exec -n kube-system cilium-7f68t -- cilium-dbg encrypt status
Defaulted container "cilium-agent" out of: cilium-agent, config (init)...
Encryption: IPsec
Decryption interface(s):
Keys in use: 8
Max Seq. Number: N/A
Errors: 0
(Replace cilium-7f68t with a real pod name from your environment.) Capture and inspect encrypted traffic
  1. Generate traffic again from the same pod but use a larger ICMP payload so encrypted packets are easier to spot (e.g., -s 1300):
# from pod on worker1
app1-75c78488c4-hvh9f:~# ping 10.0.2.200 -s 1300
Note: Place the -s option before the destination IP.
  1. On the router capture encrypted traffic to encrypted.pcap:
user1@router:~$ sudo tcpdump -nnvv -i ens38 -w encrypted.pcap
^C
# capture stopped, file encrypted.pcap saved
  1. Open encrypted.pcap in Wireshark. With Cilium IPsec enabled you should no longer see ICMP or HTTP payloads in cleartext for inter-node pod flows. Instead, you will typically see:
  • Encapsulating Security Payload (ESP) frames (the encrypted inner payload).
  • Possibly additional encapsulation like VXLAN + ESP depending on Cilium configuration.
  • Large frame sizes due to encapsulation overhead.
Example encrypted-frame excerpt:
Frame 9: 1448 bytes on wire (11584 bits)
Internet Protocol Version 4, Src: 192.168.211.128, Dst: 192.168.44.128
User Datagram Protocol, Src Port: 51422, Dst Port: 8472
Virtual eXtensible Local Area Network
Internet Protocol Version 4, Src: 10.0.1.124, Dst: 10.0.2.104
Encapsulating Security Payload
  ESP SPI: 0x00000003 (3)
  ESP Sequence: 15
You should see ESP where the inner protocol (ICMP/HTTP) is not visible — the payload is encrypted and Wireshark cannot display inner protocol fields. Why captures show cilium_host (node) IPs as outer addresses When Cilium encrypts node-to-node traffic it encapsulates pod IPs inside an outer packet that uses node-local Cilium host addresses. Each node typically has a cilium_host interface with a /32 address reserved for encapsulation. For example:
user1@worker1:~$ ip addr
4: cilium_host@cilium_net: <...> mtu 1500 ...
    link/ether ee:c1:7f:8d:6b:fe brd ff:ff:ff:ff:ff:ff
    inet 10.0.1.124/32 scope global cilium_host
Worker2 will have its own cilium_host (e.g., 10.0.2.104/32). On the wire you will therefore see outer source/destination addresses set to these host addresses and ESP as the protocol; the inner (encrypted) packet contains the original pod IPs and payload. Recap and key takeaways
  • Before enabling Cilium encryption, router captures show pod payloads (ICMP, HTTP) in cleartext.
  • After enabling Cilium IPsec, inter-node traffic is encapsulated and encrypted — Wireshark shows ESP (and possibly VXLAN) and you cannot read the inner ICMP/HTTP payloads from the router capture.
  • Cilium uses node-local host interfaces (cilium_host) for outer addresses; the receiving node decrypts and forwards the inner pod traffic to the destination pod.
  • Use IPsec or WireGuard depending on your operational and performance requirements.
Links and references

Watch Video