This article explores admission controllers in Kubernetes, detailing their role in enforcing security and modifying requests before persistence.
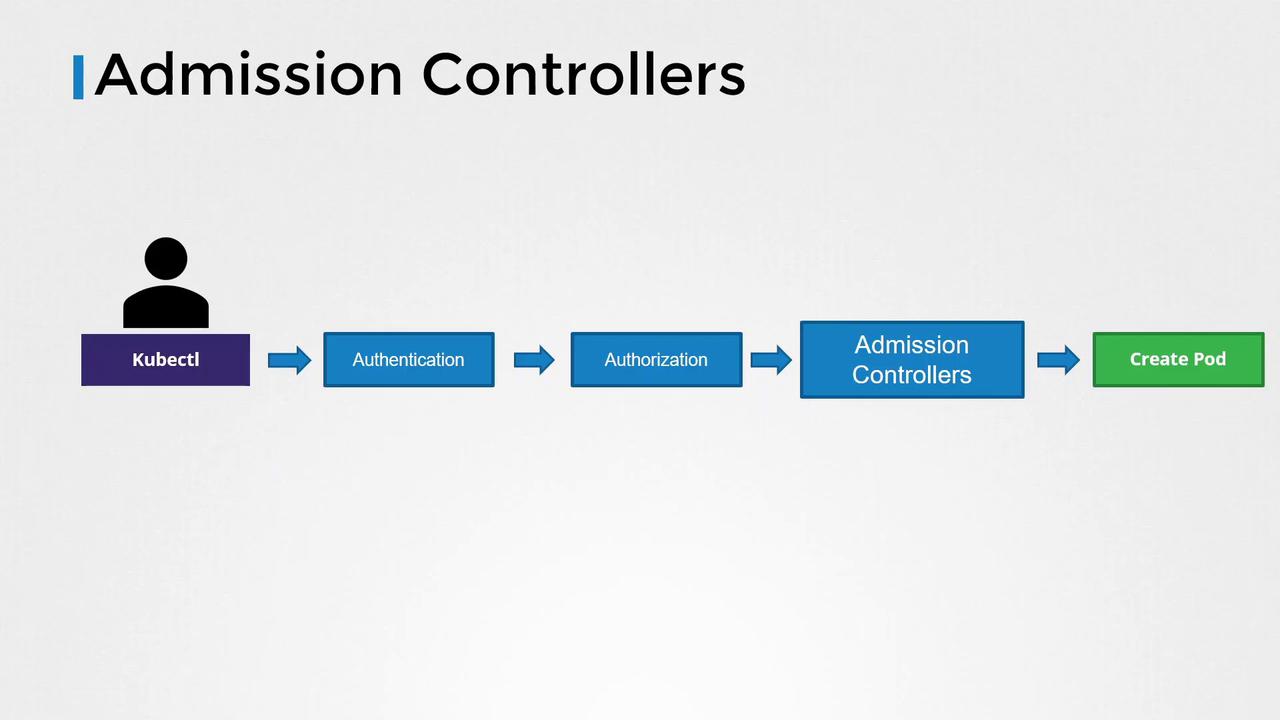
In this lesson, we’ll explore admission controllers—an essential component of Kubernetes that enforces additional security measures and modifies requests before they are persisted. Understanding how admission controllers work and how to configure them is key to enhancing your cluster’s security and operations.When you use the kubectl utility to interact with a Kubernetes cluster (for example, to create a pod), the request first reaches the API server. The following sequence outlines the process:
The API server receives the request.
It authenticates the request—commonly using certificates specified in your KubeConfig file. For example, inspect your KubeConfig with:
cat ~/.kube/configapiVersion: v1clusters:- cluster: certificate-authority-data: LS0t... # Truncated for brevity
Once authenticated, the request proceeds to the authorization phase where Kubernetes checks if the user has permission to perform the operation, typically using Role-Based Access Control (RBAC). For example, a developer role can be defined as follows:
In this example, the developer role is limited to operations on pods named “blue” or “orange”. These RBAC rules operate solely at the API level to control permitted operations.
After authentication and authorization, you might need to enforce restrictions beyond what RBAC offers. Consider these scenarios:
Preventing images from public Docker Hub by allowing only images from a specific internal registry.
Enforcing that images never use the “latest” tag.
Rejecting pod creation when a container is configured to run as the root user.
Allowing specific capabilities (like “MAC_ADMIN”) only under certain conditions.
Ensuring resource metadata always includes specific labels.
To address such policies, admission controllers are used. They operate after authentication and authorization but before the request is saved in etcd. Admission controllers can validate configurations, modify requests, or trigger additional operations.Below is an overview of the Kubernetes process flow with admission controllers positioned between the authorization phase and resource creation:
Consider the “namespace exists” admission controller. When you attempt to create a pod in a namespace that doesn’t exist, for instance:
kubectl run nginx --image nginx --namespace blue
The API server goes through authentication and RBAC authorization. Then, the namespace exists controller checks for the “blue” namespace. Since it isn’t found, the request is rejected with an error similar to:
Error from server (NotFound): namespaces "blue" not found
Some clusters may have the namespace auto-provision admission controller enabled (disabled by default) to automatically create missing namespaces.
To list the admission controllers enabled by default, run:
kube-apiserver -h | grep enable-admission-plugins
If you’re using a kubeadm-based setup, execute this command inside the kube-apiserver control plane pod using the kubectl exec command.
To add an admission controller, update the --enable-admission-plugins flag on the Kubernetes API server. In a kubeadm-based setup, modify the kube-apiserver manifest file accordingly. For example, to enable both NodeRestriction and NamespaceAutoProvision, update the ExecStart command as follows:
With NamespaceAutoProvision enabled, running the following command:
kubectl run nginx --image nginx --namespace blue
passes through authentication and authorization. The auto-provision controller detects that the “blue” namespace is missing, creates it automatically, and the pod creation completes successfully. The output would be:
kubectl run nginx --image nginx --namespace bluePod/nginx created!
Verifying the existing namespaces:
kubectl get namespacesNAME STATUS AGEblue Active 3mdefault Active 23mkube-public Active 24mkube-system Active 24m
This example shows that admission controllers not only validate and potentially reject requests but can also perform background operations and modify the request content as needed.
Note that the NamespaceAutoProvision and NamespaceExists admission controllers are deprecated. They have been replaced by the Namespace Lifecycle admission controller, which now ensures that requests to non-existent namespaces are rejected and protects default namespaces (such as default, kube-system, and kube-public) from deletion.
This concludes our lesson on admission controllers. By practicing with these controllers, you can gain a deeper understanding of how to enhance Kubernetes security and manage your cluster effectively.