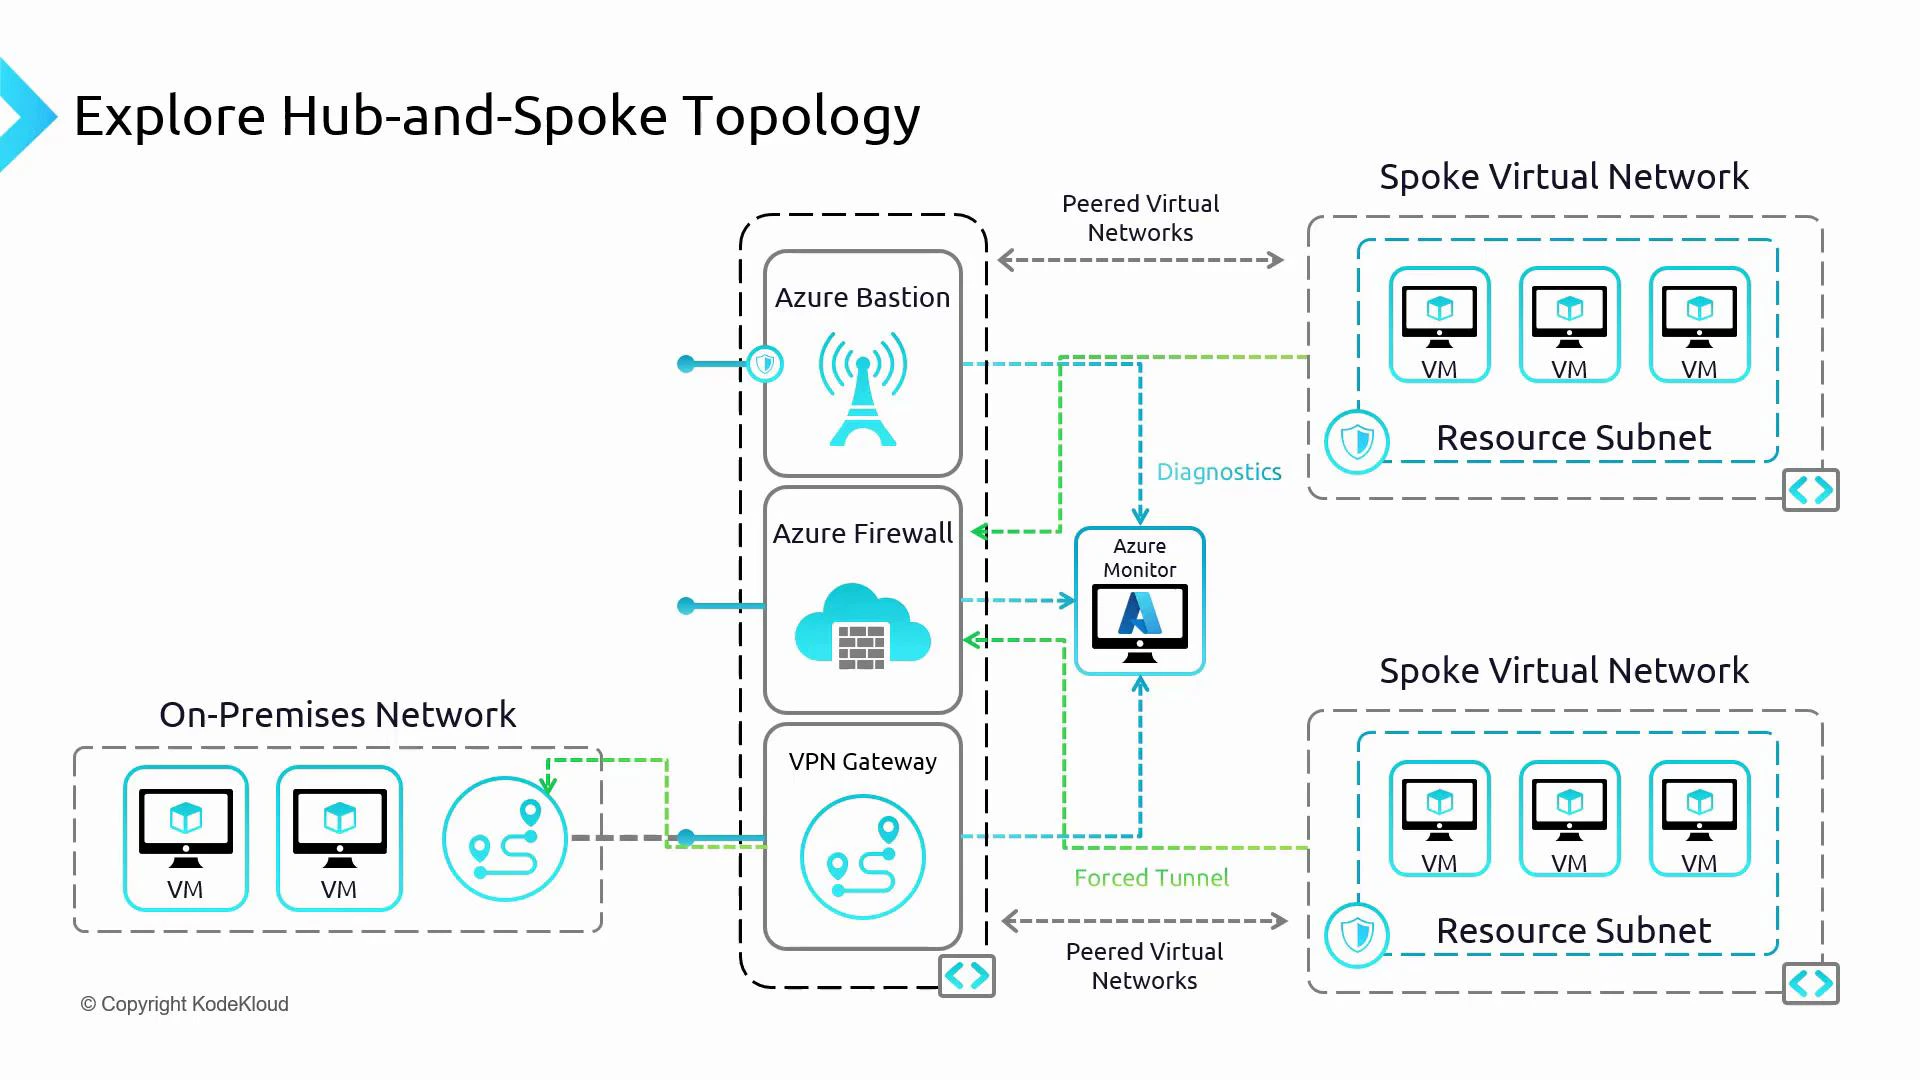
This guide shows a practical Azure hub-and-spoke network pattern focused on perimeter security using Azure Firewall in the hub to control traffic between two spoke VNets. Bastion and VPN Gateway configuration are intentionally out of scope — this lesson concentrates on routing, firewall rules, and verifying connectivity.
In a typical Azure hub-and-spoke topology the hub VNet hosts shared services such as Azure Firewall, Azure Bastion, and a VPN gateway, while spoke VNets host application or workload subnets. The hub acts as a central inspection and routing point and can connect to on-premises networks or other hubs. Key hub responsibilities:
  • Centralized traffic inspection and filtering with Azure Firewall.
  • Secure management access via Azure Bastion (no public RDP/SSH ports required).
  • Encrypted site-to-site connections via a VPN gateway.
  • Centralized logging and telemetry through Azure Monitor.
A network diagram illustrating an Azure hub-and-spoke topology, with a central hub containing Azure Bastion, Azure Firewall, and a VPN gateway connected to on-premises network and Azure Monitor. Two spoke virtual networks with resource subnets and VMs are peered to the hub, showing diagnostics and forced-tunnel flows.
What you’ll do in this walkthrough
  • Create and attach a route table for Spoke B so that non-internal traffic is routed to the hub firewall.
  • Associate the route table with the spoke subnet.
  • Add Azure Firewall network rules to allow specific spoke-to-spoke communication.
  • Verify connectivity and HTTP/HTTPS behavior based on the firewall rules.
Important resources Create and configure the route table for Spoke B
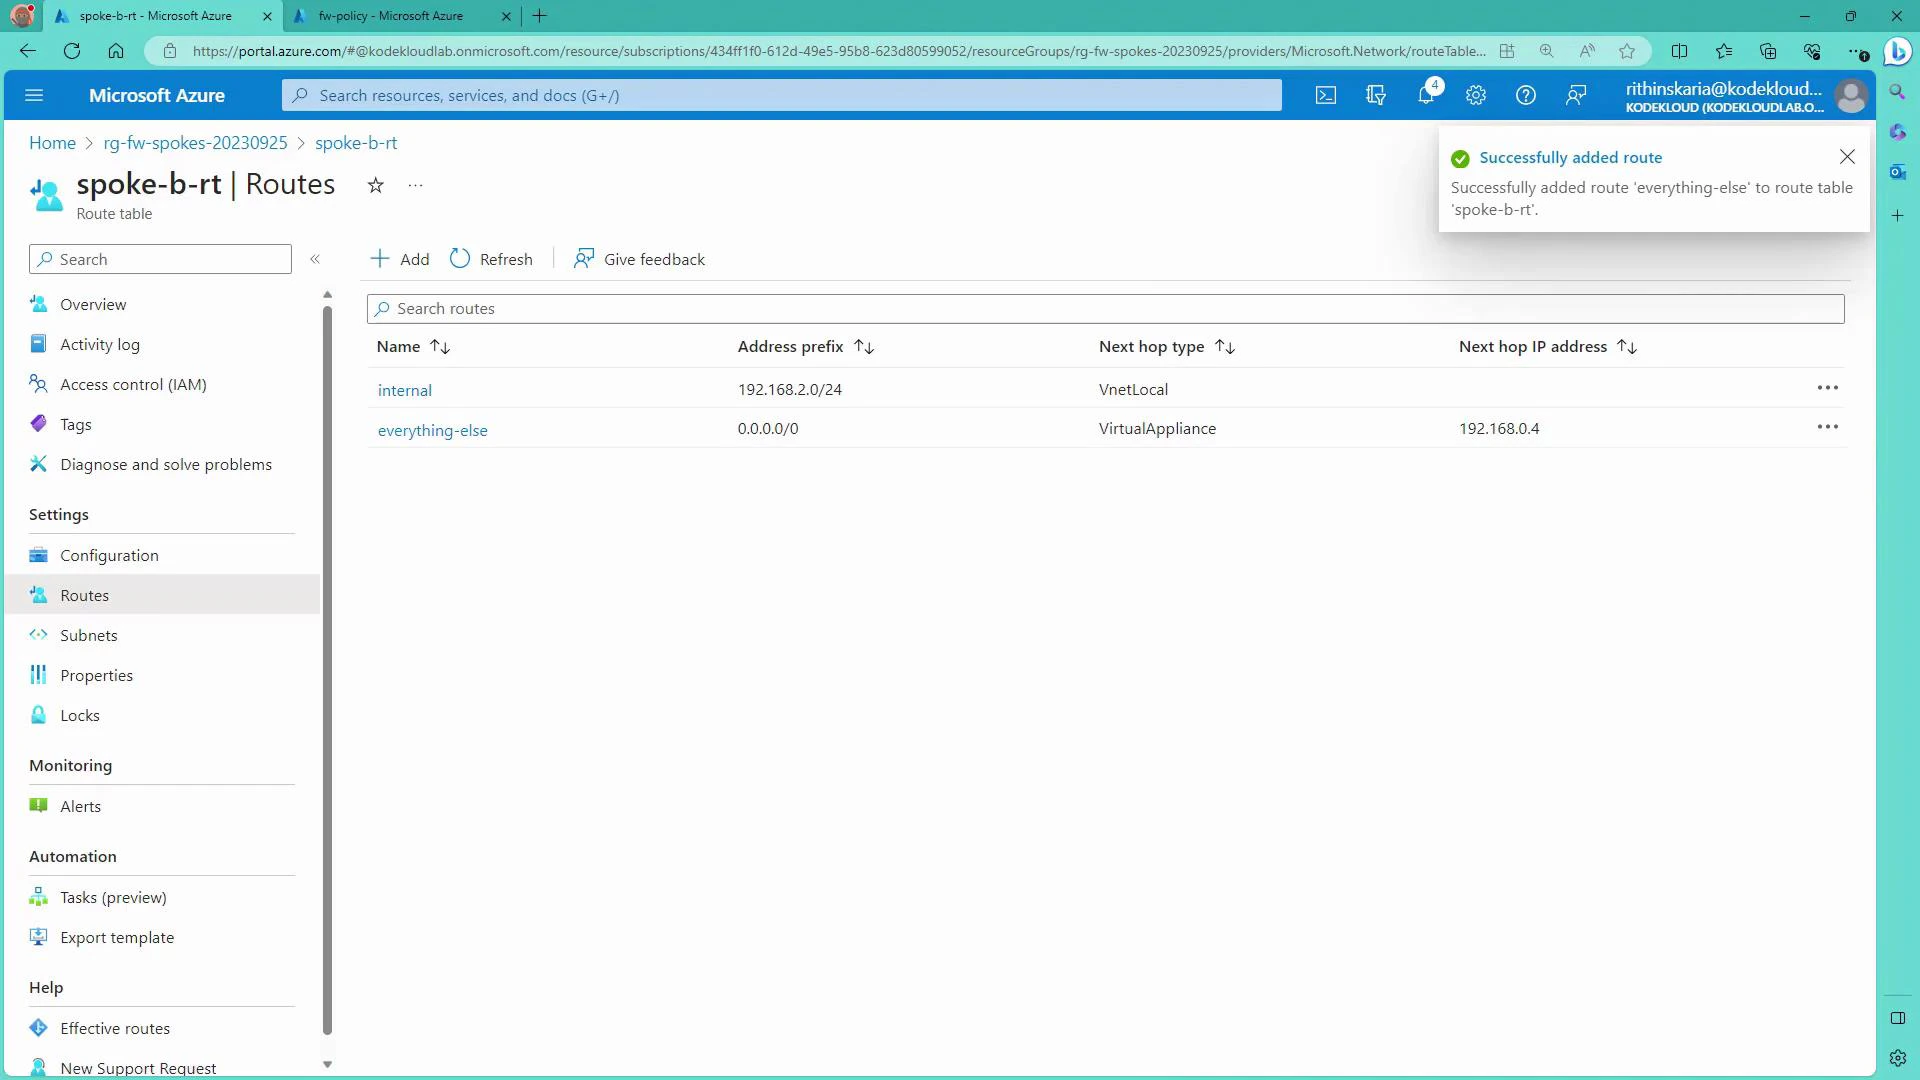
  1. In the Azure portal, create a route table in the Spoke resource group and name it SpokeBRT (Spoke B Route Table).
  2. Add these two routes to SpokeBRT:
Route nameDestination CIDRNext hop typeNext hop address / notes
internal192.168.2.0/24Virtual networkKeeps local subnet traffic local
everything-else0.0.0.0/0Virtual appliance192.168.0.4 (Azure Firewall IP in hub)
After adding the routes, the portal shows confirmation that the “everything-else” route was added:
A Microsoft Azure portal screenshot showing the "spoke-b-rt" route table with two routes: "internal" (192.168.2.0/24 via VnetLocal) and "everything-else" (0.0.0.0/0 via VirtualAppliance to 192.168.0.4). A notification at the top-right confirms the "everything-else" route was successfully added.
Verify public connectivity to the VM before associating the route table
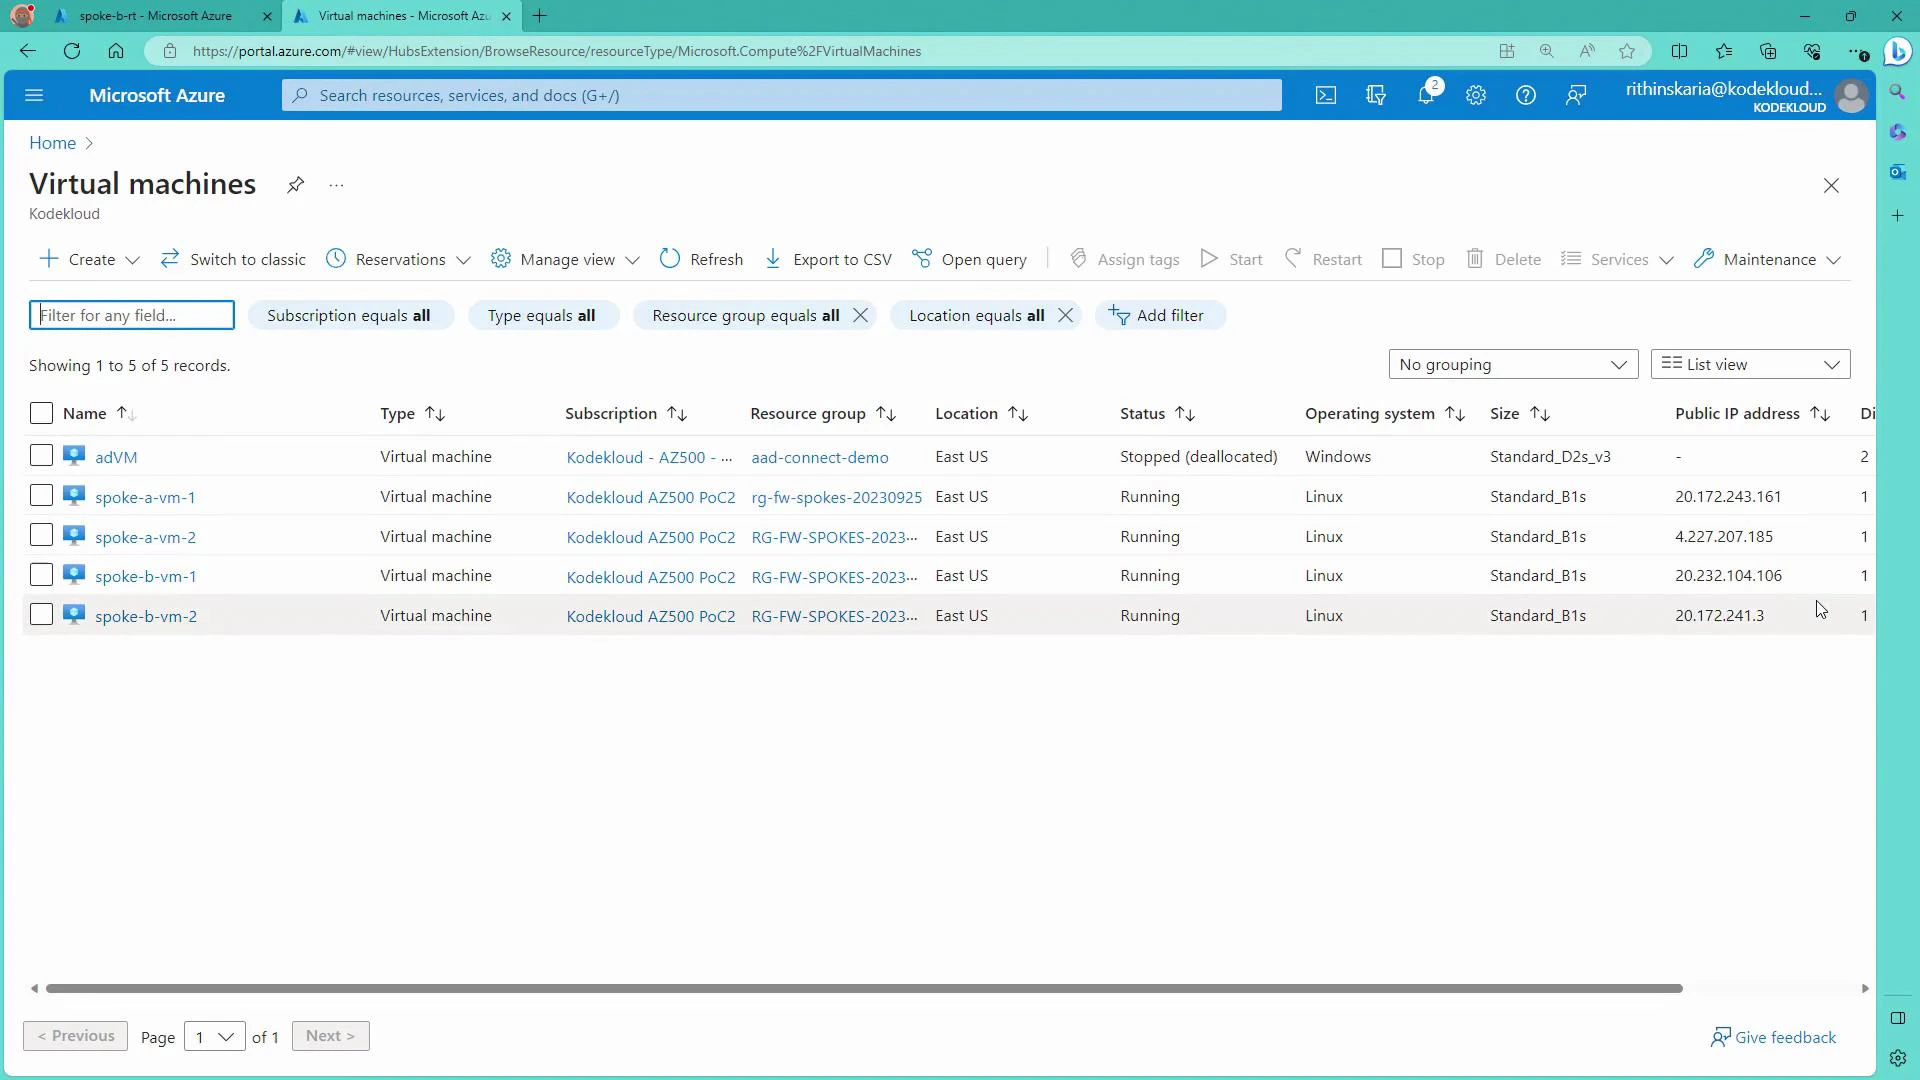
  • Before associating the route table, VMs in Spoke B may still be reachable via their public IPs. Confirm connectivity (for example via SSH) from your workstation.
List of lab VMs in the Virtual Machines blade:
A screenshot of the Microsoft Azure portal showing the "Virtual machines" list with five VMs (adVM, spoke-a-vm-1, spoke-a-vm-2, spoke-b-vm-1, spoke-b-vm-2) including columns for subscription, resource group, location (East US), OS, status, size and public IP. Most VMs are running Linux while adVM is stopped (deallocated).
Example SSH session to a Spoke B VM public IP (sanitized):
PS C:\Users\RithinSkaria> ssh kodekloud@20.232.104.106
The authenticity of host '20.232.104.106 (20.232.104.106)' can't be established.
ED25519 key fingerprint is SHA256:MbBAYg1XPD5Qb/TfWbzHMV8OPMbAQlMdgOnRJyFfEXk0.
Are you sure you want to continue connecting (yes/no/[fingerprint])? yes
Warning: Permanently added '20.232.104.106' (ED25519) to the list of known hosts.
kodekloud@20.232.104.106's password:
kodekloud@spoke-b-vm-1:~$
Associate the route table with the Spoke B subnet
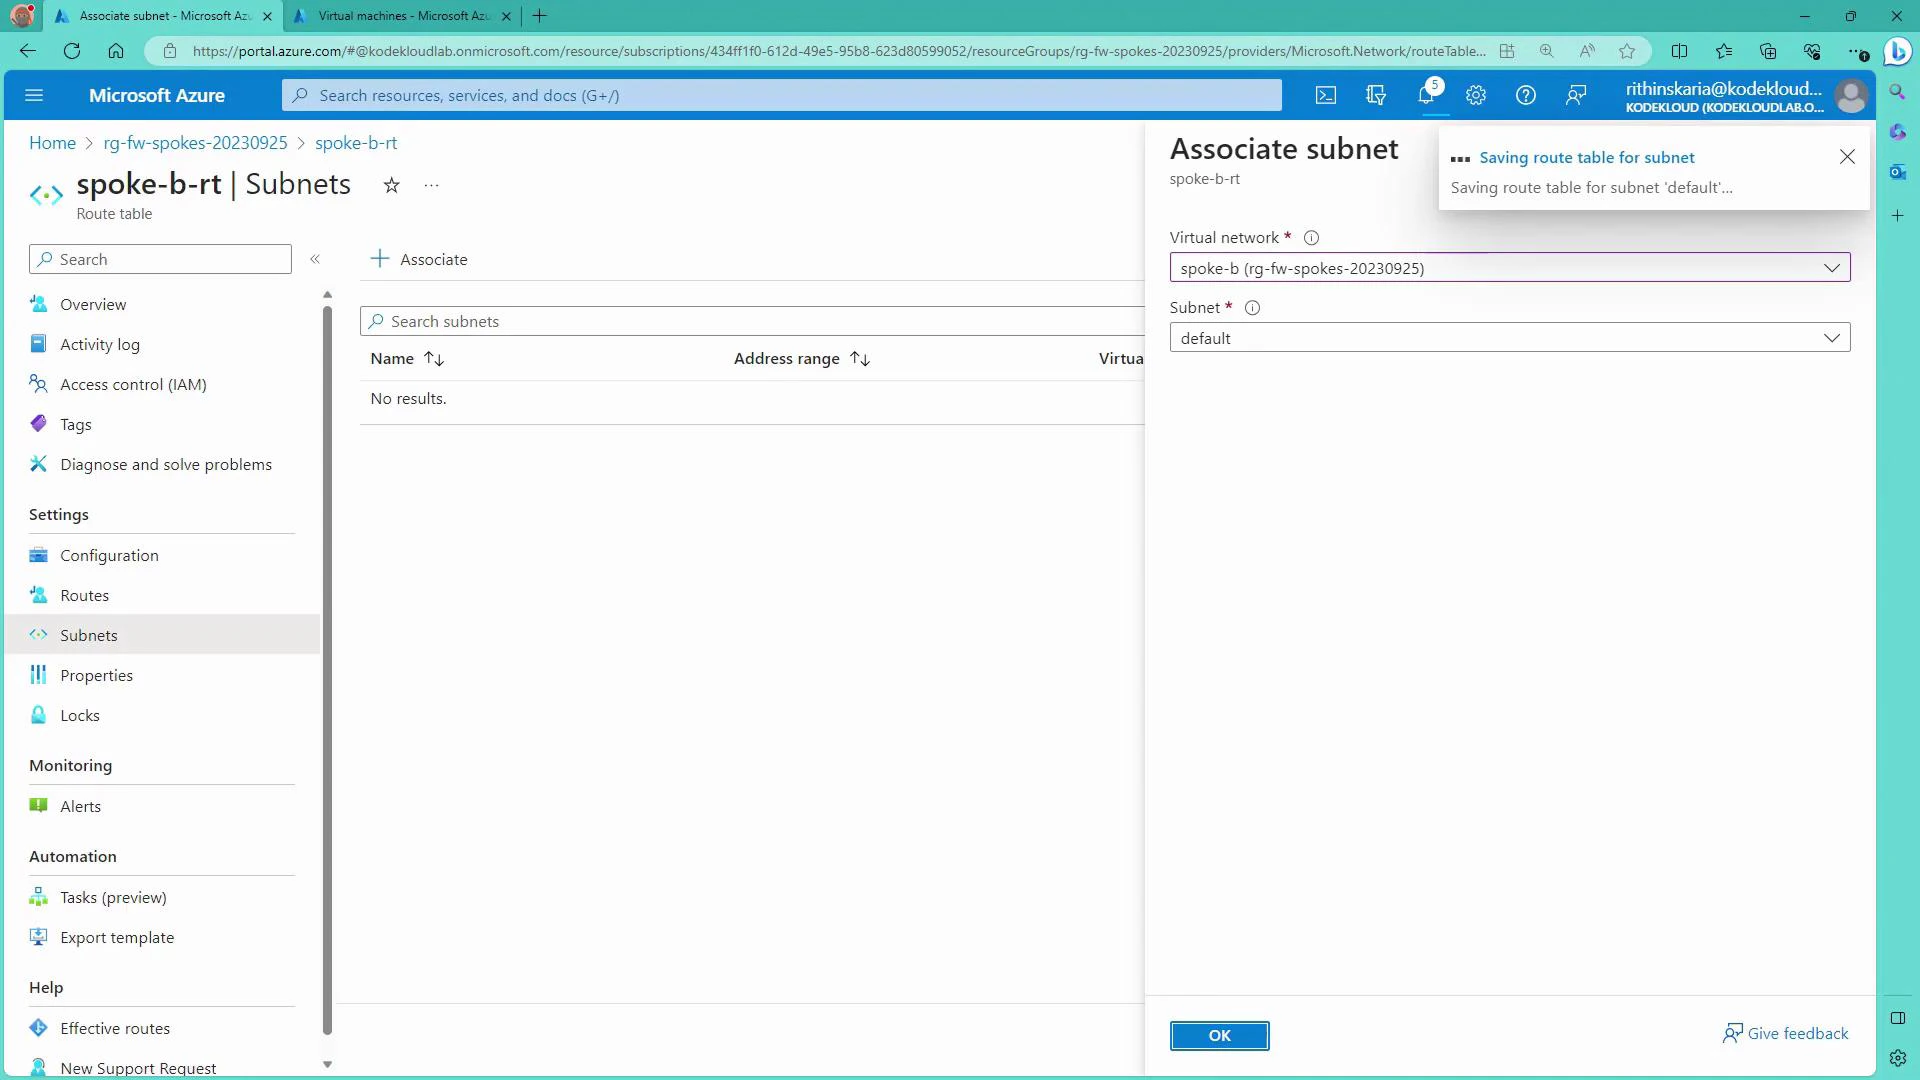
  • In the route table pane, associate SpokeBRT with the Spoke B VNet’s default subnet. Once associated, the 0.0.0.0/0 route will force non-local traffic to the hub firewall (192.168.0.4), which changes the effective path for outbound traffic and may interrupt direct public-IP access.
When selecting the subnet association, the portal shows the Associate subnet pane:
A screenshot of the Microsoft Azure portal showing the "spoke-b-rt | Subnets" route table page with an open "Associate subnet" pane on the right, where a virtual network ("spoke-b") and subnet ("default") are selected. The main pane shows no subnets listed and the left menu displays Azure resource options.
After associating the route table you may see SSH sessions reset:
client_loop: send disconnect: Connection reset
PS C:\Users\RithinSkaria>
This indicates the effective route has changed and traffic is now routed through the Azure Firewall for inspection and filtering. Next, configure Azure Firewall rules to permit specific spoke-to-spoke traffic. Create Azure Firewall network rules to allow spoke-to-spoke communication
  • Open the Azure Firewall policy (or firewall instance) and add a Network rule collection (e.g., “spoke comms”). Within the collection create allow rules for the precise source/destination IPs or CIDRs you want to permit.
Example firewall network rules (use specific IPs or subnet CIDRs as needed):
Rule namePriorityActionSourceDestinationDestination portProtocols
A1-to-B1300Allow192.168.1.4 (Spoke A VM1)192.168.2.4 (Spoke B VM1)AnyAny
A2-to-B2301Allow192.168.1.5 (Spoke A VM2)192.168.2.5 (Spoke B VM2)AnyAny
Notes:
  • Use CIDR prefixes to allow entire subnets (e.g., 192.168.1.0/24 and 192.168.2.0/24) if you prefer broader rules.
  • Priority and collection evaluation order matter: Firewall checks rule collections by priority and stops when it finds a match. If no rule matches, the default action is Deny.
Verify connectivity and expected behavior
  • From Spoke A VM1 (192.168.1.4) to Spoke B VM1 (192.168.2.4) — allowed by the rule:
kodekloud@spoke-a-vm-1:~$ ping 192.168.2.4
PING 192.168.2.4 (192.168.2.4) 56(84) bytes of data.
64 bytes from 192.168.2.4: icmp_seq=1 ttl=63 time=3.86 ms
64 bytes from 192.168.2.4: icmp_seq=2 ttl=63 time=3.09 ms
^C
--- 192.168.2.4 ping statistics ---
4 packets transmitted, 4 received, 0% packet loss
  • From Spoke A VM1 to Spoke B VM2 (192.168.2.5) — blocked because no rule permits it:
kodekloud@spoke-a-vm-1:~$ ping 192.168.2.5
PING 192.168.2.5 (192.168.2.5) 56(84) bytes of data.
^C
--- 192.168.2.5 ping statistics ---
4 packets transmitted, 0 received, 100% packet loss
  • From Spoke B VM1, outbound HTTP/HTTPS (curl) is denied unless the firewall has an Application rule allowing the requested FQDNs:
kodekloud@spoke-b-vm-1:~$ curl www.microsoft.com
Action: Deny. Reason: No rule matched. Proceeding with default action.
Allowing application access (example)
  • To enable web access, add an Application rule to the firewall policy permitting specific FQDNs or FQDN tags for the subnet (e.g., allow www.google.com for 192.168.2.0/24). After applying the rule, HTTP/HTTPS requests to allowed domains will succeed:
kodekloud@spoke-b-vm-1:~$ curl www.google.com
<HTML> ... Google content ... </HTML>
Important considerations and next steps
  • Route tables (UDRs) are used to force traffic toward the hub firewall using the Virtual Appliance next hop. You can also direct specific ranges to a Virtual Network Gateway to route traffic to on-premises (e.g., using an on-prem CIDR like 10.0.0.0/8 with next hop Virtual Network Gateway).
  • Azure Firewall is stateful: permitting A → B allows return traffic B → A automatically; you do not need separate reverse rules.
  • Firewall rule collections and priorities determine which rules apply. Design rule sets to minimize overly permissive entries.
  • For secure management, use Azure Bastion to RDP/SSH from the portal without exposing VM management ports.
  • Forced tunneling routes internet-bound traffic to on-premises NVAs or other inspection points if required by your security architecture.
  • Use Azure Monitor and diagnostic settings on Firewall and VNets for centralized telemetry and alerting.
Firewall rules are stateful: if a network rule allows A → B, return traffic from B → A is allowed automatically — you do not need a separate reverse rule.
Summary This walkthrough demonstrates how to route Spoke B’s non-local traffic to an Azure Firewall in the hub using a route table, how to create network rules to allow specific spoke-to-spoke traffic, and how to verify connectivity and application-level access. From here you can expand the topology to include Bastion for management, VPN/ExpressRoute connectivity to on-premises, forced tunneling to NVAs, and comprehensive telemetry with Azure Monitor.

Watch Video